Introduction
Attending a wedding as a guest is always an exciting event! From choosing the perfect dress to finding comfortable shoes, there are many details to plan. However, one question almost always comes up when getting ready: How should I style my hair?
Booking a professional hair salon appointment for every single wedding on your social calendar can quickly become expensive and time-consuming. Fortunately, you do not need to spend hundreds of dollars at a salon to achieve a stunning, photo-ready hairstyle. With a few simple tools, the right hair products, and a little bit of practice, you can easily create salon-quality wedding guest hairstyles right in the comfort of your own home!
Whether you are attending a casual outdoor garden wedding, a romantic beach ceremony, or an elegant black-tie evening reception, having a go-to list of easy wedding hairstyles guest ideas will save you stress, time, and money. Beautiful hair is all about creating soft texture, secure holds, and effortless elegance that lasts from the first photo all the way to the final dance on the dance floor.
In this ultimate guide, we will walk you through eight breathtaking, easy-to-create hairstyles that look gorgeous on all hair lengths and textures. Each hairstyle includes a full breakdown with tools needed, step-by-step instructions, styling secrets, cost estimates, and Pinterest-worthy photo inspiration prompts. Let’s dive in and find your next dream wedding guest hairstyle!
Why This Trend Is Popular
Doing your own hair for special occasions is a growing trend for several key reasons:
- Budget-Friendly: Wedding attendance can get costly with travel, gifts, and outfits. DIY hairstyles save you significant money without sacrificing glam.
- Complete Creative Control: You know your hair texture and comfort level best. Styling your own hair ensures you feel like yourself.
- Time Efficiency: Skip traffic and salon wait times by getting ready in your hotel room or bedroom on your own schedule.
- Pinterest Inspiration: Social media platforms like Pinterest make learning hair techniques quick, accessible, and fun through step-by-step visual guides.
Materials and Tools Needed
Having the right tools set up on your vanity before you begin styling makes all the difference. Here is a master list of basic hair tools and products to keep nearby:
| Tool / Product Category | Essential Items | Purpose |
| Heat Styling Tools | 1-inch Curling Iron, Flat Iron, Blow Dryer | Creating curls, waves, or sleek smoothness |
| Brushes & Combs | Teasing Brush, Fine-Tooth Comb, Paddle Brush | Detangling, smoothing sections, creating volume |
| Hair Fasteners | Clear Elastic Bands, Bobby Pins, Hair Clips | Securing braids, updos, and half-up styles |
| Styling Products | Heat Protectant, Texturizing Spray, Hairspray, Hair Oil | Prepping, volume building, long-lasting hold, shine |
| Decorative Accessories | Floral Pins, Pearl Hair Clips, Velvet Ribbons | Elevating the final look for wedding aesthetics |
Safety Tips for Heat Styling
Before starting any heat styling process, keep these practical safety steps in mind:
- Always apply heat protectant: Spray a light heat protectant spray through dry or damp hair before using hot curling irons or straighteners to prevent heat damage and split ends.
- Control tool temperature: Keep heat settings below 350°F (175°C) for fine or color-treated hair, and under 400°F (200°C) for thick or coarse hair.
- Protect surfaces: Place hot styling tools on heat-resistant mats or silicone pads to prevent burning countertops or vanity surfaces.
- Keep fingers safe: Use a heat-resistant styling glove if you are using a flat iron or wand to avoid accidental skin burns.
8 Detailed DIY Wedding Guest Hairstyle Ideas
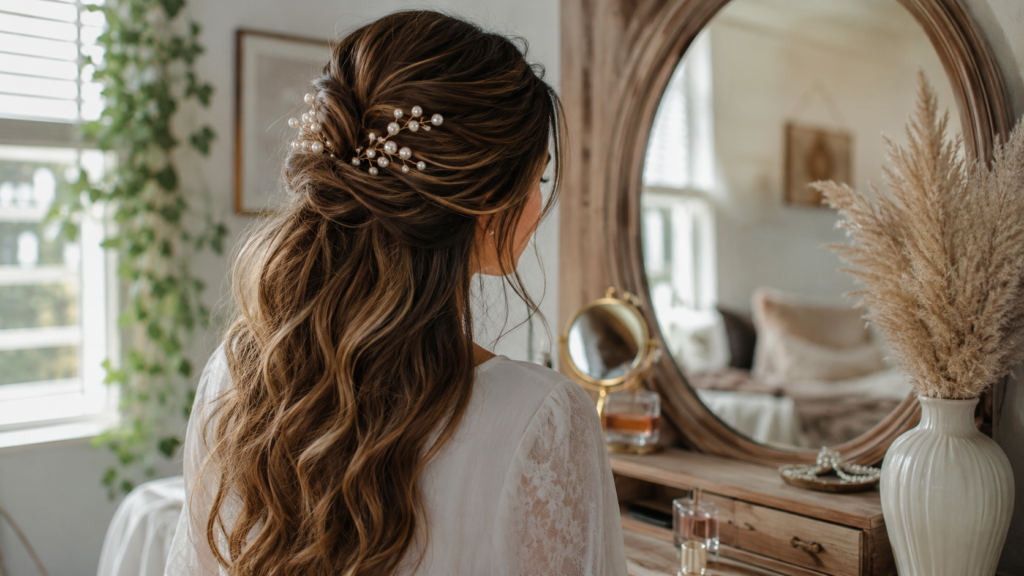
1. Romantic Soft Boho Waves with Pearl Pins
                    ┌─────────────────────────┐
                    │ Apply Heat Protectant   │
                    └────────────┬────────────┘
                                 │
                                 ▼
                    ┌─────────────────────────┐
                    │ Curl 1-Inch Sections    │
                    │ Away From Face          │
                    └────────────┬────────────┘
                                 │
                                 ▼
                    ┌─────────────────────────┐
                    │ Cool, Brush Out Waves & │
                    │ Insert Pearl Pins       │
                    └─────────────────────────┘
Short Introduction
Soft, romantic boho waves are a timeless favorite for wedding guests. This style combines loose, touchable curls with decorative pearl accent pins pinned along one side for an elegant touch.
Why You’ll Love This Idea
It works on almost any hair length from long bobs (lobs) to long locks. It provides natural movement and looks completely effortless while keeping your hair feeling comfortable all day long.
Materials Needed
- 1.25-inch curling iron or wand
- Texturizing sea-salt spray or dry shampoo
- Pearl decorative bobby pins (3–5 pins)
- Flexible hold hairspray
- Wide-tooth comb
Step-by-Step Instructions
- Start with clean, dry hair and mist thoroughly with a light heat protectant spray.
- Section your hair horizontally, starting at the nape of your neck and clipping top sections up.
- Take a 1-inch section of hair and wrap it around the curling iron away from your face.
- Hold the hair on the barrel for 5 to 8 seconds, then gently release into your palm to cool.
- Repeat this curling process across all sections of your head.
- Once your whole head is curled and fully cooled, lightly spray with texturizing spray.
- Gently brush through curls with a wide-tooth comb to convert ringlets into loose waves.
- Create a soft side part using a tail comb.
- On the smaller side of your part, tuck hair neatly behind your ear and slide in 3 pearl pins vertically.
- Finish with a light mist of flexible hold hairspray for all-day bounce.
Beginner Tips
- Always let curls cool completely down before combing them out. Touching warm curls causes them to fall flat prematurely.
Common Mistakes to Avoid
- Curling sections that are too thick, which leads to uneven heat distribution and flat waves.
Styling Ideas
- Pair this hairstyle with a floral midi dress or a soft pastel jumpsuit for garden weddings.
Best Colors and Materials
- Best on warm golden highlights or balayage; works beautifully with pearl, gold, or rose-gold hardware.
Quick Details
- Estimated Cost: $10 – $20 (for pearl pin accessories)
- Estimated Time: 20 – 25 minutes
- Difficulty Level: Easy / Beginner
- Where It Looks Best: Outdoor garden weddings, beach ceremonies, afternoon receptions.
Pinterest-Worthy Tip
Angle your pearl pins diagonally or in a clustered trio right above the ear for an editorial look.
Conclusion for This Idea
This soft boho wave look is foolproof, gorgeous, and adaptable to virtually every dress neckline.
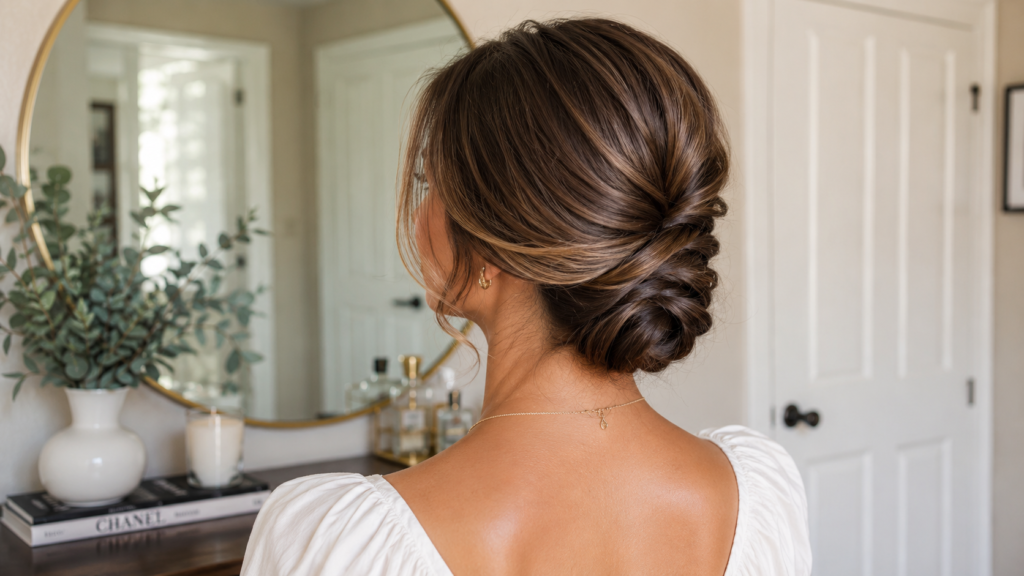
2. Low Twisted Chignon Bun
                    ┌─────────────────────────┐
                    │ Gather into Low Pony    │
                    └────────────┬────────────┘
                                 │
                                 ▼
                    ┌─────────────────────────┐
                    │ Split, Flip Pony Inside │
                    │ Out & Wrap Into Bun     │
                    └────────────┬────────────┘
                                 │
                                 ▼
                    ┌─────────────────────────┐
                    │ Secure with Bobby Pins  │
                    │ & Tug for Volume        │
                    └─────────────────────────┘
Short Introduction
The low twisted chignon is a classic updo that exudes sophistication and grace. It holds hair securely back from your face while maintaining a soft, delicate aesthetic.
Why You’ll Love This Idea
This hairstyle stays secure for hours, making it ideal if you plan to dance all night. It keeps hair off your neck during warm outdoor evening events.
Materials Needed
- Clear hair elastic bands
- Standard bobby pins (matching hair color)
- Teasing comb
- Shine finishing spray
Step-by-Step Instructions
- Brush dry hair smooth and gather into a low ponytail at the nape of your neck.
- Secure the ponytail tightly with a clear elastic band.
- Create a small gap above the elastic band using your fingers.
- Flip the ponytail up and loop it down through the gap (a topsy tail flip).
- Gently pull the elastic tight to create a neat twisted roll on both sides.
- Divide the hanging ponytail into two equal sections.
- Twist both sections around each other down to the ends and tie with an elastic.
- Roll the twisted ponytail upward toward the base of the neck, tucking ends underneath.
- Secure the bun firmly against your head using 4 to 6 bobby pins inserted crosswise.
- Lightly pull on small pieces at the crown to add soft volume, then spray with shine spray.
Beginner Tips
- Spray your bobby pins with dry shampoo before inserting them for maximum grip.
Common Mistakes to Avoid
- Pulling the initial ponytail too tight, which flattens the crown and creates a rigid look.
Styling Ideas
- Perfectly complements high-neck dresses, backless gowns, or dramatic statement earrings.
Best Colors and Materials
- Looks stunning on dark brunettes, rich chestnuts, and multi-dimensional highlights.
Quick Details
- Estimated Cost: Under $10
- Estimated Time: 15 minutes
- Difficulty Level: Easy / Intermediate
- Where It Looks Best: Formal black-tie weddings, classic church ceremonies, ballroom receptions.
Pinterest-Worthy Tip
Pull out two slim, wispy face-framing strands near your temples and curl them softly to frame your face.
Conclusion for This Idea
A low twisted chignon brings high-end elegance to your wedding look with minimal effort required.
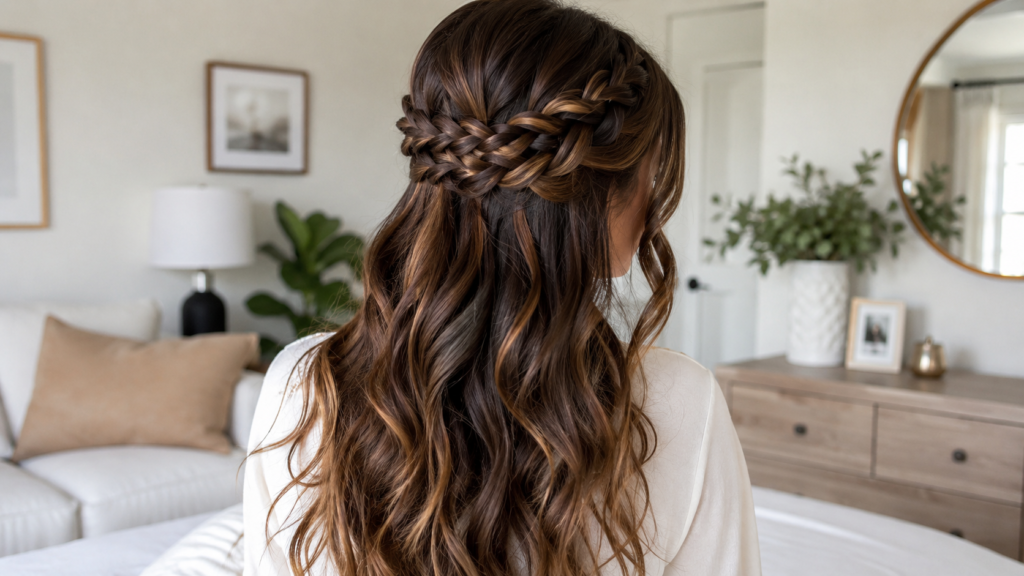
3. Half-Up Half-Down Crown Braid
                    ┌─────────────────────────┐
                    │ Braid Front Side        │
                    │ Sections on Left & Right│
                    └────────────┬────────────┘
                                 │
                                 ▼
                    ┌─────────────────────────┐
                    │ Pull Both Braids Back   │
                    │ & Secure at Center      │
                    └────────────┬────────────┘
                                 │
                                 ▼
                    ┌─────────────────────────┐
                    │ Pancake Braids for      │
                    │ Full, Soft Volume       │
                    └─────────────────────────┘
Short Introduction
This half-up style features two delicate side braids pinned together at the back to form a feminine crown, leaving the lower half in loose curls.
Why You’ll Love This Idea
You get the best of both worlds: the freedom of leaving your hair down combined with the tidiness of an updo that keeps hair out of your eyes.
Materials Needed
- Fine-tooth comb
- 2 clear mini elastics
- Medium-barrel curling iron
- Volumizing powder or texturizing spray
Step-by-Step Instructions
- Curl the bottom two-thirds of your hair using a curling iron to establish loose waves.
- Part your hair down the center or slightly off-center.
- Take a 2-inch section of hair near your right temple and divide into three strands.
- Create a simple three-strand braid moving toward the back of your head.
- Secure the braid end with a mini clear elastic.
- Repeat the exact braiding process on the left temple section.
- Gently “pancake” both braids by lightly pulling at the outer loops to make them look thicker.
- Bring both braids together at the center back of your head.
- Cross one braid end over the other and pin securely under the opposite braid using bobby pins.
- Hide elastic ends under the braids and lock everything in place with hairspray.
Beginner Tips
- Pancaking (pugging) the braid loops transforms a basic thin braid into a lush, full braid instantly.
Common Mistakes to Avoid
- Braiding too tightly down toward your face instead of angling the braid backward toward the crown.
Styling Ideas
- Great for cottagecore, rustic barn, or bohemian vineyard wedding themes.
Best Colors and Materials
- Accentuates blonde highlights, honey tones, and multi-tone dimensional hair color.
Quick Details
- Estimated Cost: $5 – $10
- Estimated Time: 15 – 20 minutes
- Difficulty Level: Easy
- Where It Looks Best: Country barn weddings, vineyard settings, spring outdoor events.
Pinterest-Worthy Tip
Tuck small fresh baby’s breath flowers into the braid loops for an enchanting botanical vibe.
Conclusion for This Idea
This sweet crown braid half-up style adds romantic charm without requiring complex braiding skill.
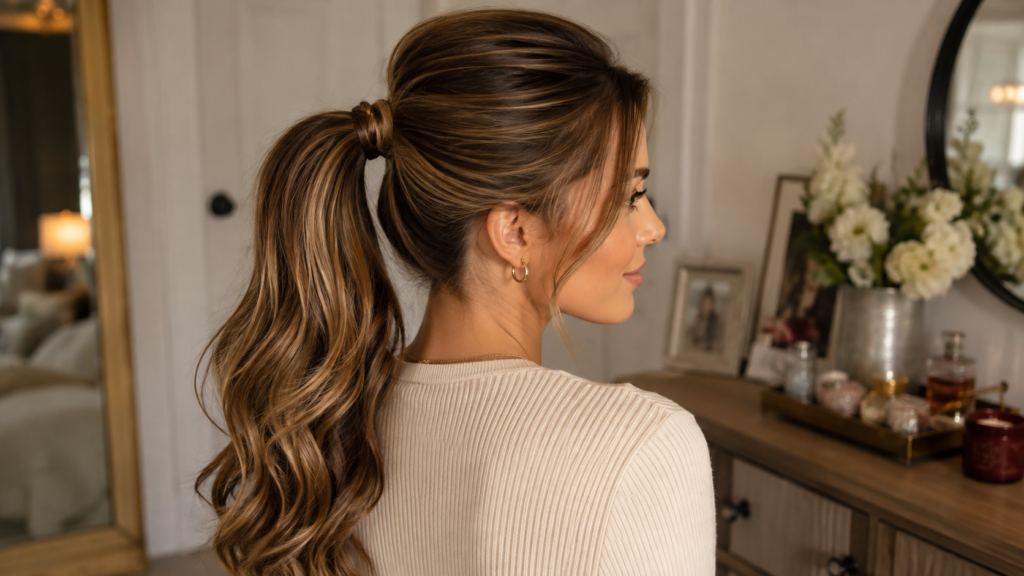
4. Sleek Glamour Ponytail with Hair Wrap
                    ┌─────────────────────────┐
                    │ Straighten Hair & Pull  │
                    │ into High/Mid Pony      │
                    └────────────┬────────────┘
                                 │
                                 ▼
                    ┌─────────────────────────┐
                    │ Wrap Hair Strand Around │
                    │ Elastic Band Base       │
                    └────────────┬────────────┘
                                 │
                                 ▼
                    ┌─────────────────────────┐
                    │ Pin End Underneath &    │
                    │ Apply Gloss Serum       │
                    └────────────┬────────────┘
Short Introduction
A polished, high-shine sleek ponytail elevates a simple concept into a dramatic, chic red-carpet-worthy hairstyle perfect for modern weddings.
Why You’ll Love This Idea
It highlights your face structure, shows off high collar lines or dress details, and remains completely smudge-proof and humidity-resistant all night long.
Materials Needed
- Flat iron (hair straightener)
- Boar bristle smoothing brush
- Strong-hold hair gel or wax stick
- Heavy-duty hair tie
- Hair shine oil serum
Step-by-Step Instructions
- Apply heat protectant and blow-dry hair straight, then pass over with a flat iron.
- Apply a small dab of smoothing wax stick or hair gel along your hairline and roots.
- Use a boar bristle brush to sweep all hair smoothly up to mid-crown height.
- Secure tightly with a sturdy elastic hair tie that matches your hair shade.
- Take a 1/2-inch strand of hair from the bottom underside of the ponytail.
- Wrap this strand neatly around the elastic hair band to completely conceal it.
- Tuck the end of the strand under the elastic and pin firmly underneath using a bobby pin.
- Smooth the length of the ponytail with a flat iron for glassy straightness.
- Apply 1 to 2 drops of hair oil serum across the surface for a radiant glossy finish.
- Mist with firm-hold hairspray to lock down any stray flyaways.
Beginner Tips
- Tilt your head slightly backward while securing the ponytail band to prevent loose sagging at the nape.
Common Mistakes to Avoid
- Using bumpy brushes that leave lumps along the head surface.
Styling Ideas
- Combines amazingly with sleek trouser suits, satin slip dresses, or bold modern fashion choices.
Best Colors and Materials
- Best on jet black, deep espresso, raven dark brown, or crisp platinum hair colors.
Quick Details
- Estimated Cost: $10 – $15
- Estimated Time: 15 minutes
- Difficulty Level: Beginner
- Where It Looks Best: Modern city rooftop weddings, contemporary art gallery venues, cocktail attire events.
Pinterest-Worthy Tip
Wrap a silk ribbon or metallic cord over the hair wrap for an additional modern fashion touch.
Conclusion for This Idea
Sleek, polished, and sophisticated, this pony proves that simplicity equals modern luxury.
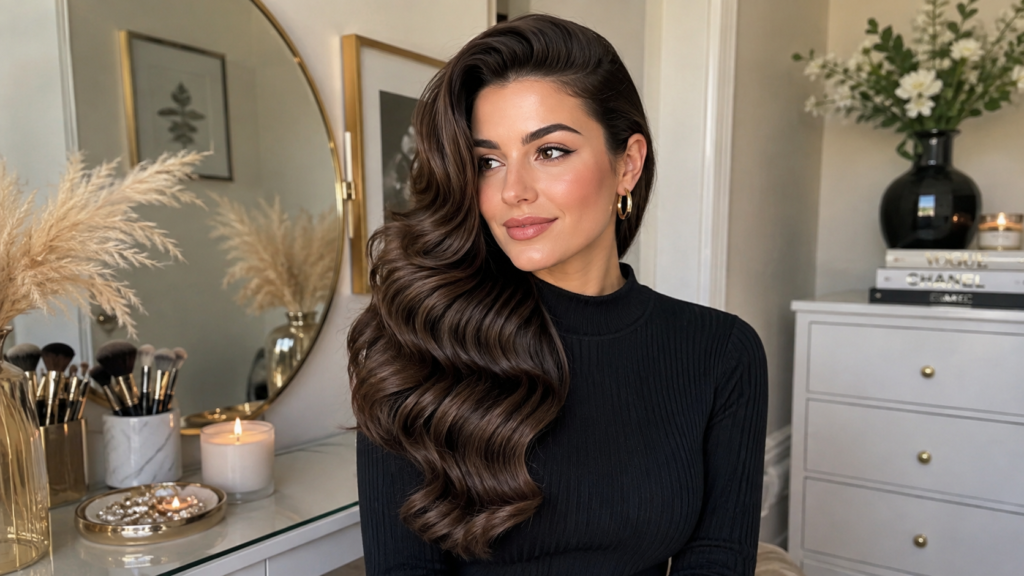
5. Voluminous Side-Swept Hollywood Waves
                    ┌─────────────────────────┐
                    │ Set Curls All in Same   │
                    │ Direction with Iron     │
                    └────────────┬────────────┘
                                 │
                                 ▼
                    ┌─────────────────────────┐
                    │ Brush Out Firmly with   │
                    │ Paddle Brush for Waves  │
                    └────────────┬────────────┘
                                 │
                                 ▼
                    ┌─────────────────────────┐
                    │ Deep Side Part & Pin    │
                    │ One Side Behind Ear     │
                    └────────────┬────────────┘
Short Introduction
Old Hollywood glamour never goes out of style. This side-swept look features smooth, continuous deep waves cascading gracefully over one shoulder.
Why You’ll Love This Idea
It instantly gives off high-end elegance and red-carpet vintage appeal without requiring complex braiding or intricate updos.
Materials Needed
- 1-inch curling iron with clamp
- Large paddle brush
- Duckbill setting clips
- Deep conditioning shine spray
- Teasing comb
Step-by-Step Instructions
- Create a dramatic deep side part directly over the arch of your left eyebrow.
- Working in horizontal sections, curl all hair in the exact same direction toward your face.
- Clip each hot curl in place against your scalp using a duckbill clip to let it cool completely.
- Remove all setting clips after 15 minutes of cooling.
- Take a large paddle brush and firmly brush out all curls from root to tip.
- Watch as individual ringlets merge into one uniform, glossy Hollywood wave S-pattern.
- Tease the roots lightly on the fuller side to build height and glamour volume.
- Sweep the smaller side smooth behind your ear and pin tight at the nape using crisscrossed bobby pins.
- Bring the main body of hair forward over your shoulder.
- Finish with setting spray and a high-shine mist.
Beginner Tips
- The secret to authentic Hollywood waves is curling every single curl in the exact same direction.
Common Mistakes to Avoid
- Alternating curl directions, which creates tousled beach waves instead of continuous Hollywood S-curves.
Styling Ideas
- Pairs dramatically with strapless gowns, off-the-shoulder necklines, and classic red lipstick.
Best Colors and Materials
- Highlights rich glossy hair shades like dark chocolate, auburn, and bright Hollywood blonde.
Quick Details
- Estimated Cost: $10 – $15
- Estimated Time: 30 minutes
- Difficulty Level: Intermediate
- Where It Looks Best: Evening black-tie galas, formal estate venues, luxury hotel ballroom weddings.
Pinterest-Worthy Tip
Add a sparkling vintage crystal hair comb right above the ear on the pinned side.
Conclusion for This Idea
Hollywood waves bring unmistakable elegance and movie-star glamour to any wedding celebration.
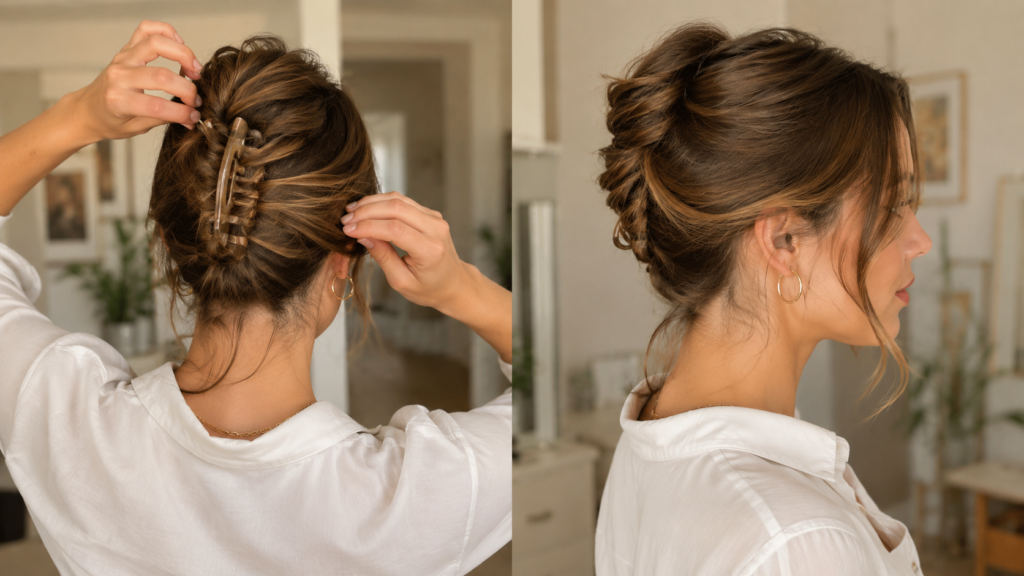
6. Easy Textured French Twist
                    ┌─────────────────────────┐
                    │ Gather Hair & Twist     │
                    │ Upward Against Head     │
                    └────────────┬────────────┘
                                 │
                                 ▼
                    ┌─────────────────────────┐
                    │ Tuck Ends Inside Roll   │
                    │ & Anchor with Pins      │
                    └────────────┬────────────┘
                                 │
                                 ▼
                    ┌─────────────────────────┐
                    │ Pull Soft Strands for   │
                    │ Modern Relaxed Look     │
                    └────────────┬────────────┘
Short Introduction
A modern update to the French twist updo. This textured version skips the stiff, dated feel of older twists in favor of soft volume and airy, relaxed movement.
Why You’ll Love This Idea
It is chic, sophisticated, and surprisingly fast once you get the hand technique down. It flatters every face shape effortlessly.
Materials Needed
- Dry texturizing spray
- French hair pin (U-shaped pin) or large bobby pins
- Sectioning clips
- Medium-hold finishing spray
Step-by-Step Instructions
- Prep hair by spraying dry texturizing spray generously throughout roots and lengths.
- Gather all hair into a low ponytail in your hands (do not use an elastic).
- Twist the ponytail tightly in one direction (clockwise) to form a neat rope.
- Point the twisted rope upward against the back center of your head.
- Continue twisting until the hair naturally rolls in on itself toward your scalp.
- Tuck the remaining tail ends neatly inside the vertical seam roll.
- Insert French U-shaped pins or bobby pins horizontally into the seam to anchor the twist to your base hair.
- Gently pinch and lift hair strands at the crown to add soft height and texture.
- Loosen a few wispy side pieces around your ears for a contemporary relaxed texture.
- Set with a cloud of light-hold hairspray.
Beginner Tips
- U-shaped French pins work much better than standard bobby pins for holding a French twist securely with fewer pins.
Common Mistakes to Avoid
- Over-smoothing the hair; texture is essential for making this updo look modern rather than dated.
Styling Ideas
- Complements backless dresses, high-neck lace outfits, and minimalist jewelry designs.
Best Colors and Materials
- Best on textured, wavy, or highlighted hair where dimensional movement is visible.
Quick Details
- Estimated Cost: $5 – $10
- Estimated Time: 10 – 15 minutes
- Difficulty Level: Intermediate
- Where It Looks Best: Cocktail receptions, urban chic venues, micro-weddings.
Pinterest-Worthy Tip
Insert a sleek tortoiseshell or gold French hairpin sticking out slightly from the top seam.
Conclusion for This Idea
Effortlessly French, modern, and light, this updo stays stylish from ceremony to send-off.
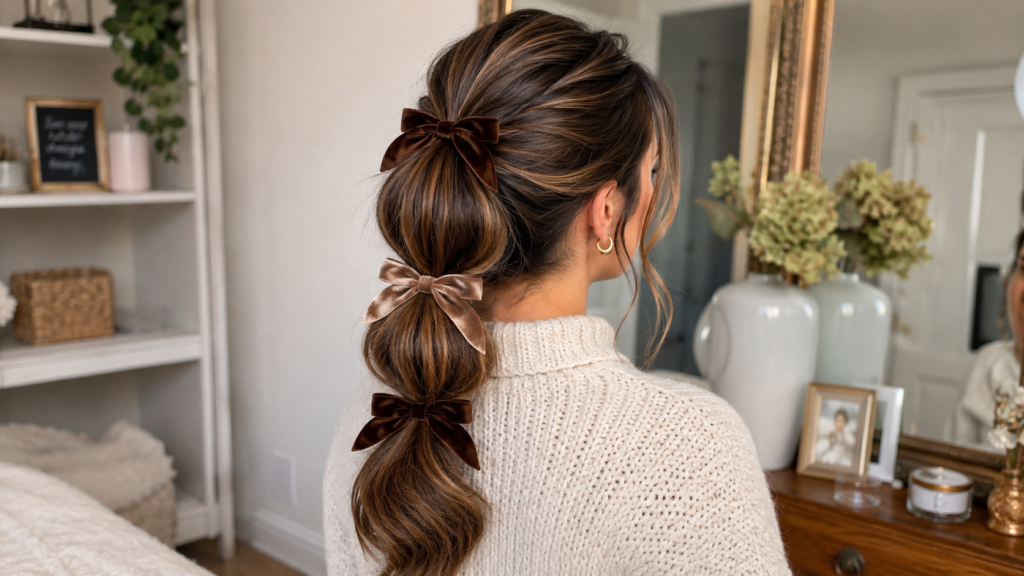
7. Bubble Ponytail with Bow Accessories
                    ┌─────────────────────────┐
                    │ Secure High Ponytail    │
                    └────────────┬────────────┘
                                 │
                                 ▼
                    ┌─────────────────────────┐
                    │ Place Elastics Down     │
                    │ Length Every 2-3 Inches │
                    └────────────┬────────────┘
                                 │
                                 ▼
                    ┌─────────────────────────┐
                    │ Tug Each Section Outward│
                    │ & Add Ribbon Bows       │
                    └────────────┬────────────┘
Short Introduction
The bubble ponytail is playfulness meets high style! It takes a traditional ponytail and divides it into round, voluminous “bubbles” accented with delicate bow ties.
Why You’ll Love This Idea
It requires zero curling or heat styling skills! It is fast, holds exceptionally well on medium to long hair, and looks show-stopping in photos.
Materials Needed
- 5 to 8 clear micro elastic bands
- Velvet or satin ribbon bows (clip-on or tied)
- Volumizing dry powder or texturizing spray
- Smoothing brush
Step-by-Step Instructions
- Brush hair smooth and tie into a neat ponytail at mid- or high-head level.
- Apply a light dusting of texturizing powder along the ponytail length.
- Place a second clear elastic band about 2 to 3 inches down from the main pony elastic.
- Hold the second elastic with one hand while using your other fingers to gently pull the hair between the two elastics outward into a round “bubble” shape.
- Place a third elastic another 2 to 3 inches down the hair length.
- Tug and tease that section outward to form your second round bubble.
- Repeat this pattern all the way down to the end of your ponytail.
- Attach a mini velvet or satin bow clip directly over each clear elastic band.
- Adjust each bubble so they are even in shape and volume down the tail.
- Spray with light holding spray.
Beginner Tips
- Pull hair outward evenly in 360 degrees to make the bubbles round rather than flat.
Common Mistakes to Avoid
- Spacing elastics too close together, which prevents bubbles from expanding into round shapes.
Styling Ideas
- Excellent for whimsical spring/summer weddings, playful receptions, or colorful dresses.
Best Colors and Materials
- Complements all hair textures; pair black velvet bows with light hair or cream satin bows with dark hair.
Quick Details
- Estimated Cost: $8 – $12
- Estimated Time: 10 minutes
- Difficulty Level: Very Easy / Beginner
- Where It Looks Best: Outdoor garden parties, destination weddings, creative venue settings.
Pinterest-Worthy Tip
Match the color of your ribbon bows directly to your dress or shoe accent color.
Conclusion for This Idea
Fun, fast, and ultra-stylish, the bubble ponytail is a playful favorite that gets endless compliments.
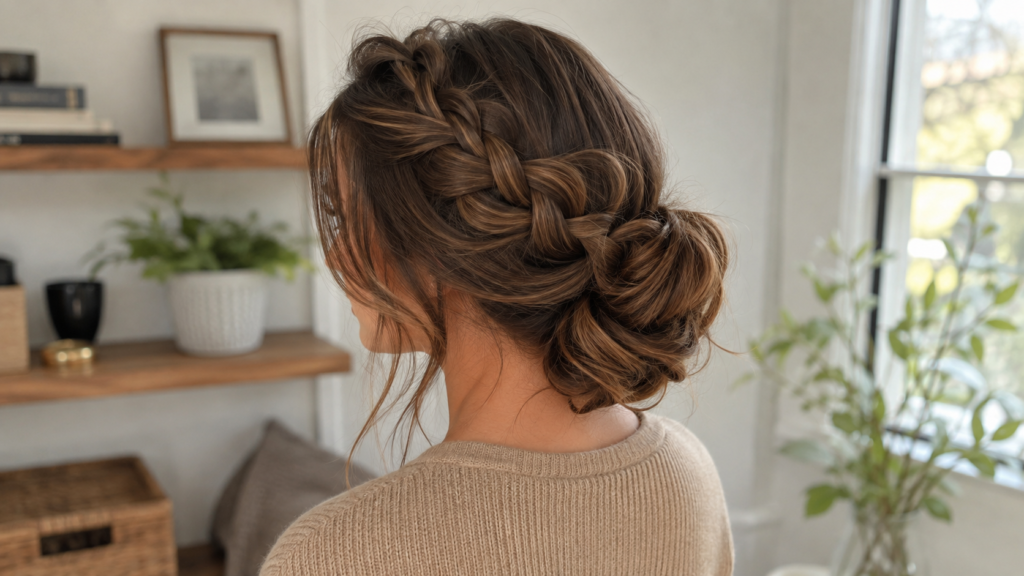
8. Romantic Dutch Braid Low Side Bun
                    ┌─────────────────────────┐
                    │ Dutch Braid Along Side  │
                    │ Down to Nape of Neck    │
                    └────────────┬────────────┘
                                 │
                                 ▼
                    ┌─────────────────────────┐
                    │ Wrap Hair Tail into Low │
                    │ Side Bun behind Ear     │
                    └────────────┬────────────┘
                                 │
                                 ▼
                    ┌─────────────────────────┐
                    │ Secure with Bobby Pins  │
                    │ & Fan Braid Loops Out   │
                    └────────────┬────────────┘
Short Introduction
This romantic updo weaves an inverted Dutch braid along the hairline down to the nape, finishing in a soft, low side bun behind one ear.
Why You’ll Love This Idea
Because the braid is locked against your scalp, it keeps wind-blown flyaways completely secured while maintaining an intricate, fairytale charm.
Materials Needed
- Clear elastic hair bands
- Standard hair pins and bobby pins
- Light hair wax or braid paste
- Flexible hold spray
Step-by-Step Instructions
- Apply a pinch of braid paste to fingertips for grip and flyaway control.
- Create a deep side part on your preferred side.
- Begin a Dutch braid (cross strands under middle strand rather than over) along your hairline.
- Continue gathering small sections as you braid down along your ear toward the nape.
- Once you reach behind your ear, secure the remaining tail with a clear elastic.
- Gather the braid tail along with the rest of your remaining loose hair behind your ear.
- Twist the combined hair loosely into a circular bun shape.
- Secure the bun around all edges using 4 to 6 sturdy bobby pins.
- Lightly tug loop edges of the Dutch braid outward to make it look full and romantic.
- Spray with flexible hairspray to finish.
Beginner Tips
- Dutch braids cross underneath the central strand, pushing the braid upward for 3D visibility.
Common Mistakes to Avoid
- Braid positioning too far back on the crown where it cannot be seen from front portrait angles.
Styling Ideas
- Complements romantic floral gowns, sweetheart necklines, and delicate silver jewelry.
Best Colors and Materials
- Unbelievable depth on balayage hair, highlighted brown, or dimensional blonde shades.
Quick Details
- Estimated Cost: Under $10
- Estimated Time: 20 minutes
- Difficulty Level: Intermediate
- Where It Looks Best: Romantic vineyard weddings, botanical conservatory events, sunset beach ceremonies.
Pinterest-Worthy Tip
Tuck a tiny decorative floral pin or pearl clip directly into the center of the side bun.
Conclusion for This Idea
Intricate yet simple to build, this Dutch braid bun brings fairy-tale romance to life.
Expert Styling & Decorating Tips for Wedding Guests
To make sure your hairstyle stays fresh from the emotional “I Do” vows until the midnight reception farewell, follow these pro blogger styling tips:
- Prep Hair the Day Before: Slightly “second-day hair” holds volume, braids, and curls significantly better than freshly washed, slippery hair. Wash your hair 18–24 hours before your event.
- Master Product Layering: Start with heat protectant on damp hair, texturizing spray before curling, and finish with setting hairspray. Layering products ensures firm hold without crunchy stiffness.
- Match Style to Dress Neckline:
- High-neck or illusion gowns: Choose updos (French twist, low chignon).
- Strapless or scoop necklines: Choose down styles (Hollywood waves, boho curls).
- One-shoulder dresses: Choose side-swept styles (side bun or side waves).
- Pack an Emergency Touch-Up Kit: Bring a mini pouch in your clutch containing 4 bobby pins, 2 mini elastics, a travel-size hairspray, and a small folding comb for quick bathroom touch-ups.
Budget-Saving Tips for Wedding Guest Glam
Achieving a luxury hairstyle does not require spending high salon prices. Here is how to keep your budget under control:
                  ┌─────────────────────────────────┐
                  │      DIY WEDDING GLAM TIPS      │
                  └────────────────┬────────────────┘
                                   │
          ┌────────────────────────┼────────────────────────┐
          │                        │                        │
          ▼                        ▼                        ▼
┌──────────────────┐    ┌──────────────────┐    ┌──────────────────┐
│ Accessory Multi- │    │ Practice Runs 2  │    │ Multi-Use Beauty │
│ Packs on Sale    │    │ Weeks in Advance │    │ Tools & Products │
└──────────────────┘    └──────────────────┘    └──────────────────┘
- Buy Accessory Value Packs: Purchase pearl pins, hair ribbon, and clear elastics in multi-packs online rather than paying full retail per piece at boutique shops.
- Do Practice Runs: Practice your chosen style twice during the weeks leading up to the wedding. Practice eliminates wedding-day panic, rushes, and costly last-minute salon calls.
- Invest in Multi-Use Tools: Buy a quality 1-inch curling iron or straightener that can perform multiple styles (straightening, waves, tight curls) instead of specialized single-use wands.
- Use Drugstore Heroes: Many affordable drugstore texturizing sprays and dry shampoos outperform expensive luxury salon brands for grip and volume.
Frequently Asked Questions (FAQs)
1. How far in advance should I wash my hair before styling for a wedding?
It is usually best to wash your hair the day before the wedding (18 to 24 hours prior). Natural hair oils give hair grip, preventing curls and updos from slipping out prematurely.
2. What is the best wedding guest hairstyle for short hair?
Soft boho waves with side decorative pearl clips or a half-up crown twist work amazingly on short hair like bobs and lobs.
3. How do I make my curls last all day in hot or humid weather?
Apply a humidity-resistant anti-frizz spray before curling. Let each curl cool completely down before brushing out, and set the finished style with a firm anti-humidity hairspray.
4. Should I wear my hair up or down for an outdoor summer wedding?
An updo like a low chignon or textured French twist is usually best for outdoor summer weddings to keep hair off your neck and prevent sweat or humidity from ruining your look.
5. Can I achieve these wedding guest hairstyles without using heat tools?
Yes! Styles like the bubble ponytail, braided half-up crown, and braided side bun can be created entirely heat-free on damp or dry natural hair textures.
6. What size curling iron is best for romantic wedding waves?
A 1-inch to 1.25-inch barrel curling iron is the most versatile size for creating classic soft waves on medium to long hair lengths.
7. How do I hide visible bobby pins in an updo?
Match bobby pins closely to your hair color (blonde, brown, or black) and slide them with the bumpy side facing down into the core of your hair roll or bun so they stay hidden inside.
8. What are the most popular hair accessories for wedding guests this year?
Pearl bobby pins, velvet mini bow clips, silk ribbons, vintage crystal hair combs, and delicate botanical pins are top trending accessories on Pinterest right now.
Final Thoughts
Creating a stunning, photo-ready hairstyle for a wedding guest outfit does not have to be stressful or expensive. With these eight easy DIY hairstyle options, you hold all the inspiration and step-by-step techniques needed to feel confident, glam, and beautiful without stepping foot into an expensive salon.
Remember, practice makes perfect! Try out your favorite style a few days before the event to get your hands comfortable with the steps. Pair your style with your favorite outfit, pop on some jewelry, and you are officially ready to celebrate!
Save This Pin for Later!
Loved these easy wedding guest hairstyle tutorials? Pin this article directly to your Pinterest Wedding Inspiration, DIY Beauty, or Hairstyle Boards so you always have these tutorials handy whenever a wedding invitation arrives in your mailbox!