Introduction
If you scroll through Pinterest for even five minutes, you have probably seen it everywhere: Y2K butterfly nail art. This fun, nostalgic style is taking over feeds, salons, and DIY manicure kits all over again. It mixes the sparkly, playful energy of the early 2000s with bold colors, chrome finishes, and, of course, butterflies on every single nail.
This trend is not just cute. It is easy to customize, budget-friendly, and perfect for anyone who wants their nails to feel like a tiny piece of art. Whether you love soft pastel wings or neon rainbow chrome butterflies, there is a version of this look made just for you.
In this guide, we are going to walk through everything you need to know about bold colorful Y2K butterfly nail art design ideas. You will learn why this trend became so popular, what tools and materials you need, safety tips to keep your nails healthy, and eight detailed, step-by-step nail art ideas you can try at home this weekend.
We designed this post for beginners and nail art lovers of all skill levels. You do not need to be a professional nail tech to pull off these looks. All you need is a little patience, the right supplies, and a willingness to have fun with color.
By the end of this article, you will have a full list of butterfly nail designs to save to your Pinterest boards, plus tips on materials, costs, timing, and styling so you can plan your next manicure with confidence. Let’s dive into the colorful, glittery, nostalgic world of Y2K butterfly nails.
Why This Trend Is Popular
Y2K butterfly nail art did not just appear out of nowhere. It is part of a bigger wave of early 2000s nostalgia that includes low-rise jeans, butterfly clips, chunky sneakers, and glittery makeup. Here is why so many people are obsessed with this trend right now.
- Nostalgia sells. Millennials and Gen Z both grew up around butterfly clips, mood rings, and sparkly accessories. Bringing that energy to your nails feels fun and familiar.
- It is endlessly customizable. You can go soft and pastel, or loud and neon. Butterflies work with almost any color palette.
- Pinterest and TikTok love it. Short, colorful nail art videos get huge engagement because they are satisfying to watch and easy to recreate.
- It works for every season. Butterflies feel just as good in spring as they do at a summer pool party or a fall festival look.
- DIY-friendly. Many of these designs use stickers, decals, or simple hand-painted shapes, so you do not need to be an expert.
- It photographs beautifully. Bold colors and shiny chrome finishes look amazing in photos, which is exactly what makes it perfect for Pinterest boards.
This mix of easy DIY methods and eye-catching color makes Y2K butterfly nails one of the most saved nail art styles online today.
Materials and Tools Needed
Before you start any of the designs below, it helps to have a basic nail art kit ready. Here is a general list. Each idea later in this post will also list its own specific materials.
| Category | Items |
|---|---|
| Base Products | Base coat, top coat, regular or gel polish |
| Color Products | Bold polish colors (pink, purple, blue, orange, green, chrome) |
| Butterfly Tools | Butterfly nail stickers, butterfly charms, butterfly stamping plates |
| Detail Tools | Thin nail art brush, dotting tool, striping tape |
| Glitter and Extras | Loose glitter, glitter polish, rhinestones, chrome powder |
| Prep Tools | Nail file, buffer, cuticle pusher, cuticle oil |
| Cleanup Tools | Small angled brush, acetone, cotton swabs |
| Lighting | LED or UV lamp (only needed for gel polish designs) |
Tip: You do not need every single item on this list. Start with a few basics like polish, a thin brush, and butterfly stickers. You can always add more tools as you get more comfortable with nail art.
Safety Tips
Nail art is fun, but it is smart to protect your nails and skin while you create these looks.
- Always use a base coat. This protects your natural nail from staining, especially with bold or dark polish colors.
- Work in a ventilated room. Nail polish and acetone have strong fumes, so open a window or turn on a fan.
- Do not skip cuticle care. Push back cuticles gently instead of cutting them to avoid infection.
- Let each layer dry. Rushing between coats causes smudging and uneven texture.
- Use gel lamps carefully. If you use UV gel products, apply sunscreen or UPF gloves to protect your hands from UV exposure.
- Avoid glitter overload near cuticles. Loose glitter near the skin can be hard to clean and may cause irritation for sensitive skin.
- Patch test new products. If you are trying a new polish brand or glue for charms, test a small spot first to check for reactions.
- Store tools properly. Keep brushes and dotting tools clean between uses to avoid bacteria buildup.
Now that your kit is ready and you know how to stay safe, let’s get into the best bold colorful Y2K butterfly nail art design ideas.
Idea 1: Classic Butterfly French Tips
Short Introduction
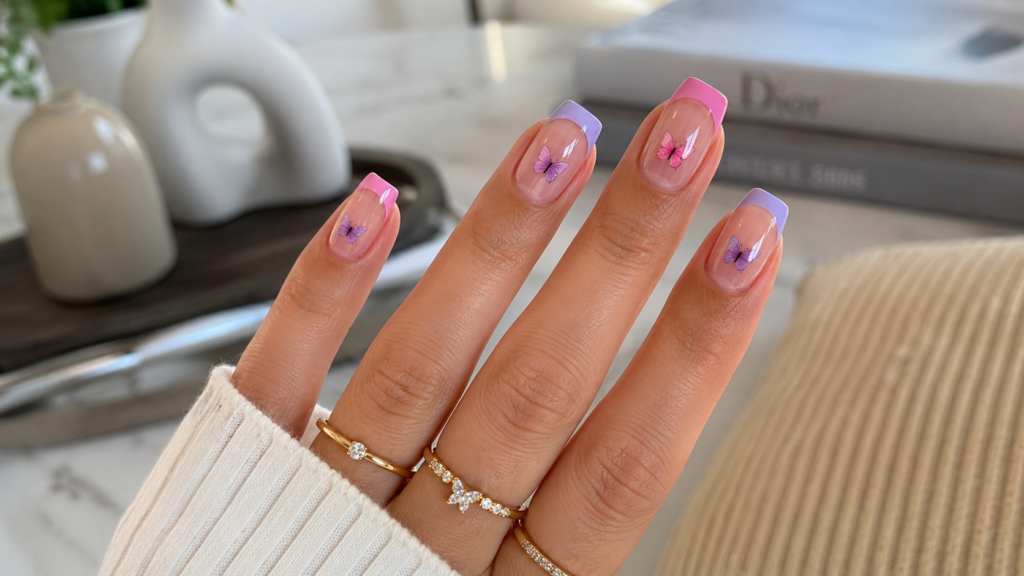
This first idea takes the timeless French manicure and gives it a fresh Y2K twist. Instead of plain white tips, you will paint colorful tips and add small butterfly accents for a playful, modern update.
Why You’ll Love This Idea
This design is a perfect starting point because it combines something familiar (the French tip) with something fresh (bold color and butterflies). It looks elegant but still feels fun and youthful.
Materials Needed
- White, pink, or purple base polish
- Bold colored polish for tips (hot pink, lavender, or baby blue)
- Butterfly nail stickers or a thin nail art brush
- Top coat
- French tip guide stickers (optional)
Step-by-Step Instructions
- Start with clean, filed nails and apply a base coat.
- Paint your entire nail with a light nude or pale pink base color.
- Let the base dry completely for about 10 minutes.
- Use French tip guide stickers to mark where the tip color will start.
- Paint the tips with your bold color choice using two thin coats.
- Remove the guide stickers carefully while the polish is still slightly wet.
- Add one or two small butterfly stickers near the base of each tip.
- Seal everything with a glossy top coat.
- Let nails dry fully before touching anything.
Beginner Tips
- Use guide stickers if your hand is not steady yet.
- Practice on one nail first before doing all ten.
- Keep your tip color light for your first try since it is more forgiving.
Common Mistakes to Avoid
- Applying tip color too thick, which causes clumping.
- Placing butterfly stickers before the polish is dry, which can smudge the design.
- Skipping the top coat, which leads to chipping within a day or two.
Styling or Decorating Ideas
- Add tiny rhinestones at the corner of each tip for extra sparkle.
- Alternate tip colors between nails for a rainbow effect.
- Use chrome powder on just the ring finger for an accent nail.
Best Colors and Materials
Best colors include hot pink, lilac, baby blue, and mint green. Pearl or shimmer polish works beautifully for the base.
Estimated Cost
Around $10 to $20 if you already own basic polish and stickers.
Estimated Time
About 45 minutes to 1 hour.
Difficulty Level
Beginner-friendly
Where It Looks Best
This design looks best for everyday wear, work, school, or casual outings since it is colorful but still polished.
Pinterest-Worthy Tip
Photograph your hand resting on a light-colored surface with natural sunlight to make the colors and butterflies pop for your Pinterest board.
Conclusion
This classic-meets-Y2K design is the perfect entry point into bold colorful Y2K butterfly nail art. It is simple, wearable, and still delivers that nostalgic butterfly charm everyone loves.
Idea 2: Chrome Butterfly Accent Nails
Short Introduction
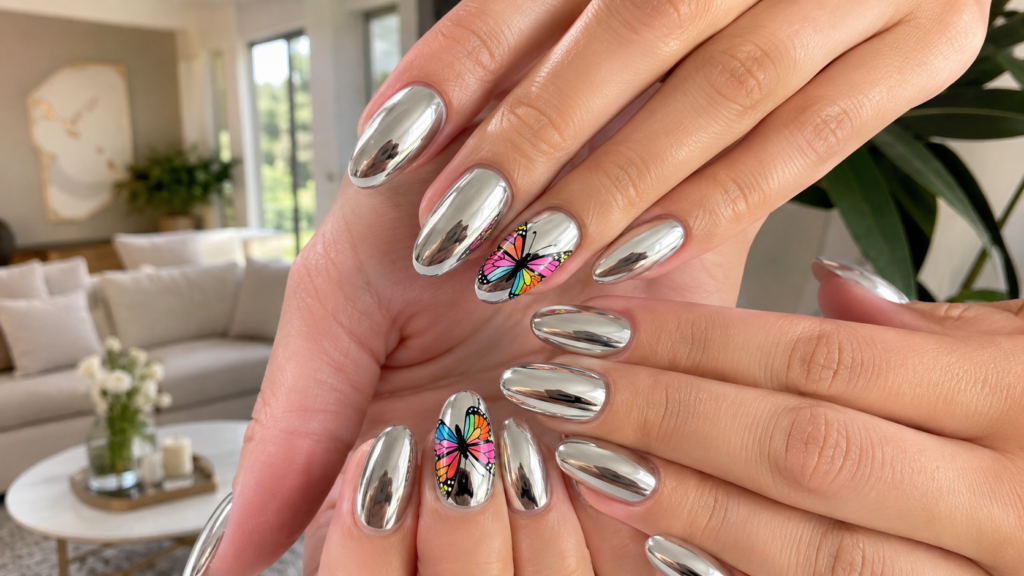
Chrome nails are one of the biggest parts of the Y2K comeback. This idea uses a shiny chrome finish paired with one bold butterfly accent nail for a look that feels futuristic and glamorous.
Why You’ll Love This Idea
Chrome polish reflects light like a mirror, giving your nails a metallic, eye-catching shine. Adding just one butterfly nail keeps the design balanced instead of overwhelming.
Materials Needed
- Black or nude gel base polish
- Chrome powder (silver, holographic, or rose gold)
- Small sponge applicator
- Butterfly decal or hand-painted design
- Gel top coat and LED lamp
Step-by-Step Instructions
- Apply a base coat and let it dry.
- Paint nails with a dark gel color like black or deep purple as your base.
- Cure under an LED lamp if using gel polish.
- Apply a no-wipe gel top coat and cure again.
- Use a sponge applicator to rub chrome powder onto each nail until shiny.
- Buff away excess powder gently with a soft brush.
- On your accent nail (usually the ring finger), skip the chrome and paint a colorful butterfly design instead.
- Seal the chrome nails and butterfly nail with a glossy top coat.
- Cure again if using gel products.
Beginner Tips
- Chrome powder works best over a fully cured, glossy gel top coat.
- Rub in small circular motions instead of pressing hard.
- Practice the chrome technique on a nail wheel before doing your real nails.
Common Mistakes to Avoid
- Applying chrome powder over a matte top coat, which will not shine properly.
- Rubbing too hard, which can create streaks instead of a smooth finish.
- Forgetting to seal the chrome nail, which can dull the shine over time.
Styling or Decorating Ideas
- Use rose gold chrome for a warmer, softer look.
- Add tiny crystals along the cuticle line of the butterfly nail.
- Try holographic chrome for a color-shifting rainbow effect.
Best Colors and Materials
Silver, holographic, and rose gold chrome pair beautifully with black, white, or deep purple bases.
Estimated Cost
Around $25 to $40, mostly due to chrome powder and gel supplies.
Estimated Time
About 1.5 hours, including curing time.
Difficulty Level
Intermediate
Where It Looks Best
Perfect for parties, date nights, or any event where you want your hands to stand out.
Pinterest-Worthy Tip
Shoot your chrome nails near a window so natural light bounces off the metallic finish for a stunning reflective photo.
Conclusion
Chrome butterfly accent nails bring high-shine glamour to the Y2K butterfly nail art trend, proving that one bold accent nail can make an entire manicure unforgettable.
Idea 3: Rainbow Gradient Butterfly Nails
Short Introduction
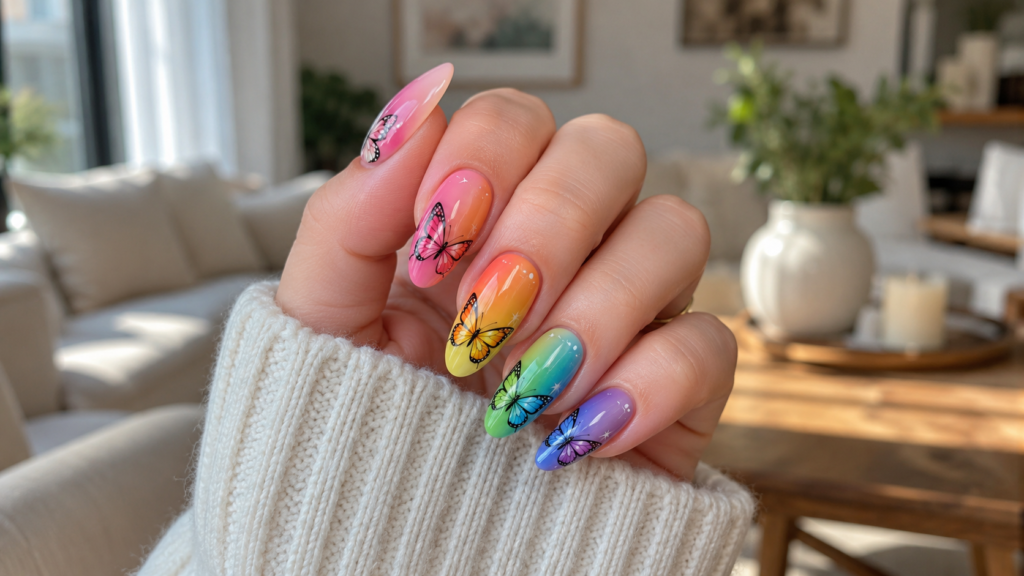
This design blends two or more bright colors together in a smooth gradient, then adds butterfly details on top for a dreamy, colorful effect.
Why You’ll Love This Idea
Gradient nails look complicated but are actually simple once you learn the sponge technique. The rainbow blend makes every nail look like a tiny sunset with butterflies floating across it.
Materials Needed
- 3 to 4 bright polish colors
- Makeup sponge
- Aluminum foil or a paper plate for blending
- Thin brush for butterfly outlines
- Top coat
Step-by-Step Instructions
- Apply a white or light base coat and let it dry fully.
- Paint stripes of your chosen colors onto foil, slightly overlapping.
- Dab a makeup sponge onto the color stripes to pick up the blend.
- Press the sponge onto your nail using a patting motion.
- Repeat two to three times per nail for full color coverage.
- Clean up the skin around your nails with a cotton swab and a bit of acetone.
- Once dry, use a thin brush to paint simple butterfly shapes on top of the gradient.
- Add small dots for antennae and patterns on the wings.
- Finish with a glossy top coat to blend everything together.
Beginner Tips
- Choose colors that are next to each other on the color wheel for a smoother blend.
- Use a fresh sponge if the pattern looks patchy.
- Practice the butterfly shape on paper first if you are nervous about freehand painting.
Common Mistakes to Avoid
- Letting polish dry on the sponge, which stops it from transferring color smoothly.
- Overloading the nail with too many colors, which can look muddy.
- Skipping cleanup around the nail edges, leaving a messy border.
Styling or Decorating Ideas
- Add gold foil flakes on top for a magical, sparkly finish.
- Try a sunset gradient with orange, pink, and purple.
- Use a cool-tone gradient with blue, teal, and purple for an ocean vibe.
Best Colors and Materials
Bright pink, orange, yellow, purple, and blue work beautifully together for bold, colorful gradients.
Estimated Cost
Around $15 to $25.
Estimated Time
About 1 hour.
Difficulty Level
Intermediate
Where It Looks Best
Great for spring and summer outfits, beach days, or festival looks.
Pinterest-Worthy Tip
Take close-up shots of just one or two nails to highlight the smooth gradient blend and butterfly detail.
Conclusion
Rainbow gradient butterfly nails are a fun, colorful way to bring joy to your hands. This idea captures everything people love about bold colorful Y2K butterfly nail art.
Idea 4: 3D Butterfly Charm Nails
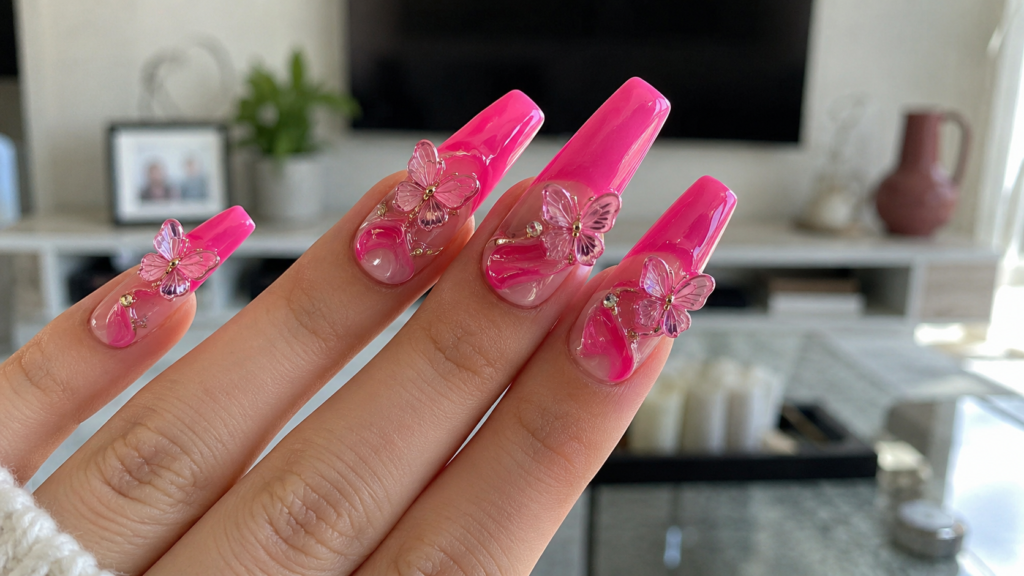
Short Introduction
For a design that pops right off the nail, try adding small 3D butterfly charms. This idea uses lightweight resin or metal charms glued onto a colorful base for extra texture and dimension.
Why You’ll Love This Idea
3D charms add a tactile, playful element that flat nail art cannot match. It feels a little like wearing tiny jewelry on your hands.
Materials Needed
- Bold polish base color
- 3D butterfly charms (resin or metal)
- Nail glue or clear gel top coat
- Tweezers
- Top coat
Step-by-Step Instructions
- Apply a base coat and let it dry.
- Paint two coats of your chosen bold color, such as hot pink or turquoise.
- Let the polish dry completely, about 15 to 20 minutes.
- Decide on the placement for your charm, usually near the cuticle or center of the nail.
- Add a small dot of nail glue or clear gel to the spot.
- Use tweezers to gently place the butterfly charm onto the glue.
- Press down lightly for a few seconds to secure it.
- Repeat on your accent nails, usually the ring fingers.
- Seal the edges of the charm with top coat, avoiding the raised center if it is 3D.
- Let everything dry fully before using your hands.
Beginner Tips
- Start with just one accent nail per hand to keep the look balanced.
- Use tweezers instead of fingers to avoid smudging polish.
- Choose lightweight charms so they do not fall off easily.
Common Mistakes to Avoid
- Using too much glue, which can seep out from under the charm.
- Placing charms on nails that will do a lot of manual work, since they can pop off easier.
- Sealing the entire 3D charm in top coat, which can dull its shine.
Styling or Decorating Ideas
- Mix charm sizes for a layered look.
- Pair with a matte base for contrast against a shiny charm.
- Add tiny rhinestones around the charm for extra sparkle.
Best Colors and Materials
Bright turquoise, hot pink, and lilac bases make charms stand out. Iridescent or pastel-colored charms photograph especially well.
Estimated Cost
Around $15 to $30, depending on charm quality.
Estimated Time
About 1 hour.
Difficulty Level
Beginner to Intermediate
Where It Looks Best
Great for special occasions, birthdays, or anytime you want a statement manicure.
Pinterest-Worthy Tip
Take a photo from a slight side angle to show off the raised, 3D texture of the butterfly charms.
Conclusion
3D butterfly charm nails add texture and dimension that make your manicure feel extra special, giving your Y2K butterfly nail art a fun and glamorous upgrade.
Idea 5: Glitter Ombre Butterfly Nails
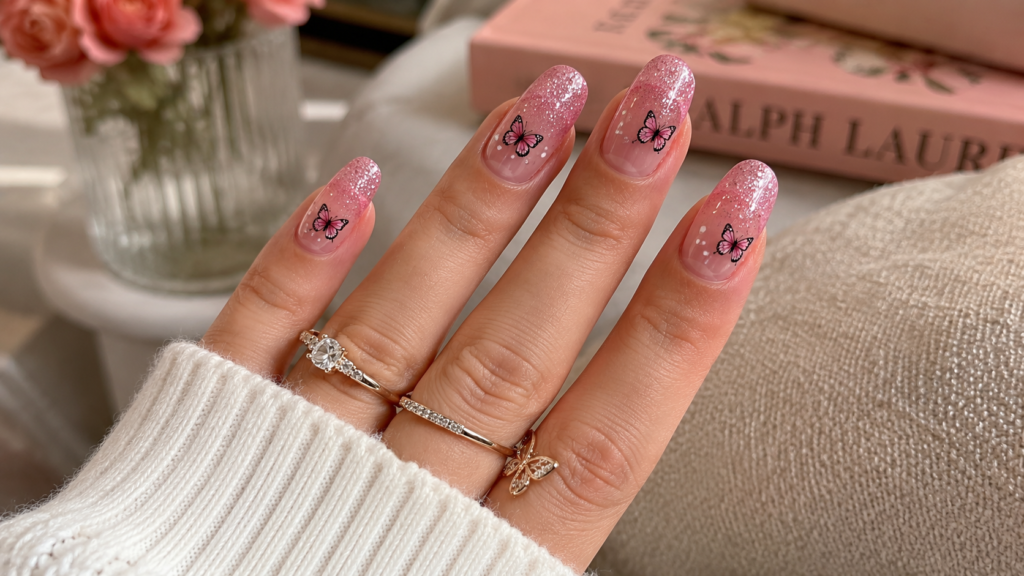
Short Introduction
This idea combines a soft glitter ombre fade with bold butterfly outlines for a sparkly, dreamy look that feels perfect for celebrations.
Why You’ll Love This Idea
Glitter ombre adds sparkle without covering the whole nail in glitter, which keeps it wearable for everyday life while still feeling festive.
Materials Needed
- Sheer or light base polish
- Fine glitter polish in one or two colors
- Makeup sponge
- Thin brush for butterfly outlines
- Top coat
Step-by-Step Instructions
- Apply a base coat, then a sheer pink or nude polish.
- Let the base dry for about 10 minutes.
- Dab glitter polish onto a sponge, concentrating more glitter at the tip.
- Press the sponge onto the nail starting from the tip and fading toward the cuticle.
- Repeat two to three times for a fuller glitter fade.
- Let the glitter layer dry for at least 15 minutes.
- Use a thin brush to outline a simple butterfly shape near the base of the nail.
- Fill in the wings with a contrasting bold color.
- Add tiny dots for the body and antennae.
- Seal with a thick top coat to smooth out the glitter texture.
Beginner Tips
- Use a thick top coat to prevent the glitter from feeling rough or bumpy.
- Practice glitter fading on scrap paper first to get comfortable with the sponge technique.
- Keep butterfly designs simple with two or three wing shapes.
Common Mistakes to Avoid
- Applying too much glitter at once, which creates a clumpy texture.
- Skipping extra top coat layers, leaving nails feeling gritty.
- Painting butterflies before the glitter is fully dry, which can smear the sparkle.
Styling or Decorating Ideas
- Try a two-tone glitter fade using pink and purple glitter together.
- Add a single rhinestone in the center of each butterfly wing.
- Use gold glitter for a warm, glowing effect.
Best Colors and Materials
Soft pink, lavender, and gold glitter pair beautifully with white or pastel butterfly outlines.
Estimated Cost
Around $15 to $25.
Estimated Time
About 1 to 1.5 hours.
Difficulty Level
Intermediate
Where It Looks Best
Perfect for weddings, birthdays, holidays, or any sparkly celebration.
Pinterest-Worthy Tip
Photograph your nails under soft indoor lighting to capture the glitter’s sparkle without harsh glare.
Conclusion
Glitter ombre butterfly nails bring a soft sparkle to the bold, colorful world of Y2K butterfly nail art, making them perfect for special moments worth celebrating.
Idea 6: Neon Y2K Butterfly Nails
Short Introduction
Neon nails are one of the loudest, most fun parts of the Y2K trend. This idea uses electric colors paired with bold butterfly shapes for a design that is impossible to miss.
Why You’ll Love This Idea
If you love bright, energetic colors, this design lets you go all out. Neon shades feel young, playful, and full of confidence.
Materials Needed
- Neon polish colors (green, pink, orange, yellow)
- White polish for butterfly base shapes
- Thin brush
- Black polish or gel liner for outlines
- Top coat
Step-by-Step Instructions
- Apply a base coat and let it dry.
- Paint each nail a different neon color for a bold multicolor effect, or stick to one shade for a uniform look.
- Allow polish to dry fully, about 15 minutes.
- Use white polish to paint two simple wing shapes on one or two accent nails.
- Let the white base dry before adding color.
- Fill in the wings with a contrasting neon shade.
- Use a thin brush or gel liner to outline the wings in black for definition.
- Add small dots along the wings for pattern details.
- Paint a thin black line down the center for the butterfly body.
- Finish with a high-shine top coat to make the neon pop even more.
Beginner Tips
- Neon colors often need two to three coats for full opacity.
- Let each neon layer dry completely before adding the butterfly on top.
- Black outlines make the butterfly shape much easier to see and photograph.
Common Mistakes to Avoid
- Skipping the white base under the butterfly, which can make colors look dull.
- Choosing too many neon shades at once, which can feel overwhelming.
- Forgetting a top coat, since neon polish can dry with a slightly rough texture.
Styling or Decorating Ideas
- Pair neon green and hot pink for a classic Y2K color combo.
- Add black and white checkered accents for extra 2000s flair.
- Try a matte top coat on some nails and glossy on others for contrast.
Best Colors and Materials
Neon pink, neon green, neon orange, and neon yellow are must-haves for this look.
Estimated Cost
Around $15 to $20.
Estimated Time
About 1 hour.
Difficulty Level
Beginner to Intermediate
Where It Looks Best
Perfect for summer festivals, pool parties, or anytime you want maximum color impact.
Pinterest-Worthy Tip
Photograph neon nails outdoors in daylight, since natural sunlight makes neon shades look even more vibrant.
Conclusion
Neon Y2K butterfly nails are loud, fun, and full of personality, making them one of the boldest choices in this entire Y2K butterfly nail art collection.
Idea 7: Pastel Butterfly Swirl Nails
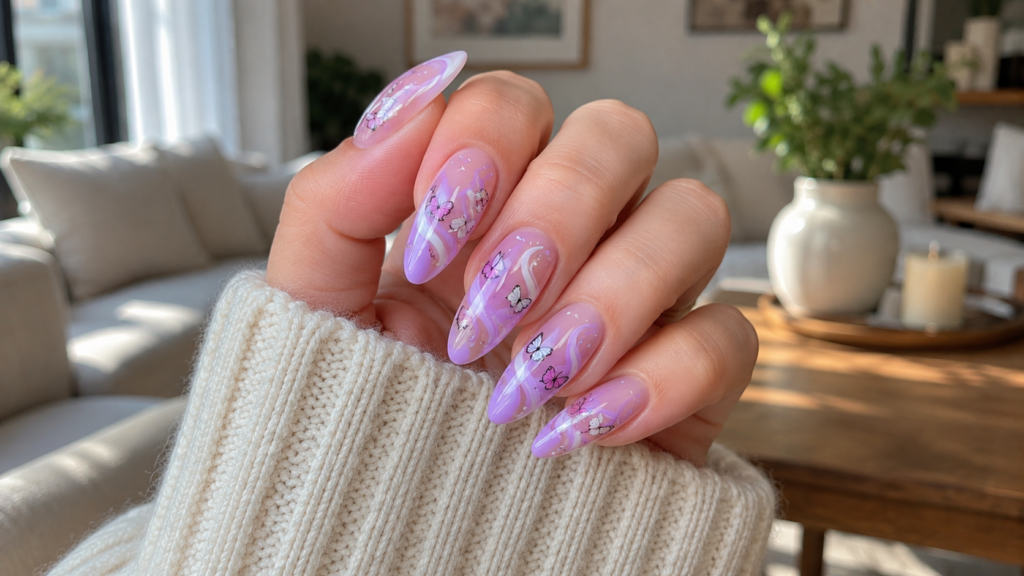
Short Introduction
This softer take on the trend combines pastel swirls with delicate butterfly outlines for a dreamy, cloud-like manicure.
Why You’ll Love This Idea
If bold neon feels like too much, this pastel version gives you the same Y2K butterfly charm in a softer, more romantic style.
Materials Needed
- Pastel polish colors (pink, lavender, mint, baby blue)
- Thin nail art brush
- Dotting tool
- White polish for outlines
- Top coat
Step-by-Step Instructions
- Apply a base coat and let it dry.
- Paint your nail with a soft pastel base, such as light lavender.
- Allow the base color to dry fully.
- Use a thin brush to paint gentle, swirling lines across the nail in a slightly different pastel shade.
- Let the swirls dry for about 10 minutes.
- Paint a simple butterfly shape using white polish on one or two nails.
- Once dry, add soft pastel color inside the wings.
- Use a dotting tool to add small dots along the wingtips for texture.
- Outline the butterfly lightly with a thin brush for definition.
- Seal the whole design with a glossy top coat.
Beginner Tips
- Pastel swirls look best when kept light and airy, so avoid overloading the brush with polish.
- Practice swirl patterns on paper before painting your nails.
- Use a dotting tool for clean, even dots instead of a brush tip.
Common Mistakes to Avoid
- Making swirls too thick, which can look messy instead of soft.
- Choosing colors that are too similar, making the design hard to see.
- Rushing the drying time between layers.
Styling or Decorating Ideas
- Add a few tiny pearls along the swirl lines for texture.
- Use a matte top coat for a soft, cloud-like finish.
- Pair with baby blue and lavender for a cotton-candy color scheme.
Best Colors and Materials
Soft pink, lavender, mint green, and baby blue create the dreamiest pastel palette.
Estimated Cost
Around $10 to $20.
Estimated Time
About 1 hour.
Difficulty Level
Beginner
Where It Looks Best
Great for spring events, baby showers, or anytime you want a soft, romantic look.
Pinterest-Worthy Tip
Style your photo with pastel props like flowers or ribbon to match the soft color palette of your nails.
Conclusion
Pastel butterfly swirl nails prove that Y2K butterfly nail art does not always have to be loud. This soft, dreamy version is just as charming and Pinterest-worthy.
Idea 8: Black and Silver Gothic Y2K Butterfly Nails
Short Introduction
This edgier idea mixes dark, moody colors with metallic silver butterflies for a bold, gothic take on the trend.
Why You’ll Love This Idea
Not every Y2K fan wants pastel or neon. This design is perfect for anyone who loves darker, edgier styles while still following the butterfly trend.
Materials Needed
- Black polish
- Silver chrome powder or silver polish
- Thin brush
- Small rhinestones (optional)
- Top coat
Step-by-Step Instructions
- Apply a base coat and let it dry.
- Paint two coats of black polish on all nails.
- Let the black base dry fully, about 15 to 20 minutes.
- Use a thin brush and silver polish to paint butterfly wing outlines on one or two accent nails.
- Fill in the wings with silver polish or chrome powder for extra shine.
- Add a thin black line down the center for the butterfly body.
- Use a dotting tool to add small silver dots along the wing edges.
- Place a tiny rhinestone in the center of the butterfly if desired.
- Seal the design with a glossy top coat for shine.
- Let nails dry fully before wearing gloves or handling rough surfaces.
Beginner Tips
- Silver polish shows up best on a fully dry, opaque black base.
- Use a fine brush for clean wing outlines.
- Add rhinestones last so they do not get covered in top coat too early.
Common Mistakes to Avoid
- Painting silver details before the black base is fully dry, which can smudge the design.
- Using too many rhinestones, which can make the design feel cluttered.
- Skipping top coat, since black polish can dry with a dull finish.
Styling or Decorating Ideas
- Add a few silver studs along the cuticle line for extra edge.
- Try deep purple instead of black for a slightly softer gothic look.
- Pair with matte black on some nails and glossy silver butterflies on others.
Best Colors and Materials
Black, deep purple, and silver chrome create the perfect moody color palette for this design.
Estimated Cost
Around $20 to $35.
Estimated Time
About 1.5 hours.
Difficulty Level
Intermediate to Advanced
Where It Looks Best
Perfect for concerts, night events, or anytime you want a bold, edgy manicure.
Pinterest-Worthy Tip
Photograph these nails against a dark background to make the silver butterflies stand out dramatically.
Conclusion
Black and silver gothic butterfly nails bring a bold, edgy energy to the Y2K butterfly nail art trend, proving this style can be soft, bright, or dark depending on your mood.
Expert Decorating Tips
- Start with an accent nail. If you are nervous about a full butterfly design, try it on just one or two nails first.
- Balance bold and simple. Pair one detailed butterfly nail with simpler solid-color nails so the design does not feel too busy.
- Layer textures. Combine matte and glossy finishes on the same set for a more dynamic look.
- Match your mood, not just the trend. Choose pastel, neon, or gothic colors based on what actually feels like you.
- Practice on paper first. Sketching butterfly shapes before painting them helps build muscle memory.
- Use good lighting while painting. Natural daylight makes it much easier to see true colors and clean lines.
Budget-Saving Tips
- Buy a basic polish set instead of individual bottles to save money on color variety.
- Reuse stickers and decals across multiple manicures when possible.
- Choose multi-use tools, like a dotting tool that can also double as a thin brush handle.
- Practice on a nail wheel instead of real nails to avoid wasting polish on mistakes.
- Shop sales during back-to-school or holiday seasons when beauty supplies are often discounted.
- DIY your own chrome effect using cheaper loose pigment powders instead of pricey pre-made chrome polishes.
Frequently Asked Questions
1. What is Y2K butterfly nail art? It is a nail art style inspired by early 2000s fashion trends, featuring bold colors, chrome finishes, glitter, and butterfly designs on the nails.
2. Do I need gel polish for these designs? No. Most of these ideas work with regular polish, though gel polish can help chrome and glitter designs last longer.
3. How long does butterfly nail art usually last? With regular polish, expect 5 to 7 days. With gel polish, these designs can last up to 2 to 3 weeks.
4. Can beginners really do these designs at home? Yes. Several ideas in this post, like the pastel swirl and classic French tip designs, are beginner-friendly and do not require advanced skills.
5. What is the easiest butterfly nail design for beginners? The classic butterfly French tips and pastel butterfly swirl designs are the easiest to start with.
6. How do I stop glitter nails from feeling rough? Apply a thick top coat and let it dry fully. Adding a second top coat layer can smooth out texture even more.
7. Can I use nail stickers instead of hand-painting butterflies? Yes. Butterfly stickers and decals are a great shortcut if you are not confident with freehand painting.
8. What colors work best for Y2K nail art? Bright pink, purple, neon green, silver chrome, and pastel shades all work well within this trend.
9. How do I make my chrome nails shine brighter? Make sure your base top coat is fully glossy and cured before applying chrome powder, and rub the powder in gentle circular motions.
10. Is this nail art style good for special occasions? Yes. Many designs in this post, like the glitter ombre and 3D charm nails, are perfect for parties, weddings, and celebrations.
Final Thoughts
Bold colorful Y2K butterfly nail art design ideas are more than just a passing trend. They bring together nostalgia, creativity, and endless color options into one fun, wearable art form. Whether you prefer soft pastel swirls, loud neon shades, shiny chrome accents, or a moody gothic twist, there is a butterfly design on this list made just for you.
The best part about this trend is how flexible it is. You do not need a salon appointment or years of practice to create something beautiful. With a few basic tools, some bold polish colors, and a little patience, you can recreate any of these eight ideas right at your kitchen table.
Nail art is a small, simple way to express your personality every single day. So grab your favorite colors, pick a design from this list, and give your nails the bold Y2K butterfly makeover they deserve.
Pinterest Call-to-Action
Loved these ideas? Save this pin to your favorite nail art board so you can come back anytime you need inspiration for your next manicure. Don’t forget to share it with a friend who would love these bold colorful Y2K butterfly nail art design ideas too!