Introduction
Do you love the cozy, rustic look of farmhouse style? If so, you are going to fall in love with burlap flowers for home decor. These simple, budget-friendly crafts can turn plain burlap fabric into beautiful roses, sunflowers, peonies, and more. Best of all, you do not need to be a craft expert to make them.
Burlap flowers have become one of the most popular Pinterest DIY trends, and it is easy to see why. They are affordable, easy to customize, and they never wilt like real flowers do. Whether you want a wreath for your front door, a centerpiece for your dining table, or a garland for a wedding, burlap flowers can do it all.
In this guide, you will learn everything you need to know about making stunning burlap flowers. We will cover the best materials and tools, safety tips, and eight detailed step-by-step projects you can try today. Each idea includes tips for beginners, common mistakes to avoid, and creative styling ideas to make your project look like it came from a magazine.
Burlap is a natural, textured fabric that pairs perfectly with farmhouse, rustic, cottagecore, and boho home styles. It also blends beautifully with other materials like lace, twine, wood, and dried flowers. Once you learn the basic techniques, you can make dozens of different flower shapes, sizes, and colors.
So, grab some burlap ribbon, a hot glue gun, and a cup of coffee. By the end of this article, you will have everything you need to create your own stunning burlap flower home decor collection. Let’s get started!
Why This Trend Is Popular
Burlap flower crafts have taken over Pinterest boards and home decor blogs for many good reasons. Here is why so many people love this trend:
- Affordable: Burlap fabric and ribbon are very cheap compared to silk flowers or fresh bouquets.
- Long-lasting: Unlike real flowers, burlap flowers never wilt, wither, or need water.
- Customizable: You can dye, paint, or trim burlap flowers to match any color scheme.
- Beginner-friendly: Most burlap flower projects only need basic sewing or gluing skills.
- Versatile style: Burlap flowers fit farmhouse, rustic, boho, cottage, and even modern minimalist decor.
- Great for gifts: Handmade burlap flower crafts make thoughtful, personal gifts.
- Perfect for events: Weddings, baby showers, and holiday parties often use burlap flowers as decorations.
- Eco-friendly appeal: Burlap is a natural, biodegradable material made from jute fibers.
Pinterest users especially love burlap flowers because they photograph beautifully. The rough, natural texture creates a warm and cozy feeling that fits perfectly with today’s popular home decor styles.
Materials and Tools Needed
Before you start any burlap flower project, it helps to gather the right supplies. Here is a general list you will use across most projects in this guide.
| Category | Items |
|---|---|
| Fabric | Burlap ribbon (various widths), burlap fabric squares, natural or colored burlap |
| Tools | Hot glue gun and glue sticks, scissors, fabric scissors, wire cutters |
| Extras | Floral wire, wooden dowels or stems, buttons, beads, twine, ribbon |
| Optional | Fabric dye or spray paint, embroidery thread, lace trim, artificial leaves |
| Base Items | Wreath forms, mason jars, embroidery hoops, wooden frames |
Where to Buy Supplies
- Craft stores like Michaels, Hobby Lobby, or JOANN
- Online stores like Amazon or Etsy
- Dollar stores for budget wreath forms and jars
- Fabric stores for burlap by the yard
Pro tip: Burlap ribbon with wired edges is easier to shape into flower petals because it holds its form better than plain burlap fabric.
Safety Tips
Crafting with burlap is generally very safe, but a few precautions will keep your project fun and injury-free.
- Hot glue guns get very hot. Always keep it on a heat-safe stand and never touch the metal tip.
- Keep a bowl of cool water nearby in case you accidentally touch hot glue.
- Use fabric scissors carefully and store them away from small children.
- Wire ends can be sharp. Always bend or tape the ends after cutting floral wire.
- Work in a well-ventilated room if you are using spray paint or fabric dye.
- Supervise children closely if they are helping with hot glue or scissors.
- Test dye or paint on a small burlap scrap first to check the color and drying time.
Now that you have your materials and safety basics covered, let’s dive into eight stunning burlap flower ideas!
Idea 1: Classic Burlap Rose Bouquet
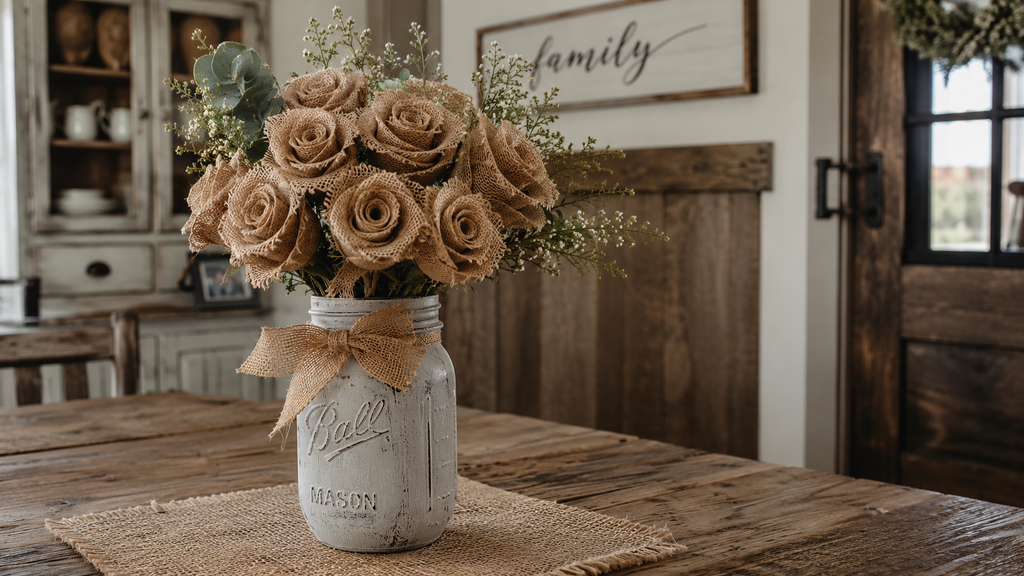
A burlap rose bouquet is one of the easiest and most popular ways to start your burlap flower journey. These roses look elegant, rustic, and surprisingly realistic once finished.
Why You’ll Love This Idea
Burlap roses never need water, they last forever, and they look stunning in a simple vase on your kitchen table or mantel. This project is also very beginner-friendly since it only uses ribbon and glue.
Materials Needed
- Burlap ribbon (2 to 3 inches wide)
- Hot glue gun and glue sticks
- Scissors
- Floral wire or wooden dowels
- Green floral tape (optional)
Step-by-Step Instructions
- Cut a piece of burlap ribbon about 18 to 24 inches long.
- Fold the top corner down at a 45-degree angle to start your first petal.
- Begin rolling the ribbon tightly from the folded corner to create the rose center.
- After two or three rolls, start folding the ribbon down and away from you before rolling again. This creates the ruffled petal look.
- Continue folding and rolling loosely, adding a dab of hot glue at the base every few folds to hold the shape.
- Keep going until you reach the end of the ribbon, then glue the raw edge to the base of the rose.
- Trim any loose threads for a neat look.
- Attach the finished rose to a floral wire or wooden dowel stem using hot glue.
- Wrap the stem base with green floral tape to hide the glue and wire.
- Repeat to make a full bouquet of 5 to 7 roses.
Beginner Tips
- Practice with an extra piece of ribbon before making your final rose.
- Keep your folds loose for a fuller, more natural-looking flower.
- Use wired burlap ribbon for easier shaping.
Common Mistakes to Avoid
- Rolling the ribbon too tightly, which makes the rose look small and stiff.
- Using too much glue, which can make the petals stiff and shiny.
- Forgetting to trim loose burlap threads before displaying.
Styling or Decorating Ideas
- Place a bouquet in a mason jar tied with twine.
- Mix burlap roses with dried baby’s breath for a soft, romantic look.
- Use them as a table centerpiece for farmhouse-style weddings.
Best Colors and Materials
Natural tan burlap looks classic, but you can also try blush pink, sage green, or ivory dyed burlap for a softer, more elegant bouquet.
Estimated Cost
$10 to $15 for a full bouquet of 5 to 7 roses.
Estimated Time
About 10 to 15 minutes per rose.
Difficulty Level
Beginner.
Where It Looks Best
Kitchen tables, entryway consoles, mantels, and wedding centerpieces.
Pinterest-Worthy Tip
Photograph your bouquet in a vintage pitcher or mason jar with soft natural window light for that dreamy farmhouse Pinterest look.
Conclusion
The classic burlap rose bouquet is the perfect starting project for anyone new to burlap flowers for home decor. It is quick, affordable, and endlessly customizable, making it a must-try for your first DIY session.ratio.
Idea 2: Rustic Burlap Sunflower Wreath
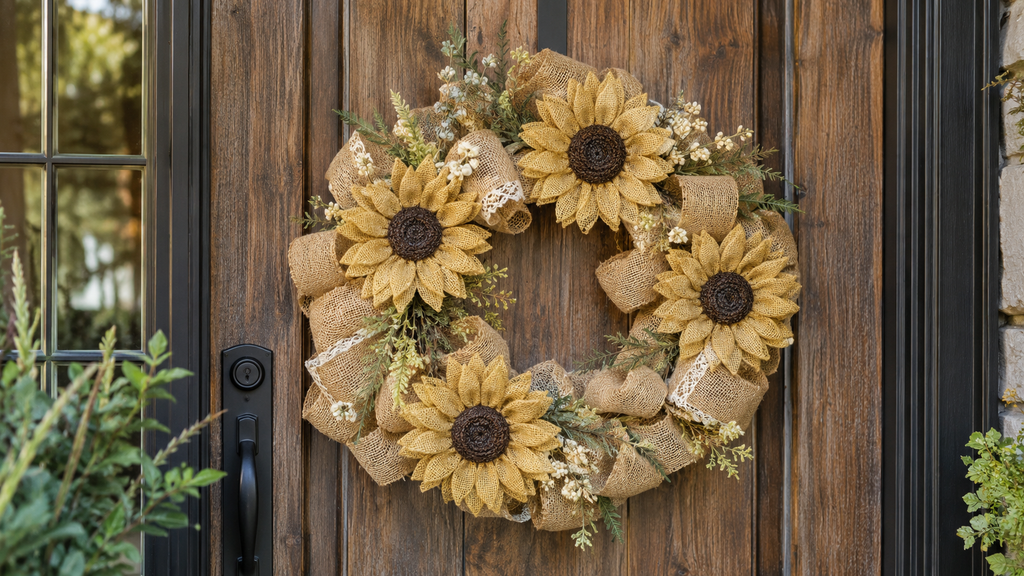
Sunflowers bring warmth and cheer to any home, and a burlap sunflower wreath is a fantastic way to welcome guests at your front door.
Why You’ll Love This Idea
This wreath combines bright yellow burlap petals with a dark brown center, creating a bold, cheerful statement piece that works beautifully for spring, summer, and fall decor.
Materials Needed
- Yellow burlap ribbon
- Brown or dark burlap fabric for flower centers
- Grapevine or straw wreath form
- Hot glue gun
- Scissors
- Wire cutters
- Floral pins
Step-by-Step Instructions
- Start by wrapping natural burlap ribbon around the wreath form to create a neutral base layer.
- Secure the ends with hot glue or floral pins.
- Cut yellow burlap ribbon into 6-inch petal shapes, rounding one end and pointing the other.
- Fold each petal slightly at the pointed end and glue to hold the shape.
- Cut a circle of brown burlap fabric, about 4 inches wide, for the sunflower center.
- Fray the edges of the brown circle slightly for texture, or add small buttons for seed detail.
- Arrange 10 to 12 yellow petals in a circle shape and glue them onto the wreath base.
- Glue the brown center on top of the petals.
- Repeat to add two or three sunflowers around the wreath.
- Fill any gaps with small burlap leaves or greenery sprigs.
Beginner Tips
- Cut all your petals at once using a template for consistent sizing.
- Layer petals slightly overlapping for a fuller flower look.
- Use a glue gun with a wide tip for faster coverage on large areas.
Common Mistakes to Avoid
- Spacing sunflowers too evenly, which can look unnatural. Vary the placement slightly.
- Skipping the wreath base layer, which leaves gaps showing through.
- Using flimsy, unwired ribbon that won’t hold petal shapes well.
Styling or Decorating Ideas
- Add a plaid bow at the top or bottom of the wreath.
- Mix in small artificial greenery for extra texture.
- Hang with a jute rope for a farmhouse touch.
Best Colors and Materials
Golden yellow and chocolate brown burlap are classic sunflower colors, but you can also try mustard yellow for a more muted, vintage look.
Estimated Cost
$20 to $30 depending on wreath form size.
Estimated Time
1.5 to 2 hours.
Difficulty Level
Intermediate.
Where It Looks Best
Front doors, porch walls, and above fireplace mantels.
Pinterest-Worthy Tip
Style your wreath on a barn door or wooden fence background for a rustic Pinterest-perfect photo.
Conclusion
A rustic burlap sunflower wreath is a joyful, eye-catching project that instantly upgrades your entryway. It is one of the most-saved burlap flowers for home decor ideas on Pinterest for good reason.
Idea 3: Burlap Flower Mason Jar Centerpiece
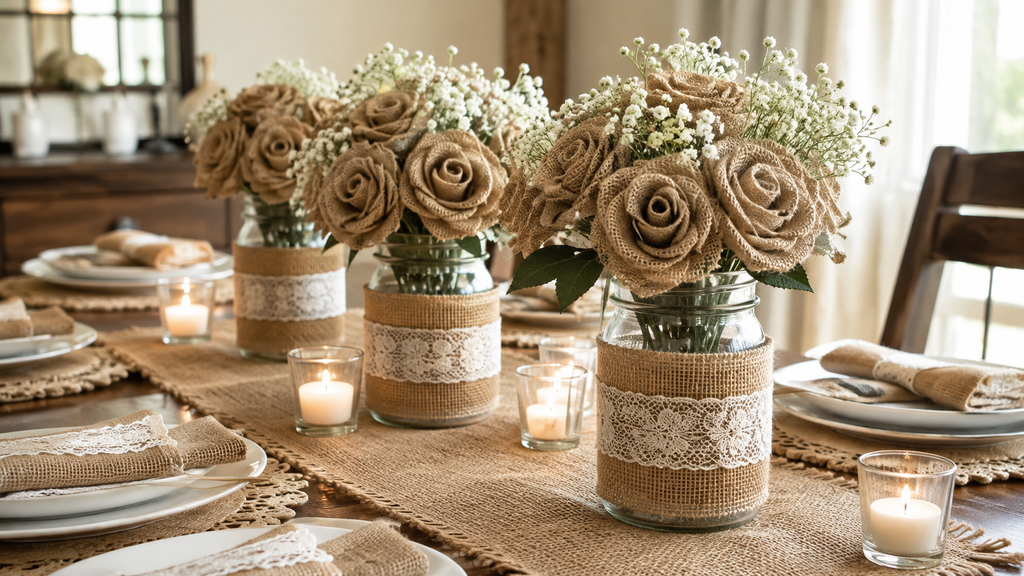
This charming centerpiece combines two farmhouse favorites: burlap flowers and mason jars. It is perfect for everyday dining tables or special occasions.
Why You’ll Love This Idea
This project is fast, inexpensive, and endlessly adjustable. You can swap flower colors and jar sizes to match any season or holiday theme.
Materials Needed
- Mason jars (any size)
- Burlap ribbon in your favorite colors
- Twine or lace ribbon
- Hot glue gun
- Small artificial greenery
- Floral foam or filler (rice, sand, or dried beans)
Step-by-Step Instructions
- Clean and dry your mason jar completely.
- Wrap a strip of burlap fabric around the jar and secure it with hot glue.
- Tie a piece of twine or lace around the burlap for extra detail.
- Make 3 to 5 burlap flowers using the rolled rose method or a simple layered petal method.
- Attach short floral wire stems to each flower.
- Fill the mason jar with floral foam, rice, or sand to hold the stems upright.
- Arrange the burlap flowers inside the jar, placing taller stems in the back.
- Add small artificial greenery or baby’s breath to fill in gaps.
- Adjust the flowers until the arrangement looks full and balanced.
- Add a small burlap bow to the front of the jar for a finishing touch.
Beginner Tips
- Use different jar heights for a more dynamic table display.
- Pre-make your flowers before assembling so you can plan the best arrangement.
- Keep 2 to 3 colors in your palette so the centerpiece does not look too busy.
Common Mistakes to Avoid
- Overcrowding the jar with too many flowers, which hides the burlap wrap detail.
- Using stems that are too long, making the jar look unbalanced.
- Forgetting to secure the burlap wrap tightly, which can slip over time.
Styling or Decorating Ideas
- Use small jars for a row of centerpieces down a long table.
- Add fairy lights inside the jar for evening ambiance.
- Match the burlap color to your table linens for a coordinated look.
Best Colors and Materials
Natural burlap with white or cream flowers looks timeless, but seasonal colors like orange for fall or red for Christmas work beautifully too.
Estimated Cost
$8 to $15 per jar.
Estimated Time
30 to 45 minutes per centerpiece.
Difficulty Level
Beginner.
Where It Looks Best
Dining tables, kitchen islands, and wedding reception tables.
Pinterest-Worthy Tip
Photograph a row of these centerpieces down a long wooden table with string lights in the background for a dreamy rustic wedding vibe.
Conclusion
The burlap flower mason jar centerpiece is a simple project with a big decorative payoff. It is one of the most practical burlap flowers for home decor ideas for everyday styling.
Idea 4: Burlap Peony Wall Hanging
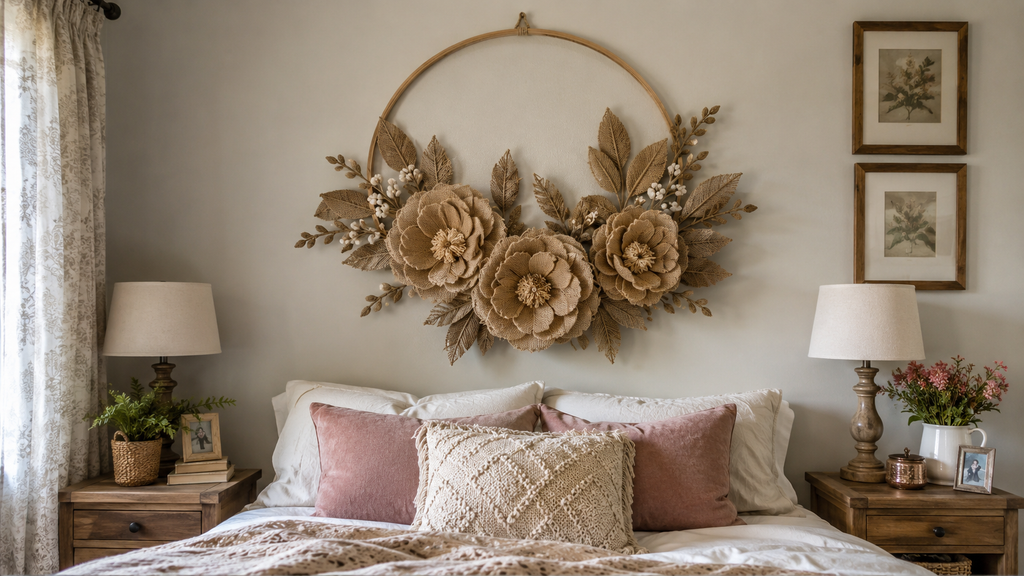
If you want a bigger statement piece, a burlap peony wall hanging brings soft, romantic texture to any blank wall.
Why You’ll Love This Idea
Peonies have a soft, layered look that adds elegance to farmhouse or cottagecore rooms. This wall hanging becomes an instant conversation piece.
Materials Needed
- Burlap fabric (large squares)
- Wooden embroidery hoop or wooden frame
- Hot glue gun
- Scissors
- Fabric dye (optional)
- Burlap leaves or greenery
Step-by-Step Instructions
- Cut burlap fabric into circles of varying sizes, from 2 inches to 5 inches wide.
- Fold each circle in half, then in half again to form a petal shape.
- Fray the curved edge slightly with your fingers for a soft, natural texture.
- Glue the folded tip of each petal to build a base layer of larger petals.
- Layer medium petals on top of the first layer, overlapping slightly.
- Add small petals in the center to complete the peony shape.
- Repeat to create 3 to 5 peony flowers of different sizes.
- Arrange the peonies on your embroidery hoop or wooden frame in a pleasing pattern.
- Glue each flower securely to the frame.
- Add small burlap leaves between the flowers to fill empty spaces.
Beginner Tips
- Use different burlap shades for a more realistic, dimensional peony.
- Start with your largest flower in the center or off to one side for balance.
- Take your time frying the edges; this step makes the flower look soft and lifelike.
Common Mistakes to Avoid
- Making all petals the same size, which looks flat instead of full.
- Gluing petals too flat instead of slightly curved for dimension.
- Overloading the frame with too many flowers, hiding the wood or hoop detail.
Styling or Decorating Ideas
- Hang above a bed as a soft, romantic headboard alternative.
- Group two or three hoops of different sizes together on a gallery wall.
- Add a small ribbon bow at the top of the hoop for a finished look.
Best Colors and Materials
Blush pink, cream, and dusty rose burlap create the most realistic peony look, though natural tan is beautiful for a more neutral palette.
Estimated Cost
$15 to $25.
Estimated Time
2 to 3 hours.
Difficulty Level
Intermediate to advanced.
Where It Looks Best
Bedroom walls, nursery rooms, and living room gallery walls.
Pinterest-Worthy Tip
Style your peony wall hanging next to a woven macrame piece for a beautifully layered boho-farmhouse wall display.
Conclusion
The burlap peony wall hanging takes a little more time, but the soft, elegant result is well worth the effort. It is one of the most romantic burlap flowers for home decor projects on this list.
Idea 5: Burlap Flower Napkin Rings
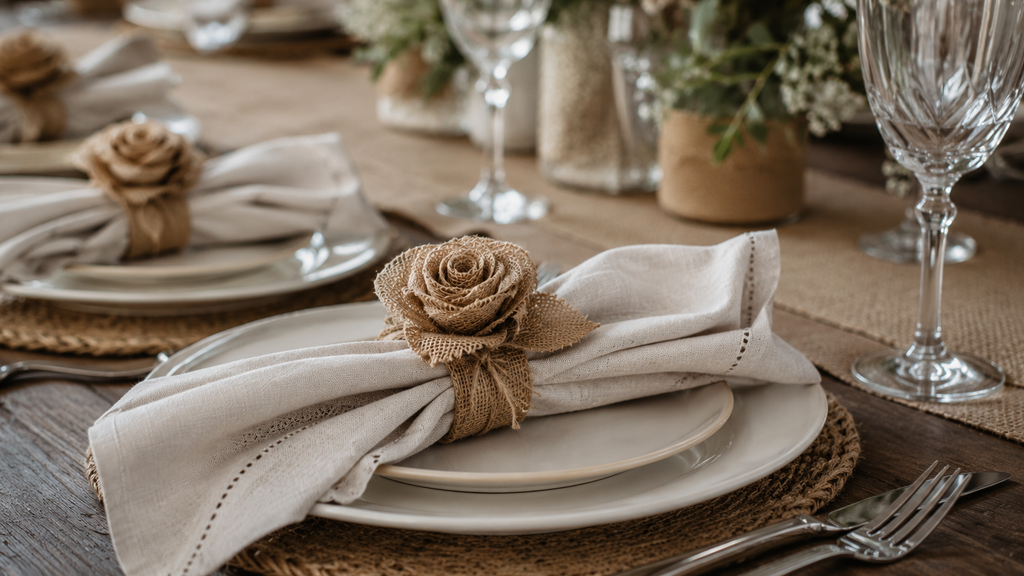
Small details make a big difference at the dinner table. These burlap flower napkin rings are a quick, elegant way to dress up any meal.
Why You’ll Love This Idea
This project uses very little material, making it perfect for using up burlap scraps from other projects. It is also a great beginner craft for kids and teens.
Materials Needed
- Cardboard toilet paper rolls or wooden napkin rings
- Burlap ribbon (1 to 2 inches wide)
- Small burlap flowers (leftover from other projects)
- Hot glue gun
- Scissors
Step-by-Step Instructions
- If using cardboard rolls, cut them into 1.5-inch wide rings.
- Wrap burlap ribbon tightly around the ring, overlapping slightly with each wrap.
- Glue the ribbon end to secure it in place.
- Make a small burlap flower using the rolled rose method, about 1.5 inches wide.
- Trim the flower stem short so it sits flat against the ring.
- Glue the small flower onto the front of the wrapped ring.
- Add a tiny leaf or button next to the flower for extra detail.
- Let the glue dry completely before sliding a napkin through the ring.
- Repeat to make a full set for your table.
- Store finished rings in a small box until your next dinner or party.
Beginner Tips
- This is a great project to make in batches while watching TV.
- Use a hot glue gun with a fine tip for more precise placement.
- Keep flowers small so they do not overwhelm the napkin ring size.
Common Mistakes to Avoid
- Making the flowers too large, which makes the ring hard to use.
- Skipping the ribbon wrap step, leaving visible cardboard underneath.
- Not letting the glue fully dry before handling.
Styling or Decorating Ideas
- Match napkin ring flower colors to your seasonal table theme.
- Pair with linen or cotton napkins for a soft, textured contrast.
- Use for holiday dinners, bridal showers, or everyday family meals.
Best Colors and Materials
Natural burlap with a small white or sage green flower looks fresh and simple for any season.
Estimated Cost
$1 to $3 per ring.
Estimated Time
15 minutes per ring.
Difficulty Level
Beginner.
Where It Looks Best
Dining tables, holiday place settings, and gift-wrapped napkin bundles.
Pinterest-Worthy Tip
Photograph a full table setting with matching napkin rings, a burlap centerpiece, and soft candlelight for a warm, inviting flat-lay pin.
Conclusion
Burlap flower napkin rings are proof that small details can make a huge decorating impact. This easy, affordable project is a wonderful way to practice your burlap flowers for home decor skills.
Idea 6: Burlap Flower Curtain Tiebacks
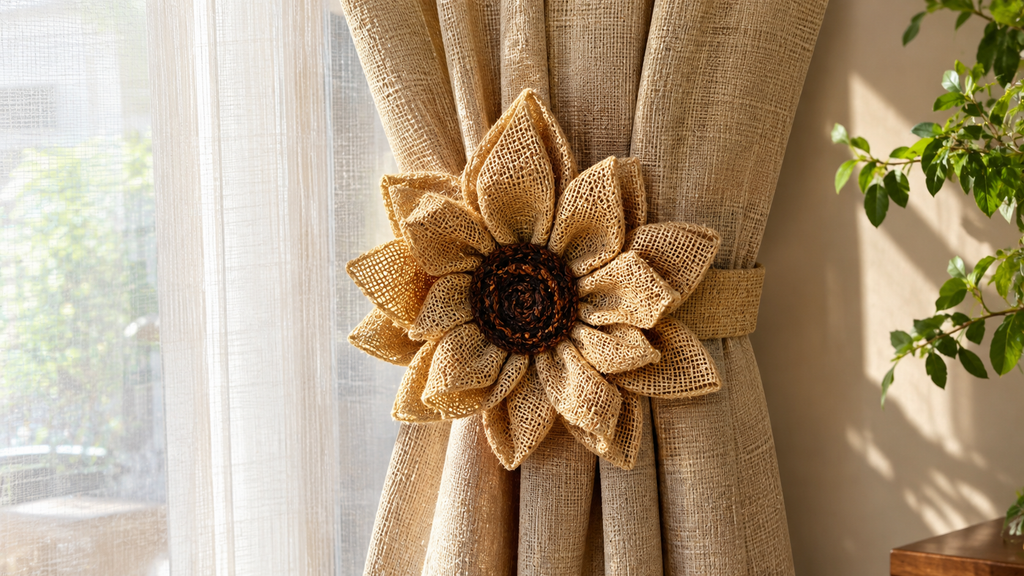
Give your window treatments a rustic upgrade with burlap flower curtain tiebacks. This project combines function and beauty in one simple craft.
Why You’ll Love This Idea
Curtain tiebacks are often overlooked, but adding a handmade burlap flower instantly elevates the whole window. This is a small project with a surprisingly big visual reward.
Materials Needed
- Burlap ribbon (2 to 3 inches wide) for tieback base
- Burlap fabric for flowers
- Hot glue gun
- Scissors
- Small curtain hooks (optional)
Step-by-Step Instructions
- Measure your curtain to determine the tieback length, usually 18 to 24 inches.
- Cut a strip of burlap ribbon or fabric to this length, folding the edges under for a clean finish.
- Fold the strip in half lengthwise and glue to create a sturdier tieback band.
- Make one large burlap flower, about 4 to 5 inches wide, using the layered petal method.
- Add a smaller flower or bud beside the large flower for extra dimension.
- Glue both flowers together at their base to form one combined embellishment.
- Attach the flower cluster to the center of the tieback band using hot glue.
- Let the glue dry completely, at least 30 minutes.
- Wrap the tieback around your gathered curtain and secure with a hook or tie the ends together.
- Adjust the flower position so it faces outward and is easily visible.
Beginner Tips
- Practice tying the band around your curtain before gluing the flower, so you know the best flower placement.
- Use wired burlap ribbon for a tieback that holds its shape well.
- Add a small loop of ribbon on the back for easy hanging on a wall hook.
Common Mistakes to Avoid
- Making the tieback too short, which makes it hard to wrap around thick curtains.
- Gluing the flower off-center, which looks unbalanced from across the room.
- Using flowers that are too heavy, causing the tieback to sag.
Styling or Decorating Ideas
- Match the flower color to your curtain trim or throw pillows.
- Use two different-sized flowers on each tieback for a more organic look.
- Pair with linen or cotton curtains for a soft farmhouse contrast.
Best Colors and Materials
Natural burlap paired with white or cream curtains creates a classic, airy farmhouse feel.
Estimated Cost
$10 to $18 per pair.
Estimated Time
1 hour per pair.
Difficulty Level
Intermediate.
Where It Looks Best
Living rooms, bedrooms, and farmhouse-style kitchens.
Pinterest-Worthy Tip
Photograph the tieback with soft morning sunlight streaming through the curtain fabric for a warm, glowing pin-worthy image.
Conclusion
Burlap flower curtain tiebacks are a small but powerful way to add charm to your windows. This creative twist on burlap flowers for home decor proves that even tiny details deserve attention.
Idea 7: Ombre Burlap Flower Front Door Wreath
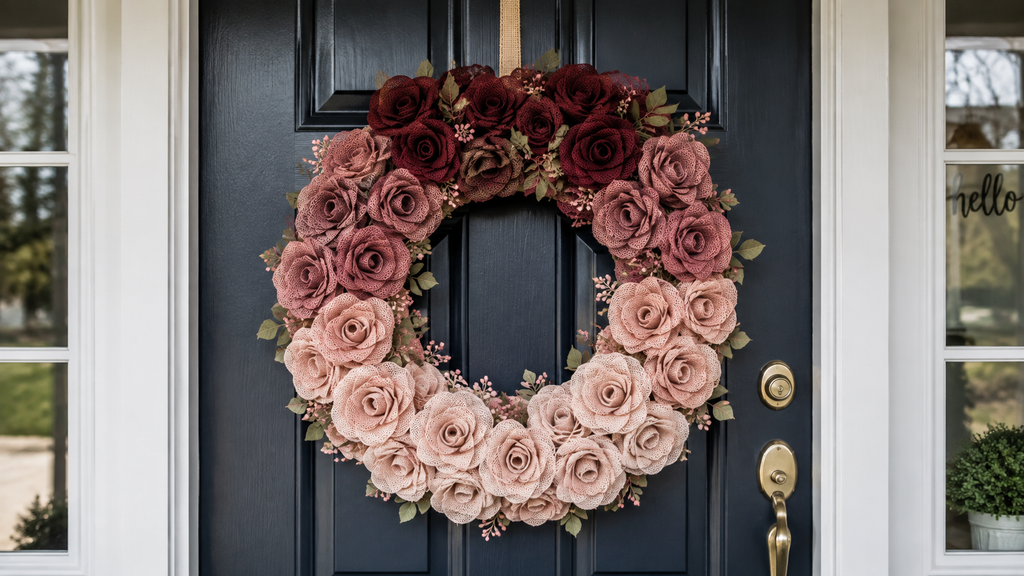
Take your wreath game to the next level with an ombre burlap flower wreath, featuring a beautiful gradient of colors from light to dark.
Why You’ll Love This Idea
An ombre design adds visual depth and a modern touch to a classic rustic craft. This wreath works for nearly any season, depending on the color palette you choose.
Materials Needed
- Burlap ribbon in 3 to 4 shades of one color (light to dark)
- Wreath form (grapevine, wire, or foam)
- Hot glue gun
- Scissors
- Floral pins
Step-by-Step Instructions
- Choose a color family, such as pink, blue, or orange, with four shades ranging from very light to very dark.
- Cut each ribbon color into petal shapes, about 12 to 15 petals per shade.
- Starting at one side of the wreath, glue your darkest petals in a small cluster.
- Move slightly around the wreath, gluing the next darkest shade so it overlaps the first cluster.
- Continue transitioning shade by shade around the wreath form.
- Finish with your lightest shade at the opposite side of the wreath.
- Fill in any gaps between color transitions with mixed shades for a smooth blend.
- Layer petals so they slightly overlap for a full, textured look.
- Add small burlap leaves in a neutral green or brown to break up the color blocks.
- Attach a ribbon loop to the back of the wreath for hanging.
Beginner Tips
- Lay out your petal colors on a table first to plan the gradient before gluing.
- Work in small clusters rather than one petal at a time for faster assembly.
- Take a step back often to check that your color transition looks smooth.
Common Mistakes to Avoid
- Choosing colors that are too similar, making the gradient hard to see.
- Rushing the transition areas, which can create obvious color blocks instead of a blend.
- Forgetting to balance the wreath weight, which can cause it to hang crookedly.
Styling or Decorating Ideas
- Use pastel shades for spring or bold jewel tones for fall.
- Add a matching ombre ribbon bow at the bottom of the wreath.
- Display on a bright front door for maximum color contrast.
Best Colors and Materials
Try blush to burgundy for romantic style, or pale yellow to burnt orange for a warm autumn look.
Estimated Cost
$25 to $35.
Estimated Time
3 to 4 hours.
Difficulty Level
Advanced.
Where It Looks Best
Front doors, porch walls, and statement pieces above fireplaces.
Pinterest-Worthy Tip
Photograph the wreath against a contrasting door color, like navy or black, to make the ombre colors pop in your Pinterest pin.
Conclusion
An ombre burlap flower wreath is a showstopping project that takes your burlap flowers for home decor skills to an advanced level. The extra effort creates a truly unique piece of handmade art.
Idea 8: Burlap Flower Garland for Parties and Weddings
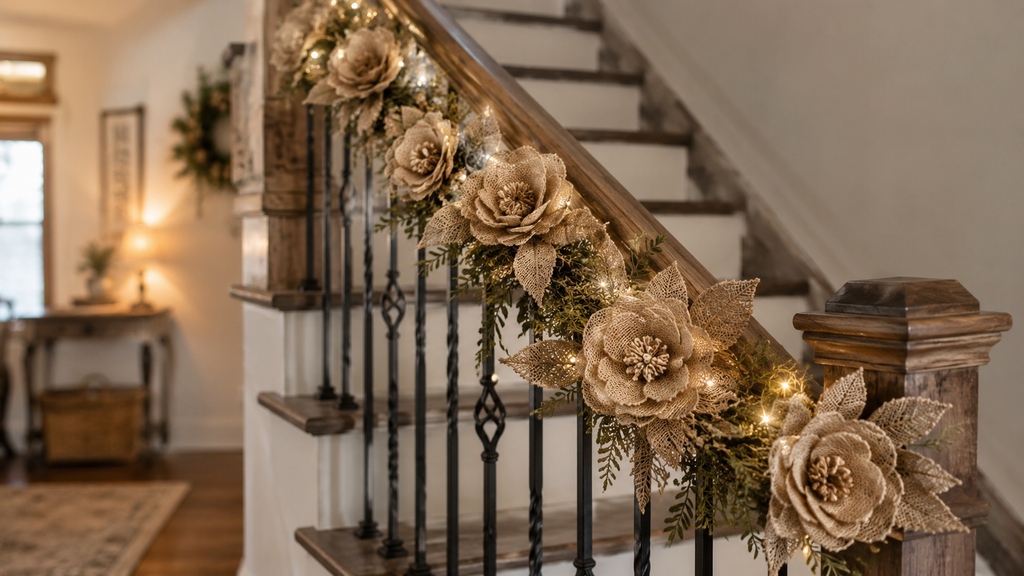
A burlap flower garland is a long, flowing decoration perfect for weddings, baby showers, birthdays, and holiday parties.
Why You’ll Love This Idea
Garlands instantly transform a plain wall, staircase, or table into a festive, decorated space. This project is also easy to make in bulk with friends or family for events.
Materials Needed
- Long piece of jute rope or twine (length depends on your space)
- Burlap ribbon for flowers
- Hot glue gun
- Scissors
- Small artificial greenery (optional)
Step-by-Step Instructions
- Measure the space where you want to hang your garland and cut your jute rope a few inches longer.
- Make 10 to 15 small to medium burlap flowers using the rolled rose or layered petal method.
- Lay your jute rope flat on a table to plan your flower spacing.
- Decide on a pattern, such as evenly spaced or clustered in groups of three.
- Starting at one end, glue the first flower directly onto the rope.
- Continue attaching flowers along the rope, following your planned pattern.
- Add small greenery sprigs between flowers to fill gaps and add texture.
- Let all glue dry completely, about 30 minutes, before moving the garland.
- Hang the garland using small nails, hooks, or command strips.
- Adjust the drape so the garland hangs with a slight natural curve.
Beginner Tips
- Make extra flowers so you have options if you need to fill unexpected gaps.
- Work on a large flat surface like a table or floor to keep the rope organized while gluing.
- Ask a friend to help hold the rope taut while you check flower spacing.
Common Mistakes to Avoid
- Spacing flowers too evenly, which can look stiff instead of natural.
- Using a rope that is too thin to support the weight of many flowers.
- Not testing the hanging method before the event, risking last-minute problems.
Styling or Decorating Ideas
- Drape along a staircase railing for weddings or holiday parties.
- Hang behind a dessert table as a decorative backdrop.
- Use as a table runner alternative for rustic-themed events.
Best Colors and Materials
Mix natural burlap with white and sage green flowers for weddings, or use red and gold for holiday parties.
Estimated Cost
$20 to $40 depending on garland length.
Estimated Time
3 to 5 hours.
Difficulty Level
Intermediate to advanced.
Where It Looks Best
Staircases, mantels, backdrop walls, and long dining tables.
Pinterest-Worthy Tip
Photograph the garland draped over a rustic staircase with soft string lights woven through it for a magical, pin-worthy event photo.
Conclusion
A burlap flower garland is one of the most impressive and versatile burlap flowers for home decor projects on this list. It is perfect for special occasions and everyday decorating alike.
Expert Decorating Tips
- Mix textures. Pair burlap flowers with smooth ceramics, soft linens, or shiny metals for contrast.
- Layer sizes. Combine large statement flowers with smaller accent blooms for a natural look.
- Use seasonal colors. Update your burlap flower decor throughout the year with seasonal shades.
- Add greenery. Even a few artificial leaves make burlap flower arrangements look more realistic.
- Think beyond vases. Use burlap flowers on picture frames, lamp shades, or gift wrapping.
- Balance your color palette. Stick to two or three main colors per project for a cohesive look.
Budget-Saving Tips
- Buy burlap ribbon in bulk rolls instead of small pre-cut packages.
- Shop dollar stores for wreath forms, mason jars, and basic tools.
- Save fabric scraps from one project to use in smaller crafts like napkin rings.
- Use coupons or sales at craft stores like Michaels, Hobby Lobby, or JOANN.
- Reuse old cardboard rolls, jars, and frames instead of buying new bases.
- Make flowers in bulk during sales season to prepare for future gifts or events.
Frequently Asked Questions
1. Is burlap hard to work with for beginners? No, burlap is actually one of the easiest fabrics for beginners. It holds shapes well, especially when using wired ribbon, and it does not fray as quickly as other fabrics.
2. Can I wash burlap flowers? Burlap flowers are not machine washable. To clean them, gently dust with a soft brush or wipe with a slightly damp cloth.
3. How long do burlap flowers last? With proper care, burlap flowers can last for many years since they do not wilt or fade quickly like real flowers.
4. Can I dye burlap fabric at home? Yes, burlap can be dyed using fabric dye. Always test a small piece first, since burlap can absorb color differently than cotton fabric.
5. What is the best glue for burlap flower crafts? A hot glue gun works best for most burlap flower projects because it dries quickly and holds the fabric securely.
6. Do I need to sew burlap flowers? No, most burlap flower projects only require hot glue. However, sewing can create a sturdier flower if you prefer that method.
7. Where can I buy burlap ribbon and fabric? You can find burlap ribbon and fabric at craft stores, fabric stores, and online marketplaces like Amazon and Etsy.
8. Can burlap flowers be used outdoors? Burlap flowers are best kept indoors or in covered outdoor areas, since rain and humidity can cause the fabric to weaken over time.
9. What other decorations pair well with burlap flowers? Lace, twine, wood, mason jars, and dried flowers all pair beautifully with burlap flower crafts.
10. Are burlap flowers good for weddings? Yes, burlap flowers are extremely popular for rustic and farmhouse-style weddings, especially in bouquets, centerpieces, and garlands.
Final Thoughts
Learning how to make burlap flowers for home decor is a fun, affordable, and rewarding craft project for any skill level. From simple roses in a mason jar to an elaborate ombre wreath, these eight ideas offer something for every home style and occasion.
Burlap flowers bring warmth, texture, and a handmade charm that store-bought decor simply cannot match. Once you learn the basic techniques, the design possibilities are truly endless.
Pinterest Call-to-Action
Loved these burlap flower ideas? Save this pin now so you can come back anytime you need rustic home decor inspiration! Don’t forget to follow for more DIY and farmhouse decorating ideas. 🌻