Introduction
Have you been staring at your hair in the mirror, feeling a little bored with it? You are not alone. So many people get stuck in a hair rut, keeping the same style for years just because change feels scary. But here is some good news: medium length haircuts might be the easiest, most exciting way to switch things up without going too short or waiting years to grow your hair long again.
Medium length hair sits somewhere between your chin and your shoulders, and honestly, it might be the most flattering length there is. It works for almost every face shape. It looks amazing straight, wavy, or curly. And it gives you tons of styling options, from messy beach waves to sleek, polished looks for work.
This length is having a huge moment on Pinterest right now, and it is easy to see why. Medium length haircuts are low maintenance compared to long hair, but they still give you enough length to braid, curl, tie up, or wear down. They frame your face beautifully and can even make you look younger and more put-together.
In this article, we are going to walk through everything you need to know about medium length haircuts. We will cover why this trend is so popular, what tools and products you need, important safety tips for cutting or styling at home, and then dive into 8 detailed medium length haircut ideas that you can bring to your next salon visit or try yourself at home.
Whether you have straight hair, curly hair, thick hair, or fine hair, there is a style here for you. Grab a cup of coffee, save this pin, and let’s find your next favorite look together!
Why This Trend Is Popular
Medium length haircuts are everywhere right now, and it is not just a random trend. There are real reasons people love this length so much.
- It is the most versatile length. You can straighten it, curl it, braid it, or wear it in a bun. Short hair limits your styling options, and very long hair can be heavy and hard to manage. Medium hair gives you the best of both worlds.
- It flatters almost every face shape. Because the length usually falls around the jaw, cheekbones, or shoulders, it naturally frames the face in a soft and balanced way.
- It is easier to take care of than long hair. Less hair means less time washing, drying, and detangling. Many people say switching to medium length cuts their morning routine in half.
- It looks healthy. Long hair can get damaged and thin at the ends over time. Medium length hair often looks thicker and shinier because the ends are trimmed more often.
- It works for every age. From teenagers to grandmothers, medium length haircuts look fresh and modern on everyone.
- Pinterest and social media love it. Hairstylists and influencers post medium length looks constantly because they photograph so well and give so much styling inspiration.
Simply put, medium length haircuts transform your look because they are flattering, practical, and endlessly customizable.
Materials and Tools Needed
Before you try any of the styles below, it helps to have the right tools on hand. Here is a simple list to keep nearby.
| Tool or Product | What It’s Used For |
|---|---|
| Sharp hair shears | For salon-quality cutting (professional use recommended) |
| Wide-tooth comb | Detangling without breaking hair |
| Round brush | Blowouts and smooth curls |
| Flat iron | Straightening or creating sleek waves |
| Curling wand or iron | Loose curls and beachy waves |
| Diffuser attachment | Enhancing natural curls and waves |
| Heat protectant spray | Protecting hair from heat damage |
| Texturizing spray | Adding volume and grip |
| Lightweight hair oil | Taming frizz and adding shine |
| Bobby pins and clips | Sectioning hair and holding styles |
| Hair ties (soft, no metal) | Ponytails and buns without breakage |
| Dry shampoo | Refreshing roots between washes |
You do not need every single item to get started. A comb, a flat iron or curling wand, and a good heat protectant will get you through most of the styles in this article.
Safety Tips
Hair tools involve heat and sharp objects, so a little caution goes a long way.
- Always use a heat protectant before using any hot tool. This prevents burnt ends and breakage.
- Never cut your own hair with kitchen scissors. Regular scissors are not sharp enough and will cause split ends. Use proper hair shears, or better yet, visit a professional stylist for the actual cut.
- Keep hot tools away from your scalp and ears. Even a light touch can cause a burn.
- Do not leave hot tools unattended, especially around kids or pets.
- Let tools cool down completely before putting them away.
- Check the heat setting for your hair type. Fine hair needs lower heat (around 300°F), while thick or coarse hair can handle higher heat (up to 400°F).
- Unplug tools when you are done to avoid fire hazards.
Now that you are prepped and ready, let’s get into the fun part: the styles!
Idea 1: The Classic Long Bob (Lob)
Short Introduction
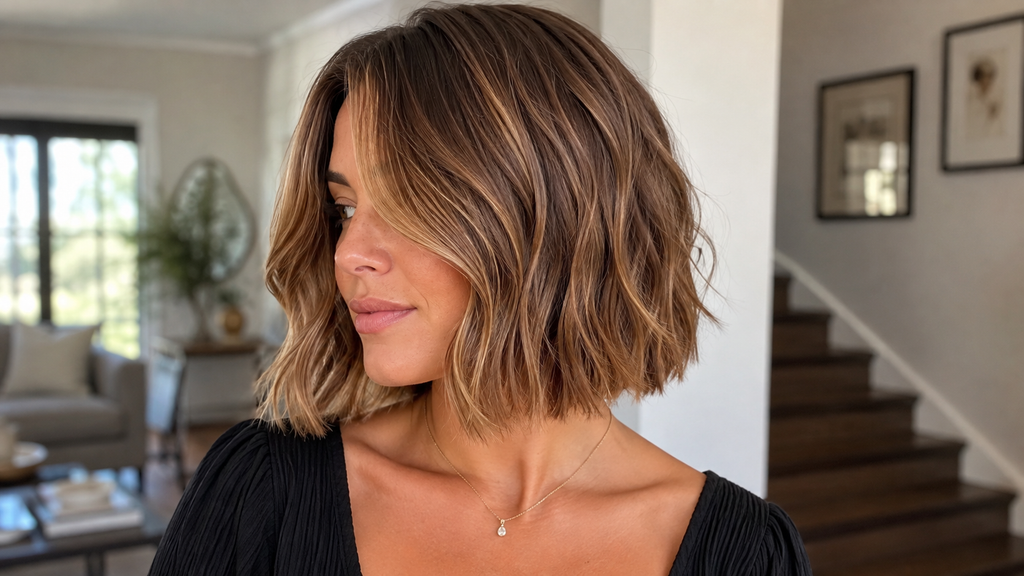
The long bob, often called the “lob,” is one of the most requested medium length haircuts in salons today. It usually falls between the collarbone and shoulders, striking the perfect balance between short and long hair.
Why You’ll Love This Idea
The lob is timeless, flattering, and works with almost any hair texture. It gives you the freedom of shorter hair without losing the ability to tie it up or add waves. It also makes hair look thicker and more voluminous instantly.
Materials Needed
- Sharp hair shears (professional cut recommended)
- Wide-tooth comb
- Flat iron or round brush
- Heat protectant spray
- Light-hold hairspray
Step-by-Step Instructions
- Start with clean, towel-dried hair for the initial cut (ask your stylist for a blunt or slightly layered lob).
- Decide on your length: aim for somewhere between your collarbone and two inches below your shoulders.
- Once cut, let your hair air dry about 80 percent of the way.
- Apply heat protectant spray evenly through the strands.
- Blow-dry using a round brush, pulling the ends slightly inward for a soft curve.
- Use a flat iron on the ends only, turning them under gently for a polished look.
- Add a small amount of shine serum to smooth flyaways.
- Set with a light-hold hairspray to keep the shape all day.
Beginner Tips
- Ask your stylist for a “blunt lob” if you want maximum thickness, or a “layered lob” if you want more movement.
- Get the length trimmed every 8–10 weeks to keep the shape crisp.
Common Mistakes to Avoid
- Cutting it too short by accident — always start longer than you think, since hair looks shorter once it is dry.
- Using too much product, which can weigh the style down and make it look flat.
Styling or Decorating Ideas
- Add a deep side part for an elegant, editorial look.
- Try a middle part with soft waves for a casual, everyday vibe.
- Tuck one side behind your ear for a chic asymmetrical touch.
Best Colors and Materials
This cut looks stunning in warm caramel, chocolate brown, honey blonde, or a soft balayage. Glossy, healthy-looking hair is key to making the lob shine.
Estimated Cost
$40–$120 depending on your salon and location.
Estimated Time
30–45 minutes for the cut; 15 minutes for daily styling.
Difficulty Level
Easy (styling) / Professional recommended (cutting)
Where It Looks Best
Office settings, first dates, everyday wear, and photos — it is one of the most photogenic medium length haircuts around.
Pinterest-Worthy Tip
Pin a few reference photos before your salon visit so your stylist can match the exact shape and layering you want.
Conclusion for This Idea
The classic lob proves that sometimes the simplest medium length haircuts are the most transformative. It is polished, easy to maintain, and flatters nearly everyone.
Idea 2: Shoulder-Length Layers with Face-Framing Pieces
Short Introduction
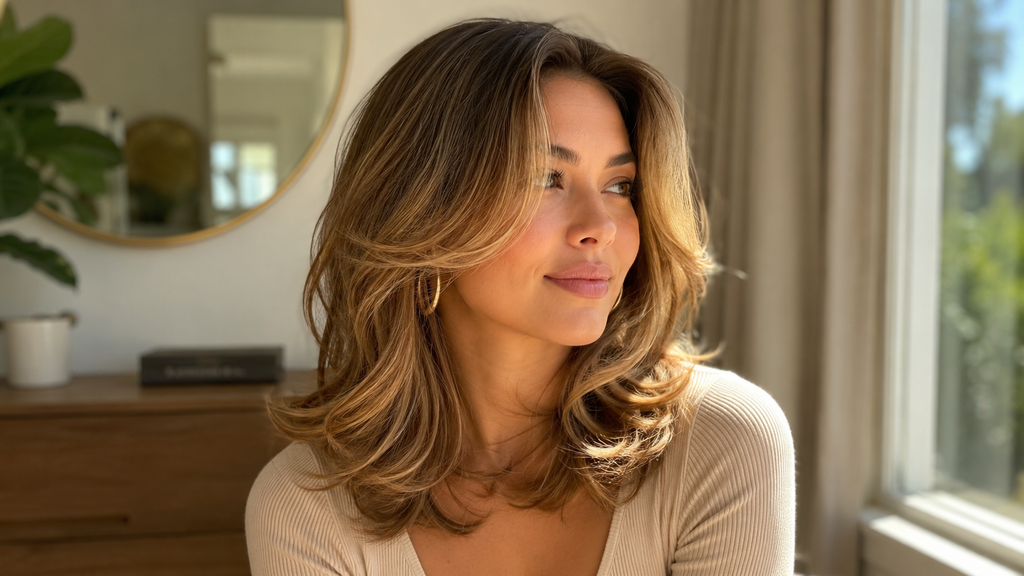
This style keeps your hair around shoulder length while adding soft layers around the face. It is one of the most requested medium length haircuts for people who want movement and softness.
Why You’ll Love This Idea
Face-framing layers instantly brighten your complexion and highlight your eyes and cheekbones. This cut adds volume without sacrificing length, and it works beautifully with almost any hair type.
Materials Needed
- Hair shears (professional cut)
- Round brush
- Blow dryer with concentrator nozzle
- Curling wand (1-inch barrel)
- Heat protectant
- Texturizing spray
Step-by-Step Instructions
- Ask your stylist for long layers starting around the cheekbone or chin area.
- Keep the back length at your shoulders for balance.
- After washing, apply heat protectant from mid-shaft to ends.
- Blow-dry your roots first for lift, using a round brush to add volume.
- Curl the face-framing pieces away from your face using a curling wand.
- Lightly curl the rest of your hair in alternating directions for natural movement.
- Run your fingers through the curls to loosen them (do not brush them out completely).
- Mist texturizing spray at the roots for extra volume.
- Finish with a light-hold spray to lock the style in place.
Beginner Tips
- Curl away from your face, not toward it, for the most flattering frame.
- If your hair is fine, curl in small sections for longer-lasting waves.
Common Mistakes to Avoid
- Cutting layers too short, which can create a “wing” effect instead of soft framing.
- Brushing curls out completely right after styling, which makes them fall flat fast.
Styling or Decorating Ideas
- Add a few small braids near the temples for a boho touch.
- Clip back the top layer for a half-up style that still shows off the framing pieces.
Best Colors and Materials
Soft highlights or babylights around the face enhance the layered effect beautifully. Warm blondes and rich brunettes both work wonderfully here.
Estimated Cost
$50–$130 for the cut; $10–$25 for styling tools if you don’t already own them.
Estimated Time
40 minutes for the cut; 20 minutes for styling.
Difficulty Level
Intermediate
Where It Looks Best
Casual outings, brunch dates, and everyday life — this style feels effortless yet put-together.
Pinterest-Worthy Tip
Take a photo in natural window light right after styling — the soft layers catch light beautifully and make for a stunning, save-worthy pin.
Conclusion for This Idea
This layered style shows how small changes, like adding face-framing pieces, can completely transform a simple medium length cut into something special.
Idea 3: The Textured Curly Medium Cut
Short Introduction
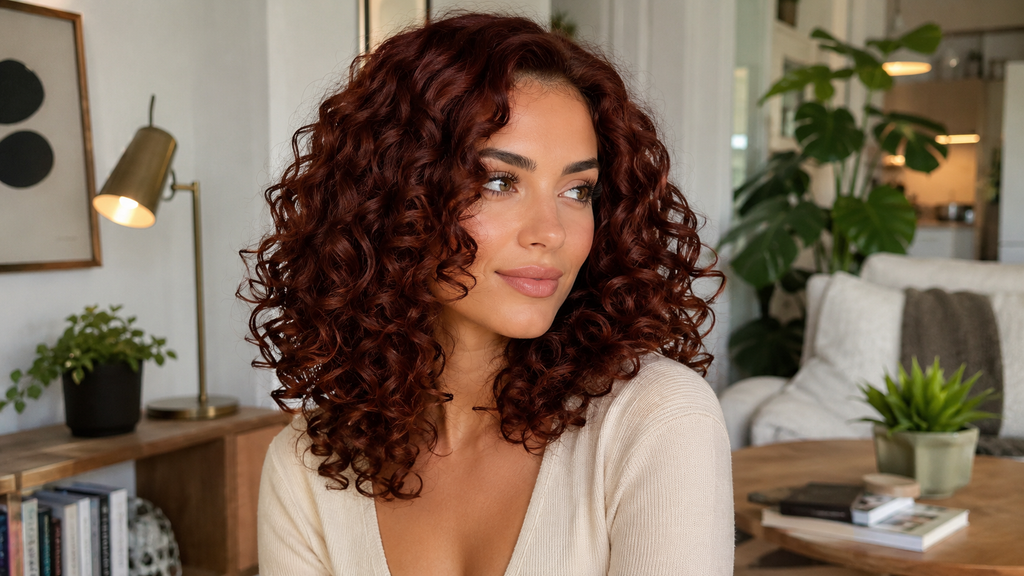
For those with natural curls or waves, this cut works with your texture instead of against it. It is one of the most popular medium length haircuts for curly-haired girls who want their curls to pop.
Why You’ll Love This Idea
This style celebrates natural texture, meaning less time fighting frizz and more time enjoying your curls. It creates a rounded, bouncy shape that looks intentional and full of life.
Materials Needed
- Hair shears (dry-cut recommended for curly hair)
- Wide-tooth comb or fingers
- Diffuser attachment
- Curl cream or leave-in conditioner
- Microfiber towel or cotton t-shirt
Step-by-Step Instructions
- Ask your stylist for a “dry cut,” which is cut while your curls are in their natural state so the stylist can see the true shape.
- Aim for a length that ends around your shoulders, since curls “bounce up” and appear shorter than they are.
- Wash hair with a sulfate-free shampoo and conditioner.
- Apply leave-in conditioner and curl cream to soaking wet hair.
- Scrunch gently with a microfiber towel or cotton t-shirt to remove excess water without causing frizz.
- Flip your head upside down and diffuse on low heat, cupping curls in your palm as you go.
- Once mostly dry, let curls air-dry the rest of the way to avoid over-drying.
- Avoid touching your hair until it is completely dry to prevent frizz.
Beginner Tips
- Never brush dry curly hair — only detangle when wet and full of conditioner.
- Sleep on a silk or satin pillowcase to reduce frizz overnight.
Common Mistakes to Avoid
- Cutting curly hair while it’s wet and stretched, which can lead to an uneven shape once it dries and shrinks.
- Using too much product, which can leave curls crunchy or greasy.
Styling or Decorating Ideas
- Add a colorful silk scarf as a headband for a fun, boho look.
- Try a half-up curly bun for date nights or parties.
Best Colors and Materials
Rich, deep colors like chestnut brown or deep auburn make curls look glossy and full of dimension.
Estimated Cost
$45–$150 depending on curly-hair specialist pricing.
Estimated Time
45–60 minutes for cutting; 20–30 minutes for wash-and-style routine.
Difficulty Level
Intermediate
Where It Looks Best
Everywhere! This style is especially stunning outdoors in natural light, where curls really shine.
Pinterest-Worthy Tip
Photograph your curls right after diffusing, before touching them — this is when they look their fullest and bounciest for photos.
Conclusion for This Idea
Working with your natural curl pattern instead of fighting it can completely transform your relationship with your hair — and this cut proves that curly medium length haircuts can be just as elegant as straight ones.
Idea 4: Sleek Straight Medium Cut with Blunt Ends
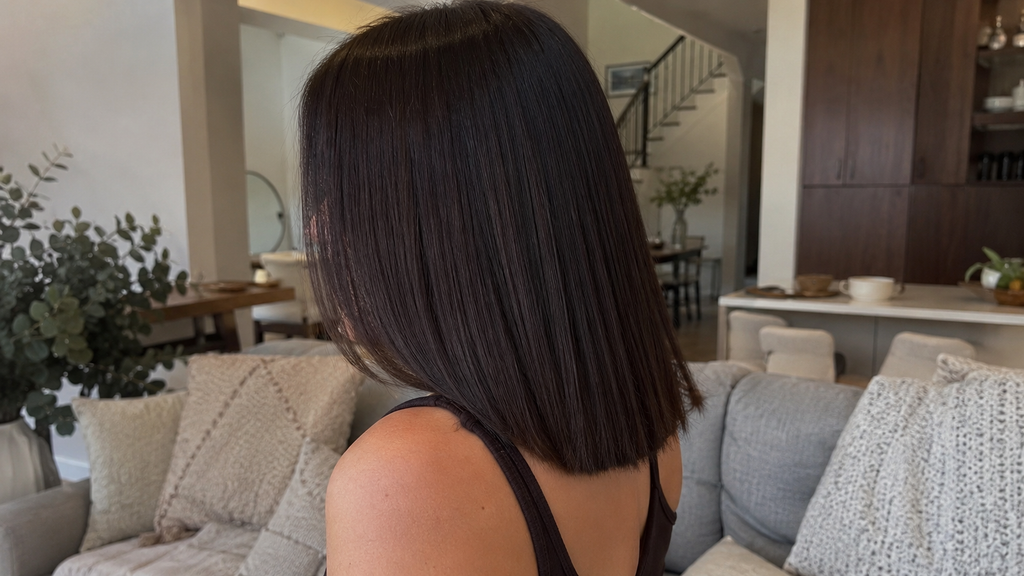
Short Introduction
This is the ultimate polished look — straight, sleek, medium length hair with crisp, blunt ends. It is a favorite among medium length haircuts for anyone who loves a clean, minimalist style.
Why You’ll Love This Idea
There is something so satisfying about perfectly straight, healthy-looking hair with a defined line at the ends. It looks expensive, elegant, and works for both casual and formal occasions.
Materials Needed
- Hair shears (blunt cutting technique)
- Flat iron
- Heat protectant spray
- Smoothing serum
- Fine-tooth comb
Step-by-Step Instructions
- Ask your stylist for a one-length, blunt cut at your desired medium length (usually shoulder to collarbone).
- Wash and towel-dry hair, then apply heat protectant from roots to ends.
- Blow-dry hair straight using a round brush and concentrator nozzle, working in small sections.
- Once fully dry, divide hair into four sections using clips.
- Starting at the back, flat iron each section in small pieces, moving slowly for maximum smoothness.
- Keep the iron moving continuously to avoid heat damage or creases.
- Once all sections are straightened, run a fine-tooth comb through to check for missed pieces.
- Apply a small drop of smoothing serum to your palms and glide over the top layer for shine.
- Finish with a light mist of anti-frizz spray.
Beginner Tips
- Always straighten in small sections — trying to do too much hair at once leads to uneven results.
- Point the flat iron slightly downward at the ends for a soft flip instead of a harsh line.
Common Mistakes to Avoid
- Straightening hair that is not fully dry, which causes steam damage.
- Going over the same section too many times with the flat iron, which leads to breakage.
Styling or Decorating Ideas
- Add a slick, low ponytail for evening events.
- Try a middle part for a modern, model-off-duty look.
Best Colors and Materials
Jet black, deep espresso brown, or icy platinum blonde all look incredible with this sleek, blunt style because the color shows off the clean lines.
Estimated Cost
$45–$140 for cut; $30–$80 for a quality flat iron if needed.
Estimated Time
35 minutes for cut; 25–30 minutes for styling.
Difficulty Level
Intermediate
Where It Looks Best
Job interviews, formal events, and professional photos.
Pinterest-Worthy Tip
Photograph this style from the back to show off the clean, blunt line — it is one of the most repinned angles for sleek haircuts.
Conclusion for This Idea
A sleek, blunt medium cut is proof that simplicity can be the most transformative choice of all. This clean, polished style never goes out of fashion.
Idea 5: Medium Length Shag with Curtain Bangs
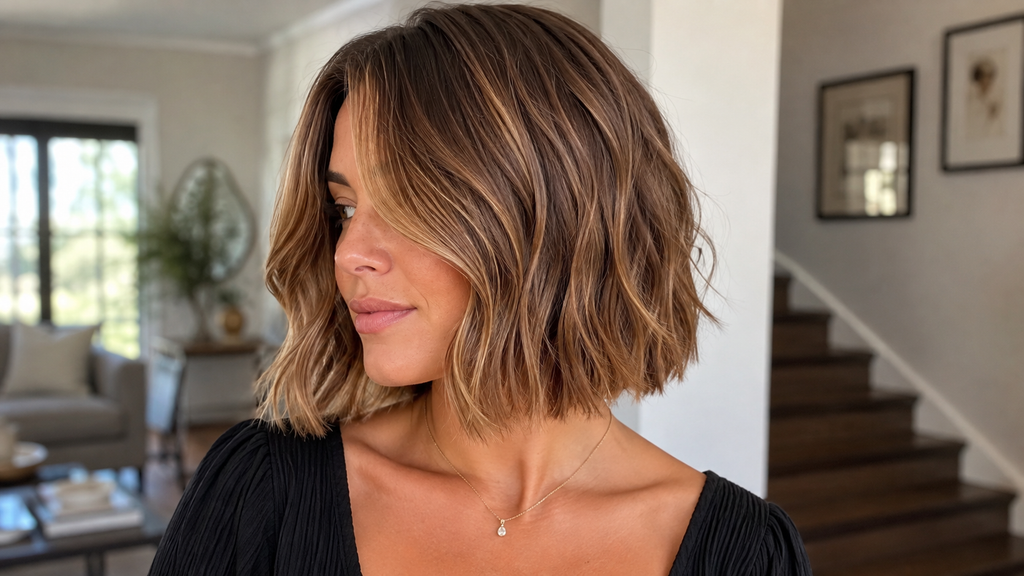
Short Introduction
The shag haircut is back, and paired with curtain bangs, it is one of the trendiest medium length haircuts on Pinterest right now. This style is all about soft, effortless texture.
Why You’ll Love This Idea
The shag gives you built-in volume and movement without much effort. Curtain bangs soften your whole face and add a retro, cool-girl vibe that photographs beautifully.
Materials Needed
- Hair shears (razor or point-cutting technique)
- Round brush
- Curling wand (small barrel, ¾–1 inch)
- Texturizing spray
- Dry shampoo
Step-by-Step Instructions
- Ask your stylist for heavy layering throughout, starting around the chin and continuing to shoulder length.
- Request curtain bangs that part in the middle and sweep to each side, blending into the layers.
- After washing, apply texturizing spray to damp hair.
- Blow-dry with a round brush, focusing on lifting the roots for volume.
- Curl the bangs away from your face in soft, loose waves.
- Curl the rest of your hair in small alternating sections for a piecey, textured look.
- Once cool, gently tousle your hair with your fingers (do not brush it smooth).
- Add a small amount of texturizing spray or dry shampoo at the roots for grip.
- Finish with a flexible-hold spray to keep the movement without stiffness.
Beginner Tips
- This cut looks best a little “undone,” so do not worry about perfection.
- Curtain bangs take a few weeks to grow out and blend, so be patient during the growing-out phase.
Common Mistakes to Avoid
- Brushing the style out completely, which removes all the texture and volume.
- Cutting bangs too short — curtain bangs should hit around the cheekbone, not the eyebrow.
Styling or Decorating Ideas
- Add small hair clips along the part line for a trendy, playful touch.
- Try tucking the curtain bangs behind your ears for a different look on low-effort days.
Best Colors and Materials
Warm copper, buttery blonde, or dark chocolate all enhance the shag’s texture beautifully.
Estimated Cost
$50–$150 depending on layering complexity.
Estimated Time
45 minutes for cut; 20 minutes for styling.
Difficulty Level
Intermediate
Where It Looks Best
Casual hangouts, concerts, creative workplaces, and photos with a retro or boho theme.
Pinterest-Worthy Tip
Style this cut with a bit of “undone” texture and photograph it outdoors on a breezy day for that effortless, cool-girl Pinterest look.
Conclusion for This Idea
The shag with curtain bangs is a fantastic example of how medium length haircuts can completely transform your vibe, adding personality and edge to your everyday look.
Idea 6: Medium Length Wavy Beach Hair
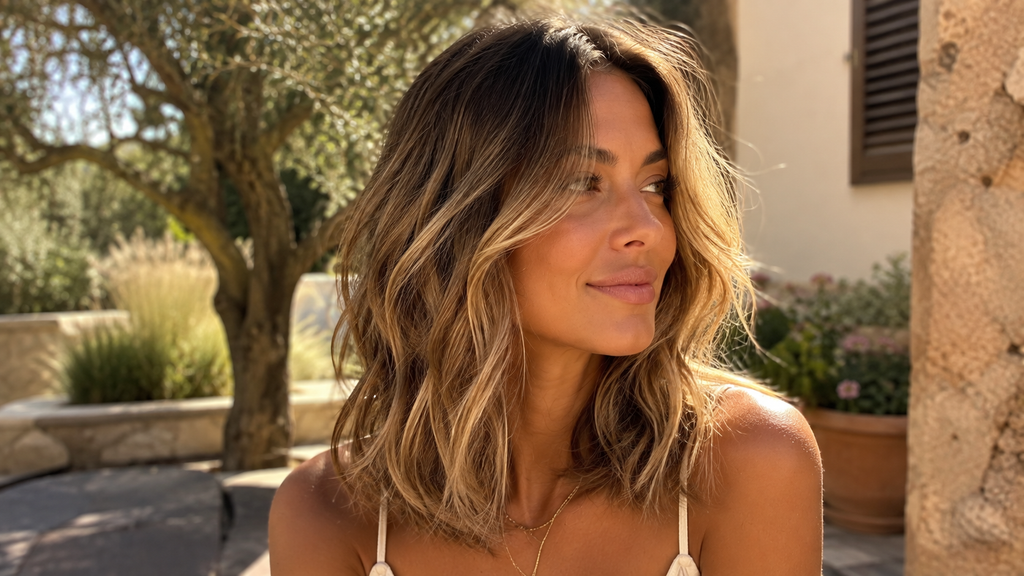
Short Introduction
Nothing says relaxed and effortless quite like beachy waves. This style takes any medium length haircut and gives it that soft, tousled, “just came from vacation” feel.
Why You’ll Love This Idea
Beach waves are forgiving, low-maintenance once you learn the technique, and they add texture and volume instantly. This look works whether your hair is naturally straight or curly.
Materials Needed
- Curling wand or flat iron
- Heat protectant spray
- Sea salt texturizing spray
- Wide-tooth comb
- Bobby pins (optional, for the pinning method)
Step-by-Step Instructions
- Start with clean, dry hair. Apply heat protectant throughout.
- Divide hair into four to six sections.
- Using a curling wand, wrap small sections of hair around the barrel, alternating direction (away from your face) with each piece.
- Hold each curl for 5–8 seconds, then release without brushing.
- Repeat through all sections, leaving the very ends slightly uncurled for a natural look.
- Once all hair is curled and cooled, flip your head over and shake out the curls gently with your fingers.
- Spray sea salt texturizing spray throughout for that beachy texture.
- Scrunch sections lightly with your hands to break up the curls into soft waves.
- Finish with a light-hold flexible spray so the waves move naturally.
Beginner Tips
- Curl away from your face for the most flattering, natural-looking wave.
- Let curls cool completely before touching them — this helps the wave hold longer.
Common Mistakes to Avoid
- Curling every single piece the same direction, which looks unnatural. Always alternate.
- Brushing waves out with a hairbrush, which turns waves into frizz instead of soft curls.
Styling or Decorating Ideas
- Add a thin braid on one side, pulled back and pinned for a romantic touch.
- Wear with a sun hat and gold jewelry for a summery, vacation-ready photo.
Best Colors and Materials
Sun-kissed balayage, beachy blonde, or bronde (blonde-brown mix) tones make this style look extra radiant.
Estimated Cost
$0–$40 if you already own a curling wand; texturizing spray averages $10–$20.
Estimated Time
20–30 minutes.
Difficulty Level
Easy
Where It Looks Best
Vacations, summer parties, outdoor photoshoots, and casual weekends.
Pinterest-Worthy Tip
Take your photo outdoors with a bit of wind or near water for the ultimate breezy, beachy Pinterest aesthetic.
Conclusion for This Idea
Beach waves are one of the easiest ways to transform a medium length haircut into something soft, romantic, and completely photo-ready.
Idea 7: Medium Length Bob with Micro Bangs
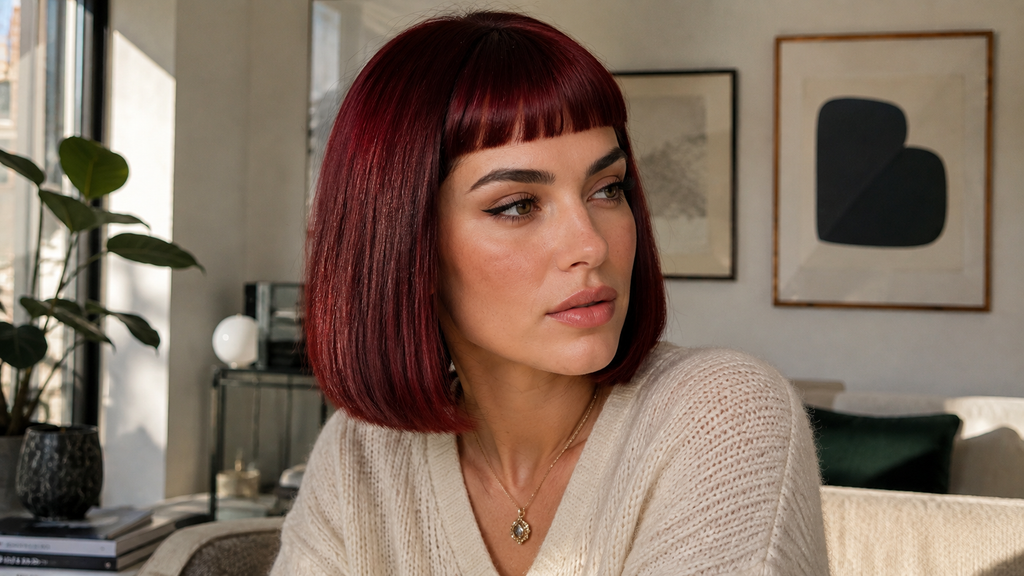
Short Introduction
Looking for something bold? A medium bob paired with micro bangs (very short, blunt bangs above the eyebrows) is a daring but stunning choice among medium length haircuts.
Why You’ll Love This Idea
This look is edgy, modern, and instantly eye-catching. It draws attention to your eyes and cheekbones while giving your whole style a fresh, fashion-forward update.
Materials Needed
- Hair shears (precision cutting)
- Fine-tooth comb
- Small round brush
- Flat iron (mini size works best for bangs)
- Light-hold styling gel
Step-by-Step Instructions
- Ask your stylist for a blunt medium bob, ending around the collarbone.
- Section off a small triangle of hair at the crown for the micro bangs (from the outer corners of your eyes).
- Cut the bangs very short, sitting about an inch above the eyebrows, with a soft point-cut for texture.
- After washing, blow-dry the bob smooth using a round brush.
- Dry the bangs separately using a small round brush, pulling them straight down as you dry.
- Once dry, use a mini flat iron to smooth the bangs flat if needed.
- Apply a small dab of light-hold gel to keep flyaways in place.
- Style the rest of your bob straight or with soft waves to balance the boldness of the bangs.
Beginner Tips
- Micro bangs require trims every 1–2 weeks to keep their shape, so be ready for extra upkeep.
- This style works best on people who like a bold, statement look — try a bang clip-in first if you are unsure.
Common Mistakes to Avoid
- Cutting bangs too uneven — always cut small sections at a time and check symmetry often.
- Skipping trims, which causes bangs to grow out unevenly and lose their shape.
Styling or Decorating Ideas
- Pair with bold earrings since your ears and face are more visible with this style.
- Try a slicked-back top section for an edgy, high-fashion look.
Best Colors and Materials
Solid, rich colors like jet black or deep burgundy make a bold statement with this style.
Estimated Cost
$40–$130, plus $15–$25 every couple weeks for bang trims (some salons offer free bang trims between full appointments).
Estimated Time
40 minutes for cut; 15 minutes daily styling.
Difficulty Level
Advanced (styling upkeep) / Professional cut required
Where It Looks Best
Fashion events, creative industries, and anyone who loves a bold, statement style.
Pinterest-Worthy Tip
This look is extremely eye-catching in close-up portrait shots — get a clean, front-facing photo to show off the bold bangs.
Conclusion for This Idea
If you are ready for a dramatic change, this bold combination proves that medium length haircuts can be just as daring and transformative as a full chop.
Idea 8: Medium Length Half-Up Braided Style
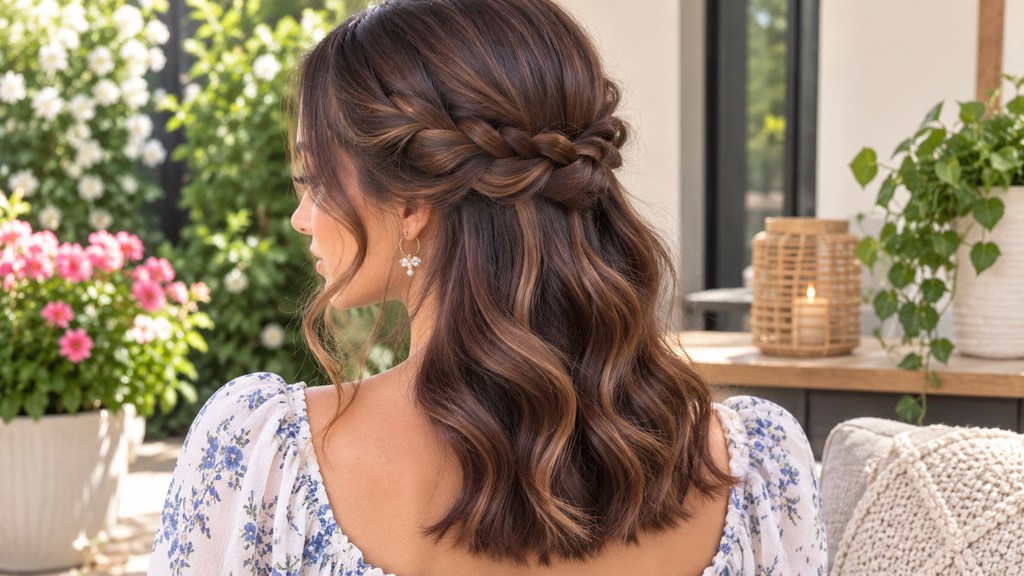
Short Introduction
Sometimes the most transformative thing you can do with medium length hair is not a cut at all — it’s a stunning styling technique. This half-up braided look elevates any medium length haircut.
Why You’ll Love This Idea
This style works with your existing haircut, making it perfect for anyone not ready to visit the salon yet. It looks romantic, polished, and works for both casual days and special occasions.
Materials Needed
- Fine-tooth comb
- Small hair ties (clear or matching your hair color)
- Bobby pins
- Texturizing spray
- Optional: small flowers or hair clips for decoration
Step-by-Step Instructions
- Start with clean or slightly textured hair (day-old hair holds braids better than freshly washed hair).
- Spray texturizing spray throughout for grip.
- Section off the top half of your hair, from ear to ear.
- Divide this section into three even parts for a classic braid, or two for a simpler twist.
- Braid down to the ends, keeping tension even but not too tight.
- Secure the braid with a small clear hair tie.
- Gently pull on the sides of the braid with your fingers to loosen it and create a fuller, more relaxed look.
- Let the bottom half of your hair fall naturally, straight or curled.
- Pin any loose flyaways back with small bobby pins.
- Add optional flowers or decorative clips along the braid for a special-occasion touch.
Beginner Tips
- Practice on “second-day hair” since it has more texture and is easier to grip than freshly washed hair.
- If your braid feels too tight or neat, gently tug at the edges to loosen it for a softer look.
Common Mistakes to Avoid
- Braiding too tightly, which can cause headaches and an unnatural look.
- Using thick elastic hair ties, which can leave a crease or cause breakage.
Styling or Decorating Ideas
- Add tiny pearl pins for a wedding guest or event-ready look.
- Try a double braid (one on each side) meeting in the middle for a boho, festival-ready style.
Best Colors and Materials
This style works with any hair color, but subtle highlights make the braid detail stand out even more.
Estimated Cost
$5–$15 for hair ties, pins, and accessories.
Estimated Time
10–15 minutes.
Difficulty Level
Easy
Where It Looks Best
Weddings, garden parties, date nights, and everyday casual outings.
Pinterest-Worthy Tip
Photograph this style from a slight side angle to show off both the braid detail and the flow of hair underneath — this angle performs extremely well on Pinterest.
Conclusion for This Idea
This simple braided style proves you do not always need a haircut to transform your look. Sometimes, a little creativity with styling is all it takes.
Expert Decorating Tips
Think of your hairstyle like a room in your home — the little details make all the difference. Here are some expert tips to elevate any medium length haircut:
- Layer your accessories. Combine a delicate hair clip with a few loose strands for a “collected, not overdone” look.
- Match your part to your face shape. A deep side part elongates round faces, while a middle part balances longer faces.
- Play with texture, not just length. Adding waves or curls to a blunt cut instantly makes it feel new.
- Use color strategically. Face-framing highlights draw attention to your best features.
- Do not skip the trims. Regular trims every 8–10 weeks keep any medium length haircut looking fresh and healthy.
Budget-Saving Tips
You do not need to spend a fortune to enjoy stunning medium length haircuts. Try these budget-friendly ideas:
- Stretch time between salon visits by learning simple at-home styling techniques.
- Ask for a “dust and shape” trim instead of a full cut if you are just maintaining length.
- Invest in one good multi-use tool, like a curling iron that also straightens, instead of buying several separate tools.
- Use dry shampoo to stretch days between washes, which also protects your color and reduces heat styling frequency.
- Watch salon-recommended tutorials on their social media pages for free styling tips specific to your cut.
- Book with students at a local cosmetology school for a fraction of the salon price.
Frequently Asked Questions
1. What is considered a medium length haircut? Medium length hair usually falls anywhere between the chin and the middle of your back, but most stylists consider “true” medium length to be somewhere between the shoulders and just past the collarbone.
2. Are medium length haircuts good for thin hair? Yes! Medium length haircuts with layers can actually make thin hair look thicker and fuller because the ends are not weighed down like with longer hair.
3. How often should I get a trim for medium length hair? Most stylists recommend a trim every 8–10 weeks to prevent split ends and keep the shape looking fresh.
4. Can medium length haircuts work for curly hair? Absolutely. In fact, curly hair often looks its best at medium length because it has enough weight to hold a shape without becoming too heavy or too puffy.
5. Will a medium length haircut suit my round face? Yes. Layered cuts with some length past the chin, along with a deep side part, help elongate round faces beautifully.
6. How do I keep my medium length hair looking healthy? Use a heat protectant, avoid excessive heat styling, get regular trims, and use a nourishing hair mask once a week.
7. What is the easiest medium length haircut to maintain? The classic long bob (lob) is considered one of the lowest-maintenance medium length haircuts since it requires minimal daily styling.
8. Can I transition from long hair to medium length gradually? Yes, many stylists recommend cutting a few inches at a time if you are nervous about a big change, gradually working your way to your desired medium length.
9. Do medium length haircuts work for special occasions like weddings? Definitely. Medium length hair is long enough for elegant updos, braids, and half-up styles, making it perfect for weddings and formal events.
10. What products should I use daily for medium length hair? A lightweight shampoo and conditioner, a heat protectant spray, and a small amount of finishing oil or serum are usually enough for daily care.
Final Thoughts
Medium length haircuts truly live up to their reputation as one of the most transformative choices you can make for your hair. They offer the perfect mix of style, ease, and versatility, whether you want something sleek and polished, wild and curly, or soft and romantic.
The best part? You do not have to choose just one style. With medium length hair, you can switch between sleek and straight, wavy and beachy, or braided and boho, all with the same base cut. It is like having endless outfit options from one wardrobe staple.
Whether you decide to go for a classic lob, bold bangs, or a dreamy shag with curtain bangs, remember that the most important thing is choosing a style that makes you feel confident and like the best version of yourself.
Pinterest Call-to-Action
Loved these medium length haircuts? Save this pin now so you never lose these ideas, and come back anytime you need a little hair inspiration! Don’t forget to share it with a friend who might be ready for their own hair transformation too. 💇♀️✨