Introduction
If you have ever tripped over a backpack in the hallway, you already know the struggle. Backpacks pile up fast, especially if you have kids, students, or a busy household. One backpack turns into three. Three turns into a mountain of straps and zippers by the front door. It feels impossible to keep things neat when you do not have a lot of room to work with.
The good news is that you do not need a huge mudroom or a walk-in closet to fix this problem. You just need the right backpack storage ideas for small spaces that actually work in real homes, not just in magazine photos. Small entryways, tiny apartments, shared kids’ rooms, and narrow hallways can all become organized and stylish with a few smart changes.
In this guide, we are going to walk through eight practical, budget-friendly, and totally doable storage solutions. These ideas use wall space, door space, and even the space under your stairs. Some are quick weekend projects. Others take less than an hour. All of them are designed to help you say goodbye to backpack clutter for good.
Whether you are dealing with a college dorm, a small apartment entryway, a busy family mudroom, or a shared kids’ closet, this list has something for you. We will cover materials, tools, step-by-step instructions, styling tips, and even common mistakes to avoid. By the end, you will have a full toolbox of ideas to make your space feel calm, organized, and pretty enough to pin.
Let’s turn that backpack pile into a system that actually works for your daily routine.
Why This Trend Is Popular
Backpack storage ideas for small spaces have become one of the most searched home organization topics on Pinterest, and it is easy to see why.
- More people are living in smaller homes. Apartments, condos, and starter homes often do not have a dedicated mudroom.
- Remote learning and hybrid schedules mean backpacks, laptop bags, and gym bags are used almost every day, so they need a home base.
- Families are busier than ever. Mornings are rushed, and a clear system saves time and stress.
- Minimalism and cozy home aesthetics are trending, and clutter simply does not fit that look.
- DIY culture is booming. People want projects that are affordable, doable in a weekend, and still look professionally designed.
At its core, this trend is popular because it solves a real, everyday problem. A good backpack storage idea is not just about looks. It saves time, reduces stress, and helps everyone in the house find their things without a morning meltdown.
Materials and Tools Needed
You will not need every item on this list for every project. Each idea below has its own specific materials, but here is a general overview of what tends to come up again and again.
| Category | Common Items |
|---|---|
| Hardware | Wall hooks, S-hooks, coat hooks, pegboard hooks, over-the-door hooks |
| Mounting Supplies | Wall anchors, screws, a stud finder, level, drill |
| Storage Pieces | Baskets, bins, cubbies, shelves, ladder racks |
| Finishing Touches | Paint, wood stain, labels, decorative baskets |
| Basic Tools | Drill, screwdriver, measuring tape, pencil, hammer |
| Optional Extras | Command strips (for renters), hooks with adhesive backing, felt pads |
A quick tip before you start: always check what your walls or doors are made of. Drywall, plaster, and solid wood all need slightly different anchors or hooks to hold weight safely.
Safety Tips
Backpacks can get heavy, especially with books, laptops, and water bottles inside. Before you hang anything on a wall or door, keep these safety tips in mind.
- Always find a stud when possible. A stud finder helps you locate solid wood behind drywall for stronger holding power.
- Use the right wall anchors. If you cannot hit a stud, use anchors rated for the weight you plan to hang.
- Check weight limits. Over-the-door hooks and Command-style hooks list a maximum weight. Do not guess.
- Keep hooks and shelves at a safe height. For kids, place hooks low enough that they can reach without climbing.
- Avoid blocking exits or walkways. Storage should make your space safer, not create new tripping hazards.
- Let adhesive strips cure fully before hanging anything heavy on them, usually at least one hour.
- Double check ladder shelves and leaning furniture are stable and cannot tip over, especially in homes with kids or pets.
Now let’s get into the good stuff: the eight ideas.
Idea 1: Wall-Mounted Backpack Hook Rail
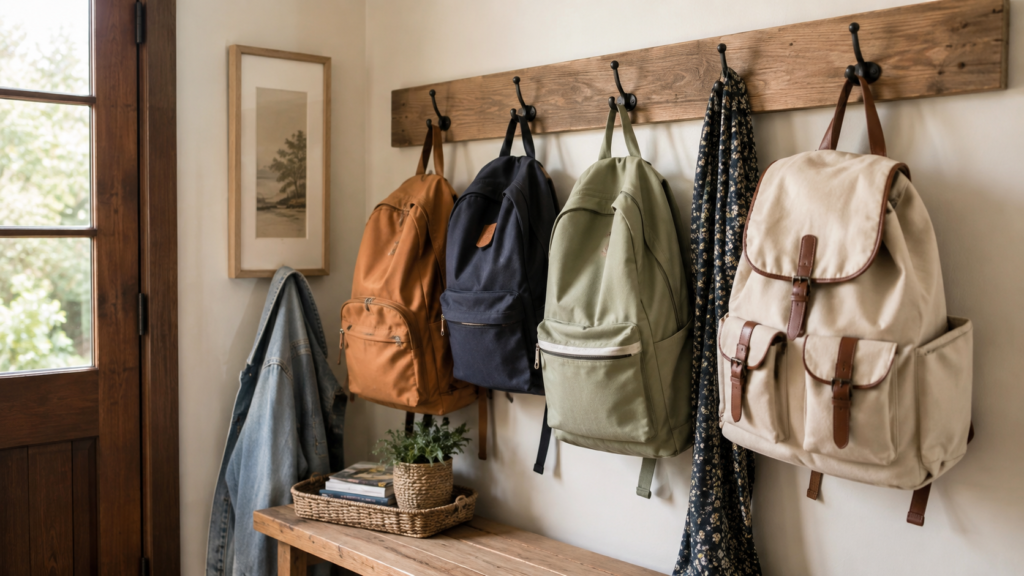
A wall-mounted hook rail is one of the simplest and most effective backpack storage ideas for small spaces. It takes up almost no floor space, and it works in entryways, hallways, mudrooms, and even bedrooms.
Why You’ll Love This Idea
This idea is simple, affordable, and works almost anywhere. You do not need a big wall or a lot of tools. It also teaches kids and adults to hang up their bag the moment they walk in, which cuts down on floor clutter fast.
Materials Needed
- A wooden board or rail (or skip the board and use hooks straight on the wall)
- 4 to 6 wall hooks
- Screws and wall anchors
- Wood stain or paint (optional)
- Sandpaper (if using raw wood)
- Level and pencil
- Drill
Step-by-Step Instructions
- Choose your wall space. Pick a spot near your main entry door, at a height everyone in the house can reach.
- Measure the width you want your hook rail to cover, usually 24 to 36 inches works well for a small space.
- If using a wood board, sand the edges smooth, then stain or paint it in your chosen color.
- Let the paint or stain dry completely, usually 24 hours for the best finish.
- Use a level to draw a straight guideline on the wall where the rail will go.
- Find studs with a stud finder, or use heavy-duty wall anchors if studs are not available.
- Mount the board securely using screws into the studs or anchors.
- Space out and attach your hooks evenly along the board, leaving 4 to 6 inches between each one.
- Test each hook’s strength before hanging a full backpack.
- Hang backpacks and step back to admire your new drop zone.
Beginner Tips
- Start with fewer hooks than you think you need. You can always add more later.
- Choose hooks with a slight upward curve so backpacks do not slide off.
- If you are renting, use heavy-duty adhesive hooks instead of screws.
Common Mistakes to Avoid
- Hanging the rail too high for kids to use easily.
- Skipping the stud finder and hoping drywall alone will hold the weight.
- Placing hooks too close together, which causes backpacks to overlap and look messy.
Styling or Decorating Ideas
- Paint the board a soft, warm wood tone to match your entryway furniture.
- Add a small shelf above the hooks for keys, sunglasses, or mail.
- Use mismatched vintage hooks for a charming, collected-over-time look.
Best Colors and Materials
Natural wood, matte black metal hooks, and soft white boards are all popular choices. For a cozy feel, go with warm oak tones. For a modern look, choose matte black hardware on a white or light gray board.
Estimated Cost
$15 to $40
Estimated Time
30 to 60 minutes
Difficulty Level
Beginner
Where It Looks Best
Entryways, hallways, mudrooms, garage entrances, and bedroom doors.
Pinterest-Worthy Tip
Style the shot with one backpack hung neatly, a small potted plant on a nearby shelf, and warm natural light for that cozy, aspirational entryway look.
Conclusion for This Idea
A wall-mounted hook rail proves that you do not need a big budget or a big wall to solve backpack clutter. It is quick to install, easy to customize, and instantly makes your entryway feel more organized. This is often the very first project people try when searching for backpack storage ideas for small spaces, and it is a great place for you to start too.
Idea 2: Over-the-Door Backpack Organizer
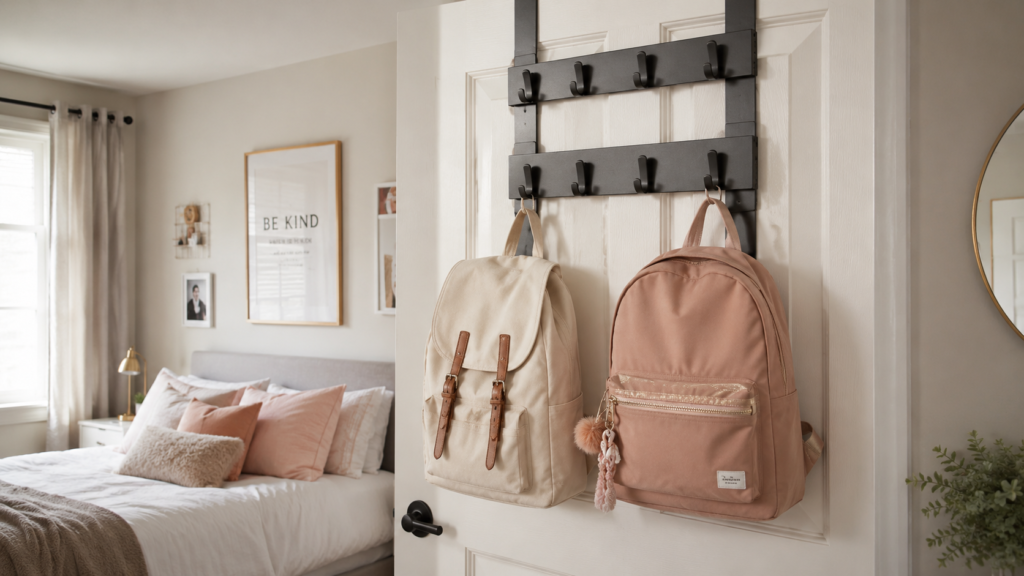
If you have zero wall space to spare, the back of a door is your secret weapon. An over-the-door organizer is one of the most renter-friendly backpack storage ideas for small spaces because it requires no drilling at all.
Why You’ll Love This Idea
This idea is perfect for tiny bedrooms, dorm rooms, and apartments where you cannot put holes in the wall. It uses space that is usually wasted, the back of a closet or bedroom door, and turns it into a full storage station.
Materials Needed
- Over-the-door hook rack (metal or wood)
- Optional: over-the-door shoe organizer with pockets for smaller items
- Felt pads (to protect the door surface)
- Measuring tape
Step-by-Step Instructions
- Measure the width and thickness of your door to make sure the rack will fit properly.
- Choose a hook style rack for backpacks, or a pocket-style organizer if you also want to store shoes, water bottles, or umbrellas.
- Unpack the rack and lay out all the hardware pieces.
- Hang the top hooks of the rack over the top edge of the door.
- Adjust the rack so it sits flat and centered on the door.
- Add felt pads to any metal parts touching painted wood to prevent scratches.
- Test the rack by gently pulling down on it to check it is secure.
- Hang your lightest backpack first to test the weight capacity.
- Arrange backpacks by size, heaviest on the bottom hooks for better balance.
- Add a small basket or bin below the rack for shoes or extra gear.
Beginner Tips
- Measure your door before buying, since some racks only fit standard door thicknands.
- Choose a rack with rubber or felt-coated hooks to protect the door finish.
- If the door swings and hits a wall, make sure the rack does not stick out too far.
Common Mistakes to Avoid
- Overloading the rack past its listed weight limit.
- Choosing a rack that is too wide for a narrow door.
- Forgetting to check that the door still closes fully once the rack is installed.
Styling or Decorating Ideas
- Choose a matte black or brushed brass rack to match your door hardware.
- Add small labeled tags to each hook so everyone knows which backpack goes where.
- Pair with a small mirror on the door for a functional, put-together look.
Best Colors and Materials
Matte black, brushed bronze, and natural wood all work well. Metal racks tend to be more durable for heavier backpacks, while wood racks add a softer look.
Estimated Cost
$15 to $35
Estimated Time
15 to 20 minutes
Difficulty Level
Beginner
Where It Looks Best
Bedroom doors, closet doors, dorm rooms, laundry room doors.
Pinterest-Worthy Tip
Photograph the door slightly open with soft afternoon light streaming in, showing two or three backpacks hung neatly with a plant or framed print nearby.
Conclusion for This Idea
An over-the-door organizer is proof that great backpack storage ideas for small spaces do not require permanent changes to your home. It is fast, affordable, renter-friendly, and instantly frees up floor and wall space. If you are short on time or tools, this is the easiest project on the list to start today.
Idea 3: Pegboard Backpack Station
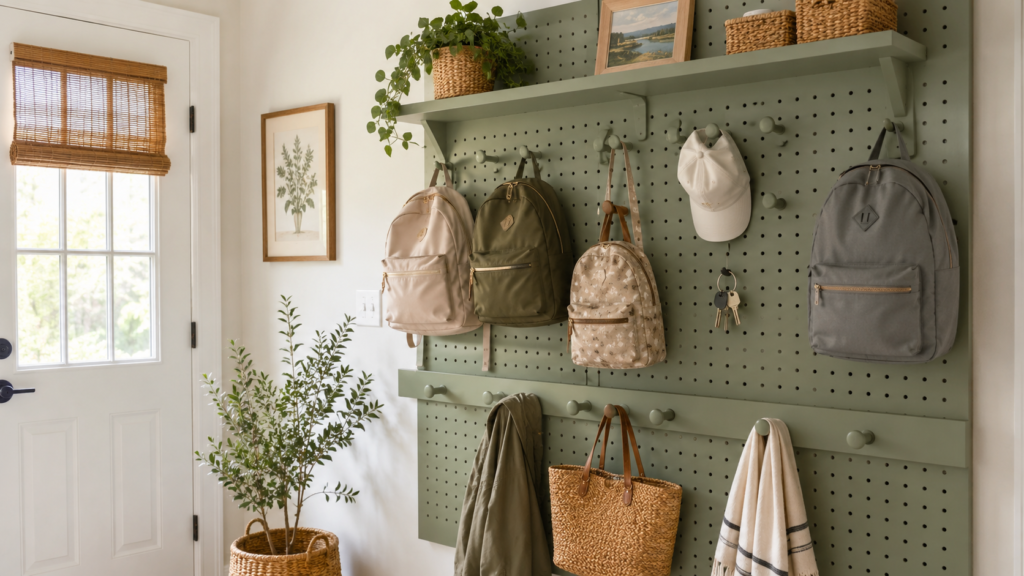
A pegboard station is one of the most flexible backpack storage ideas for small spaces because you can move hooks and shelves around anytime your needs change. It is a favorite among DIY lovers on Pinterest for good reason.
Why You’ll Love This Idea
Pegboards are endlessly customizable. As your family grows or your storage needs shift, you can rearrange hooks, add small shelves, or include baskets, all without new holes in the wall.
Materials Needed
- A pegboard panel (paintable wood or metal)
- Pegboard hooks in a few sizes
- Small pegboard shelves or baskets (optional)
- Furring strips (thin wood strips to mount the board with spacing)
- Screws and wall anchors
- Paint in your chosen color
- Drill and level
Step-by-Step Instructions
- Choose the size of pegboard that fits your wall space, a 2×4 foot panel works well for most small entryways.
- Paint the pegboard your desired color and let it dry fully.
- Attach furring strips to the back of the pegboard so it sits slightly off the wall, allowing room for hooks to slide in.
- Find wall studs using a stud finder, marking their location with a pencil.
- Hold the pegboard against the wall at your chosen height and check it is level.
- Screw the pegboard into the studs through the furring strips for a secure hold.
- Insert pegboard hooks where you want them, spacing them for backpacks, jackets, or bags.
- Add optional small shelves for shoes, hats, or mail.
- Hang a small basket on a hook for gloves or accessories.
- Step back and rearrange hooks until the layout feels right for your family.
Beginner Tips
- Buy a few extra hooks in different sizes so you can experiment with layout.
- Paint the board before mounting it, since it is much easier to paint flat on a table.
- Start with a smaller panel if you are unsure how much space you need.
Common Mistakes to Avoid
- Mounting the pegboard flush against the wall without furring strips, which makes hooks impossible to insert.
- Choosing hook sizes that do not match your pegboard hole size.
- Overcrowding the board so it looks cluttered instead of organized.
Styling or Decorating Ideas
- Paint the pegboard a soft sage green or warm terracotta for a trendy, homey look.
- Add a printed label above each hook using a label maker.
- Mix in a small mirror or clock for a functional command-center feel.
Best Colors and Materials
White and light wood pegboards feel airy and modern. Painted pegboards in sage, navy, or terracotta add personality and match popular cozy home color trends.
Estimated Cost
$30 to $70
Estimated Time
2 to 3 hours
Difficulty Level
Intermediate
Where It Looks Best
Entryways, mudrooms, garages, home offices, kids’ playrooms.
Pinterest-Worthy Tip
Style the pegboard with a mix of hooks and one small shelf holding a plant, so the photo shows both function and warmth.
Conclusion for This Idea
A pegboard station is one of the most adaptable backpack storage ideas for small spaces, since it grows and changes with your life. It takes a bit more time to set up, but the flexibility makes it worth the extra effort. Once it is up, you can rearrange it in minutes whenever your storage needs change.
Idea 4: Built-In Bench with Backpack Cubbies
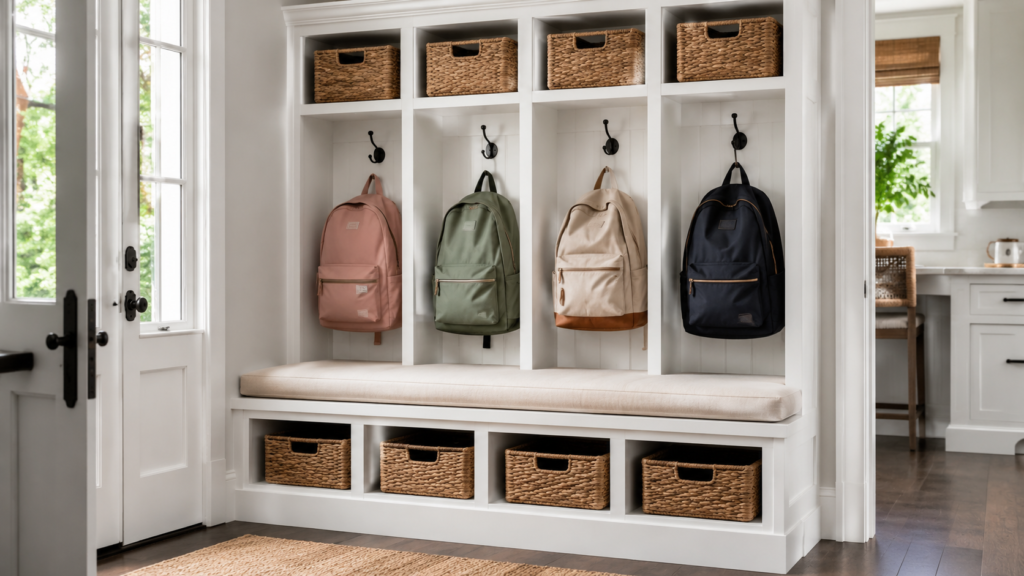
If you have a little bit of floor space to spare, a bench with cubbies is one of the most popular backpack storage ideas for small spaces on Pinterest. It combines seating, storage, and a landing spot all in one furniture piece.
Why You’ll Love This Idea
This idea gives each family member their own dedicated cubby, which cuts down on the “whose backpack is this” confusion. It also gives you a spot to sit while putting on shoes, which is a small detail that makes mornings so much smoother.
Materials Needed
- Plywood sheets or pre-cut cubby kit
- Wood screws and wood glue
- Bench cushion or seat pad
- Paint or wood stain
- Sandpaper
- Measuring tape and pencil
- Drill and saw (or have wood pre-cut at the store)
Step-by-Step Instructions
- Measure your available wall space to determine how wide and tall your bench and cubbies can be.
- Sketch a simple design with the bench seat on top and open cubbies underneath.
- Cut your plywood pieces to size, or have them cut at a hardware store if you do not have a saw.
- Sand all edges smooth to prevent splinters.
- Assemble the side panels and shelves using wood glue and screws to form the cubby sections.
- Attach the top seat board across the assembled cubby frame.
- Sand the entire piece once more after assembly.
- Paint or stain the bench in your chosen color and let it dry fully.
- Secure the bench to the wall with an anti-tip bracket for safety, especially in homes with kids.
- Add a cushion on top and place a backpack in each cubby.
Beginner Tips
- If building from scratch feels overwhelming, buy a pre-made cubby bench kit and simply assemble it.
- Label each cubby with a name tag so everyone has their own spot.
- Keep the cubby openings a little larger than you think you need, backpacks are bulkier than they look.
Common Mistakes to Avoid
- Skipping the anti-tip wall anchor, which is an important safety step.
- Making cubbies too narrow for a full backpack to slide in easily.
- Choosing a cushion fabric that is hard to clean, since entryways get dirty fast.
Styling or Decorating Ideas
- Add small woven baskets inside each cubby for a softer, more finished look.
- Paint each cubby a slightly different pastel shade for a playful kids’ entryway.
- Hang hooks above the bench for coats, adding a full mudroom feel.
Best Colors and Materials
Painted white or soft gray benches feel timeless. Natural wood stain adds warmth. For kids’ spaces, playful colors like blue, yellow, or mint green are popular Pinterest choices.
Estimated Cost
$80 to $200 (less if using a kit or reclaimed wood)
Estimated Time
1 full weekend
Difficulty Level
Advanced
Where It Looks Best
Mudrooms, entryways, hallway nooks, under staircases.
Pinterest-Worthy Tip
Photograph the bench with folded blankets, a cushion, and one open cubby showing a neatly placed backpack for that “everything has a place” appeal.
Conclusion for This Idea
A built-in bench with cubbies is a bigger project, but it delivers one of the most complete backpack storage ideas for small spaces you can build. It gives every backpack, and every family member, its own dedicated home. The extra effort pays off with years of daily use and a much calmer entryway.
Idea 5: Ladder Shelf Backpack Rack
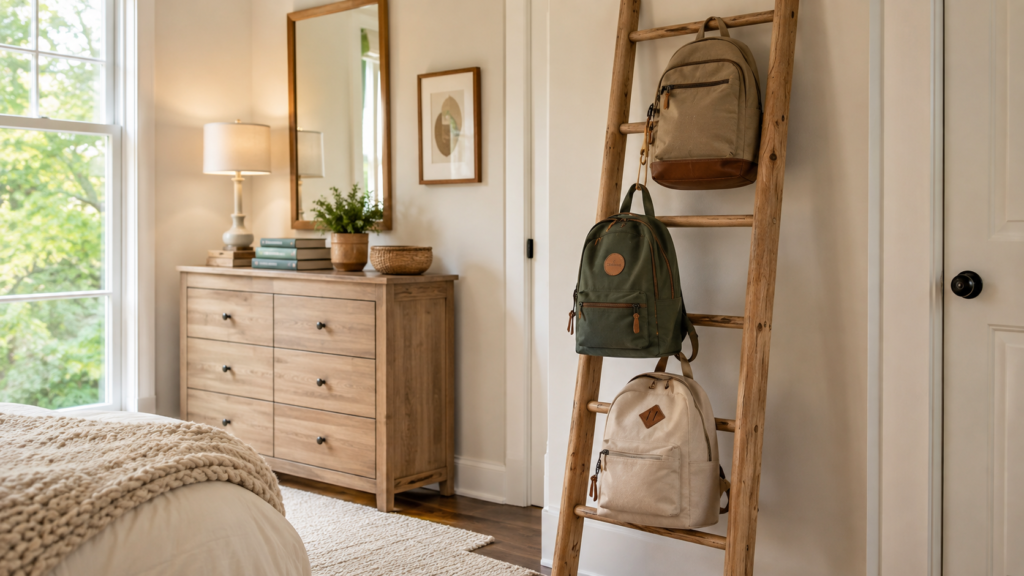
A ladder shelf is a trendy, no-drill option and one of the most Pinterest-friendly backpack storage ideas for small spaces. It leans against the wall, so it works even if you cannot mount anything permanently.
Why You’ll Love This Idea
Ladder shelves are stylish, portable, and require almost no installation. You can move them from room to room, which is perfect for renters or anyone who likes to rearrange often.
Materials Needed
- A wooden ladder shelf (store-bought or DIY)
- Wood dowels or rungs (if building your own)
- Wood glue and screws
- Sandpaper
- Wood stain or paint
- Anti-tip wall strap (for safety)
Step-by-Step Instructions
- Decide on the height and width of your ladder shelf based on your available wall space.
- If building your own, cut two long side rails and several shorter rungs to size.
- Sand all pieces smooth, especially the rungs, since backpack straps will rub against them.
- Attach the rungs evenly between the two side rails using wood glue and screws.
- Let the glue cure fully before moving the ladder, usually 24 hours.
- Stain or paint the finished ladder and allow it to dry completely.
- Lean the ladder against the wall at a slight angle for stability.
- Attach an anti-tip strap from the top of the ladder to the wall for safety.
- Hang backpacks by their top loop over each rung.
- Adjust spacing so backpacks do not overlap or crowd each other.
Beginner Tips
- Buy a pre-made ladder shelf if woodworking feels intimidating, plenty of affordable options exist.
- Choose thicker rungs, since thin dowels can bend under heavy backpacks over time.
- Place the ladder in a corner for extra stability.
Common Mistakes to Avoid
- Skipping the anti-tip strap, which is important since ladders can shift over time.
- Using rungs that are too thin, causing backpacks to slide off.
- Placing it somewhere with heavy foot traffic where it could get bumped.
Styling or Decorating Ideas
- Drape a small blanket over the top rung for a cozy layered look.
- Mix backpacks with a woven basket on the floor beside the ladder.
- Choose a whitewashed or honey oak finish for a soft, natural aesthetic.
Best Colors and Materials
Natural wood tones are the most popular choice for ladder shelves. White or black painted versions also work well in modern spaces.
Estimated Cost
$25 to $80
Estimated Time
1 to 2 hours (DIY) or 10 minutes (store-bought)
Difficulty Level
Beginner to Intermediate
Where It Looks Best
Bedrooms, small entryways, apartment hallways, dorm rooms.
Pinterest-Worthy Tip
Style the ladder shelf beside a window so natural light highlights the wood grain, with just two or three backpacks hung for a clean, uncluttered photo.
Conclusion for This Idea
A ladder shelf is one of the easiest backpack storage ideas for small spaces to try if you want something stylish without any wall damage. It looks great in almost any room and can be moved whenever your space changes. This is a favorite for renters who still want a Pinterest-worthy entryway.
Idea 6: Closet Shelf and Bin System
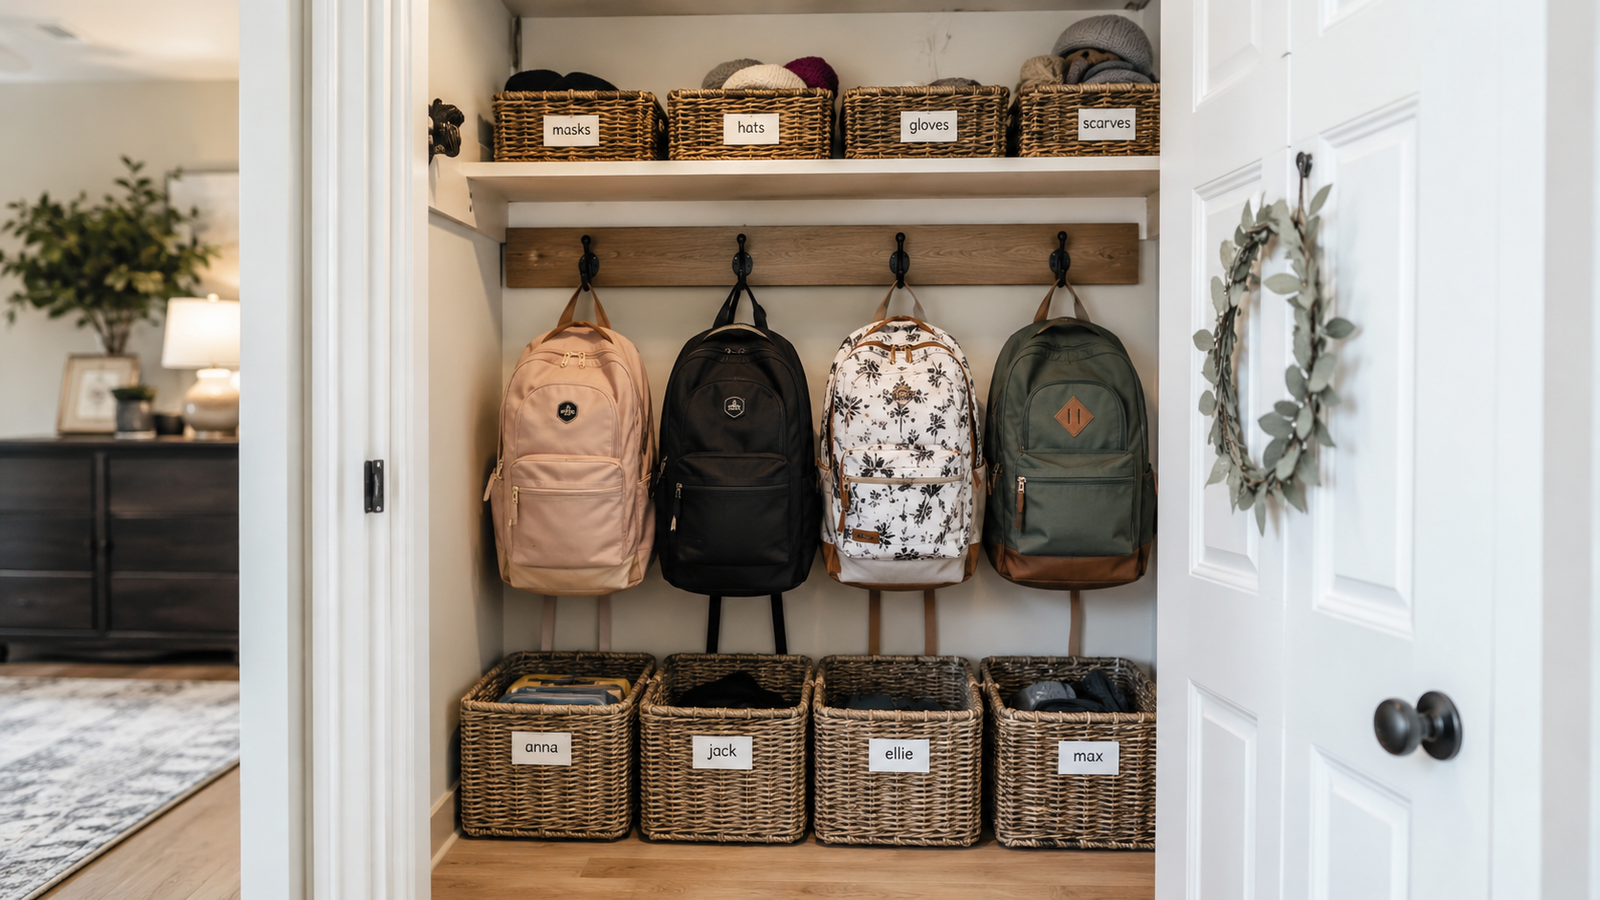
Sometimes the best backpack storage ideas for small spaces are hidden ones. Turning a small section of your closet into a backpack zone keeps everything out of sight while staying easy to reach.
Why You’ll Love This Idea
This idea works great if you like a clean, clutter-free entryway look but still need somewhere close by to store backpacks. Everything stays hidden behind a closet door, yet is easy to grab on your way out.
Materials Needed
- Wire or wood closet shelving
- Fabric or wire storage bins
- Shelf brackets
- Labels or tags
- Drill and level
- Measuring tape
Step-by-Step Instructions
- Clear out a section of your closet, even just 2 feet of width is enough.
- Measure the height and width of the space to plan your shelf placement.
- Mark shelf bracket locations at a height everyone in the house can reach.
- Use a level to make sure your markings are straight.
- Drill and secure the brackets into wall studs or use appropriate anchors.
- Set the shelf onto the brackets and check it is stable.
- Add fabric or wire bins onto the shelf, one per person or per bag type.
- Label each bin clearly using a label maker or tags.
- Place backpacks upright inside the bins so they are easy to see and grab.
- Add a small hook on the inside of the closet door for jackets or hats.
Beginner Tips
- Choose bins with handles so they are easy to pull out and put back.
- Pick a shelf height low enough for kids to reach on their own.
- Keep frequently used items like backpacks near the front of the closet, not buried in the back.
Common Mistakes to Avoid
- Making the shelf too high, which leads to kids leaving backpacks on the floor instead.
- Choosing bins that are too small to fit a full-sized backpack.
- Forgetting to label bins, which causes mix-ups in busy households.
Styling or Decorating Ideas
- Use matching woven bins for a clean, coordinated look.
- Add a small chalkboard label to each bin for an easy-to-update system.
- Line the shelf edge with a thin strip of trim for a built-in, finished appearance.
Best Colors and Materials
Natural woven bins, white wire shelving, and neutral fabric bins all photograph beautifully and match most home styles.
Estimated Cost
$30 to $60
Estimated Time
1 to 2 hours
Difficulty Level
Beginner to Intermediate
Where It Looks Best
Hallway closets, coat closets, entryway closets, mudroom closets.
Pinterest-Worthy Tip
Photograph the closet with the door open, bins pulled slightly forward, and soft interior lighting to show off the organized system.
Conclusion for This Idea
A closet shelf and bin system is a wonderful choice if you want your backpack storage tucked out of sight. It is one of the more practical backpack storage ideas for small spaces, especially for families who prefer a minimal, clutter-free entryway look while still keeping everything organized and easy to find.
Idea 7: Under-the-Stairs Backpack Nook
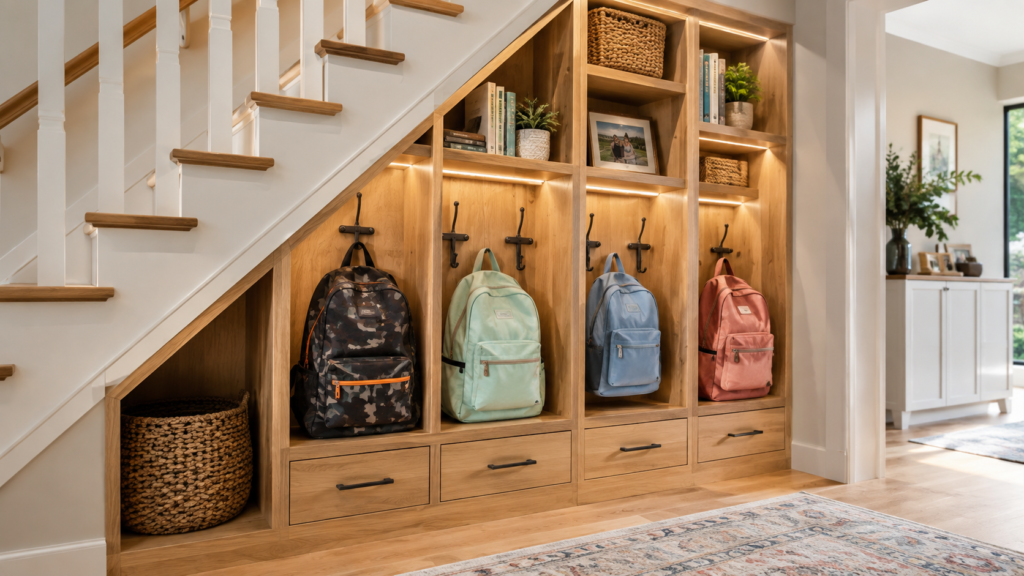
If your home has a staircase, the space underneath it is often wasted. Turning it into a backpack nook is one of the most creative backpack storage ideas for small spaces, and it makes great use of an awkward area.
Why You’ll Love This Idea
This idea transforms unused space into a functional, good-looking storage nook. It keeps backpacks completely out of your main living area while still being easy to access every day.
Materials Needed
- Plywood for shelving or cubby dividers
- Wood screws and brackets
- Paint or wood stain
- Small baskets or bins
- Hooks (optional)
- Saw, drill, level, measuring tape
Step-by-Step Instructions
- Measure the height and depth of the space under your stairs at a few different points, since the slope changes the available room.
- Sketch a simple plan for shelves or cubbies that fit the sloped ceiling.
- Cut plywood pieces to match your measurements, adjusting for the angle of the stairs.
- Sand all edges smooth.
- Install shelf brackets or a simple frame at the back wall of the nook.
- Secure your shelves or cubby dividers into place, checking each one is level.
- Paint or stain the finished woodwork to match your home’s style.
- Add hooks along the back wall for extra hanging space if there is room.
- Place baskets or bins on the lower shelves for shoes or smaller items.
- Arrange backpacks in the taller sections where the ceiling has more height.
Beginner Tips
- Start with the tallest part of the space for backpacks, and use the shorter areas for baskets or shoes.
- Take detailed measurements since under-stair spaces are rarely a perfect rectangle.
- If cutting angled wood feels tricky, ask your hardware store to make cuts for you.
Common Mistakes to Avoid
- Ignoring the slope of the ceiling, which leads to shelves that do not fit properly.
- Making shelves too deep, which wastes space and makes bags hard to see.
- Forgetting to add lighting, since under-stair nooks can be dark.
Styling or Decorating Ideas
- Add a small battery-powered light strip for a cozy glow.
- Paint the back wall a fun contrasting color to make the nook feel intentional.
- Use a patterned rug or floor mat at the base for a finished look.
Best Colors and Materials
White or light wood keeps the space feeling open, while a bold accent color on the back wall adds personality and makes for a great Pinterest photo.
Estimated Cost
$100 to $250
Estimated Time
1 full weekend
Difficulty Level
Advanced
Where It Looks Best
Homes with staircases, especially open floor plan entryways.
Pinterest-Worthy Tip
Add a small light strip and photograph the nook at dusk so the warm glow highlights the neatly stored backpacks.
Conclusion for This Idea
An under-the-stairs nook is one of the most impressive backpack storage ideas for small spaces because it uses space most homes waste completely. It takes planning and some carpentry skills, but the payoff is a totally custom storage spot that feels like it was always part of your home’s design.
Idea 8: Hanging Basket Backpack Storage
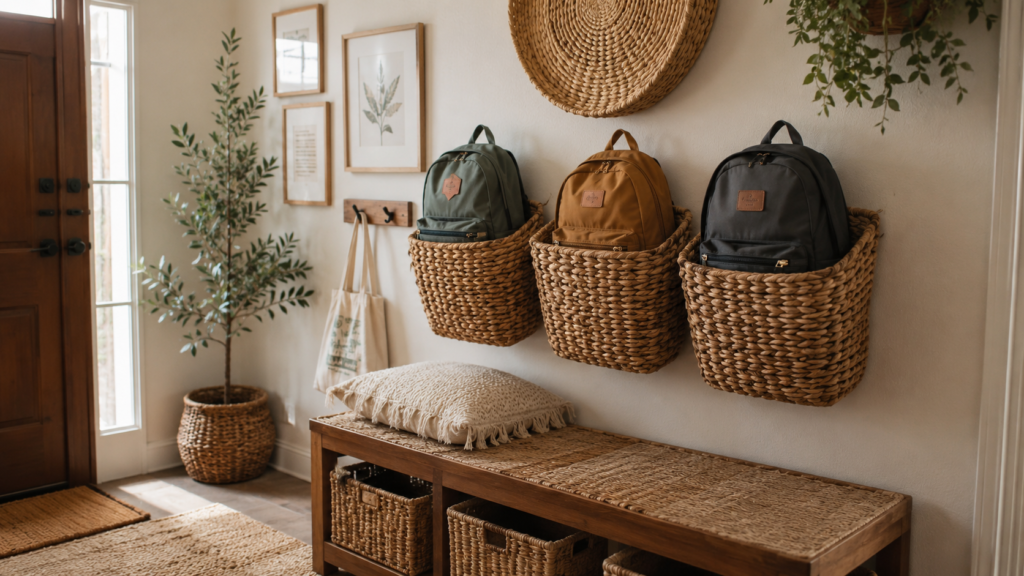
For a soft, boho-inspired look, hanging baskets are one of the most charming backpack storage ideas for small spaces. They add texture and warmth while keeping bags off the floor.
Why You’ll Love This Idea
This idea feels more decorative than most storage solutions, so it works well if you want your entryway to feel styled, not just organized. It is also a great option for small apartments where every bit of wall space needs to do double duty.
Materials Needed
- 2 to 4 woven or wire hanging baskets
- Heavy-duty ceiling hooks or wall brackets
- Rope or chain (if not already attached to the basket)
- Wall anchors and screws
- Level and measuring tape
- Drill
Step-by-Step Instructions
- Choose baskets that are large enough to fit a folded or rolled backpack comfortably.
- Decide whether you will hang the baskets from the ceiling or mount brackets on the wall.
- Measure and mark your hanging points, spacing baskets evenly apart.
- Use a level to make sure all marks line up at the same height.
- Install wall anchors or find ceiling joists for secure mounting.
- Attach hooks or brackets firmly into the marked spots.
- Hang each basket, checking that it sits level and secure.
- Gently test the weight capacity with an empty basket first.
- Place a rolled or folded backpack inside each basket.
- Adjust spacing and basket height until the display looks balanced.
Beginner Tips
- Choose baskets with sturdy rims so they hold their shape once weight is added.
- Group three baskets at slightly different heights for a more dynamic, styled look.
- Test a basket with books or towels first to check it holds weight well before adding backpacks.
Common Mistakes to Avoid
- Choosing baskets that are too small, making backpacks hard to fit or remove.
- Hanging baskets too high for kids to use on their own.
- Skipping a weight test, which can lead to a basket pulling loose.
Styling or Decorating Ideas
- Mix basket sizes for visual interest.
- Add small trailing plants nearby to complement the woven texture.
- Choose natural fiber baskets for a warm, cottagecore-inspired entryway.
Best Colors and Materials
Natural rattan, woven seagrass, and light wicker are the most popular choices. For a more modern look, try black wire baskets instead.
Estimated Cost
$25 to $60
Estimated Time
30 to 45 minutes
Difficulty Level
Beginner
Where It Looks Best
Boho-style entryways, small apartments, reading nooks, kids’ rooms.
Pinterest-Worthy Tip
Photograph the baskets slightly off-center with a plant in the frame and warm natural light for that cozy, lived-in Pinterest feel.
Conclusion for This Idea
Hanging baskets prove that backpack storage ideas for small spaces do not have to look purely functional. This option blends style and practicality, giving your entryway a soft, textured look while keeping backpacks organized and off the floor.
Expert Decorating Tips
- Group by zone, not just by person. Keep backpacks, shoes, and jackets in the same general area so mornings feel like one quick stop.
- Use consistent hardware finishes. Matching hook and bracket colors make even a mix of DIY pieces feel pulled together.
- Add a mirror near your storage area. It makes small entryways feel bigger and adds a quick last-look spot before heading out.
- Bring in one plant. A small plant softens hardware-heavy storage walls and adds a cozy, welcoming touch.
- Keep a small bench or stool nearby, even if it is not built-in, so putting on shoes is easier.
- Rotate seasonal items out of sight. Store off-season bags elsewhere so your main storage area never feels overcrowded.
Budget-Saving Tips
- Shop secondhand for hooks, baskets, and shelving. Thrift stores and online marketplaces often have great finds for a fraction of retail price.
- Repurpose what you already own. An old ladder, crate, or shelf can often be turned into backpack storage with a little paint.
- Buy unfinished wood pieces and paint or stain them yourself instead of paying more for pre-finished versions.
- Use Command-style hooks instead of drilled hardware to save money on tools and anchors, especially if renting.
- Watch for sales at hardware and home stores, especially around back-to-school season when organization items are discounted.
- Start with one idea, not all eight. Focus your budget on the single best solution for your space instead of spreading it thin.
Frequently Asked Questions
1. What is the easiest backpack storage idea for a small apartment? An over-the-door organizer or a wall-mounted hook rail are the easiest options since they take very little time, tools, and space.
2. How do I store backpacks without drilling holes in the wall? Try heavy-duty adhesive hooks, an over-the-door organizer, or a freestanding ladder shelf. All three work without any permanent wall damage.
3. How high should I hang backpack hooks for kids? A good rule of thumb is to hang hooks at a height your child can reach comfortably without stretching, usually between 24 and 36 inches off the ground.
4. What is the best material for backpack storage baskets? Woven natural fibers like rattan or seagrass are popular for their warm look, while wire or fabric bins work well for a more casual, durable option.
5. How can I store multiple backpacks in a very tiny entryway? A pegboard station or a hook rail works best in tight spaces since both are compact and can be customized to fit narrow walls.
6. Are ladder shelves safe for backpack storage? Yes, as long as you lean them at a slight angle and secure the top with an anti-tip strap, especially in homes with children or pets.
7. What is the best way to organize backpacks for a family with several kids? A bench with individual cubbies or a labeled closet bin system works well, since each child gets their own clearly marked spot.
8. Can I use backpack storage ideas in a dorm room? Absolutely. Over-the-door organizers and small hook racks are ideal for dorm rooms since most colleges do not allow permanent wall changes.
9. How do I keep backpack storage from looking cluttered? Stick to one storage system per area, use matching hardware, and avoid overcrowding hooks or shelves with too many bags at once.
10. What is the most budget-friendly backpack storage option? A simple wall-mounted hook rail or hanging baskets are usually the most affordable choices, often costing less than $40 total.
Final Thoughts
Backpack clutter is one of those small daily frustrations that adds up over time. The good news is that with just a little creativity, you can turn even the tiniest entryway, hallway, or closet into a functional, good-looking storage spot. These eight backpack storage ideas for small spaces prove that you do not need a big budget or a big house to get organized. You just need the right idea for your space and your family’s daily routine.
Whether you start with a simple hook rail this weekend or work your way up to a full built-in bench, every small step brings you closer to a calmer, more organized home. Pick the idea that fits your space best, gather your materials, and give it a try. Your future mornings will thank you.
Pinterest Call-to-Action
Loved these backpack storage ideas for small spaces? Save this pin so you can come back to it anytime you need a little organization inspiration! Pin it now, and follow along for more small space storage tips, DIY projects, and cozy home decor ideas.