
Introduction
Moving into a college dorm is one of the most exciting moments of your life, but facing those stark cinder block walls and standard-issue wooden furniture can feel a bit underwhelming. Standard dorm rooms are built for durability, not style. However, you do not need a designer bank account to transform a boring box into a high-end sanctuary. Learning how to create a luxury dorm room on a budget is all about smart styling, clever DIY projects, and choosing high-impact accents that make a small space look insanely expensive.
A luxury aesthetic relies on texture, rich colors, soft lighting, and cohesive decor rather than high price tags. When you walk into your room after a long day of lectures, you want it to feel like a boutique hotel room, not a temporary shelter. By mixing simple materials, rental-safe adhesives, and budget-friendly textiles, you can achieve an ultra-glam look that will be the envy of your floor.
In this guide, we are going to explore eight detailed, step-by-step projects and hacks designed to completely elevate your space. Whether you are aiming for modern chic, cozy boho glam, or classic Parisian elegance, these ideas are cost-effective, easy to execute, and completely safe for college dorm policies. Get ready to save these pins, gather your materials, and design the ultimate aesthetic dream room.
Why This Trend Is Popular
The push to style high-end dorms has exploded on platforms like Pinterest and TikTok. College students view their dorm rooms as an extension of their personal brand and a primary setting for social media content. Additionally, having a calm, well-designed environment directly impacts your mental health and study focus.
The luxury-on-a-budget trend is especially popular because it proves that style isn’t tied to spending thousands of dollars. Students are increasingly leaning into peel-and-stick wallpaper, thrifted decor flips, ambient lighting, and rich faux textures to cover up outdated college furniture without losing their security deposit.
Materials and Tools Needed
To complete the projects in this guide, collect these basic tools and decor supplies:
- Adhesives: Heavy-duty Command strips, painter’s tape, double-sided carpet tape, and clear adhesive hooks.
- Textiles: Velvet throw pillows, faux-fur blankets, tailored bed skirts, and velvet black-out curtains.
- Surface Upgrades: Marble contact paper, peel-and-stick wall moldings, and peel-and-stick headboards.
- Lighting: Warm-toned LED fairy lights, rechargeable puck lights, and cordless battery lamps.
- Tools: Utility knife, measuring tape, scissors, plastic squeegee, and a level.
Safety Tips for Dorm Decorating
- Check College Guidelines: Always review your university’s residential life handbook before applying wallpaper or hanging items.
- Avoid Open Flames: Use battery-operated LED candles instead of traditional wax candles to comply with fire codes.
- Protect the Walls: Stick exclusively to damage-free adhesives like removable Command strips to prevent paint damage when moving out.
- Keep Outlets Clear: Do not overload extension cords or cover electrical outlets with fabric or heavy decor.
1. The Faux-Padded Peel-and-Stick Headboard
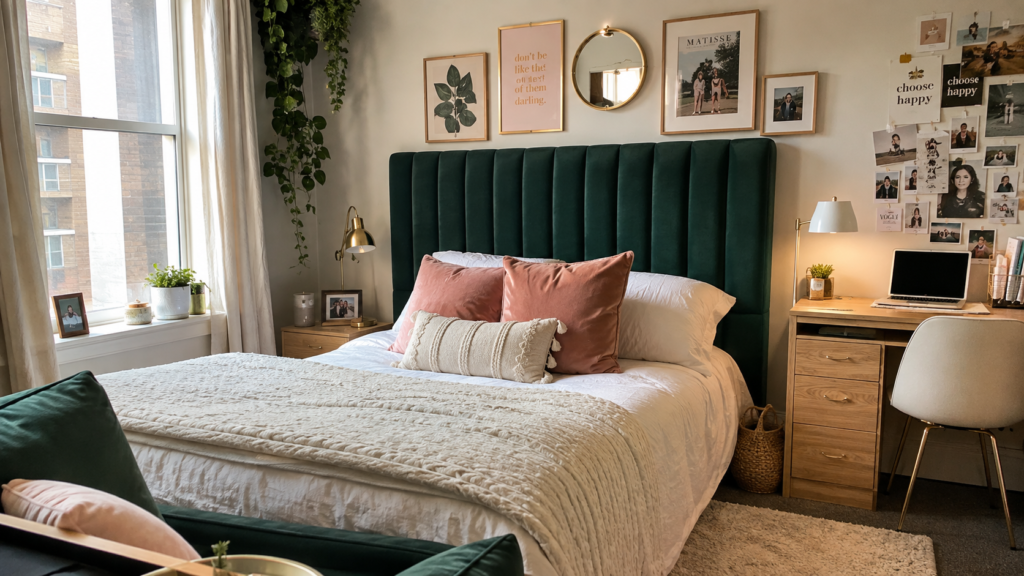
Transforming Your Basic Dorm Bed Into a Glam Sanctuary
Standard dorm beds lack a headboard, leaving your pillows resting directly against cold, hard walls. Adding a custom, padded headboard immediately adds structure and elegance to your sleeping space.
Why You’ll Love This Idea
It creates an instant focal point in your room, making your bed feel like a custom hotel frame. It also provides comfortable back support while studying in bed.
Materials Needed
- 4 to 6 light wooden canvas boards or foam boards (12×12 inches each)
- Velvet or faux-leather fabric (1-2 yards)
- High-density upholstery foam sheet
- Heavy-duty staple gun and staples
- Heavy-duty velcro Command strips
Step-by-step Instructions
- Measure the width of your dorm mattress to determine the size of your headboard.
- Cut your foam sheet into squares that match the size of your canvas or foam boards.
- Place a piece of foam on top of each board.
- Cut your fabric into squares, leaving a 2-inch border around each board.
- Wrap the fabric tightly over the foam and board, stapling it securely to the backside.
- Fold the corners neatly, like wrapping a present, and staple them flat.
- Repeat this process for all 4 to 6 panels to create individual upholstered tiles.
- Arrange the panels together on the floor to form a solid grid pattern.
- Attach two heavy-duty velcro Command strips to the back of each panel.
- Press the panels onto the wall behind your bed, holding each firmly for 30 seconds.
Beginner Tips
Keep the fabric pulling uniform across all boards so the cushion depth looks consistent across the entire grid.
Common Mistakes to Avoid
Using fabric that stretches too easily can cause wrinkles over time. Choose thick velvet or sturdy canvas.
Styling or Decorating Ideas
Pair this headboard with crisp white linens and metallic accent pillows to make the velvet texture pop.
Best Colors and Materials
- Colors: Emerald green, blush pink, rich cream, or deep charcoal gray.
- Materials: Tufted velvet, faux leather, or linen blends.
Quick Stats
- Estimated Cost: $35 – $50
- Estimated Time: 1.5 Hours
- Difficulty Level: Easy
- Where It Looks Best: Centered behind the dorm bed.
- Pinterest-Worthy Tip: Add thin metallic wash tape lines between the panels for a modern geometric look.
Conclusion
This quick DIY headboard instantly raises the baseline style of your room while giving you a plush place to rest your head.
2. Marble Contact Paper Desk Elevation
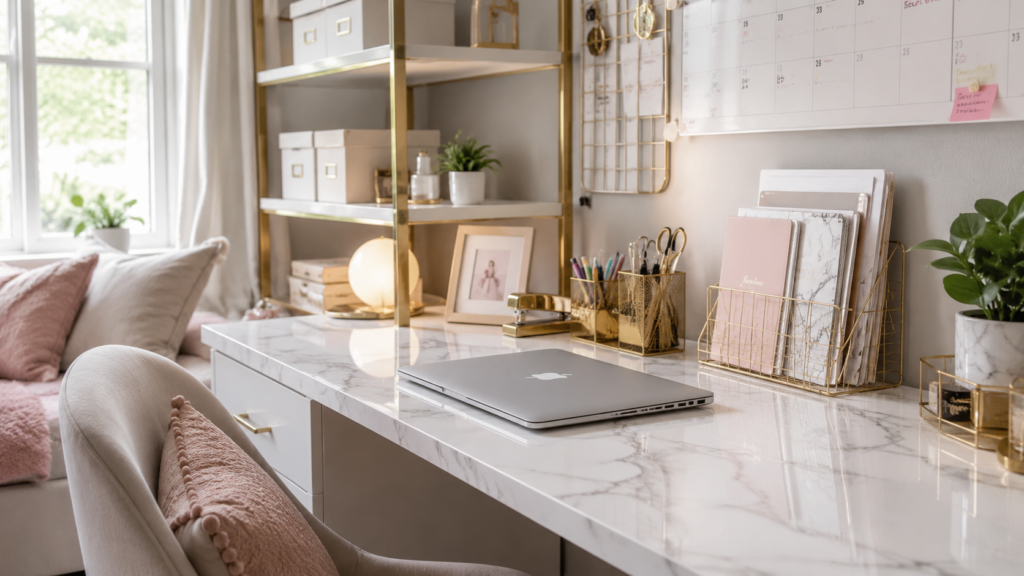
Upgrade Scratched College Desk Tops Instantly
Dorm desks are usually made of worn laminate. Covering the desk surface with faux-marble contact paper creates a chic, high-end work surface that wipes clean easily.
Why You’ll Love This Idea
It covers up decades of scratches and stains with an elegant marble finish that looks like real stone.
Materials Needed
- High-gloss marble peel-and-stick contact paper
- Plastic smoothing tool or credit card
- Precision knife or box cutter
- Cleaning spray and microfiber cloth
- Tape measure
Step-by-step Instructions
- Clean the surface of your desk thoroughly to remove all dust and oil.
- Measure your desk top and cut the contact paper, leaving an extra inch on all sides.
- Peel back 2 inches of the backing paper at one edge.
- Align the paper with the back corner of your desk.
- Press the adhesive side down firmly onto the edge.
- Slowly peel away more backing paper with one hand while smoothing the top with your plastic tool.
- Work in small sections from the center outwards to push out air bubbles.
- Wrap the excess paper smoothly over the desk edges.
- Trim away excess paper around corners using a sharp precision knife.
- Run a hairdryer over the edges on low heat to soften the vinyl and seal it flush against the desk.
Beginner Tips
If you get an unfixable air bubble, poke a tiny hole in it with a pin and smooth it down flat.
Common Mistakes to Avoid
Don’t pull or stretch the vinyl too hard during application, or it will shrink back later and expose the wood underneath.
Styling or Decorating Ideas
Add a gold wire desk organizer, a sleek acrylic lamp, and a faux-leather desk pad to complete the luxury look.
Best Colors and Materials
- Colors: White marble with grey veins, black gold marble, or clean white terrazzo.
- Materials: Thick, vinyl peel-and-stick sheets with a glossy finish.
Quick Stats
- Estimated Cost: $12 – $20
- Estimated Time: 45 Minutes
- Difficulty Level: Beginner
- Where It Looks Best: On top of the study desk, nightstand, or dresser surfaces.
- Pinterest-Worthy Tip: Wrap your matching desk pencil holders in the remaining contact paper for a matching set.
Conclusion
A clean, marble desk surface brightens your study area and serves as the perfect backdrop for study-gram photo sessions.
3. Floor-to-Ceiling Sheer and Velvet Drapes
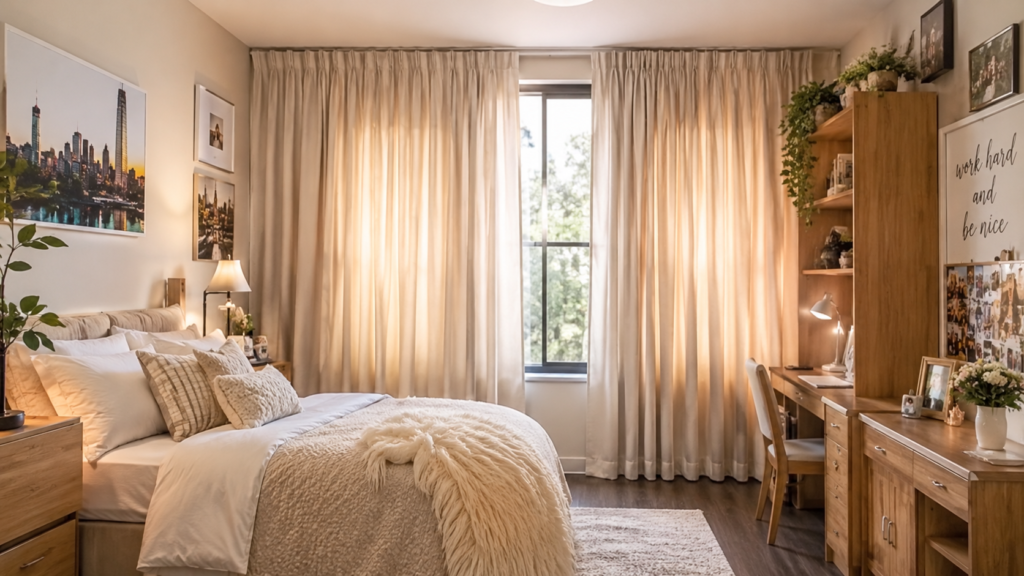
Soften Harsh Blinds for a Hotel-Suite Vibe
Standard plastic window blinds look clinical. Layering long drapes softens the lines of your room and creates the illusion of higher ceilings.
Why You’ll Love This Idea
It softens hard outdoor light, hides basic blinds, and instantly doubles the perceived ceiling height of your dorm room.
Materials Needed
- Adjustable tension curtain rod (or adhesive curtain rod brackets)
- Extra-long curtain panels (84 or 96 inches)
- Velvet tie-backs or gold metallic clips
- Steamer or iron
Step-by-step Instructions
- Measure the full height from the ceiling to the floor near your dorm window.
- Select extra-long curtains that will lightly pool on the floor for a plush appearance.
- Install adhesive curtain brackets or set up a tension rod as close to the ceiling as possible.
- Steam out all shipping wrinkles from your curtain panels before hanging.
- Thread your curtain panels onto the rod.
- Adjust the rod to fit snugly inside or outside the window frame.
- Allow the fabric to fall straight down to the floor.
- Style the curtains by sweeping them to the sides using metallic tie-backs.
Beginner Tips
Mounting your curtain rod closer to the ceiling rather than the window frame makes small rooms feel significantly taller.
Common Mistakes to Avoid
Avoid purchasing standard 63-inch curtains; short curtains look awkward and shrink the appearance of the space.
Styling or Decorating Ideas
Pair heavy velvet drapes with soft inner sheer curtains so you can let light in during the day while maintaining privacy.
Best Colors and Materials
- Colors: Creamy ivory, champagne gold, navy blue, or dusty rose.
- Materials: Heavy velvet, faux linen, or lightweight sheer panels.
Quick Stats
- Estimated Cost: $25 – $45
- Estimated Time: 30 Minutes
- Difficulty Level: Easy
- Where It Looks Best: Main window wall.
- Pinterest-Worthy Tip: Choose curtains with grommet tops for smooth, structural folds that fall evenly every time.
Conclusion
Drapery adds soft architectural texture, making your dorm feel warmer, quieter, and noticeably more luxurious.
4. Under-Bed Hidden Storage with Custom Bed Skirting
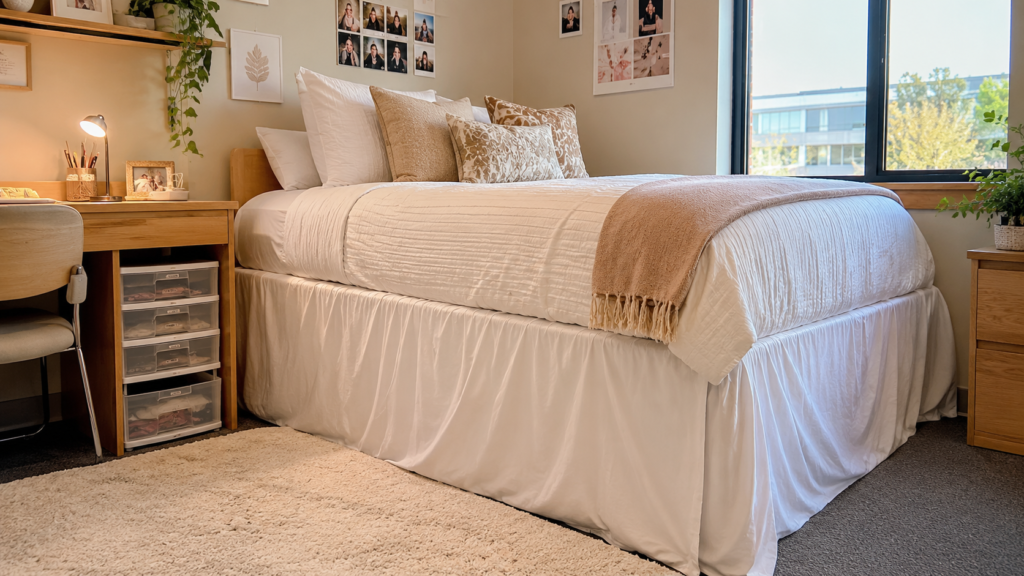
Hide Plastic Tubs Under Elegant Fabric Layers
Dorm beds are often lofted high to create storage space, exposing plastic bins and messy luggage underneath. A tailored bed skirt conceals storage while creating a sleek, clean base.
Why You’ll Love This Idea
It hides all your extra clothes, shoes, and bulky storage containers while giving your bed a neat, box-spring appearance.
Materials Needed
- Extra-long drop bed skirt (or 3 fabric panels)
- Heavy-duty safety pins or velcro strips
- Iron or fabric steamer
- Bed risers (optional)
Step-by-step Instructions
- Adjust your bed frame or risers to your preferred storage height.
- Measure from the top of the bed frame springs directly down to the floor.
- Purchase an extra-long bed skirt matching those exact measurements.
- Steam out all folds and wrinkles from the fabric.
- Lift the mattress off the frame slightly.
- Position the bed skirt deck over the frame springs.
- Secure the skirt corners to the metal frame using strong velcro pads or safety pins so it doesn’t shift.
- Replace the mattress carefully so the fabric stays tucked in place.
- Adjust the hem so it hovers half an inch above the floor smoothly.
Beginner Tips
If you cannot find a bed skirt long enough, buy three standard curtain panels and pin them directly to the mattress frame sides.
Common Mistakes to Avoid
Don’t let the fabric drag heavily across the floor, as it will gather dust and pull down the edges over time.
Styling or Decorating Ideas
Layer your top duvet slightly over the edge of the bed skirt to create a soft, seamless transition down to the floor.
Best Colors and Materials
- Colors: Tailored crisp white, deep beige, or slate gray.
- Materials: Microfiber, heavy cotton canvas, or pleated linen.
Quick Stats
- Estimated Cost: $15 – $30
- Estimated Time: 30 Minutes
- Difficulty Level: Beginner
- Where It Looks Best: Around the base of elevated beds.
- Pinterest-Worthy Tip: Use box-pleated bed skirts rather than ruffled ones for a clean, tailored, and modern look.
Conclusion
Hiding clutter is essential when learning how to create a luxury dorm room on a budget, and a tailored skirt is the best solution.
5. Peel-and-Stick Picture Frame Wall Molding
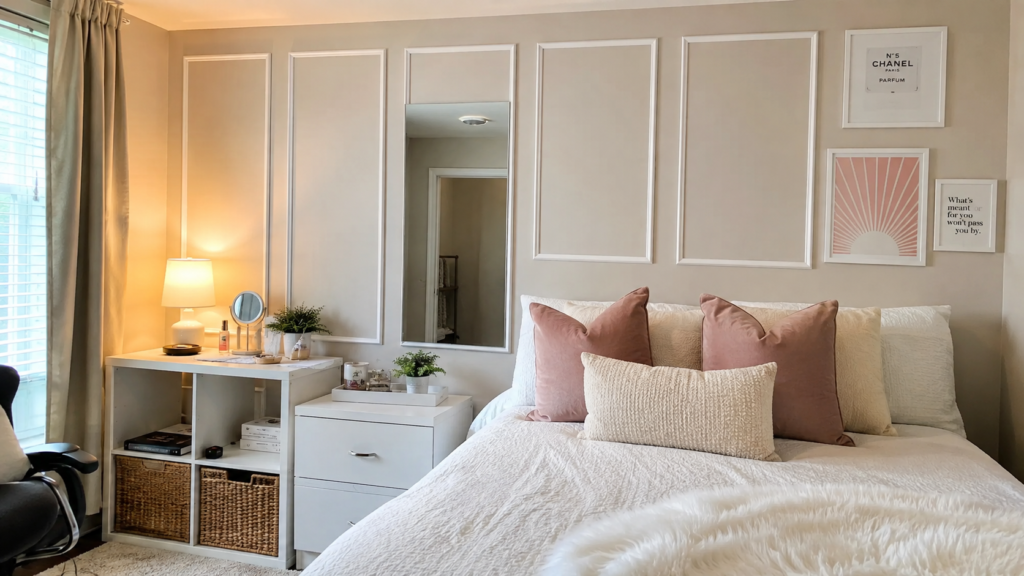
Add Parisian Architectural Elegance to Cinder Block Walls
Plain walls can look cold and institutional. Removable picture frame molding adds character and depth without damaging paint or plaster.
Why You’ll Love This Idea
It adds high-end, historic architectural detail to plain walls, making your room feel like an upscale apartment.
Materials Needed
- Flexible peel-and-stick foam/rubber wall molding trims
- Painter’s tape
- Measuring tape and pencil
- Mitre shears or sharp utility knife
- Lightweight level tool
Step-by-step Instructions
- Map out 2 to 4 large rectangular frames on your wall using painter’s tape.
- Use a level to ensure all tape lines are straight.
- Measure the top, bottom, and side lengths for each box.
- Cut your flexible molding pieces at 45-degree angles on the ends so they meet smoothly in corners.
- Dry-fit the cut pieces on your desk to verify the mitered corners match up.
- Peel the backing off the top horizontal piece of molding.
- Press the piece firmly onto the wall along your tape guide line.
- Attach the side and bottom pieces, pressing firmly for 30 seconds at each point.
- Use a level on every piece before fully pressing down the adhesive.
- Remove the painter’s tape guides and admire your custom wall paneling.
Beginner Tips
Draw your layout lightly on paper first to figure out equal spacing between each rectangular frame before sticking anything to the wall.
Common Mistakes to Avoid
Failing to use a level will result in crooked frames, which ruin the polished architectural look.
Styling or Decorating Ideas
Hang a framed canvas print or metallic mirror centered directly inside each molding box for a gallery feel.
Best Colors and Materials
- Colors: White trim on soft grey, cream trim on white, or tonal neutral colors.
- Materials: Flexible lightweight PVC or high-density foam molding strips.
Quick Stats
- Estimated Cost: $20 – $40
- Estimated Time: 2 Hours
- Difficulty Level: Intermediate
- Where It Looks Best: Accent wall behind the bed or desk.
- Pinterest-Worthy Tip: Keep equal spacing (around 4-6 inches) between all frames and wall corners for clean balance.
Conclusion
Wall molding turns flat surfaces into sophisticated feature walls that make your entire room feel expensive and custom-built.
6. Ambient Hotel Lighting with Rechargeable Sconces
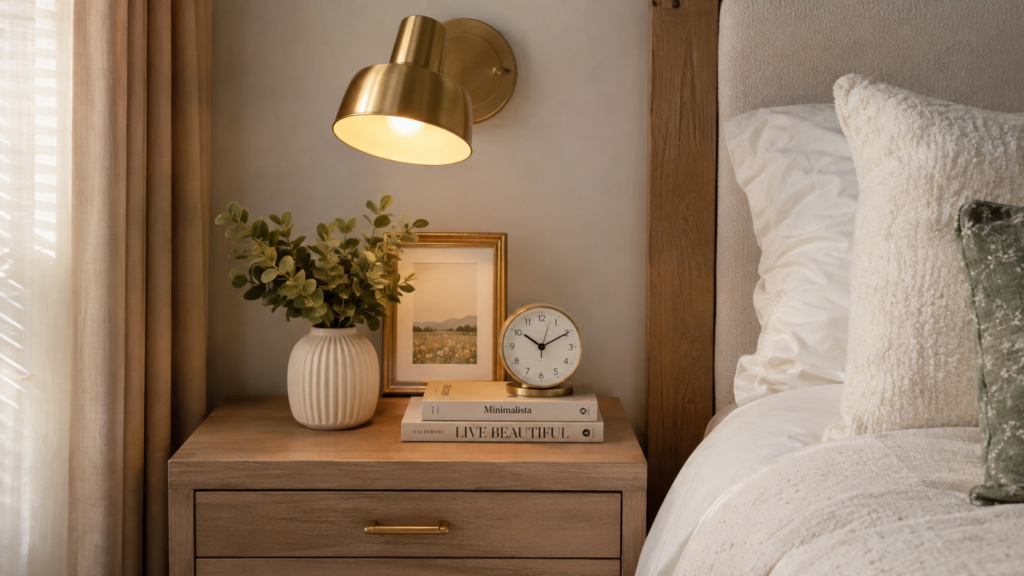
Swap Overhead Fluorescent Fixtures for Warm, Soft Lighting
Dorm rooms are notorious for harsh, cold fluorescent overhead lights. Adding wireless, warm-toned sconces lets you create a cozy ambient atmosphere.
Why You’ll Love This Idea
It eliminates harsh overhead light, reducing eye strain while giving your space a warm, relaxing resort ambiance.
Materials Needed
- Set of 2 battery-operated/rechargeable LED wall sconces
- Remote control with dimmer features
- Heavy-duty Command hanging strips
- USB charging cable
Step-by-step Instructions
- Charge your sconce light units fully before installation.
- Select mounting locations on either side of your bed or above your desk.
- Clean the wall area thoroughly with rubbing alcohol and let it dry.
- Attach command strips to the back of the sconce mounting plates.
- Press the mounting plate against the wall for 30 seconds.
- Let the adhesive set for 1 hour before attaching the sconce fixtures.
- Mount the sconces onto their base plates.
- Test the remote control to check dimming levels and color warmth settings.
Beginner Tips
Choose sconces with magnetic bases so you can easily detach the light fixtures to recharge them without pulling the mounts off the wall.
Common Mistakes to Avoid
Avoid cold blue light temperatures (5000K+). Stick to warm white light (2700K-3000K) to maintain a soft glow.
Styling or Decorating Ideas
Position a pair of sconces symmetrically above your nightstand or bed to mimic a modern luxury hotel suite layout.
Best Colors and Materials
- Colors: Brushed brass, matte black, or polished chrome finishes.
- Materials: Metal fixture bodies with linen or frosted glass diffusers.
Quick Stats
- Estimated Cost: $30 – $55
- Estimated Time: 20 Minutes
- Difficulty Level: Beginner
- Where It Looks Best: Flanking the bed or above your study station.
- Pinterest-Worthy Tip: Set your lights to a low dim setting during evening hours to create a calming wind-down routine.
Conclusion
Lighting changes everything. Replacing overhead lights with warm sconces immediately elevates the mood of your living space.
7. Luxe Gallery Wall with Matching Metallic Frames
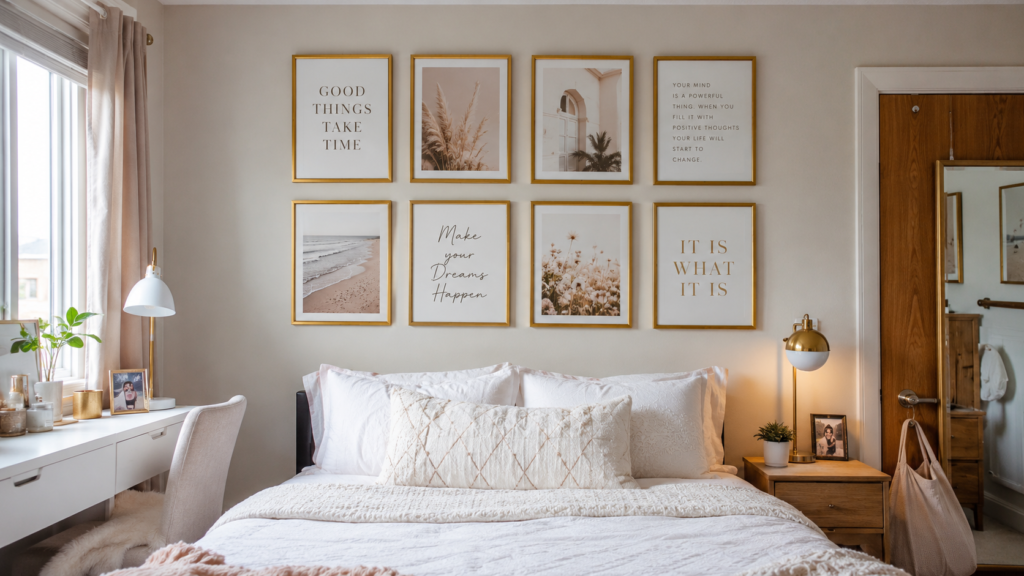
Organize Your Personal Photos with High-End Uniform Framing
Taping unmounted posters or photos directly to the wall makes a room look temporary and cluttered. Framed, matted art instantly elevates your wall decor.
Why You’ll Love This Idea
It turns personal memories, art prints, and quotes into a clean, gallery-worthy installation.
Materials Needed
- 4 to 6 matching picture frames with white mat boards
- Printed high-resolution art prints or photos
- Command picture hanging strips (velcro type)
- Measuring tape and painter’s tape
- Level
Step-by-step Instructions
- Print your photos or digital art files to fit your frame mats (e.g., 5×7 prints in 8×10 frames).
- Insert prints into frames, securing them centrally behind the matting.
- Lay frames out on your floor to experiment with grid or staggered arrangements.
- Cut paper templates matching your frame sizes and tape them to the wall to visualize layout.
- Use a level to ensure paper guides are straight.
- Apply command picture strips to the back corners of your first frame.
- Press the frame onto the wall over the paper template location.
- Hold firmly for 30 seconds.
- Repeat for all remaining frames while keeping equal distance between them.
- Remove paper guides and step back to evaluate symmetry.
Beginner Tips
Thick white matting inside frames makes simple photos look significantly more high-end and intentional.
Common Mistakes to Avoid
Don’t use standard tape or push pins, which damage prints and ruin the high-end look.
Styling or Decorating Ideas
Mix black-and-white family photos with minimalist architectural prints for a balanced, modern grid layout.
Best Colors and Materials
- Colors: Thin metallic gold, champagne silver, or slim black frames.
- Materials: Metal or wood frames with white bevel-cut mats and clear glass/acrylic covers.
Quick Stats
- Estimated Cost: $25 – $45
- Estimated Time: 1 Hour
- Difficulty Level: Easy
- Where It Looks Best: Main wall above the desk or sofa area.
- Pinterest-Worthy Tip: Space your frames exactly 2 inches apart to keep your gallery grid clean and precise.
Conclusion
Uniform framing turns simple prints into an organized, sophisticated focal point that elevates the whole room.
8. Layered Rug Technique for Texture and Warmth
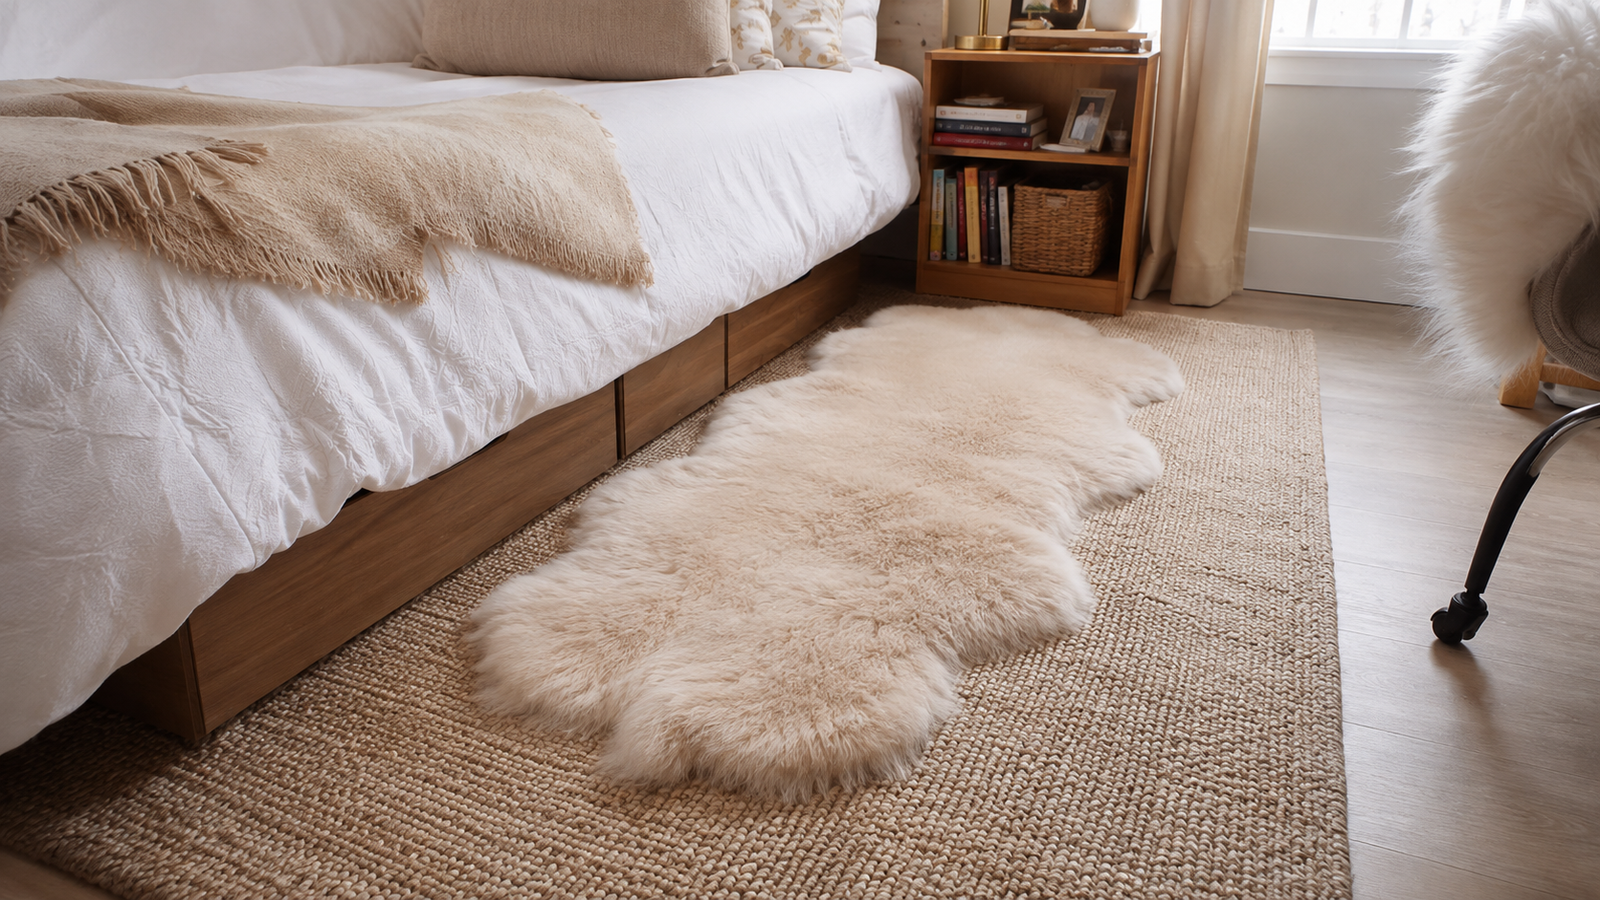
Cover Up Commercial Dorm Carpeting with High-End Rug Layers
Dorm floors are often covered in basic commercial carpet or cold vinyl tiles. Layering a large flat rug with a plush accent rug adds comfort and depth.
Why You’ll Love This Idea
It hides worn college floors while adding softness underfoot, bringing warmth and color into the space.
Materials Needed
- Large base rug (e.g., 5×7 neutral jute or flat-weave rug)
- Smaller top accent rug (e.g., 3×5 faux cowhide or plush faux-fur rug)
- Double-sided rug tape (carpet safe)
Step-by-step Instructions
- Vacuum and clean your dorm floor surface completely.
- Unroll your large base rug and position it partially under the bed frame to ground the space.
- Smooth out any wrinkles or curling corners.
- Place double-sided rug tape along the corners of the bottom rug to anchor it to the floor.
- Lay your smaller plush accent rug diagonally across a corner of the base rug.
- Adjust the top rug so it creates an intentional layered look.
- Secure the top rug edges with rug tape to prevent slipping.
- Step on all taped areas to lock the adhesives in place.
Beginner Tips
Diagonal placement for the top accent rug breaks up straight boxy lines in small rooms, making the space feel dynamic and open.
Common Mistakes to Avoid
Using a rug that is too small (like a bath mat size) will make your room look smaller. Go as large as your room permits.
Styling or Decorating Ideas
Place the layered rugs next to your bed so it is the first soft surface your feet touch every morning.
Best Colors and Materials
- Colors: Neutral cream, beige, light grey, or muted vintage pattern tones.
- Materials: Flat-weave cotton base layered with a plush faux sheepskin accent.
Quick Stats
- Estimated Cost: $40 – $75
- Estimated Time: 20 Minutes
- Difficulty Level: Beginner
- Where It Looks Best: Center floor area extending out from under the bed.
- Pinterest-Worthy Tip: Choose a plush faux sheepskin top layer to add a cozy texture contrast against a woven base.
Conclusion
Layering rugs transforms cold dorm floors into a plush, layered, and comfortable foundation for your entire design theme.
Expert Decorating Tips for Small Spaces
Making a tiny dorm room look like a high-end luxury space requires intentional layout choices. Here are key styling strategies used by interior designers:
1. Maintain a Monochromatic Color Palette
Stick to 2 or 3 main colors max (for example: cream, soft gold, and blush). Keeping your color scheme focused creates visual harmony, making small rooms look open and organized.
2. Maximize Vertical Space
Utilize tall floor lamps, floating shelves hung with Command strips, and high-mounted curtains to draw the eye upward and emphasize room height.
3. Use Metallic Accents
Incorporate small metallic finishes (like brass lamps, gold picture frames, or brushed metal trays). These reflective surfaces catch light and add instant sparkle to plain furniture.
| Decor Strategy | Budget Option | Luxury Effect |
| Monochromatic Textiles | Matching cream duvet & pillow set | Creates a seamless, high-end hotel bed look |
| Reflective Surfaces | Small gold trays & framed mirrors | Bounces light around to make rooms feel bigger |
| Hidden Storage | Bed skirts & matching decorative bins | Eliminates visual clutter instantly |
Budget-Saving Tips for Students
- Thrift and Flip: Check thrift stores for framed art, solid lamps, and trays. A quick coat of spray paint turns cheap items into chic decor.
- Buy Multi-Packs: Purchase Command strips, frames, and lighting sets in multi-packs online to save per unit.
- Shop End-of-Summer Sales: Retailers discount dorm lines heavily right after the school season starts.
- Repurpose Household Items: Use glass jars wrapped in ribbon as brush holders or small vases.
Frequently Asked Questions
How can I make my dorm bed look like a hotel bed?
Invest in a fluffy white comforter, insert an oversized duvet, add a fitted bed skirt, and layer multiple pillows using varying sizes and textures (like velvet and faux fur).
Will contact paper damage dorm desk surfaces?
No, standard vinyl contact paper removes cleanly from smooth laminate surfaces. Warm it slightly with a hairdryer prior to removal to soften the adhesive.
How do I cover ugly dorm walls without painting?
Use removable peel-and-stick wallpaper, large fabric tapestries framed with molding, or create a full-scale gallery wall using Command hanging strips.
How can I add warm lighting without plugging in many cords?
Use rechargeable LED puck lights, battery-powered wall sconces, or cord-free desk lamps that charge via USB.
What is the best way to hide storage under a high dorm bed?
An extra-long tailored bed skirt or long velvet curtain panels pinned along the frame springs will hide plastic bins completely.
How do I make my small dorm room look larger?
Hang mirrors across from windows to bounce natural light, keep your floor space clear, and stick to light neutral color schemes.
Can I install peel-and-stick wall molding on cinder block?
Yes! Ensure the cinder blocks are clean and dry, then use heavy-duty removable adhesive strips to hold the lightweight foam molding strips flat.
What decor item gives the highest luxury impact for under $20?
Warm-toned lighting fixtures and faux-marble contact paper offer the highest visual upgrade for the lowest overall cost.
Final Thoughts
Transforming your college space doesn’t require spending a fortune. When learning how to create a luxury dorm room on a budget, focus on texture, soft lighting, and clean lines. By putting these eight easy DIY projects into action, you can build a cozy, high-end space that feels like home throughout your college years. Take it one project at a time, stick to your style vision, and turn your basic dorm room into an aesthetic sanctuary!
Love these ideas? Save this Pin!
Don’t lose these budget-friendly luxury tips! Hover over any image and click the Save button to pin this post directly to your Dorm Decor or DIY Room Upgrade boards on Pinterest. Share your transformations with us by tagging your photos—we would love to see your upgraded luxury dorm rooms!