Introduction
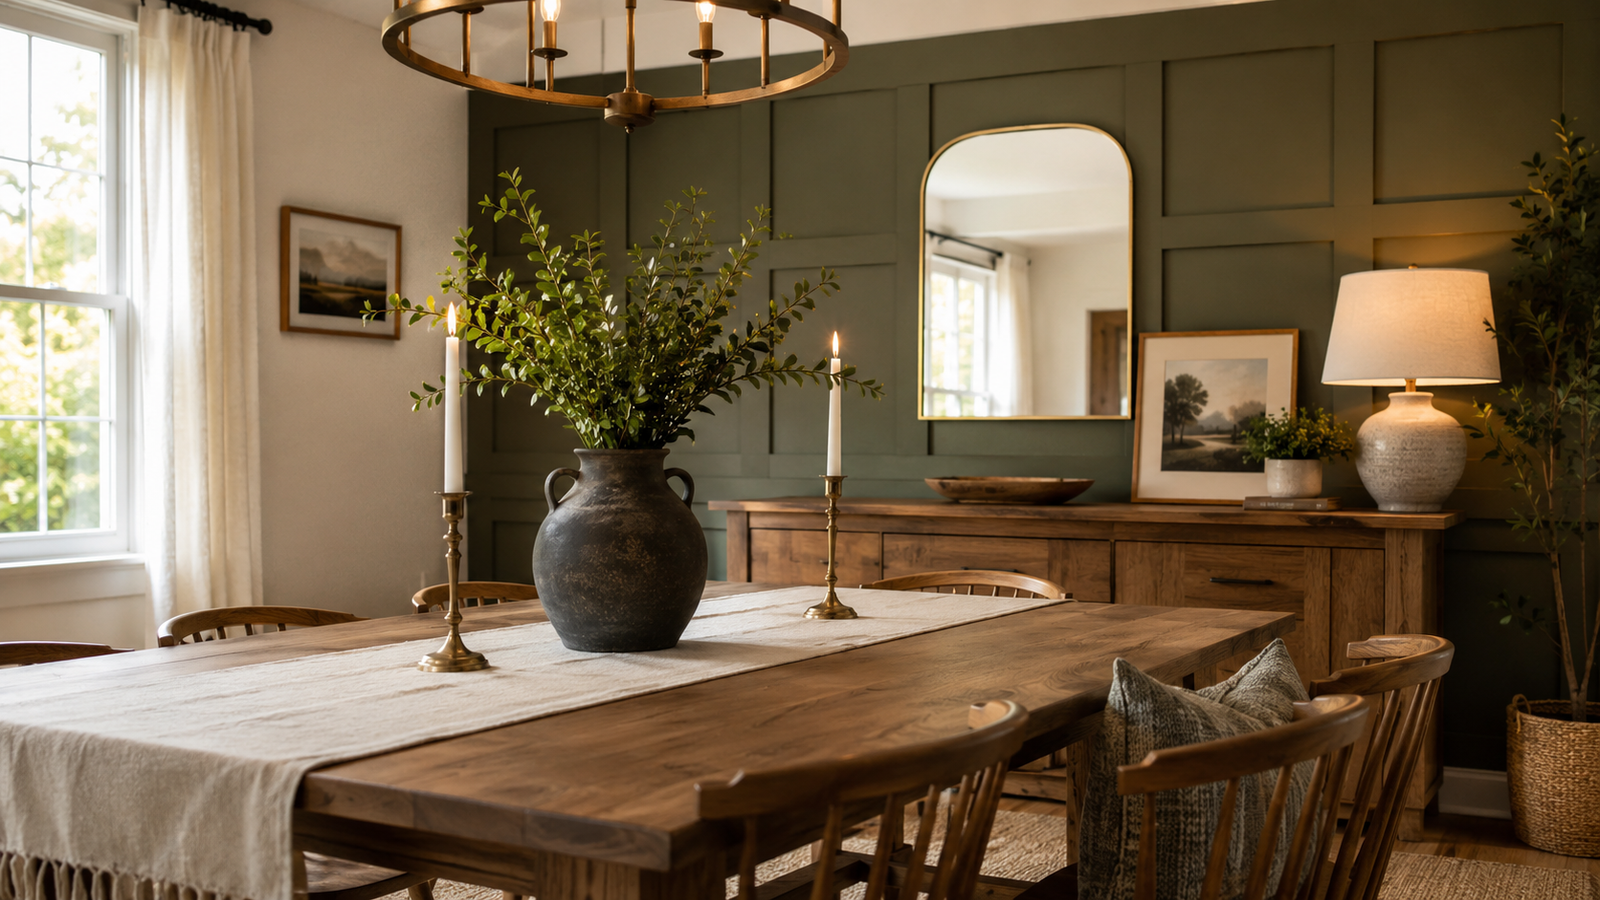
Your dining room is so much more than just a place to eat dinner—it is the beating heart of your home! It is where your family gathers after a long day, where late-night conversations over dessert happen, and where memories are made during holidays and cozy weekend brunches.
Whether you have a massive formal dining hall, a tiny breakfast nook in an apartment, or an open-concept living space, finding the perfect dining room decoration idea can feel a bit overwhelming. With thousands of gorgeous images popping up on Pinterest every second, where do you even start?
The great news is that you don’t need a massive budget or a team of professional interior designers to create a magazine-worthy dining room. A fresh coat of paint, a smart change in lighting, or a well-placed rug can instantly elevate your space.
In this ultimate decorating guide, we are going to dive into eight fully detailed, step-by-step dining room makeover projects. Every single idea comes with clear instructions, material lists, budget breakdowns, and expert secrets to ensure your project turns out picture-perfect.
Grab a warm cup of coffee, fire up your favorite Pinterest boards, and let’s explore these incredible dining room decoration ideas that will turn your home into a stylish, cozy haven!
Why Dining Room Decorating Trends Are Booming
Dining room makeovers are taking Pinterest and social media by storm. Over the past few years, our homes have become our sanctuaries. People are moving away from overly formal, stiff dining spaces and moving toward warm, multifunctional, personal rooms.
Here is why refreshing your dining room decor is trending right now:
- Social & Gathering Hubs: Homeowners want spaces that feel welcoming and comfortable for entertaining guests without feeling stuffy.
- Budget-Friendly DIY Culture: Thanks to modern paint techniques, thrift-store flips, and smart lighting swaps, you can achieve a luxury look for a fraction of the high-end cost.
- Statement Aesthetics: The dining room is usually a self-contained space, making it the perfect playground to test out bold paint colors, accent walls, and dramatic light fixtures.
- Pinterest Inspiration: DIYers love seeing real, step-by-step transformations that are easy to copy and tailor to their own personal style.
Essential Materials and Tools Needed
Before starting any home decor transformation, it helps to keep a basic decorating toolkit on hand. While specific projects require unique materials, having these basics ready will make your workflow seamless:
| Tool / Material | What It’s Used For |
| Measuring Tape | Measuring room dimensions, rug sizing, and hanging artwork correctly |
| Painter’s Tape & Drop Cloths | Protecting floors and creating sharp lines for accent walls |
| Cordless Power Drill & Screws | Hanging shelves, light fixtures, and wall art securely |
| Bubble Level or Laser Level | Ensuring frames and shelving sit perfectly straight |
| Quality Paintbrushes & Rollers | Smooth application for walls, trim, and thrifted furniture |
| Command Strips & Picture Hooks | Damage-free wall hanging options for artwork and gallery walls |
Essential Safety Tips for Home Decorating
Decorating is super fun, but safety always comes first! Keep these simple guidelines in mind:
- Turn Off the Power: Always turn off your electrical breaker at the main box before swapping out light fixtures or chandeliers. Test the wires with a voltage tester!
- Use Heavy-Duty Anchors: When hanging heavy mirrors or wooden shelves, locate the wall studs or use drywall anchors rated for the appropriate weight.
- Ensure Good Ventilation: When painting or staining furniture inside, keep windows open and run fans to prevent inhaling fumes.
- Practice Ladder Safety: Always place your step ladder on a firm, flat surface when hanging higher wall items or light fixtures. Never overreach!
8 Creative Dining Room Decoration Ideas
Idea 1: The Cozy Board and Batten Accent Wall
Introduction
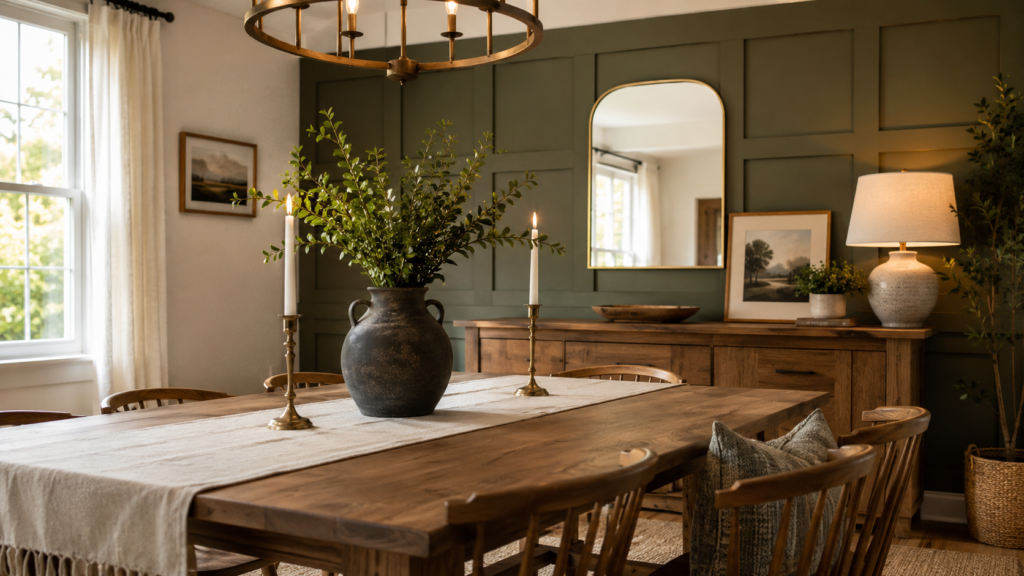
Adding texture to a plain, boring wall is one of the most effective ways to upgrade a dining room. A half-wall Board and Batten accent wall adds architectural charm, classic character, and visual depth to any space.
Why You’ll Love This Idea
It turns a basic drywall room into a custom, high-end dining space. It looks expensive, but it can easily be done over a single weekend with basic wood strips and paint.
Materials Needed
- MDF strips or pre-primed pine boards (1x3s or 1x4s)
- Top ledge board (1×2 pine board)
- Construction adhesive (Liquid Nails)
- Finishing nails and nail gun
- Paintable wood filler and caulk
- Interior paint (matching or contrasting wall color)
Step-by-Step Instructions
- Measure and Plan: Measure the width of your dining room wall. Decide on the height of your accent wall (usually two-thirds up the wall, around 4 to 5 feet).
- Calculate Grid Spacing: Calculate the distance between your vertical boards. A good rule of thumb is spacing them roughly 12 to 16 inches apart.
- Attach Top and Bottom Horizontal Rails: Install a bottom baseboard if needed, then attach your top horizontal rail across the length of the wall using a level, nail gun, and adhesive.
- Cut Vertical Batten Strips: Cut your vertical boards to size using a miter saw or manual hand saw.
- Attach Vertical Boards: Apply construction adhesive to the back of each vertical strip, place it against the wall, level it, and secure it with finishing nails.
- Add the Top Ledge: Nail a 1×2 board flat on top of the upper rail to create a picture ledge.
- Fill Nail Holes & Caulk: Fill all nail holes with wood filler. Apply paintable caulk along every seam where the wood meets the wall for a seamless look.
- Sands and Clean: Once the filler dries, sand it smooth and wipe away dust with a damp cloth.
- Prime and Paint: Apply one coat of primer and two coats of durable interior paint (satin or semi-gloss finish works best).
Beginner Tips
Use a wood spacer block cut to the exact size of the gap between your boards. This saves you from having to use your tape measure for every single board!
Common Mistakes to Avoid
Skipping the caulking step. If you don’t caulk the gaps between the wood and the drywall, the wall will look cheap and unfinished.
Styling & Decorating Ideas
Style the top ledge with small framed artwork, brass candlesticks, or trailing greenery like pothos or ivy.
Best Colors & Materials
- Colors: Deep olive green, moody navy blue, crisp warm white, or greige.
- Materials: MDF boards, satin interior paint, brass accents.
Quick Project Overview
- Estimated Cost: $80 – $150
- Estimated Time: 1 to 2 Days
- Difficulty Level: Intermediate
- Where It Looks Best: Small to medium dining rooms that lack architectural character.
Pinterest-Worthy Tip
Paint the Board and Batten in a rich, dark tone while keeping the top half of the wall a soft cream to create high contrast and drama!
Conclusion
This classic accent wall idea brings instant architectural character to your space and makes every dinner feel like a fine dining experience.
Idea 2: Statement Oversized Pendant Lighting
Introduction
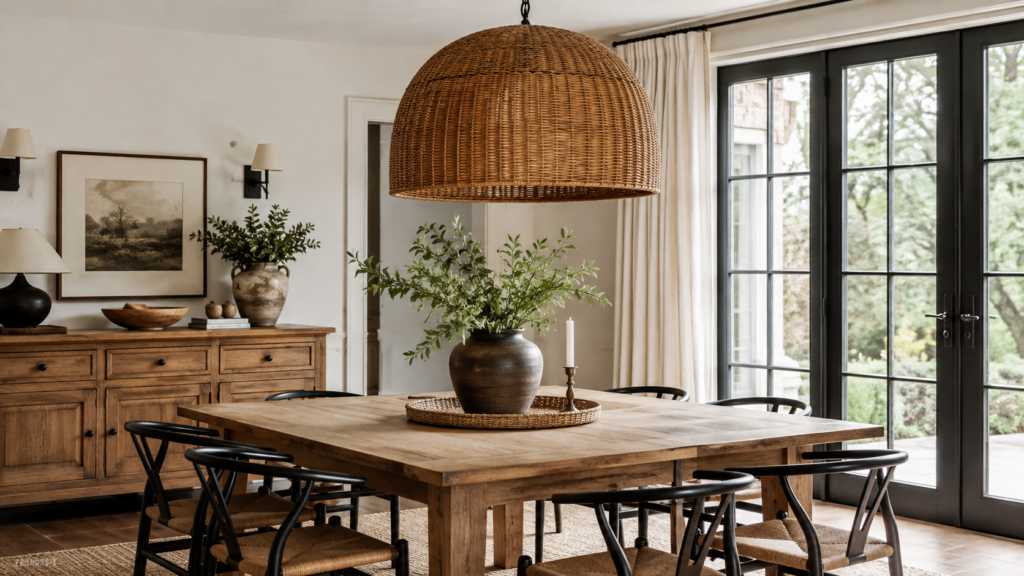
Lighting is the crown jewel of any room. Swapping out a small, outdated ceiling fixture for a stunning oversized pendant light instantly draws the eye upward and anchors your dining table.
Why You’ll Love This Idea
It creates an immediate visual focal point. Even if your furniture is simple, a gorgeous light fixture elevates the entire room instantly.
Materials Needed
- Oversized pendant light fixture or basket chandelier
- Voltage tester
- Screwdrivers and wire strippers
- Wire nuts and electrical tape
- Step ladder
Step-by-Step Instructions
- Turn Off Electrical Power: Shut off power to the dining room at your main breaker box. Double-check with a voltage tester at the light switch.
- Remove the Old Fixture: Unscrew the canopy of your existing light, disconnect the wire nuts, and carefully lower the old light fixture down.
- Assemble the New Fixture: Unpack your statement light fixture and adjust the chain or cord length so it hangs correctly over your table.
- Check Height Placement: The bottom of your light fixture should hang roughly 30 to 36 inches above the surface of your dining table.
- Connect Wiring: Twist the white (neutral) wires together and cap them with a wire nut. Do the same for the black (hot) wires and ground wires.
- Secure the Mounting Bracket: Screw the mounting bracket flush into the ceiling electrical box.
- Attach the Canopy: Lift the fixture canopy flush against the ceiling and tighten the securing screws.
- Install Bulbs & Test: Insert warm LED bulbs, turn the breaker back on, and switch on the light to test your installation.
Beginner Tips
Always keep a helper nearby to hold the light fixture while you connect the electrical wiring overhead!
Common Mistakes to Avoid
Hanging the light fixture too high or too small. An undersized fixture will make your dining room feel off-balance and unfinished.
Styling & Decorating Ideas
Pair a woven rattan pendant light with natural wood tones and linen chair covers for an effortless organic modern vibe.
Best Colors & Materials
- Colors: Matte black, brushed brass, natural rattan, or clear seeded glass.
- Materials: Woven seagrass, powder-coated metal, hand-blown glass.
Quick Project Overview
- Estimated Cost: $100 – $250
- Estimated Time: 2 Hours
- Difficulty Level: Beginner to Intermediate
- Where It Looks Best: Centered directly over square or rectangular dining tables.
Pinterest-Worthy Tip
Install a dimmer switch on your light line so you can easily shift from bright breakfast light to low, romantic dinner lighting!
Conclusion
Upgrading to a bold statement light completely rewrites the energy of your dining room with minimal effort and maximum impact.
Idea 3: The Thrifted Vintage Sideboard Makeover
Introduction
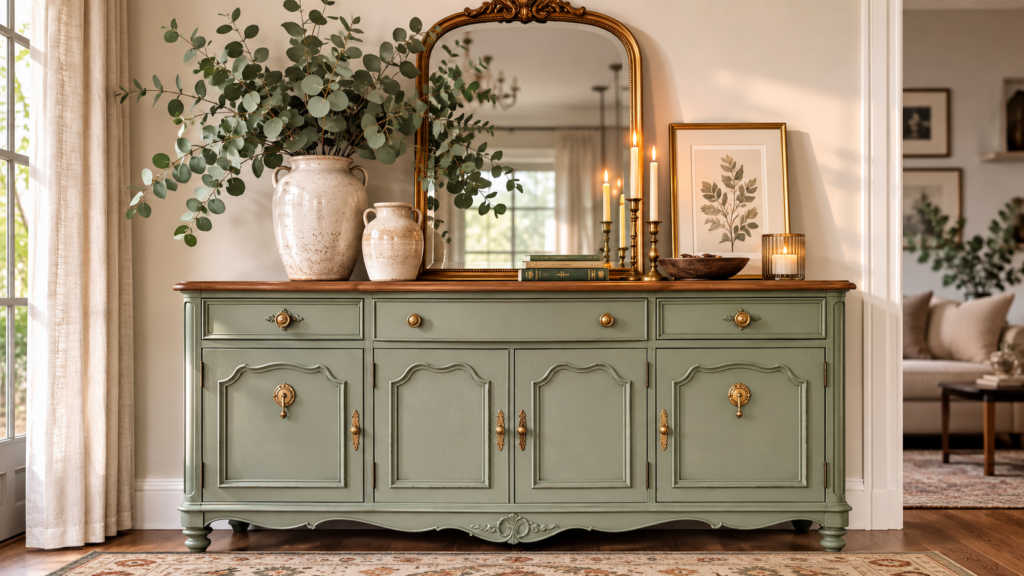
Adding a sideboard or credenza offers both valuable storage space and a decorative surface. Refinishing a thrifted piece of wood furniture gives you modern style while preserving historic charm.
Why You’ll Love This Idea
It saves hundreds of dollars compared to buying brand-new furniture, offers hidden storage for linens and wine glasses, and yields a completely unique piece!
Materials Needed
- Thrifted vintage buffet or dresser
- Medium (120-grit) and fine (220-grit) sandpaper
- Degreaser/Cleaner (Krud Kutter or TSP)
- Furniture primer and cabinet paint
- New modern hardware (knobs or pulls)
- Paint rollers and detail brushes
Step-by-Step Instructions
- Prep and Clean: Remove all drawers, doors, and old hardware. Clean the entire furniture piece thoroughly with a degreaser to remove dust and oils.
- Light Sanding: Scuff-sand all surfaces with 120-grit sandpaper to remove old gloss and help the new paint adhere properly.
- Wipe Clean: Use a tack cloth or damp micro-fiber rag to wipe away all sanding dust.
- Apply Primer: Coat the entire piece with a stain-blocking primer. Let it dry completely according to manufacturer directions.
- Lightly Sand Primer: Smooth out any tiny drips using fine 220-grit sandpaper, then dust clean.
- Apply First Coat of Paint: Apply thin, even coats of high-quality cabinet paint using a micro-fiber roller for flat surfaces and brushes for trim.
- Apply Second Coat: Let the first coat dry for 4 to 6 hours, then apply a second smooth coat.
- Install New Hardware: Drill new holes if needed, and attach modern brass or matte black drawer pulls.
- Reassemble: Put the drawers and doors back in place and let the paint cure for 48 hours before styling.
Beginner Tips
Avoid applying thick paint coats! Multiple thin coats cure much harder and create a smooth, streak-free factory finish.
Common Mistakes to Avoid
Skipping the cleaning or priming step. Skipping prep work causes paint to chip and peel off very easily over time.
Styling & Decorating Ideas
Style the top surface with a large decorative mirror leaning against the wall, a tall ceramic vase filled with dried eucalyptus, and stacked coffee table books.
Best Colors & Materials
- Colors: Muted sage green, matte charcoal, warm greige, or rich terracotta.
- Materials: Hardwood furniture, chalk or enamel cabinet paint, brushed metal hardware.
Quick Project Overview
- Estimated Cost: $60 – $120
- Estimated Time: 1 Weekend
- Difficulty Level: Beginner
- Where It Looks Best: Placed along the main focal wall of your dining space.
Pinterest-Worthy Tip
Style your sideboard using the “Rule of Three”: pair one tall item (like a lamp), one wide item (like a tray), and one low item (like a bowl) together!
Conclusion
A refreshed vintage sideboard gives your dining room a custom custom designer feel while keeping clutter organized behind closed doors.
Idea 4: The Large Gallery Wall with Personal Photos
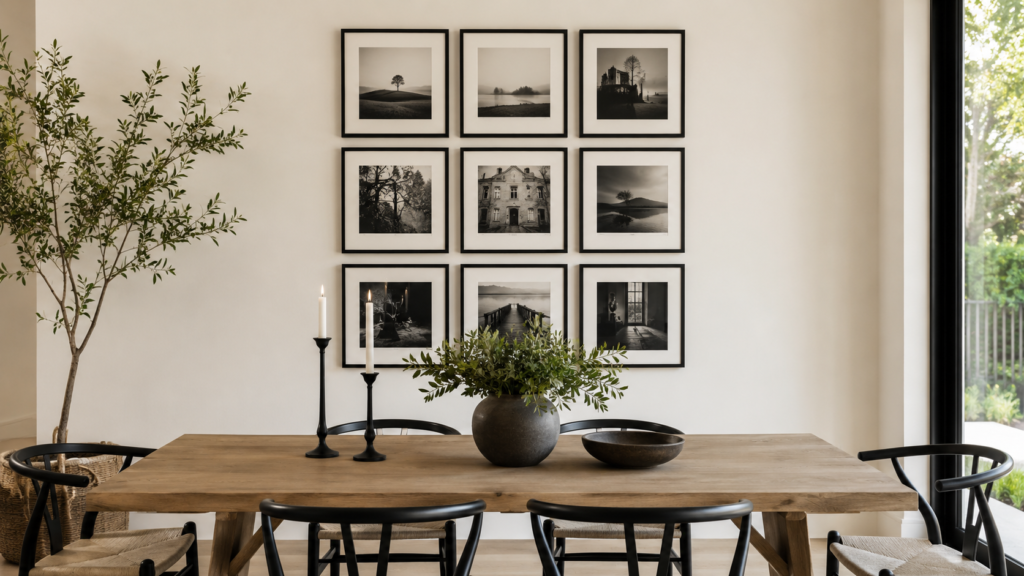
Introduction
A gallery wall brings warmth and personal stories into your dining room. Using matching frames with large mats turns everyday family photos into an elegant art gallery.
Why You’ll Love This Idea
It fills up large blank walls effortlessly, costs very little to make, and adds deeply personal emotional value to your dining space.
Materials Needed
- 6 to 9 matching picture frames (11×14 or 16×20)
- Picture mats with photo cutouts (e.g., 8×10 cutouts)
- Black and white printed family or landscape photos
- Painter’s tape and craft paper
- Laser level or tape measure
- Picture hanging nails and hammer
Step-by-Step Instructions
- Print Your Photos: Select high-resolution family photos or travel shots and print them in black and white for a cohesive, timeless aesthetic.
- Assemble Frames: Place prints into mats and mount them securely inside your matching frames.
- Create Paper Templates: Trace each frame onto craft paper, cut them out, and mark where the hanging hooks are located on the paper.
- Tape Templates to Wall: Use painter’s tape to arrange the paper templates on your wall. Test different grid layouts until balanced.
- Use a Level: Ensure all paper cutouts are evenly spaced (usually 2 to 3 inches apart) and perfectly level.
- Drive Nails: Hammer picture nails directly through the hanging spots marked on your paper templates.
- Remove Paper: Tear away the craft paper templates from the wall, leaving the nails in place.
- Hang Frames: Hang your framed art pieces onto the nails and double-check with a mini level.
Beginner Tips
Always use black-and-white photos when mixing different scenes. Black-and-white editing instantly ties various pictures together visually!
Common Mistakes to Avoid
Hanging your gallery wall too high! The center of your overall grid should sit roughly at eye level (57 to 60 inches from the floor).
Styling & Decorating Ideas
Arrange frames in a precise 3×3 grid pattern over your dining table for a modern, clean, organized look.
Best Colors & Materials
- Colors: Crisp white mats with black, natural wood, or gold thin frames.
- Materials: Glass, real wood frames, high-gloss photo prints.
Quick Project Overview
- Estimated Cost: $50 – $100
- Estimated Time: 2 Hours
- Difficulty Level: Beginner
- Where It Looks Best: On large, plain walls adjacent to the main dining table.
Pinterest-Worthy Tip
Keep the spacing between frames precise and tight (2 inches). Tight spacing makes grid gallery walls look cohesive and expensive!
Conclusion
A symmetrical gallery wall bridges the gap between sleek modern interior design and sweet home memories.
Idea 5: Oversized Area Rug Grounding
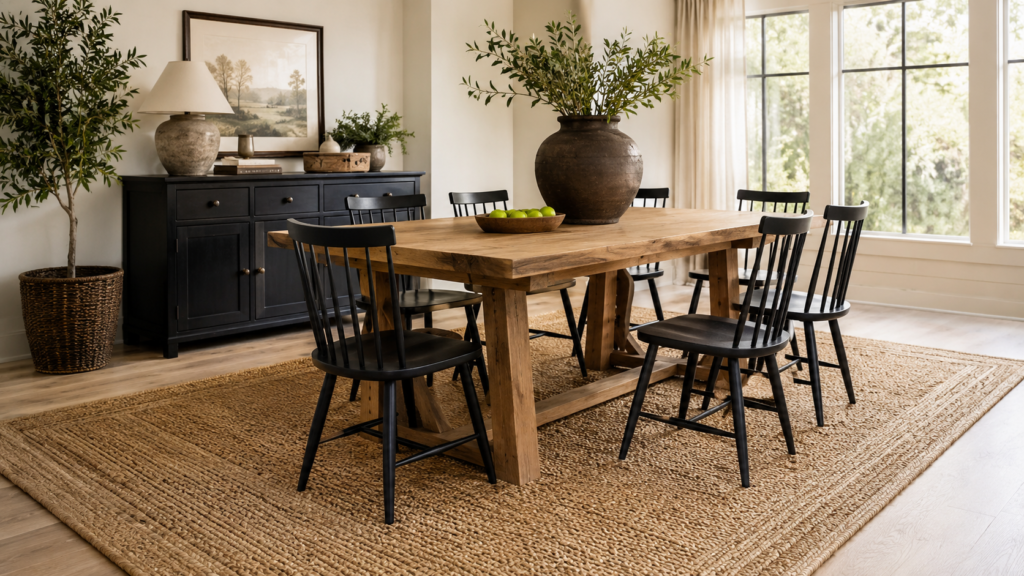
Introduction
An area rug anchors the entire dining room set, pulling chairs and tables together into a single cohesive functional zone, especially in open-concept floor plans.
Why You’ll Love This Idea
It adds soft texture underfoot, deadens room echoes, protects floor wood, and adds instant color and warmth to the dining space.
Materials Needed
- Low-pile or flat-weave area rug (8×10 or 9×12 ft)
- Non-slip rug pad
- Carpet tape (optional)
Step-by-Step Instructions
- Measure Dining Table: Measure the exact footprint of your dining table with all leaves extended.
- Calculate Rug Size: Add at least 24 inches to all four sides of your table measurements so dining chairs stay on the rug when pulled out.
- Clear the Space: Move all dining chairs and the dining table out of the immediate area.
- Position Rug Pad: Lay out a high-quality non-slip rug pad and trim it so it stays 1 to 2 inches smaller than your rug edges.
- Unroll the Area Rug: Center your area rug over the non-slip pad, smoothing out any creases or air bubbles.
- Flatten Corners: Place heavy books or furniture pieces on stubborn corners overnight to flatten them completely.
- Reset Dining Furniture: Move your table back to the absolute center of the rug and arrange chairs neatly around it.
Beginner Tips
Choose a low-pile or flat-weave rug (like jute or wool flat-weave). High-shag rugs capture food crumbs easily and make sliding chairs difficult!
Common Mistakes to Avoid
Buying a rug that is too small! If your chair legs fall off the rug edge when sitting down, your rug is too small for the room.
Styling & Decorating Ideas
Layer a textured natural fiber jute rug underneath a smaller vintage-patterned washable rug for a rich, trendy bohemian look.
Best Colors & Materials
- Colors: Natural tan, washed vintage blue, warm terracotta, or warm cream.
- Materials: Jute, wool, washable synthetic blends.
Quick Project Overview
- Estimated Cost: $120 – $300
- Estimated Time: 1 Hour
- Difficulty Level: Very Easy
- Where It Looks Best: Underneath open-concept or hardwood floor dining room setups.
Pinterest-Worthy Tip
If you have kids or pets, buy an indoor/outdoor or machine-washable rug so you can clean food spills in a snap!
Conclusion
The right area rug frames your dining space like a piece of art, creating a cozy and defined gathering place..
Idea 6: The Modern Greenery & Centerpiece Station
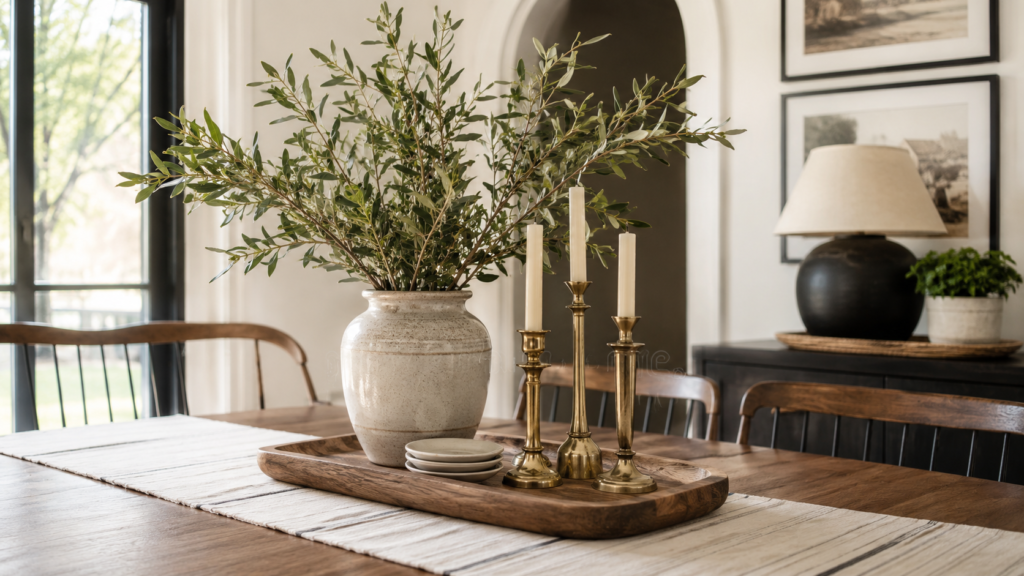
Introduction
You don’t need fixed structural changes to transform a dining room. A beautifully styled, rotating seasonal table centerpiece brings immediate life into the entire room.
Why You’ll Love This Idea
It is completely affordable, fast to set up, and can be easily customized every season or holiday!
Materials Needed
- Large wood tray or stone pedestal bowl
- Vase (ceramic, glass, or terracotta)
- Fresh or high-quality faux greenery stems (e.g., olive, eucalyptus)
- Taper candles and brass candlesticks
Step-by-Step Instructions
- Clear the Surface: Wipe down your dining table surface thoroughly until spotless.
- Anchor with a Tray: Place a large decorative tray or flat wooden runner in the center of the table.
- Add Vertical Height: Place a tall ceramic or glass vase near the center of the tray base.
- Arrange Foliage Stems: Insert tall, arching green branches (like stems of olive branches) into the vase for natural height.
- Layer Secondary Accents: Add balance by placing two or three brass taper candlesticks of varying heights next to the main vase.
- Incorporate Texture: Place a small decorative stone bowl or low dish on the remaining tray space to hold salt cellars or small trinkets.
- Check View Lines: Sit down in a chair to verify that guests can easily see across the table over or around the arrangement!
Beginner Tips
Always use odd-numbered groupings (3 or 5 items) when arranging centerpiece decorations. Odd numbers create visually appealing compositions.
Common Mistakes to Avoid
Making centerpieces so wide and dense that guests have to awkwardly lean around them to talk during dinner.
Styling & Decorating Ideas
Swap green olive branches out for warm dried pampas grass in autumn, or pine boughs with red berries during winter holidays!
Best Colors & Materials
- Colors: Deep forest greens, warm brass gold, creamy white ceramics, natural wood tones.
- Materials: Raw stoneware, turned wood, brass metal, natural dried greenery.
Quick Project Overview
- Estimated Cost: $30 – $70
- Estimated Time: 20 Minutes
- Difficulty Level: Very Easy
- Where It Looks Best: Centered on any round, square, or rectangular table.
Pinterest-Worthy Tip
Trim real olive or eucalyptus branches from your yard and place them in water; they last for weeks and smell amazing!
Conclusion
A styled centerpiece adds everyday elegance to your room, making your dining space feel intentional and ready for company.
Idea 7: Built-in Window Seat or Breakfast Nook
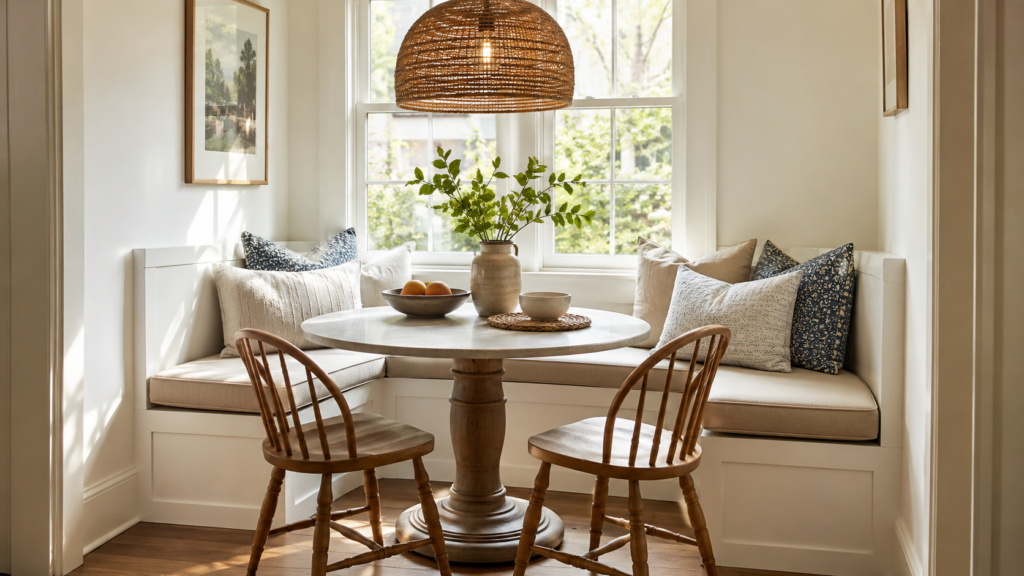
Introduction
Transforming an unused dining corner or window alcove into a custom built-in dining bench creates a cozy, restaurant-style dining experience at home.
Why You’ll Love This Idea
It maximizes sitting capacity, creates hidden storage under the bench, and turns awkward corners into architectural highlights.
Materials Needed
- Plywood and 2×4 framing lumber
- Bench seat cushions and throw pillows
- Cabinet hinges (for lift-up storage tops)
- MDF trim boards for facing
- Paint and caulk
Step-by-Step Instructions
- Design and Measure: Measure your corner or window wall space. Mark target heights for sitting (around 18 inches including cushion thickness).
- Build 2×4 Framework: Frame a sturdy rectangular box against the wall using 2x4s secured directly into wall studs.
- Face with MDF: Cover the outer front facing of the bench frame with smooth MDF panels or decorative beadboard.
- Install Hinged Top: Cut a sturdy top panel out of 3/4-inch plywood. Secure it to the back frame using piano hinges to create accessible interior storage.
- Caulk and Paint: Fill all outer trim seams with caulk and paint the bench to match trim or accent wall colors.
- Add Custom Cushioning: Lay down a custom foam seat pad wrapped in durable, easy-to-clean fabric.
- Style with Pillows: Arrange plush throw pillows against the wall to act as a soft backrest.
- Position Dining Table: Slide a round or pedestal-style dining table directly up to the bench seating.
Beginner Tips
Use a pedestal dining table (a table with one center leg instead of four corner legs) to make getting in and out of the bench easy!
Common Mistakes to Avoid
Making the bench seat too tall or deep. A seat height over 19 inches makes legs dangle uncomfortably while eating dinner.
Styling & Decorating Ideas
Layer cozy linen accent pillows, textured knit throws, and a round wooden table to create a French bistro vibe.
Best Colors & Materials
- Colors: Warm white, coastal blue, subtle greige, natural leather.
- Materials: Performance washable upholstery fabrics, beadboard panelling, natural timber tops.
Quick Project Overview
- Estimated Cost: $150 – $350
- Estimated Time: 1 to 2 Weekends
- Difficulty Level: Advanced DIY
- Where It Looks Best: Small kitchens, window bays, and breakfast nooks.
Pinterest-Worthy Tip
Choose performance stain-resistant cushion fabric so spills wipe right off without staining your bench upholstery!
Conclusion
A cozy banquette bench turns tight dining corners into functional, high-density seating areas full of character.
Idea 8: The Dramatic Dark & Moody Accent Room
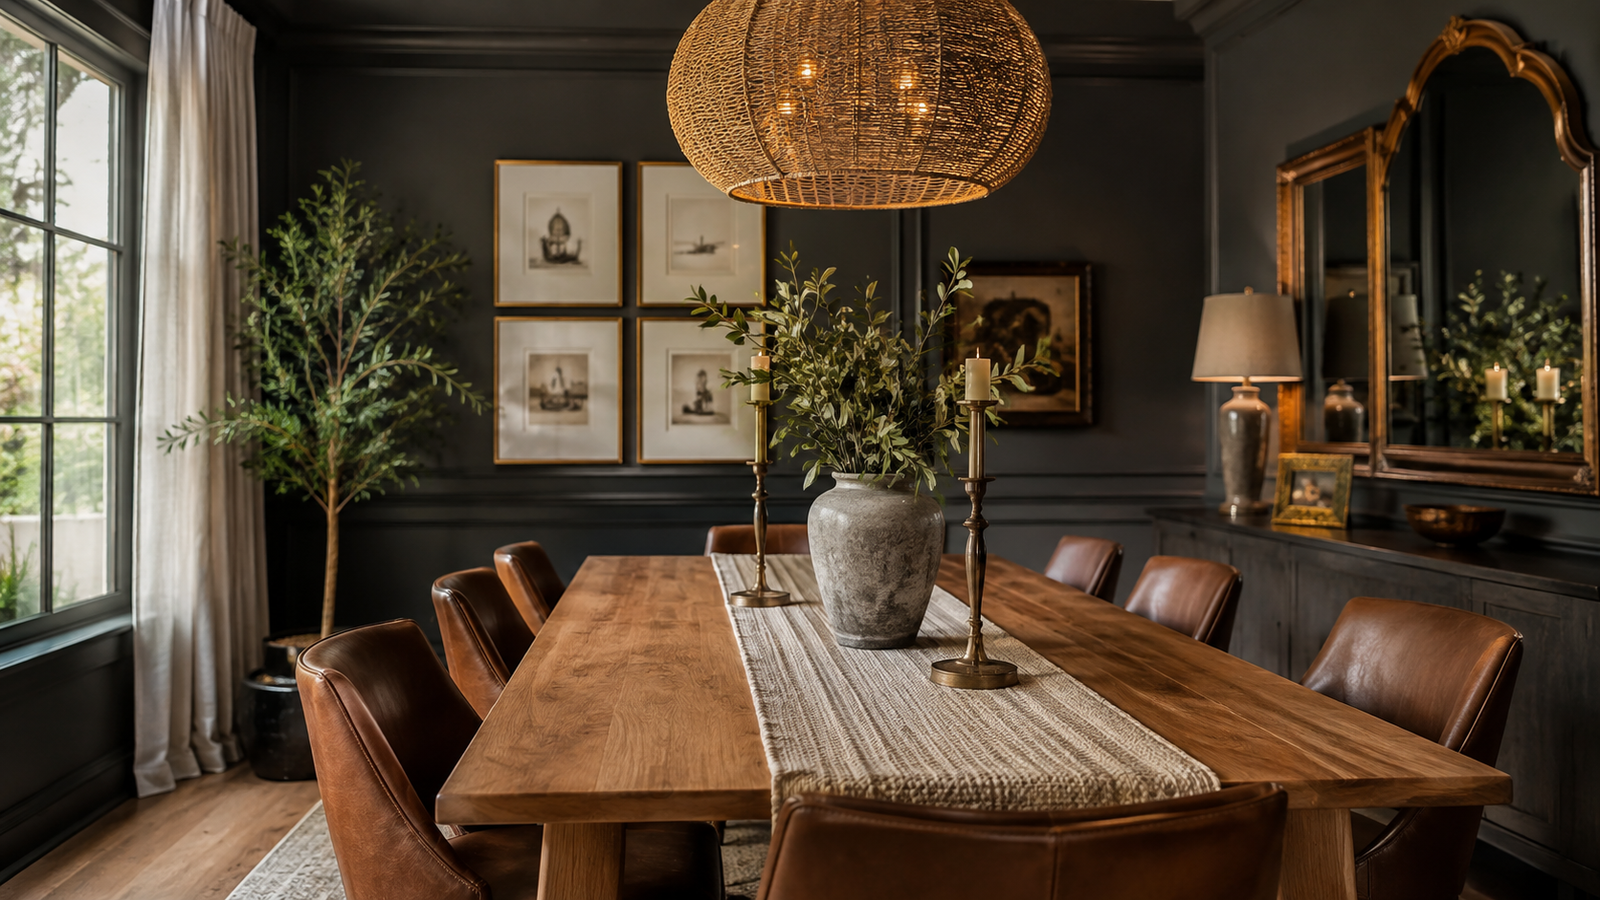
Introduction
Instead of making every room white, lean into cozy drama by painting your dining space in a dark, rich color palette.
Why You’ll Love This Idea
Dark rooms feel intimate, sophisticated, and glamorous under evening lamp light. It creates a bold, unforgettable aesthetic for dinner parties!
Materials Needed
- Rich dark interior paint (matte or flat finish)
- Painter’s tape and drop cloths
- High-quality paint roller set
- Metallic gold or brass wall decor accents
Step-by-Step Instructions
- Pick Your Shade: Select a moody shade like charcoal, deep navy, rich plum, or dark forest green.
- Prep Wall Surfaces: Patch any wall dents, sand smooth, and wipe down walls to remove dust.
- Tape Off Trim: Apply high-quality painter’s tape along all baseboard edges, door frames, and ceiling lines.
- Apply Primer: If painting dark color over light walls, apply a dark-tinted primer coat for optimal color coverage.
- Cut in Edges: Use an angled paint brush to carefully cut in paint along all wall edges and corners.
- Roll First Coat: Roll paint onto walls in even ‘W’ pattern motions to ensure complete, streak-free coverage.
- Apply Second Coat: Let the first coat dry fully (2 to 4 hours) before applying a rich second coat.
- Add High-Contrast Decor: Hang warm gold-framed mirrors, warm wood wall art, and warm light fixtures to contrast the dark walls.
Beginner Tips
Paint your baseboards and crown molding in the exact same dark color as your walls for a modern, high-end monochrome color look!
Common Mistakes to Avoid
Using harsh white fluorescent lights. Dark walls require soft, warm lighting (2700K bulbs) to feel cozy rather than cold.
Styling & Decorating Ideas
Combine dark charcoal walls with a warm honey-oak dining table, cognac leather dining chairs, and brass wall sconces.
Best Colors & Materials
- Colors: Farrow & Ball Railings, Sherwin Williams Cyberspace, or Benjamin Moore Salamander.
- Materials: Brass hardware, velvet chair fabrics, warm leather, natural dark oak wood.
Quick Project Overview
- Estimated Cost: $50 – $100
- Estimated Time: 1 Day
- Difficulty Level: Beginner
- Where It Looks Best: Dedicated, enclosed dining rooms with warm lighting options.
Pinterest-Worthy Tip
Hang a large gold-framed mirror opposite a window so it reflects incoming natural sunlight across dark walls!
Conclusion
A dark paint color scheme transforms your dining room into an intimate, dramatic space for late night dinners and cozy conversations.
Pro Decorating Secrets from Interior Designers
Want your dining room to look like it came straight out of a interior design magazine? Keep these pro design secrets in mind:
+------------------+-------------------------------------------------------------+
| Design Principle | How to Apply It in Your Dining Room                         |
+------------------+-------------------------------------------------------------+
| Scale & Ratio    | Choose rugs & lights scaled correctly to your table footprint|
| Color Balance    | Use 60% main color, 30% secondary color, and 10% accent color|
| Layered Lighting | Combine overhead pendants, wall sconces, and soft candles   |
| Texture Contrast | Mix hard wood tables with soft fabric cushions & woven rugs |
+------------------+-------------------------------------------------------------+
- Mix Chair Styles: Don’t buy a matching 7-piece furniture set! Pair a natural wood table with modern metal or velvet upholstered chairs for an updated look.
- Mind the Hanging Heights: Hang wall artwork so its center point rests roughly 57 to 60 inches off the floor. Hang dining lights 30 to 36 inches above the tabletop.
- Incorporate Live Plants: Fresh indoor plants soften hard furniture edges and make dining spaces feel fresh and inviting.
Smart Budget-Saving Tips for DIY Decorators
You don’t need to break the bank to completely transform your space. Use these smart budget tricks:
- Thrift and Upcycle: Shop local secondhand thrift stores or online marketplaces for solid wood tables, sideboards, and chairs. A little paint transforms them completely!
- DIY Art Prints: Purchase downloadable digital art online for a few dollars, then print prints locally at photo centers for budget-friendly wall art.
- Shop Your Own House: Rotate vases, candle holders, and rug pieces from other rooms into your dining space for a quick refresh without spending a dime.
- Paint is Magic: Never underestimate paint! Painting an accent wall costs under $50 and changes the entire room aesthetic in a few hours.
Frequently Asked Questions
What is the most popular trend for dining rooms right now?
Organic modern design is extremely popular right now! It combines natural wood textures, clean lines, neutral colors, and plenty of cozy textiles like linen and jute.
How do I make a small dining room look bigger?
Use light wall colors like warm whites or greiges, place a large mirror on one wall to reflect light, and opt for a round pedestal table to save floor space.
What height should a dining room light fixture hang?
The bottom edge of your pendant or chandelier should hang roughly 30 to 36 inches above the surface of your dining table.
How big should a dining room rug be?
Your area rug should extend at least 24 inches past all sides of your dining table. This ensures your chair legs stay flat on the rug even when pulled out.
How can I make my dining room feel cozy?
Layer soft textures using an area rug, plush seat cushions, warm 2700K lighting bulbs, window curtains, and warm wooden furniture tones.
Should all dining chairs match?
Not at all! Mixing chair styles—like wooden side chairs paired with upholstered head chairs—adds dynamic designer style to your room.
What is a good alternative to a traditional dining table?
A built-in banquette or window corner booth is an awesome space-saving alternative that adds cozy seating to compact rooms.
How do I choose the right paint finish for a dining room?
Satin or Eggshell paint finishes work best for dining walls because they are easy to wipe clean without looking overly shiny.
Final Thoughts
Transforming your dining room into a stylish, cozy, and functional gathering space doesn’t require a fortune. Whether you decide to tackle a simple centerpiece update, paint a dramatic dark accent wall, or tackle a weekend Board and Batten DIY project, small intentional design choices make a world of difference.
Pick one or two ideas from this list that match your personal taste and start creating a home you love coming back to every day!
Love these dining room ideas? Save this pin to your Home Decor or Dining Room Projects board on Pinterest so you can easily reference these step-by-step guides whenever you are ready to start your makeover!