
Welcome Fall with a Spooky Front Porch Makeover
As the autumn leaves begin to turn vibrant shades of amber and gold, the crisp air brings a familiar thrill. Spooky season is officially here! There is something truly magical about decorating your front entryway for Halloween. Your porch is the very first impression your home makes on neighbors, friendly trick-or-treaters, and seasonal guests. It sets the stage for cozy fall memories, warm cups of spiced cider, and just the right amount of spooky fun.
Decorating your outdoors does not have to feel overwhelming or deplete your holiday budget. You do not need professional carpentry skills or expensive store-bought animatronics to create a stunning entryway. With a few smart styling choices, simple crafting supplies, and clever budget hacks, you can design an outdoor setup that looks like it came straight out of a interior decor magazine.
Whether your aesthetic leans toward whimsical floating ghosts, rustic pumpkin displays, or moody Victorian Gothic vibes, this comprehensive guide has something for every style. In this post, we are diving deep into 8 easy & spooky Halloween porch ideas that are fun to create, simple to customize, and guaranteed to earn hundreds of saves on Pinterest. Let’s transform your entryway into the most enchanting house on the block!
Why Halloween Porch Decor Is Trending
Outdoor Halloween decorating has evolved into a massive seasonal trend across social media platforms like Pinterest and Instagram. Homeowners and renters alike are moving away from traditional plastic setups in favor of curated, elevated seasonal themes.
Here is why creating a spooky front porch is so popular right now:
- Maximum Curb Appeal: A styled porch instantly boosts your home’s exterior aesthetic, making it warm, festive, and welcoming.
- Budget-Friendly Upgrades: DIY decor allows you to reuse natural elements like pumpkins, cornstalks, and dried florals while adding quick, low-cost scary touches.
- Family-Friendly Activities: Setting up porch displays is a wonderful weekend project that kids and adults can work on together.
- Pinterest-Worthy Visuals: High-contrast decor—such as bright orange pumpkins paired with matte black lanterns or crisp white floating ghosts—photographs beautifully for social sharing.
Essential Materials & Tools Needed
Before starting your Halloween porch transformation, gather these basic supplies to make your setup smooth and stress-free:
Basic Crafting & Mounting Tools
- Command hooks (outdoor adhesive, heavy-duty)
- Clear monofilament fishing line
- Zip ties (black and clear)
- Hot glue gun and glue sticks
- Outdoor extension cords and timer plugs
- Scissors and wire cutters
Standard Decor Items
- Assorted real or faux pumpkins (various sizes and colors)
- Black gauze cloth and spooky spiderwebs
- Faux greenery, dried cornstalks, and hay bales
- Battery-operated LED pillar candles and fairy lights
- Faux skeletons, bats, and floating witches’ hats
Crucial Outdoor Safety Tips
Creating a spooky setup should always be fun and safe. Keep these essential rules in mind when decorating your exterior entry:
- Keep Pathways Clear: Ensure your main stairs and walkways are completely free of tripping hazards like loose wires, trailing fabric, or sprawling pumpkins.
- Use Weatherproof Lighting: Only use lights and extension cords rated explicitly for outdoor use. Keep plug connections elevated or wrapped in waterproof covers.
- Choose Flameless Candles: Replace real wax candles with battery-operated LED candles, especially near dry cornstalks, hay bales, or hanging cotton cobwebs.
- Secure Hanging Elements: Fasten floating ghosts, bats, or hats tightly using heavy-duty fishing line and outdoor hooks to withstand strong autumn winds.
1. Floating Cheesecloth Ghost Entryway
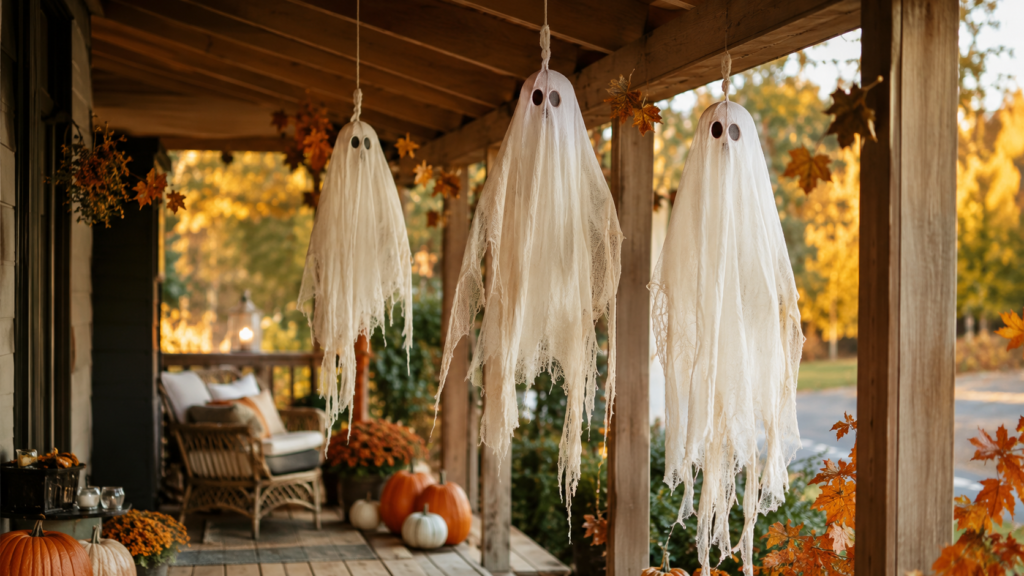
Transform your porch ceiling into an eerie, magical display with glowing floating ghosts made from lightweight cheesecloth. This classic DIY project creates beautiful movement whenever an autumn breeze blows through your porch.
Why You’ll Love This Idea
Floating ghosts bring immediate height, drama, and gentle movement to your front entrance. They are incredibly light, extremely inexpensive to craft, and give your home an instant haunted aesthetic without feeling overly scary for young trick-or-treaters.
Materials Needed
- Unbleached cheesecloth (3–4 yards per ghost)
- Styrofoam balls (5–6 inch diameter)
- Fabric stiffener spray or Mod Podge mixed with water
- Balloons (for shaping)
- Clear fishing line
- Outdoor LED fairy light strands or battery-operated puck lights
- Black felt (for eyes)
- Scissors
Step-by-Step Instructions
Step 1: Set Up Your Workspace
Cover an outdoor table with a plastic tarp or drop cloth. Inflate a balloon and tape it securely onto an upright jar or plastic bottle to create a stable mannequin form for your ghost head.
Step 2: Cut the Cheesecloth
Cut your cheesecloth into square sheets measuring roughly 3 feet by 3 feet. You will need 3 to 4 layers per ghost for a soft, opaque look.
Step 3: Apply the Fabric Stiffener
Submerge the cheesecloth sheets completely into your liquid fabric stiffener, squeezing out any excess liquid so it is damp but not dripping wet.
Step 4: Layer Over the Form
Drape the wet cheesecloth layers over the balloon form, pulling edges outward to create flowing, uneven drapes at the bottom.
Step 5: Allow to Dry Completely
Let the form dry outdoors in a warm, dry spot for 12 to 24 hours until the fabric turns completely stiff and rigid.
Step 6: Remove the Form & Add Details
Pop the interior balloon and carefully remove it. Cut tiny black felt ovals and glue them onto the front of the ghost head to create classic eyes.
Step 7: Insert Lighting
Tuck a lightweight, battery-operated LED puck light or fairy light strand inside the top of the hollow ghost head.
Step 8: Hang on the Porch
Tie clear fishing line through the top layer of fabric and secure it to your porch ceiling using heavy-duty outdoor Command hooks.
Beginner Tips
- Mix different sizes of styrofoam balls or balloons to create a cute “ghost family” effect.
- Always apply fabric stiffener outdoors to keep your indoor tables clean.
Common Mistakes to Avoid
- Using real open-flame candles: The cheesecloth is highly flammable; stick exclusively to cool LED bulbs.
- Hanging in direct rain: Fabric stiffener can soften if exposed to heavy downpours. Hang ghosts under a covered porch roof.
Styling Ideas & Color Palettes
Pair bright white ghosts with jet-black porch railings, deep orange chrysanthemums, and warm yellow string lights to create a high-contrast palette.
| Attribute | Details |
| Estimated Cost | $15 – $25 total |
| Estimated Time | 45 minutes (plus 12 hours drying time) |
| Difficulty Level | Easy |
| Best Placement | Covered porch ceilings, entry archways, tall doorways |
Pinterest-Worthy Tip
Stagger the hanging heights of your ghosts in groups of three to add depth, dimension, and visually appealing layers to your porch photos!
Conclusion
The floating cheesecloth ghost entryway is a charming, budget-friendly staple that combines vintage nostalgia with magical evening lighting.
2. Moody Victorian Gothic Pumpkin Arch
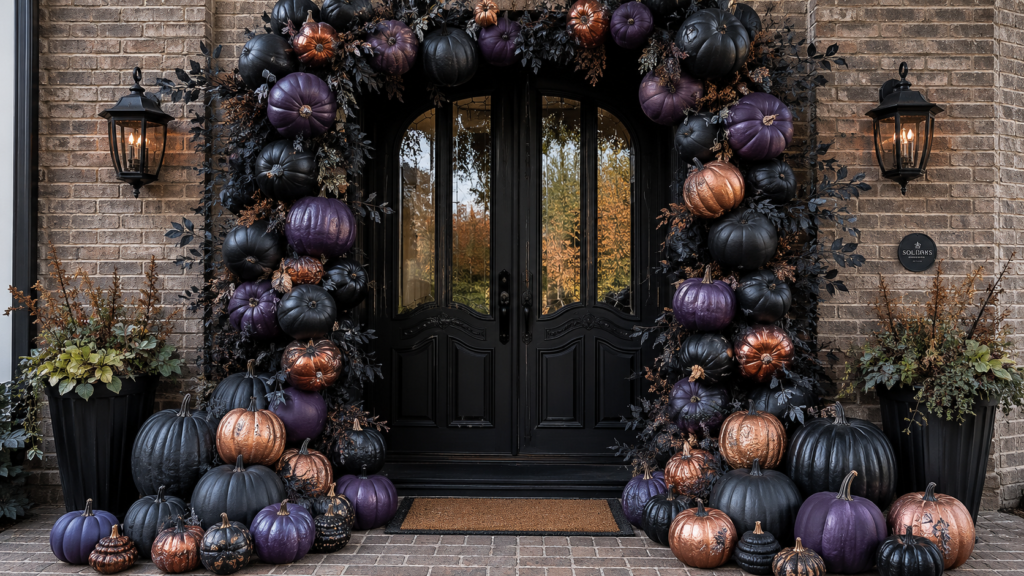
Make a dramatic statement by framing your front door with a lush, dark pumpkin arch featuring deep black, velvety purple, and metallic copper tones.
Why You’ll Love This Idea
If you prefer elegant, moody fall decor over bright orange colors, this Victorian Gothic arch is perfection. It turns an ordinary front door frame into a grand, magazine-ready entrance.
Materials Needed
- Pre-made chicken wire arch or garden trellis
- Faux foam pumpkins (assorted sizes: small, medium, large)
- Matte black, deep plum, and metallic copper spray paint
- Heavy-duty zip ties
- Faux black eucalyptus garlands and dark faux roses
- Drill with small bit
Step-by-Step Instructions
Step 1: Spray Paint the Pumpkins
Layout your foam pumpkins outdoors. Coat them evenly with matte black, dark plum, and copper spray paint. Allow 2 hours to dry.
Step 2: Drill Anchor Holes
Drill a small hole straight through the back of each foam pumpkin. Thread a thick black zip tie halfway through the hole.
Step 3: Secure Arch Structure
Attach your chicken wire frame or garden trellis around your front door frame using exterior screws or heavy-duty hooks.
Step 4: Attach Large Base Pumpkins
Beginning at the bottom ground level, zip-tie your largest black and plum pumpkins to the frame to build a strong visual base.
Step 5: Fill in Medium & Small Pumpkins
Work your way up the door sides, securing medium and small pumpkins into open spaces across the frame.
Step 6: Weave Dark Greenery
Tuck faux black eucalyptus stems, dark ivy, and deep red roses into the small gaps between the pumpkins.
Step 7: Final Tweaks & Inspection
Snip off any visible long ends of the plastic zip ties using wire cutters for a clean finished look.
Beginner Tips
- Use lightweight foam pumpkins rather than heavy plastic or real pumpkins to prevent your arch from sagging.
- Spray paint your raw chicken wire black so it blends invisibly into the dark floral background.
Common Mistakes to Avoid
- Overloading the top: Keep heavier pumpkins at the bottom base and lighter ones near the top arch.
- Neglecting the anchor: Ensure your main wire frame is anchored tightly against the door trim to withstand autumn winds.
Styling Ideas & Color Palettes
Pair your Gothic arch with a deep charcoal welcome mat, brass lanterns, and antique-style pillar candles on your porch steps.
| Attribute | Details |
| Estimated Cost | $60 – $100 |
| Estimated Time | 2 to 3 hours |
| Difficulty Level | Intermediate |
| Best Placement | Main front door frame or porch entryway |
Pinterest-Worthy Tip
Add battery-operated warm micro-fairy lights throughout the dark leaves to create a dreamy, subtle glow during nighttime photo shoots.
Conclusion
A moody Victorian Gothic pumpkin arch delivers dramatic curb appeal, blending elegant dark tones with seasonal autumn shapes.
3. Flying Witches’ Broomstick & Hat Display
Bring a touch of whimsical magic to your outdoor porch by suspending glowing witches’ hats and rustic twigs broomsticks along your porch eaves.
Why You’ll Love This Idea
This decor setup looks like a flight of witches just landed on your porch! It is interactive, fun for kids, and creates an enchanting visual backdrop for night photos.
Materials Needed
- Black fabric witch hats (5 to 7 hats)
- Small LED hanging puck lights or glowing battery sticks
- Handmade wooden broomsticks (gathered tree branches and twig bunches)
- Jute twine and clear fishing line
- Outdoor ceiling hooks
- Needle and strong thread
Step-by-Step Instructions
Step 1: Prepare the Witches’ Hats
Thread a sharp needle with clear fishing line and pass it through the pointed peak of each fabric witch hat, tying a secure knot.
Step 2: Install Interior Lights
Tape a small, battery-powered LED puck light inside the crown of each hat so the light casts a downwards glow.
Step 3: Measure Hanging Spacing
Space your ceiling hooks evenly along your porch beam, leaving about 18 to 24 inches between each hook location.
Step 4: Hang the Floating Hats
Attach the fishing line to your ceiling hooks at varying drop lengths to make the hats look like they are floating in mid-air.
Step 5: Craft Rustic Broomsticks
Gather sturdy fallen tree branches. Bind fine birch twigs around the bottom end of each branch using thick jute twine.
Step 6: Position the Broomsticks
Lean your handmade broomsticks upright against your front door frame or porch railing at stylish angles.
Step 7: Test Nighttime Lighting
Turn on all internal puck lights at dusk to verify bright, even illumination across your entry space.
Beginner Tips
- Choose weather-resistant nylon witch hats instead of thin paper versions so they survive damp fall weather.
- Use remote-controlled LED lights to easily turn off your hats without taking them down each night.
Common Mistakes to Avoid
- Hanging hats at the same height: Varying the hanging lengths creates a dynamic visual float effect.
- Using heavy broomsticks: Keep branch selections lightweight so they won’t fall over if brushed past.
Styling Ideas & Color Palettes
Combine black fabric hats with natural birch wood twigs, warm amber light bulbs, and vibrant orange heirloom pumpkins.
| Attribute | Details |
| Estimated Cost | $25 – $40 |
| Estimated Time | 1 to 2 hours |
| Difficulty Level | Easy |
| Best Placement | Covered porch overhangs, front verandas, entry steps |
Pinterest-Worthy Tip
Turn on your hat lights just before sunset to catch the golden hour sky contrasting against the warm illuminated hat cones!
Conclusion
The floating witches’ hat and broomstick display is an easy DIY project that transforms any ordinary porch ceiling into a magical scene.
4. Giant Skeleton Guard & Pumpkin Cascade
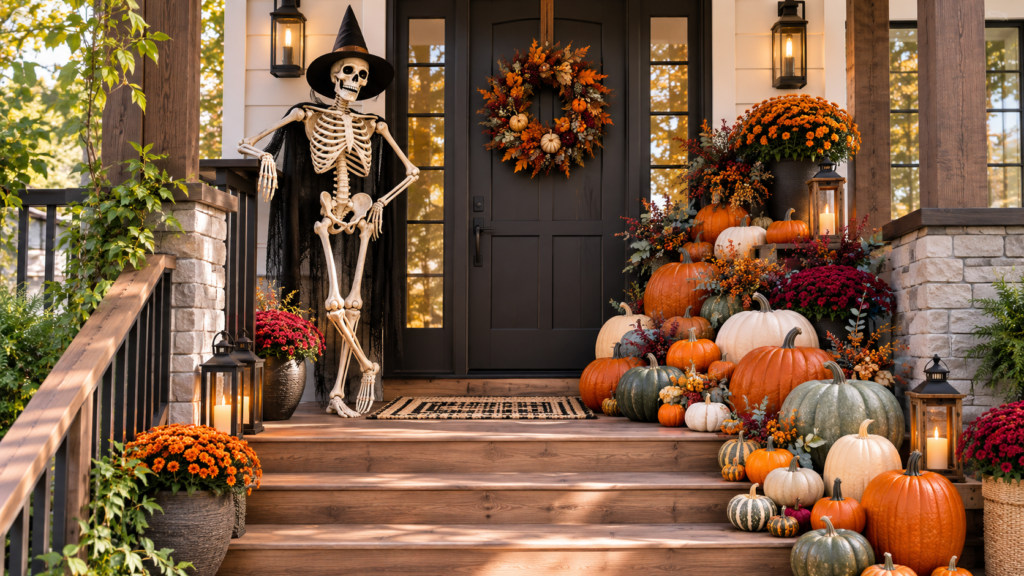
Make your front porch the star of the neighborhood by placing a giant skeleton guard at the door alongside a lush, cascading waterfall of fresh pumpkins on the stairs.
Why You’ll Love This Idea
Skeletons bring high personality and playfulness to Halloween. Positioning a full-sized skeleton beside a rich, natural pumpkin stair display balances playful scares with traditional autumn beauty.
Materials Needed
- 5 ft to 12 ft posable skeleton
- Assorted fresh real pumpkins (pie pumpkins, Cinderella pumpkins, white ghost pumpkins)
- Dried cornstalk bundles
- Bales of straw or mini hay bales
- Heavy floral wire or zip ties
- Outdoor LED spotlight
Step-by-Step Instructions
Step 1: Anchor the Skeleton Guard
Stand your posable skeleton next to your front door pillar. Secure its chest frame tightly to the post using hidden black zip ties.
Step 2: Pose the Skeleton
Adjust the arms, legs, and jaw into a welcoming or wave pose, such as holding a lantern or leaning on a broom.
Step 3: Set Up Hay Bale Base
Place two mini hay bales at the bottom of your front steps to build visual structure and height layers.
Step 4: Tie Cornstalk Bundles
Bind dried cornstalks vertically onto your porch railing posts using jute rope or heavy wire.
Step 5: Arrange Large Pumpkins
Place your largest, heaviest pumpkins on the lower steps and next to the hay bales to create solid base anchors.
Step 6: Cascade Small & Medium Pumpkins
Fill in the steps above by tumbling medium and small white, orange, and green pumpkins downward in an asymmetrical pattern.
Step 7: Position Outdoor Spotlight
Angle a ground LED spotlight upward toward the skeleton’s face to create crisp, dramatic shadows after dark.
Beginner Tips
- Mix pumpkin colors—like sage green, creamy white, and deep orange—to add a high-end designer look.
- Place zip ties around the skeleton’s pelvis and spine to keep it stable during windy storms.
Common Mistakes to Avoid
- Blocking stairs completely: Leave a clear 2-foot walking path down the steps so guests can enter safely.
- Leaving real pumpkins directly on damp soil: Place pumpkins on small wooden risers or straw to prevent rotting.
Styling Ideas & Color Palettes
Pair classic white and orange pumpkins with green gourds, natural golden straw bales, and grey bone skeletons.
| Attribute | Details |
| Estimated Cost | $70 – $150 (depending on skeleton size) |
| Estimated Time | 1.5 hours |
| Difficulty Level | Easy |
| Best Placement | Front staircases, wide entry steps, front porches |
Pinterest-Worthy Tip
Snap your photos from a low camera angle looking up the steps to make your pumpkin cascade appear fuller and grander!
Conclusion
A giant skeleton paired with a tumbling pumpkin stair display offers high impact, perfect for inviting neighborhood admiration.
5. Spooky Bats & Black Lantern Pathway
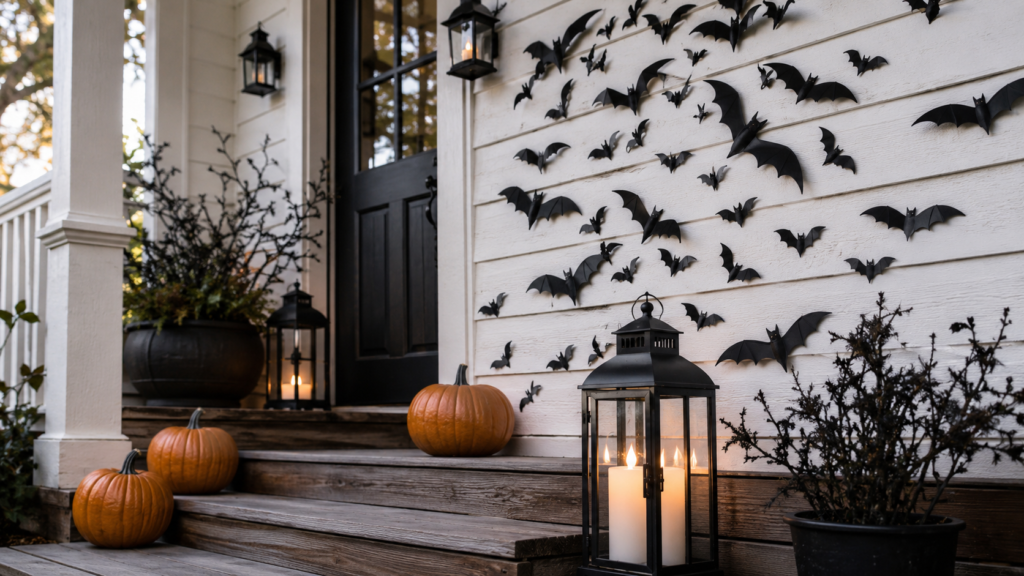
Guide your trick-or-treaters along a cozy, mysterious path using an array of matte black lanterns and a swarm of 3D bats crawling across your entryway.
Why You’ll Love This Idea
This concept relies on clean lines, dark silhouettes, and warm lighting. It works amazingly well on minimalist, modern, or farmhouse-style home exteriors.
Materials Needed
- Weatherproof 3D plastic wall bats (pack of 40–60)
- Outdoor painter’s tape or exterior foam tape
- Matte black metal candle lanterns (varying sizes)
- Battery-operated LED pillar candles with timers
- Faux black leaf garlands or dead branches
- Outdoor potting planter boxes
Step-by-Step Instructions
Step 1: Clean Your Exterior Walls
Wipe down your front door and surrounding exterior walls using a dry cloth to remove dirt so adhesives stick properly.
Step 2: Bend the Bat Wings
Fold the wings of your 3D plastic bats outward along their crease lines to give them a realistic flying shape.
Step 3: Map Out the Swarm Pattern
Plan a dynamic, curved flight path starting low near your side planter and soaring up across your front door.
Step 4: Attach Bats to Wall
Apply exterior painter’s tape or removable foam tape to the back of each bat, pressing firmly onto your wall for 10 seconds.
Step 5: Clean and Set Up Lanterns
Wipe down your black metal lanterns and place battery-operated LED pillar candles inside each one.
Step 6: Line the Walkway Steps
Arrange your lanterns along both sides of your porch steps, staggering tall and short lanterns together.
Step 7: Add Dark Foliage Touches
Tuck faux black eucalyptus twigs or curly dead tree branches into your planters to frame the bat flight path.
Beginner Tips
- Place smaller 3D bats near the top of the wall and larger bats down low to create a strong sense of visual perspective.
- Set your LED candle timers so your lanterns turn on automatically every evening at dusk.
Common Mistakes to Avoid
- Using cheap indoor double-sided tape: Standard tape can peel exterior wall paint or lose grip when wet. Stick to outdoor painter’s tape.
- Spacing bats in straight lines: Scatter your bats randomly in fluid, curved lines to mimic natural animal swarms.
Styling Ideas & Color Palettes
High-contrast colors work best here: stark black bat cutouts against crisp white or grey walls, lit up by warm amber candle glow.
| Attribute | Details |
| Estimated Cost | $30 – $55 |
| Estimated Time | 1 hour |
| Difficulty Level | Very Easy |
| Best Placement | Front door surround, porch walls, walkway steps |
Pinterest-Worthy Tip
Capture photos right at twilight when the ambient light matches the warm glow of your outdoor lanterns!
Conclusion
A 3D bat swarm paired with black lanterns provides a sleek, modern, and moody entrance that is quick to install and easy to clean up.
6. Poison Apple & Wicked Witch Cauldron Corner
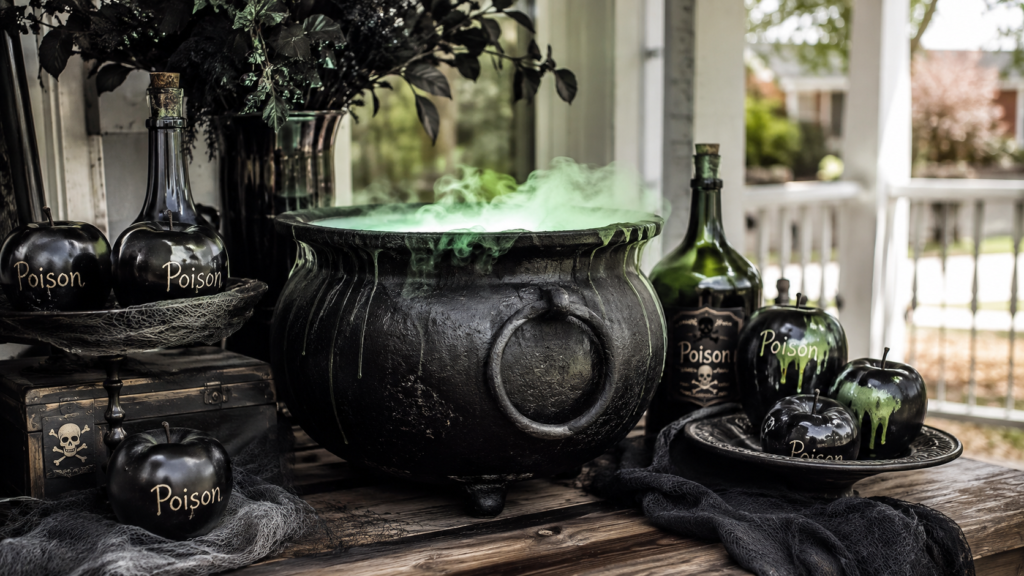
Create a potion station right on your porch corner, featuring a bubbling black cauldron, glowing green light effects, and sinister poison apples.
Why You’ll Love This Idea
This creative corner setup turns an unused porch nook into a storybook scene. It is interactive, mysterious, and visually unique for fall.
Materials Needed
- Large plastic black cauldron
- Ultrasonic mist maker or mini fog machine
- Green LED waterproof puck light or spotlight
- Faux green apples dipped in dark red wax or paint
- Iridescent plastic ornament balls (various sizes)
- Hot glue gun
- Vintage potion bottles and apothecary jars
Step-by-Step Instructions
Step 1: Prepare the Cauldron Base
Place your black plastic cauldron onto a sturdy wooden crate or low outdoor table in your porch corner.
Step 2: Build Internal Elevation
Fill the lower half of your cauldron with flipped-over plastic pots or pool noodles to create a high platform.
Step 3: Glue “Bubble” Ornaments
Hot glue clear and iridescent plastic ornament balls around the rim of your cauldron to look like bubbling potion foam.
Step 4: Install Green LED Lighting
Set a waterproof green LED puck light inside the cauldron base pointing upward toward the top rim.
Step 5: Add Water & Fogger
Fill a shallow water tray inside the top of the cauldron and set your ultrasonic mist maker inside to generate low-lying fog.
Step 6: Craft Poison Apples
Coat faux green apples with streaks of deep red puff paint or wax to resemble enchanted poison apples.
Step 7: Style the Surrounding Table
Display your poison apples inside a dark rustic basket next to old potion jars, dry moss, and realistic spider accents.
Beginner Tips
- Use an ultrasonic mister instead of a hot fog machine for a safer mist effect that requires no hot liquids.
- Add a drop of dish soap to water inside the fogger tray to help create thicker, longer-lasting fog bubbles.
Common Mistakes to Avoid
- Overfilling the water tray: Ultrasonic misters require specific water depths to work properly. Follow device directions.
- Leaving electronics out in rain: Keep power adapters elevated inside waterproof dry boxes tucked behind your wooden crate.
Styling Ideas & Color Palettes
Pair electric lime green lighting with deep matte black, dark crimson red, and rustic weathered wood accents.
| Attribute | Details |
| Estimated Cost | $40 – $70 |
| Estimated Time | 1.5 hours |
| Difficulty Level | Intermediate |
| Best Placement | Unused porch corners, covered entry nooks, side tables |
Pinterest-Worthy Tip
Use a slow shutter speed on your camera when photographing to capture the smooth movement of the flowing green fog mist!
Conclusion
The poison apple cauldron corner adds a touch of whimsical magic to your porch, turning unused space into an enchanting photo spot.
7. Rustic Haunted Farmhouse Cornstalk Porch
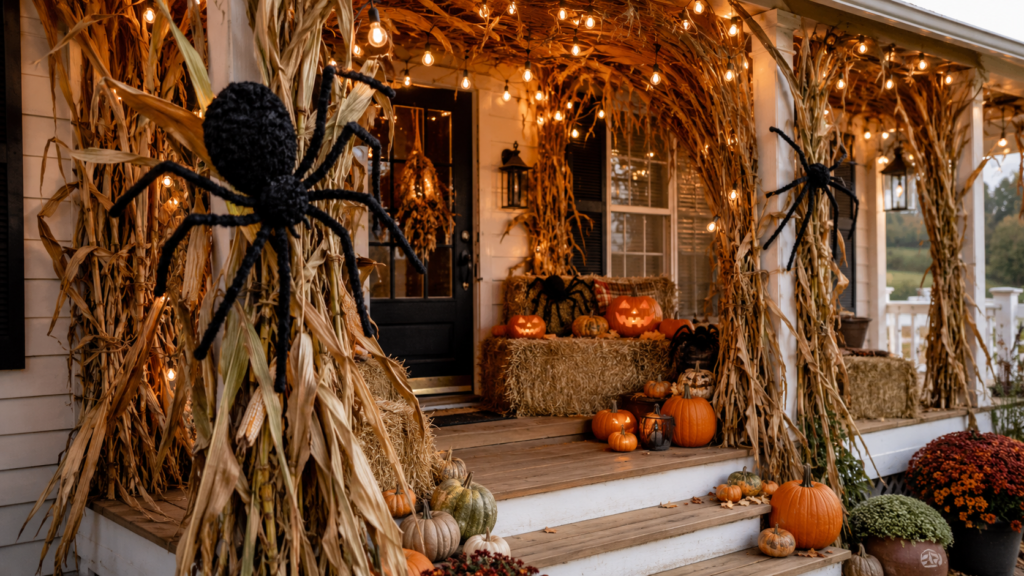
Embrace classic autumn roots with a spooky twist by combining tall dried cornstalks, stacked hay bales, black spiders, and vintage jack-o’-lanterns.
Why You’ll Love This Idea
If you love traditional farmstand aesthetics, this rustic setup blends warm autumnal harvest textures with subtle, cozy Halloween scares.
Materials Needed
- Dried cornstalk bundles (2 to 4 bundles)
- Standard straw hay bales
- Carved orange pumpkins & vintage heirloom squash
- Large fuzzy black spiders (varying sizes)
- Burlap ribbon and thick twine
- Warm white outdoor string lights
Step-by-Step Instructions
Step 1: Anchor Cornstalk Bundles
Secure tall dried cornstalk bundles vertically against your front porch posts using natural jute twine.
Step 2: Position Hay Bales
Place two straw hay bales at an angle around your porch columns to build sturdy, rustic seating tiers.
Step 3: Wrap Warm Lights
Weave warm white fairy lights through the cornstalk leaves to create a cozy, radiant backdrop glow.
Step 4: Arrange Heirloom Pumpkins
Stack wide Cinderella pumpkins onto the hay bales, topping them with carved orange jack-o’-lanterns.
Step 5: Attach Oversized Spiders
Attach giant fuzzy black spiders to your cornstalk leaves and porch posts using bendable wire legs.
Step 6: Lay Down Burlap Runners
Drape natural burlap fabric across your porch floor or over steps to ground the organic farmstand texture.
Step 7: Add Vintage Touches
Place rustic tin lanterns, old wooden barrels, or galvanized metal buckets nearby to finish the display.
Beginner Tips
- Spray your natural cornstalks with clear acrylic sealer to keep leaves from turning brittle and dropping off in high winds.
- Choose battery-operated lights with built-in daily timers to save time every night.
Common Mistakes to Avoid
- Using wet hay bales: Store hay in covered areas so it doesn’t absorb rainwater and get heavy or moldy.
- Crowding your door swing: Check that tall cornstalk bundles leave plenty of room for your front door to swing fully open.
Styling Ideas & Color Palettes
Focus on natural, organic tones: golden straw, warm maize cornstalks, earthy terracotta orange, and textured black accents.
| Attribute | Details |
| Estimated Cost | $50 – $85 |
| Estimated Time | 1 to 2 hours |
| Difficulty Level | Easy |
| Best Placement | Front porch columns, wide verandas, rustic farmhouse entries |
Pinterest-Worthy Tip
Add a personalized hand-painted wood sign reading “Pumpkin Patch” or “Haunted Hollow” propped up against your hay bales!
Conclusion
The rustic haunted farmhouse porch brings timeless harvest warmth together with classic, fun Halloween elements.
8. Spooky Mirror & Spiderweb Porch Gallery Wall
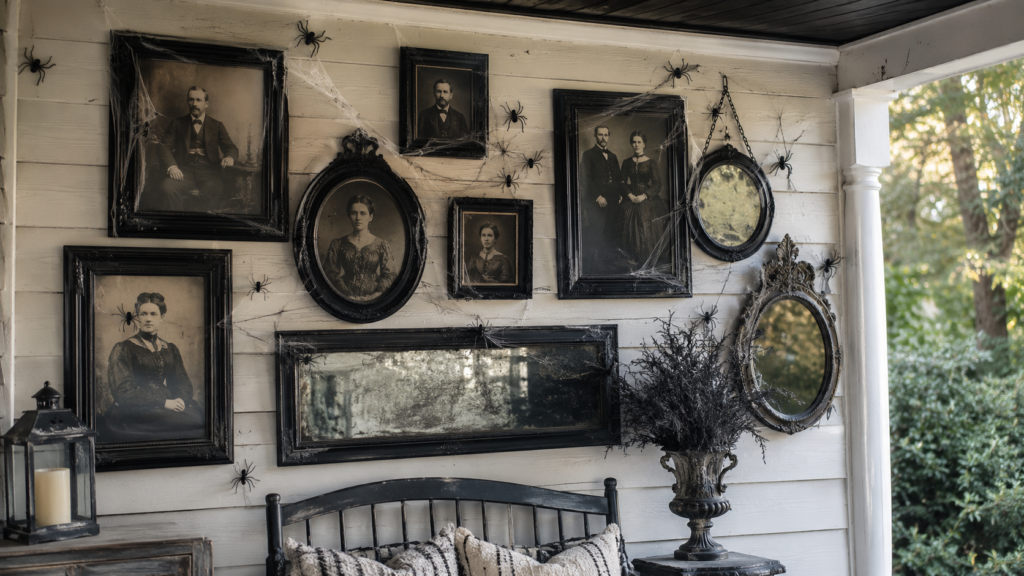
Turn your porch wall into a haunted gallery using antique frame mirrors, stretchable cobwebs, and vintage silhouette portraits.
Why You’ll Love This Idea
This indoor-inspired design brings cozy gallery styling outside. It creates an intriguing haunted house atmosphere right at your front door.
Materials Needed
- Thrifted picture frames and old wall mirrors
- Black matte spray paint
- Cotton stretch cobwebbing
- Printable vintage monster or Victorian silhouette portraits
- Faux plastic spiders
- Heavy-duty outdoor Command picture hanging strips
Step-by-Step Instructions
Step 1: Collect & Spray Paint Frames
Gather cheap thrift store picture frames. Spray paint them in matte black, antique silver, or tarnished gold finish.
Step 2: Print Vintage Portraits
Print out eerie black-and-white Victorian portraits or spooky silhouettes to place inside your frames.
Step 3: Age the Mirror Glass
Dab diluted black paint or vinegar onto your mirror surfaces using a paper towel to give them a vintage, aged look.
Step 4: Mount Frames on Porch Wall
Attach your frames securely to your exterior porch wall using outdoor picture hanging strips or masonry hooks.
Step 5: Stretch Cobwebs Over Frames
Pull small pieces of white cotton cobwebbing extremely thin, stretching them across your frame corners and wall space.
Step 6: Add Plastic Spiders
Tuck black plastic spiders into the stretched cobwebs around the frames to create realistic depth.
Step 7: Accent with Wall Sconces
Flank your gallery wall with battery-powered wall sconces or warm lanterns to light up the artwork after dark.
Beginner Tips
- Pull your cotton cobwebs as thin as possible; wispy, fine cobweb strands look far more realistic than thick clumps.
- Remove original glass panels from cheap frames to keep gallery wall pieces lightweight and safe outdoors.
Common Mistakes to Avoid
- Hanging delicate paper outside unsealed: Laminate your printed portraits or spray them with clear waterproof sealant.
- Over-saturating with webs: Use cobwebs as subtle accents around frame corners so your artwork stays visible.
Styling Ideas & Color Palettes
Stick to a sophisticated palette of tarnished gold, antique silver, matte black, stark white, and charcoal gray.
| Attribute | Details |
| Estimated Cost | $20 – $40 (especially if thrifted!) |
| Estimated Time | 1.5 hours |
| Difficulty Level | Easy |
| Best Placement | Covered entryway walls, porch hallways, side exterior walls |
Pinterest-Worthy Tip
Angling your gallery mirrors slightly allows them to reflect warm porch lights, creating glowing accents in evening photos!
Conclusion
A spooky mirror gallery wall delivers high-end vintage aesthetic appeal, making your entry look like a classic haunted estate.
Quick Comparison of All 8 Porch Ideas
Here is a handy summary table to help you choose the ideal project based on your space, budget, and free time:
| Decor Idea | Primary Vibe | Estimated Cost | Setup Time | Difficulty |
| 1. Cheesecloth Ghosts | Magical & Whimsical | $15 – $25 | 45 Mins | Easy |
| 2. Victorian Gothic Arch | Dramatic & Dark | $60 – $100 | 2.5 Hours | Intermediate |
| 3. Floating Witches’ Hats | Playful & Enchanting | $25 – $40 | 1.5 Hours | Easy |
| 4. Giant Skeleton Cascade | Bold & High Impact | $70 – $150 | 1.5 Hours | Easy |
| 5. 3D Bats & Lanterns | Modern & Sleek | $30 – $55 | 1 Hour | Very Easy |
| 6. Poison Apple Cauldron | Storybook Mystery | $40 – $70 | 1.5 Hours | Intermediate |
| 7. Haunted Farmhouse | Cozy & Traditional | $50 – $85 | 1.5 Hours | Easy |
| 8. Spooky Gallery Wall | Vintage & Elegant | $20 – $40 | 1.5 Hours | Easy |
Pro Tips for Elevating Your Halloween Decor
Want to take your front entrance from good to breathtaking? Keep these expert design rules in mind:
1. Build Layers & Height Variations
Never place all your decor directly flat on the porch floor. Use wooden crates, hay bales, steps, and hanging hooks to display items across three distinct vertical levels: Ground Level (pumpkins, lanterns), Eye Level (wreaths, door decor, skeletons), and Overhead Level (floating ghosts, witches’ hats, hanging greenery).
2. Stick to a Defined Color Palette
Narrowing your design to two or three primary colors keeps your porch looking cohesive and intentional. Great seasonal color combinations include:
- Modern Minimalist: Matte Black + Crisp White + Natural Greenery
- Gothic Glam: Deep Plum + Tarnished Copper + Black
- Classic Harvest: Terracotta Orange + Golden Yellow + Natural Straw
3. Focus on Mood Lighting
Daylight photos are great, but Halloween decor truly shines after dark. Layer your light sources using warm LED candle lanterns, fairy light strings, spotlights, and mini fog lights. Always select warm white or soft orange bulbs rather than harsh blue-white tones to maintain a cozy atmosphere.
Smart Budget-Saving Strategies
Decorating your outdoor porch beautifully does not mean you have to overspend. Try these clever budget-friendly strategies:
- Shop Thrift Stores: Search second-hand stores for old picture frames, brass candle holders, woven baskets, and plastic pots you can easily update with matte black spray paint.
- Use Natural Elements: Gather pinecones, fallen tree branches, bare twigs, and autumn leaves from your backyard for free organic decor.
- Buy Faux Items Post-Holiday: Purchase faux pumpkins, skeleton guards, and outdoor lights during clearance sales right after Halloween to save 50% to 70% for next year.
- Repurpose Everyday Items: Turn leftover cardboard boxes into painted graveyard tombstones, or repurpose regular bedsheets into large porch ghosts.
Frequently Asked Questions
How can I secure porch decor against strong autumn winds?
Use heavy-duty outdoor Command hooks, black zip ties, and clear 20 lb monofilament fishing line. Weigh down light plastic containers, cauldrons, or lanterns by placing heavy rocks or bricks inside them.
When should I put up my outdoor Halloween decorations?
The ideal timeframe to display Halloween decor is between October 1st and October 15th. This gives you several weeks to enjoy your setup while keeping natural pumpkins fresh through the end of the month.
How do I prevent real pumpkins from rotting on my porch?
Wipe down the exterior of your fresh pumpkins with a mild water-and-bleach solution (1 tablespoon of bleach per gallon of water) to kill bacteria. Coat your pumpkins with clear sealer spray, and elevate them off damp dirt using straw or small wooden risers.
Are floating cheesecloth ghosts waterproof?
Standard cheesecloth stiffened with Mod Podge or fabric stiffener can soften if exposed to heavy rain. Hang cheesecloth ghosts strictly under covered porch roofs to protect them from rain.
How can I illuminate my porch without high electrical costs?
Use battery-operated LED pillar candles, solar-powered spotlights, and low-voltage LED string lights equipped with automatic 6-hour timers.
What is the easiest DIY Halloween porch project for beginners?
The 3D Bats & Black Lantern Pathway is by far the easiest. It requires no complex tools, takes under an hour to install, and relies on simple peel-and-stick tape and battery lights.
How can I make my porch decor kid-friendly rather than scary?
Focus on bright, whimsical elements like floating witches’ hats, friendly smiling ghost shapes, warm fairy lights, and colorful stacked pumpkins rather than realistic monsters or gory props.
How do I remove exterior tape residues after the holidays?
Use painter’s tape formulated for outdoor surfaces. If any sticky residue remains on walls or trim, wipe it gently using warm soapy water or a small amount of rubbing alcohol.
Final Thoughts
Transforming your front porch for Halloween is one of the most rewarding seasonal DIY projects you can tackle. By layering warm lighting, rich natural textures, and creative DIY elements, you can design an entryway that brings joy to your family, delights your neighbors, and elevates your curb appeal all autumn long.
Choose your favorite idea from this guide—or mix elements from a few—to craft your ultimate festive entrance. Happy decorating, and have a wonderfully cozy, spooky Halloween season!
Save This Post on Pinterest!
Loved these ideas? Don’t lose them! Pin this article to your favorite Halloween Decor or Fall Styling boards on Pinterest so you can easily reference these step-by-step DIY tutorials when you are ready to decorate!
Hover over any image in this post and click the Save button to share the autumn inspiration with your followers!