Introduction
The first day of school is a big deal. New backpack? Check. Fresh school shoes? Check. Cute outfit picked out the night before? Double check! But there is one more thing that can make your little girl feel extra confident walking through those school doors: a fun, easy hairstyle that makes her smile every time she looks in the mirror.
Finding the right first day of school hair ideas for girls does not have to be stressful. You do not need to be a professional hairstylist or spend an hour before the morning bus arrives. With a few simple tools, some bobby pins, and a little practice, you can create hairstyles that are cute, comfortable, and easy to keep neat all day long.
This guide is packed with easy hairstyles for girls that work for every hair type, from short bobs to long, thick curls. Whether your daughter wants something simple like a half-up ponytail or something a little more special like a braided crown, there is an idea here for every school morning.
We will walk through why these hairstyles are so popular, the tools and materials you need, some safety tips for little ones, and then dive into 8 detailed, step-by-step hairstyle ideas that are perfect for the first day of school (and every school day after that!). Each idea includes styling tips, common mistakes to avoid, cost estimates, and Pinterest-worthy details to help you get that perfect back-to-school photo.
So grab your comb, a few hair ties, and let’s get started on making this first day of school one to remember, from the top of her head to her brand new sneakers!
Why This Trend Is Popular
Back-to-school hairstyles are one of the most searched and saved topics every August on Pinterest, and it is easy to see why. Here is why so many parents love searching for cute school hairstyles for girls:
- First day photos matter. Parents want their child to look put-together for that classic “first day of school” photo on the front porch.
- Comfort during long school days. A neat hairstyle keeps hair out of the face during class, recess, and lunch.
- Confidence boost for kids. When a child likes how her hair looks, she feels happier and more confident walking into a new classroom.
- Quick morning routines. Busy parents need styles that take five to fifteen minutes, not an hour.
- Fun bonding time. Doing hair together in the morning becomes a sweet daily ritual between parent and child.
- Works for every hair type. From straight hair to curly hair, there are options for everyone.
These styles also stay popular because they photograph beautifully, which is exactly why they perform so well on Pinterest boards about parenting, kids’ fashion, and back-to-school prep.
Materials and Tools Needed
Before trying any of the hairstyles below, gather these basic supplies. Most of them you probably already have at home!
| Tool | Purpose |
|---|---|
| Wide-tooth comb | Detangles hair gently without pulling |
| Soft-bristle brush | Smooths hair for a neat finish |
| Small hair ties (no metal) | Secures ponytails and braids without snagging |
| Bobby pins | Holds flyaways and sections in place |
| Hair clips (snap clips) | Great for quick, no-fuss styles |
| Spray bottle with water | Dampens hair to make it easier to style |
| Detangling spray or leave-in conditioner | Reduces tugging and breakage |
| Small amount of hair gel or edge control | Smooths baby hairs and flyaways |
| Ribbons, bows, or scrunchies | Adds a decorative, personal touch |
| Handheld mirror | Lets your child see the finished look |
Optional extras:
- Hair chalk or temporary glitter spray for a fun touch
- Silicone hair donut (for buns)
- Wide flat clips for thick hair sections
Safety Tips
Little ones can be wiggly, and scalps can be sensitive, so keep these safety tips in mind:
- Avoid pulling too tight. Hairstyles that are too tight can cause headaches or a condition called traction alopecia over time.
- Use kid-friendly hair ties. Choose soft, fabric-covered elastics instead of ones with metal clasps that can snag hair.
- Keep bobby pins away from little fingers. Store extras in a small container out of reach.
- Do a patch test with new hair products. Some kids have sensitive scalps, so try new gels or sprays a few days before school starts.
- Take breaks during long styling sessions. If a hairstyle takes more than 15 minutes, give your child a short break to stretch and move.
- Ask before cutting or trimming. Only trim hair yourself if you are comfortable doing so, or leave it to a professional.
- Watch for allergic reactions. If your child’s scalp gets red or itchy after using a product, stop use and check with a doctor if it continues.
8 Easy First Day of School Hairstyles for Girls
1. Classic Half-Up Ponytail
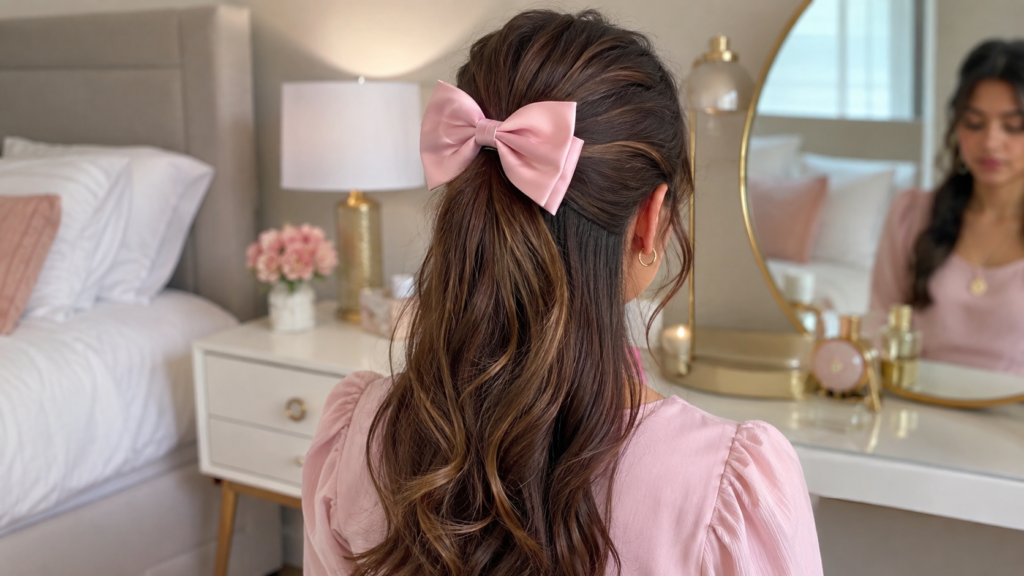
The half-up ponytail is the gold standard of easy hairstyles for girls, and it is often the very first style parents learn. It keeps hair out of the face while still letting those beautiful long strands flow down the back.
Why You’ll Love This Idea
This style takes less than five minutes, works on almost any hair length, and can be dressed up with a bow or kept simple for a busy morning. It is the perfect first day of school hairstyle because it looks polished in photos but is comfortable enough to wear all day.
Materials Needed
- Soft-bristle brush
- One small hair tie
- Optional: bow, ribbon, or decorative clip
Step-by-Step Instructions
- Brush all the hair smoothly to remove any tangles.
- Have your child tilt her head down slightly.
- Using your fingers, section off the top layer of hair, from ear to ear.
- Comb this top section smoothly toward the back of the head.
- Gather the top section into a small ponytail at the crown of the head.
- Secure it with a soft hair tie, making sure it is snug but not tight.
- Gently pull a few strands loose to fluff the ponytail for volume.
- Smooth down any flyaways with a little water or gel on your fingertips.
- Add a bow or ribbon around the hair tie for a decorative touch.
- Check the front from a mirror to make sure both sides are even.
Beginner Tips
- Practice on a doll or stuffed animal first if you are new to kid hairstyles.
- Use a rat-tail comb to create a clean, straight part for extra polish.
- If your child has layers, do not worry about grabbing every single strand.
Common Mistakes to Avoid
- Pulling the ponytail too tight, which can cause discomfort.
- Using an uneven section, making the ponytail sit crooked.
- Skipping the brush step, leaving lumps and bumps.
Styling or Decorating Ideas
- Add a bow that matches her school uniform or outfit colors.
- Try a small braid instead of a plain ponytail for the top section.
- Use two tiny twists instead of a ponytail for a fresh twist on the classic.
Best Colors and Materials
Soft pastel bows in pink, yellow, or lavender look adorable, but bold primary colors like red or navy also photograph beautifully for back-to-school pictures.
Estimated Cost
$3–$8 (for hair ties and a bow)
Estimated Time
3–5 minutes
Difficulty Level
Beginner
Where It Looks Best
This works for any hair length past the shoulders and looks great on straight, wavy, or slightly curly hair.
Pinterest-Worthy Tip
Take the “first day of school” photo from a slight side angle to show off the bow and the smooth ponytail line at the same time.
Conclusion
The classic half-up ponytail proves that simple can still be stunning. It is quick, comfortable, and endlessly customizable, making it a forever favorite among cute school hairstyles for girls.
2. Double Dutch Braids
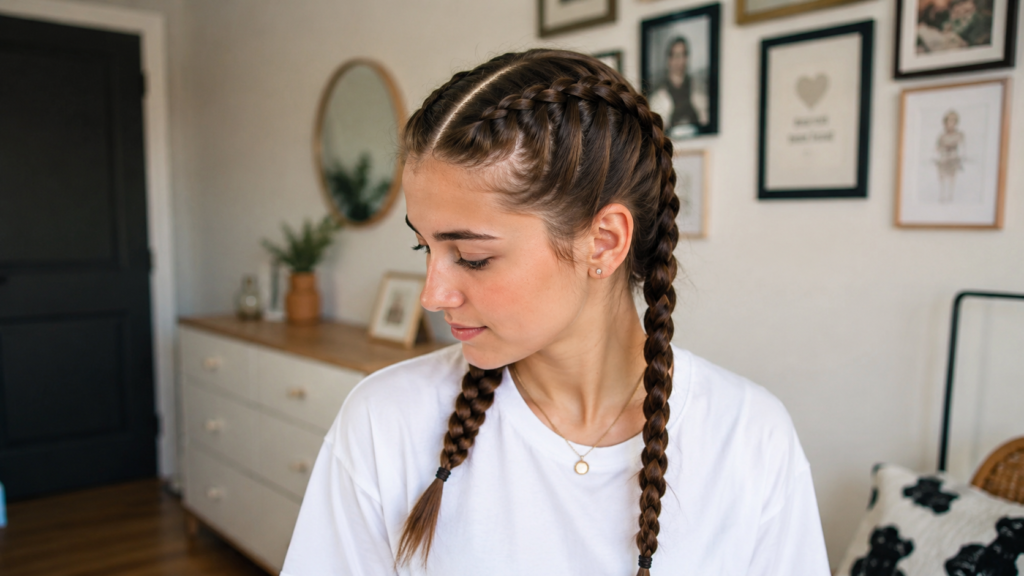
Dutch braids are a back-to-school favorite because they stay neat through recess, gym class, and even a rainy walk to the bus stop. This style is a step up from a basic braid but is still very doable for beginners with a little practice.
Why You’ll Love This Idea
Double Dutch braids keep hair completely secured and off the face, which makes them ideal for active kids. They also last for two to three days without needing a redo, which is a lifesaver on busy school mornings.
Materials Needed
- Wide-tooth comb
- Detangling spray
- Two small hair ties
- Optional: small clips to hold sections while braiding
Step-by-Step Instructions
- Detangle the hair fully with a comb and detangling spray.
- Part the hair straight down the middle, from forehead to the back of the neck.
- Clip one side out of the way to work on one section at a time.
- Take a small section of hair near the front hairline on one side.
- Split it into three even strands to begin the braid.
- Cross the outer strands under the middle strand (this is what makes it a Dutch braid instead of a regular braid).
- Add small pieces of hair from the sides into the outer strands each time you cross them.
- Continue braiding and adding hair down to the nape of the neck.
- Once all hair is added, finish with a regular three-strand braid to the ends.
- Secure with a hair tie, then repeat on the other side.
Beginner Tips
- Start practicing a few weeks before school starts so both you and your child get comfortable with the process.
- Use hair clips to keep the unused section out of the way while you braid.
- Go slowly. Speed comes with practice.
Common Mistakes to Avoid
- Crossing strands over instead of under, which turns it into a regular braid instead of a Dutch braid.
- Adding uneven sections of hair, making the braid look bumpy.
- Braiding too loosely, causing it to fall apart by lunchtime.
Styling or Decorating Ideas
- Tie the ends with colorful elastic bands that match her backpack.
- Add small flower clips along the part line for a garden-fresh look.
- Wrap a thin ribbon around each braid for extra sparkle.
Best Colors and Materials
Bright, playful colors like turquoise or coral hair ties make the braids pop, especially in first day of school photos.
Estimated Cost
$5–$10
Estimated Time
15–20 minutes
Difficulty Level
Intermediate
Where It Looks Best
Great for medium to long, straight or wavy hair. Also works beautifully on thick, curly hair with a little extra detangling spray.
Pinterest-Worthy Tip
Photograph from behind to show off the braid pattern running down the back of the head. This is one of the most saved angles on Pinterest.
Conclusion
Double Dutch braids are worth the extra few minutes because they keep hair tidy for days. It is one of the most practical and adorable first day of school hair ideas for girls.
3. Space Buns
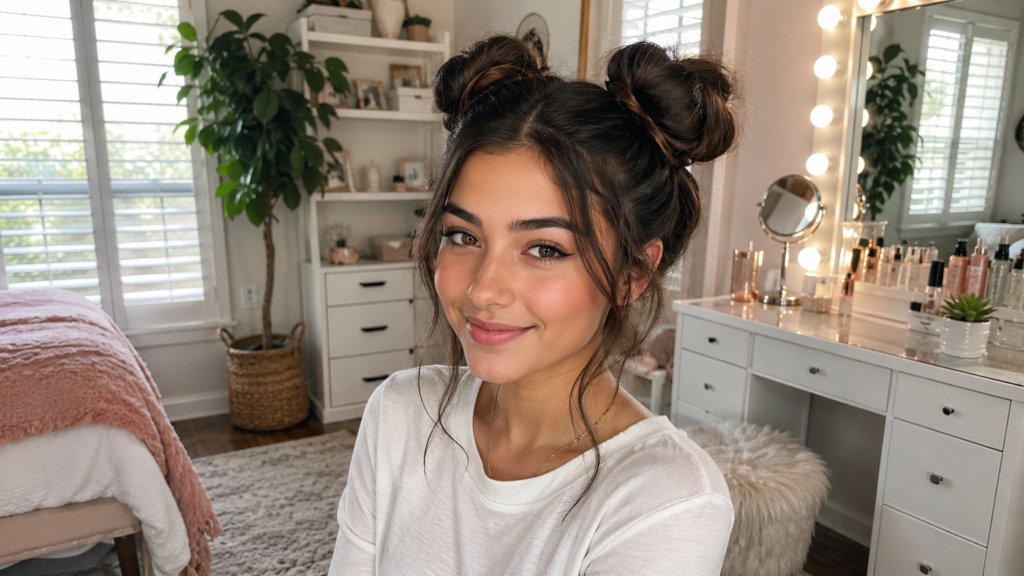
Space buns are a fun, playful hairstyle that has become extremely popular on Pinterest and social media. They give off a cheerful, energetic vibe that is perfect for a new school year.
Why You’ll Love This Idea
This style is quick, comfortable, and completely adjustable. It works whether your child wants a sleek, polished look or a fun, messy version with loose curls.
Materials Needed
- Comb
- Two hair ties
- Optional: silicone hair donuts for extra volume
- Bobby pins
Step-by-Step Instructions
- Brush hair thoroughly to remove tangles.
- Part the hair down the middle from front to back.
- Gather one side into a ponytail above the ear, roughly at eye level.
- Secure with a hair tie.
- Repeat on the other side, making sure both ponytails are level.
- If using a silicone donut, thread the ponytail through it.
- Wrap the hair around the donut (or simply twist it into a bun shape) and tuck the ends underneath.
- Secure the bun with bobby pins in a criss-cross pattern.
- Repeat on the second side.
- Gently pull a few pieces loose around the face for a softer look, if desired.
Beginner Tips
- If your child’s hair is too short for a full bun, simply leave the ponytails as “space pigtails” instead.
- Practice makes the buns more even over time.
- Use a mirror at both sides so your child can see the process too.
Common Mistakes to Avoid
- Uneven ponytail placement, which makes buns look lopsided.
- Skipping bobby pins, letting the bun unravel by midday.
- Making buns too tight, which can cause discomfort.
Styling or Decorating Ideas
- Wrap a thin strand of hair around the base of each bun to hide the elastic.
- Add small star-shaped clips for a fun “space” theme.
- Try mismatched colored hair ties for a playful twist.
Best Colors and Materials
Soft velvet scrunchies in pastel colors look adorable, while metallic star clips add a fun sparkle for pictures.
Estimated Cost
$4–$9
Estimated Time
8–10 minutes
Difficulty Level
Beginner to Intermediate
Where It Looks Best
Works wonderfully on medium to long hair, and especially well on hair with natural volume or waves.
Pinterest-Worthy Tip
Style this look with a coordinating headband or bow theme to make it extra eye-catching in photos.
Conclusion
Space buns bring a playful, joyful energy to any first day of school outfit. They are quick to create and always bring a smile.
4. Braided Crown Headband
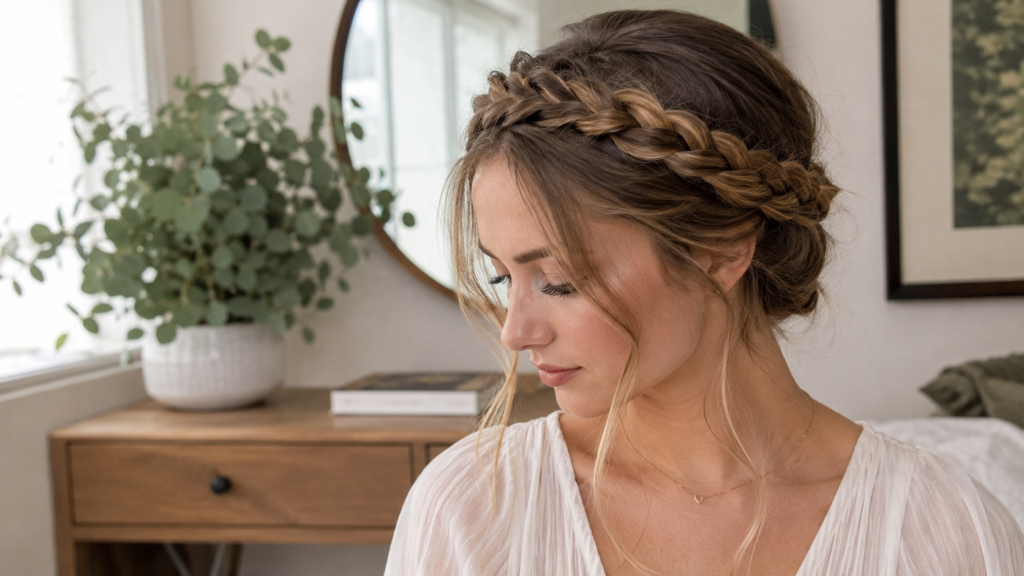
The braided crown is one of those cute school hairstyles for girls that looks like it took an hour but really only takes about ten minutes once you get the hang of it. It also has the bonus of keeping bangs and shorter layers out of the eyes all day.
Why You’ll Love This Idea
This hairstyle looks elegant and sweet, making it perfect for both school days and special events like picture day. It also works as a great “no-headband” solution for keeping hair off the face.
Materials Needed
- Comb
- Two small hair ties
- Bobby pins
- Optional: hairspray for hold
Step-by-Step Instructions
- Brush the hair smooth and part it to one side or down the middle.
- Take a section of hair near one temple, about one to two inches wide.
- Divide this section into three strands and begin a simple braid, or a Dutch braid for more texture.
- Braid down toward the back of the head, following the hairline like a headband shape.
- Secure the end of the braid with a small hair tie.
- Repeat the same process on the other side of the head.
- Bring both braided sections to the back of the head, overlapping them slightly.
- Pin the braids in place using bobby pins, tucking the ends underneath for a clean finish.
- Adjust so the “crown” sits smoothly around the head.
- Finish with a light mist of hairspray to keep flyaways in place.
Beginner Tips
- If a full braid feels tricky, a simple twist works just as well for this style.
- Keep the sections small for a neater, more delicate crown look.
- Let the rest of the hair hang down naturally, or add a low ponytail underneath.
Common Mistakes to Avoid
- Pulling the braid too far back, which can make it slip out of place.
- Not securing the ends well, causing the crown to loosen during the day.
- Braiding too loosely, which loses the neat crown shape.
Styling or Decorating Ideas
- Weave a thin ribbon into the braid for a fairy-tale touch.
- Add tiny flower pins along the crown for a garden party feel.
- Pair with loose waves for a soft, romantic finish.
Best Colors and Materials
Ivory or gold ribbon adds an elegant touch, while colorful thread-wrapped strands make it fun and youthful.
Estimated Cost
$5–$12
Estimated Time
10–15 minutes
Difficulty Level
Intermediate
Where It Looks Best
Best suited for medium to long hair, though shorter hair can still achieve a partial crown look near the front.
Pinterest-Worthy Tip
This style is stunning from a top-down angle, showing off the full crown shape. It is a favorite for “hairstyle tutorial” Pinterest pins.
Conclusion
The braided crown headband is a beautiful, practical choice that turns an ordinary school morning into a special one. It is elegant, functional, and endlessly Pinterest-worthy.
5. Low Sleek Ponytail with Wrap
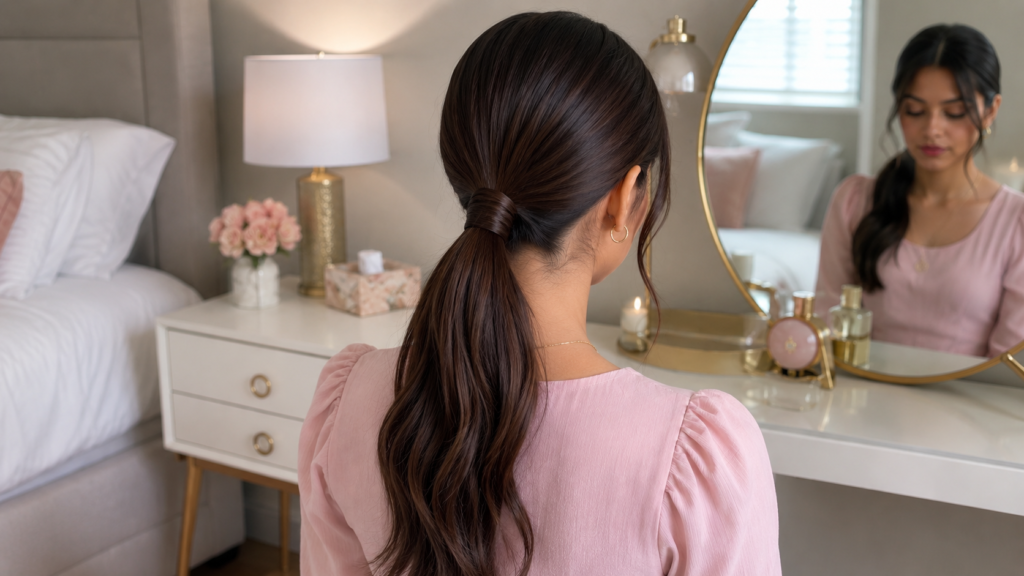
For girls who prefer a simple, polished look, the low sleek ponytail is a timeless choice. Wrapping a small section of hair around the elastic gives it that extra “finished” touch that photographs beautifully.
Why You’ll Love This Idea
This is one of the fastest easy hairstyles for girls on this list, but it still looks neat and grown-up. It is great for picture day or any morning when time is tight.
Materials Needed
- Brush
- One hair tie
- One bobby pin
- Small amount of gel or smoothing serum
Step-by-Step Instructions
- Brush hair thoroughly from roots to ends to remove all tangles.
- Apply a small amount of gel or smoothing serum to control flyaways.
- Gather all the hair at the nape of the neck.
- Smooth it back firmly with your hands or the brush.
- Secure with a hair tie at the base of the neck.
- Take a small section of hair, about a pencil’s width, from underneath the ponytail.
- Wrap this small section around the hair tie to hide it completely.
- Tuck the end of the wrapped piece under the elastic and secure it with a bobby pin.
- Smooth down the top of the head one more time for a sleek finish.
- Add a light mist of hairspray if needed to hold flyaways in place.
Beginner Tips
- A fine-tooth comb works best for getting that sleek, smooth look.
- Damp hair is easier to smooth than fully dry hair.
- Do not worry about perfection. Even a slightly bumpy ponytail still looks cute!
Common Mistakes to Avoid
- Using too much product, which can make hair look greasy instead of sleek.
- Pulling too tight at the hairline, which can be uncomfortable.
- Forgetting to wrap the hair tie, leaving the elastic visible.
Styling or Decorating Ideas
- Add a silk scrunchie for a soft, luxurious touch.
- Clip a bow just above the hair tie for extra flair.
- Try a slightly curled ponytail for texture and bounce.
Best Colors and Materials
Black or brown hair ties blend in seamlessly, while silk scrunchies in soft tones add elegance without bulk.
Estimated Cost
$3–$7
Estimated Time
5 minutes
Difficulty Level
Beginner
Where It Looks Best
Works beautifully on straight to slightly wavy hair of any length past the shoulders.
Pinterest-Worthy Tip
Photograph this style from a side profile to highlight the smooth, wrapped ponytail base.
Conclusion
The low sleek ponytail is proof that simple styles can still feel special. It is quick, classic, and always school-appropriate.
6. Twisted Pigtails
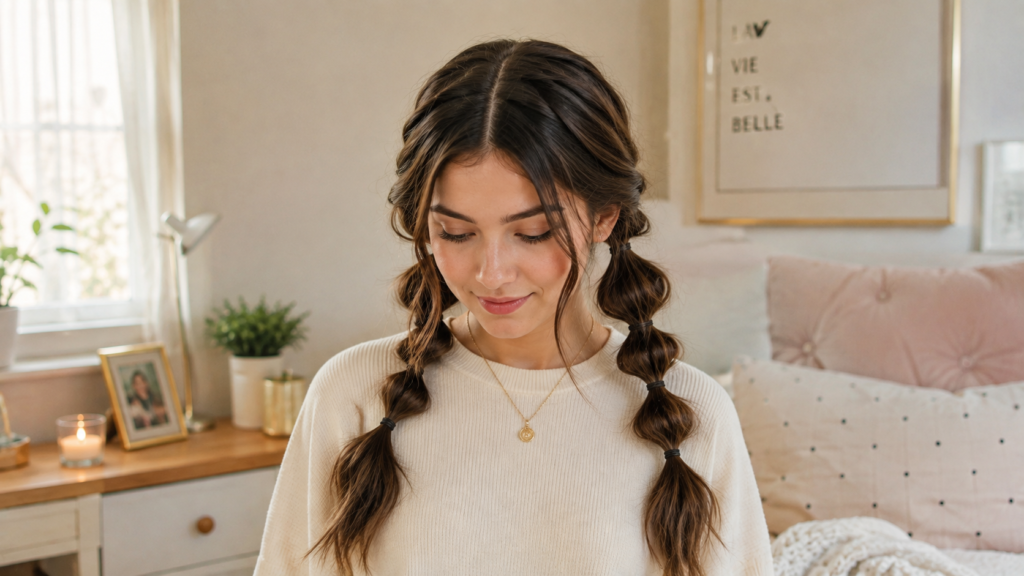
Twisted pigtails are a wonderful in-between option: easier than a full braid but far more secure and stylish than a plain ponytail. This is a favorite among parents looking for a quick but cute back-to-school look.
Why You’ll Love This Idea
Twisted pigtails add texture and a bit of flair without the time commitment of a full braid. They are great for younger girls who may not sit still for longer styles.
Materials Needed
- Comb
- Two hair ties
- Optional: small bows or clips
Step-by-Step Instructions
- Brush hair to remove tangles and part it evenly down the middle.
- Gather one side into a ponytail near the ear and secure loosely with a hair tie (this is a placeholder, remove later if needed).
- Take the ponytail and split it into two sections.
- Twist each section clockwise, then twist the two sections around each other counter-clockwise (this locks the twist in place).
- Continue twisting all the way down to the ends.
- Secure the twisted end with a small hair tie.
- Repeat the same steps on the other side.
- Gently pull the twist slightly to loosen it for more volume, if desired.
- Check both sides in the mirror to make sure they match.
- Add bows or clips at the top of each pigtail for a finishing touch.
Beginner Tips
- Keep the twist direction consistent (twist strands one way, cross the other way) for the best hold.
- Practice on one side first before doing the other, so your child gets used to the feeling.
- Wetting hair slightly can help twists stay neater.
Common Mistakes to Avoid
- Twisting too loosely, which causes the pigtails to unravel quickly.
- Uneven pigtail height, making the style look lopsided.
- Forgetting to secure the twist ends, leading to a messy finish by afternoon.
Styling or Decorating Ideas
- Add ribbon wrapped around each twist for extra color.
- Try mismatched bows for a fun, playful look.
- Pair with a fun headband for extra pop.
Best Colors and Materials
Bright, cheerful colors like yellow or teal make twisted pigtails feel extra fun and energetic.
Estimated Cost
$4–$8
Estimated Time
10 minutes
Difficulty Level
Beginner to Intermediate
Where It Looks Best
Great for shoulder-length to long hair, and works especially well on hair with natural texture or waves.
Pinterest-Worthy Tip
Capture a close-up shot of the twist pattern. Close-up texture shots are extremely popular for hairstyle pins.
Conclusion
Twisted pigtails strike the perfect balance between simple and stylish, making them a go-to choice for busy school mornings.
7. Half-Up Bubble Ponytail
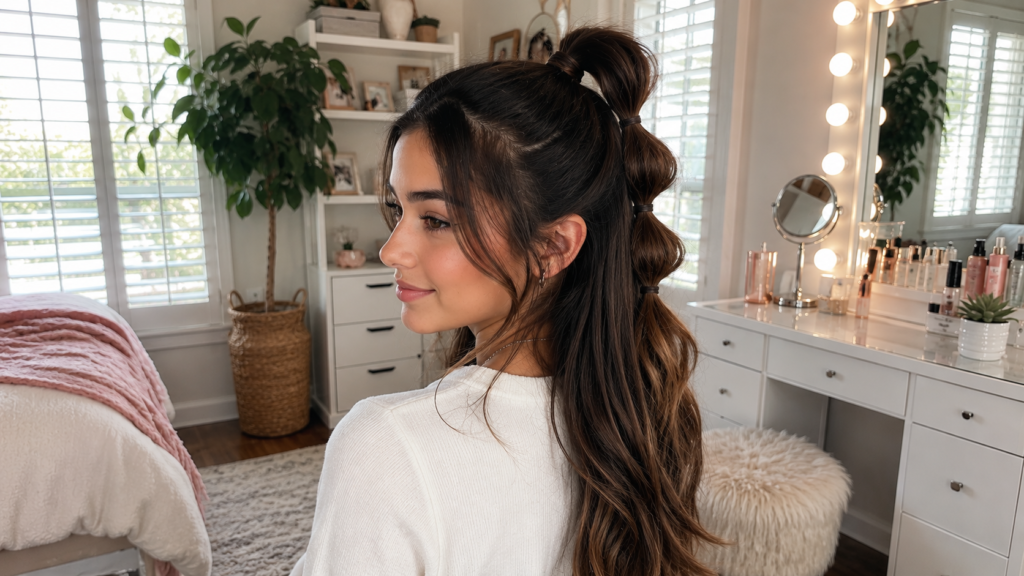
The bubble ponytail is a fun twist on the classic ponytail that creates a fun, layered look using just a few extra hair ties. It has become a huge trend on Pinterest for both kids and adults.
Why You’ll Love This Idea
This style looks impressive but is surprisingly simple to create. It adds volume and a playful bubble shape that kids love to show off.
Materials Needed
- Brush
- 4–5 small hair ties
- Optional: bow for the top tie
Step-by-Step Instructions
- Brush the hair smooth and gather the top section into a half-up ponytail, just like in Idea 1.
- Secure the base with the first hair tie at the crown of the head.
- Measure about two to three inches down the ponytail and add a second hair tie.
- Gently pull apart the hair between the two ties to create a “bubble” shape.
- Add a third hair tie another two to three inches down.
- Pull apart the hair between the second and third ties to form another bubble.
- Repeat this pattern until you reach the ends of the ponytail.
- Adjust each bubble section so they are evenly puffed out.
- Smooth down any flyaways near the top for a neat finish.
- Add a bow at the very top hair tie for a decorative finish.
Beginner Tips
- Use clear or matching hair ties for a subtle look, or colorful ones for a fun pop.
- Do not pull too hard when creating the bubbles, gentle tugging is enough.
- This style also works as a full ponytail instead of half-up.
Common Mistakes to Avoid
- Spacing the hair ties unevenly, making the bubbles different sizes.
- Pulling too hard on the bubbles, which can loosen the hair ties.
- Using too few hair ties, which makes the bubble effect less noticeable.
Styling or Decorating Ideas
- Alternate hair tie colors for a rainbow bubble effect.
- Add small flower clips between each bubble section.
- Curl the ends after finishing for extra bounce.
Best Colors and Materials
Pastel or rainbow hair ties make this style extra fun and Pinterest-worthy for photos.
Estimated Cost
$5–$10
Estimated Time
10–12 minutes
Difficulty Level
Intermediate
Where It Looks Best
Best for medium to long hair since the bubble sections need enough length to show.
Pinterest-Worthy Tip
This hairstyle looks amazing in motion shots, like a photo of your child walking or laughing, since the bubbles bounce beautifully.
Conclusion
The half-up bubble ponytail is a playful, eye-catching style that turns a simple ponytail into something extra special.
8. Simple Side Braid with Bow
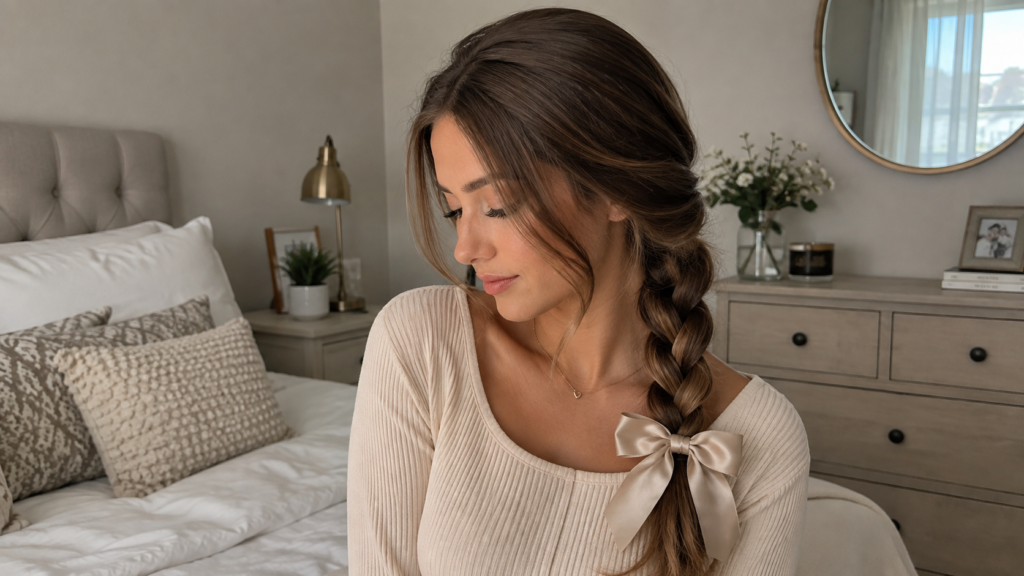
The side braid is a sweet, slightly asymmetrical style that adds interest without being complicated. It is a great choice for girls who want something a little different from a centered hairstyle.
Why You’ll Love This Idea
This look feels a little more grown-up while still being completely age-appropriate and easy to create. It is also great for keeping hair secured on one side, away from the dominant hand for activities like writing or drawing.
Materials Needed
- Comb
- One hair tie
- Bobby pins
- Bow or ribbon
Step-by-Step Instructions
- Brush the hair smooth and sweep it all to one side, behind one shoulder.
- Secure the hair loosely near the ear with a bobby pin to keep it in place temporarily.
- Split the hair into three even sections at the starting point.
- Begin a simple three-strand braid, crossing the outer strands over the middle strand.
- Continue braiding down the length of the hair, keeping tension even.
- Secure the end with a hair tie.
- Gently loosen the braid slightly by pulling on the edges for a softer, fuller look.
- Smooth down the top of the head to remove any bumps near the part.
- Remove the temporary bobby pin once the braid is secure.
- Tie a bow around the top of the braid, near the ear, for a decorative finish.
Beginner Tips
- Practice keeping even tension throughout the braid for a smooth, consistent look.
- A side braid is a great first braid to teach an older child to do on herself.
- If hair is layered, use small clips to keep shorter pieces tucked in.
Common Mistakes to Avoid
- Starting the braid too high or too low, which throws off the side-swept look.
- Braiding too tightly, which can pull at the scalp.
- Forgetting to loosen the braid, leaving it looking flat and thin.
Styling or Decorating Ideas
- Add a fabric bow that matches her school outfit.
- Try a fishtail braid instead of a classic braid for a different texture.
- Add small pearl clips along the braid for a special-occasion feel.
Best Colors and Materials
Soft satin ribbons in pastel or metallic tones add a polished, feminine touch.
Estimated Cost
$4–$9
Estimated Time
8–10 minutes
Difficulty Level
Beginner to Intermediate
Where It Looks Best
Works well on medium to long hair, and looks especially pretty on hair with natural waves.
Pinterest-Worthy Tip
Photograph the braid from behind, slightly to the side, to capture the full length and the bow placement.
Conclusion
The simple side braid with a bow is a sweet, slightly unique style that is perfect for a first day of school look your daughter will love.
Expert Decorating Tips
- Match accessories to the outfit, not the other way around. Pick the bow or ribbon color after the outfit is chosen for a coordinated first day of school look.
- Layer textures. Combine a smooth braid with a fuzzy scrunchie, or a sleek ponytail with a silky ribbon, for visual interest.
- Keep it age-appropriate. Younger girls often prefer bold colors and playful shapes, while older girls may want more subtle, elegant touches.
- Practice the week before school starts. This helps you get faster and helps your child get comfortable sitting still for the style.
- Have a backup plan. Keep a simple ponytail or braid in your back pocket for busy or rushed mornings.
Budget-Saving Tips
- Buy hair ties and clips in bulk packs instead of individual pieces, which usually cost less per item.
- Reuse ribbons and ribbons from gift wrapping for a free decorative touch.
- Make your own hair bows using fabric scraps and a hot glue gun.
- Shop dollar stores for basic combs, brushes, and hair ties.
- Watch for back-to-school sales in late July and August, when hair accessories are often discounted.
- Swap accessories with other parents in a mom’s group to try new styles without buying everything new.
Frequently Asked Questions
1. What is the easiest first day of school hairstyle for beginners? The classic half-up ponytail is the easiest option. It takes less than five minutes and requires no braiding skills at all.
2. How can I keep my daughter’s hairstyle from falling apart during the school day? Use soft, high-quality hair ties, avoid styles that are too loose, and add a few bobby pins to secure loose sections, especially around the hairline.
3. What hairstyles work best for curly or thick hair? Twisted pigtails, double Dutch braids, and space buns tend to work especially well on curly and thick hair since they add texture and control volume.
4. How long does it take to learn to braid a child’s hair? Most parents feel comfortable with a basic braid after about one to two weeks of daily practice, just a few minutes each time.
5. Are tight hairstyles bad for a child’s hair? Yes, hairstyles that are pulled too tight can cause discomfort and, over time, may lead to hair breakage or thinning near the hairline. Always aim for snug, not tight.
6. What hair accessories are must-haves for back-to-school season? Soft hair ties, bobby pins, a wide-tooth comb, and a few bows or clips cover almost every style on this list.
7. Can these hairstyles be done on short hair? Yes! Many styles, like twisted pigtails, a partial braided crown, or small space buns, can be adapted for shorter hair, even bobs.
8. How do I make hairstyles last longer between washes? Using a small amount of dry shampoo at the roots and keeping styles slightly looser on day two can help extend a hairstyle’s life.
9. What is the best way to detangle hair before styling? Start detangling from the ends of the hair and work upward toward the roots, using a wide-tooth comb and a detangling spray if needed.
10. How can I make hairstyling a fun morning routine instead of a rushed chore? Try playing music, letting your child pick her favorite hair tie color, or practicing styles the night before school starts so mornings feel calmer.
Final Thoughts
The first day of school is a special milestone, and a little extra care with hairstyling can make your daughter feel confident, comfortable, and ready to take on the new school year. From the simple half-up ponytail to the more detailed braided crown, these first day of school hair ideas for girls offer something for every hair type, skill level, and morning schedule.
Remember, practice makes progress, not perfection. Even a slightly imperfect braid or a lopsided bun is still made with love, and that is what truly matters. Pick one or two styles from this list to try this week, and by the time the first day of school arrives, you will both feel like pros.
Pinterest Call-to-Action
Loved these cute school hairstyles for girls? Save this pin to your back-to-school board so you can find it again on those busy morning routines! Don’t forget to share it with other parents who could use a little hairstyle inspiration too. Happy styling, and here’s to a wonderful first day of school! 🎒✨