Introduction
September is here, and that means one thing: it’s time to change up your nails! If you love fall, you already know it’s the best season for cozy sweaters, pumpkin spice lattes, and warm, earthy colors. Your nails deserve to join the fun too. That’s why September nail ideas are all over Pinterest right now, and for good reason.
Fall nails are more than just a color change. They are a whole mood. Think deep oranges like a sunset, rich browns like tree bark, and soft golds like falling leaves. These colors make you feel warm and cozy, even before the weather cools down. Whether you’re getting your nails done at a salon or doing them yourself at home, September is the perfect time to try something new.
In this guide, we’re sharing 8 detailed and easy-to-follow September nail ideas that capture the true spirit of fall. Each idea comes with step-by-step instructions, tips for beginners, mistakes to avoid, and even styling ideas so your manicure looks like it came straight from a magazine. We’ll also cover the tools you need, safety tips, budget-friendly tricks, and answers to the most common questions people ask about fall nails.
Whether you like short and simple nails, long and dramatic ones, or something in between, there’s an idea here for you. From classic burnt orange nails to trendy plaid patterns and sparkly leaf designs, this list has something for every style and skill level.
So grab your favorite polish, get comfortable, and let’s dive into the coziest, most beautiful September nail ideas you’ll want to save and try right away. By the end of this post, you’ll have a full list of fall-inspired designs ready for your next at-home manicure or salon visit. Let’s get those autumn vibes on your fingertips!
Why This Trend Is Popular
Fall nail art has become a huge trend on Pinterest, and it’s easy to see why. Here are the top reasons people love September nail ideas every year:
- Seasonal comfort: Warm colors like rust, brown, and mustard yellow feel cozy and match the mood of the season.
- Easy to personalize: You can mix colors, patterns, and finishes to match your own style.
- Affordable self-care: Doing your nails at home is a cheap way to feel pampered and put-together.
- Pinterest-friendly: Fall nails photograph beautifully, making them perfect for sharing and saving.
- Works with any outfit: Earthy fall tones go with sweaters, boots, flannels, and holiday outfits.
- Great for beginners: Many fall designs use simple techniques like sponging or dotting, so anyone can try them.
- Matches other fall traditions: Just like decorating your home or baking pumpkin treats, painting your nails is a fun way to welcome the season.
Fall nails also give people a creative outlet. You don’t need to be a professional nail artist to make something beautiful. With a few tools and some patience, you can create salon-quality designs right at your kitchen table.
Materials and Tools Needed
Before you start any of the ideas below, it helps to have the right supplies ready. Here is a simple table of the most common tools you’ll need for September nail ideas.
| Tool/Material | Purpose |
|---|---|
| Base coat | Protects nails and helps polish stick better |
| Top coat | Seals the design and adds shine |
| Fall-colored polishes | Main colors for your design (orange, brown, gold, olive, maroon) |
| Nail file and buffer | Shapes nails and smooths the surface |
| Cuticle pusher | Cleans up the base of the nail |
| Thin detail brush | For lines, dots, and small designs |
| Dotting tool | Creates dots and small circles |
| Makeup sponge | Used for ombre and gradient looks |
| Striping tape | Helps create clean lines and patterns |
| Nail glue or adhesive | For gems, foil, or decals |
| Rhinestones or gems | Adds sparkle and detail |
| Nail art foil | Creates a metallic, leaf-like shine |
| Cotton pads and remover | Cleans mistakes and prepares nails |
| Cuticle oil | Keeps skin around nails soft and healthy |
You don’t need every item on this list to get started. Many of these ideas only need polish, a brush, and a top coat.
Safety Tips
Nail art is fun, but it’s smart to stay safe while doing it. Keep these tips in mind:
- Work in a well-ventilated room. Nail polish and remover have strong fumes.
- Avoid extended nail wear if your nails feel weak. Give your nails a break between manicures.
- Never share nail tools without cleaning them. This helps prevent infections.
- Be careful with glue and gems near your skin. Nail glue can irritate skin if it touches you.
- Let each layer dry fully. Rushing can smudge your design and cause chipping.
- Use gentle nail files. Filing too hard can weaken your natural nails.
- Moisturize your cuticles often. Dry skin around nails can crack or peel.
Now let’s get into the fun part: the ideas!
1. Classic Burnt Orange Nails
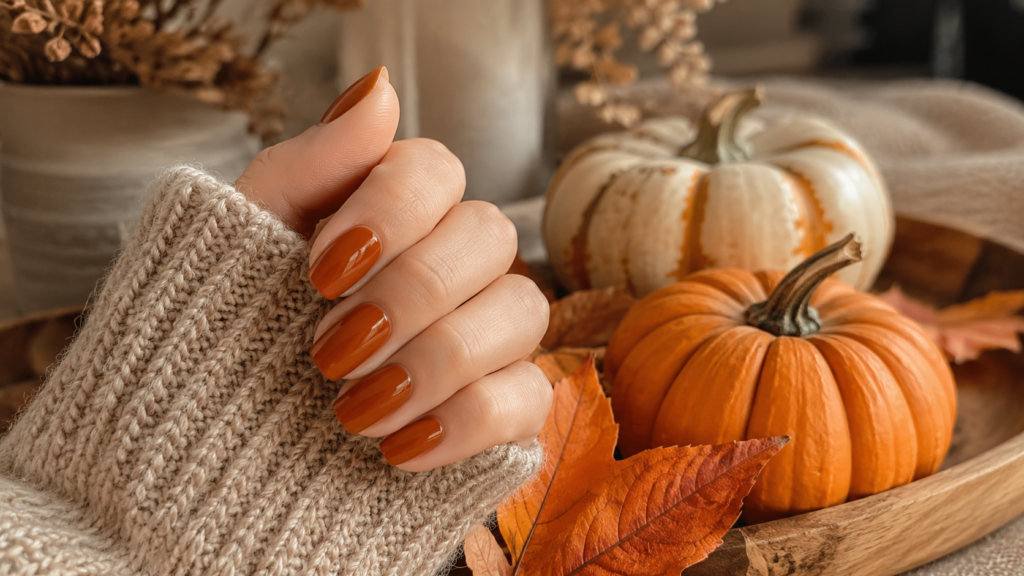
Burnt orange is basically the queen of September nail ideas. It’s warm, bold, and instantly makes you think of pumpkins and falling leaves.
Why You’ll Love This Idea
This color is easy to wear, flatters almost every skin tone, and works for both casual days and dressed-up occasions. It’s a simple way to bring fall energy to your hands without a complicated design.
Materials Needed
- Burnt orange nail polish
- Base coat
- Top coat
- Nail file
Step-by-Step Instructions
- File and shape your nails the way you like.
- Push back your cuticles gently.
- Apply a thin base coat and let it dry.
- Apply the first coat of burnt orange polish.
- Wait 2–3 minutes for it to dry.
- Apply a second coat for full color coverage.
- Clean up any polish on your skin with a small brush dipped in remover.
- Apply a glossy top coat to seal the color.
- Add cuticle oil once fully dry.
Beginner Tips
- Use thin coats instead of one thick coat to avoid smudging.
- Start painting from the middle of the nail, then fill in the sides.
Common Mistakes to Avoid
- Applying polish too thick, which causes bubbles.
- Skipping the base coat, which can lead to staining.
Styling or Decorating Ideas
Add a single gold accent nail or a thin gold line near the cuticle for extra elegance.
Best Colors and Materials
Burnt orange, terracotta, or rust-colored polish works best. Choose a creamy formula for full coverage.
Estimated Cost
$8–$15
Estimated Time
20–30 minutes
Difficulty Level
Beginner
Where It Looks Best
Great for everyday wear, fall festivals, and casual outings.
Pinterest-Worthy Tip
Photograph your nails next to a pumpkin or autumn leaves for the perfect fall flat-lay picture.
Conclusion
Burnt orange nails are a timeless, easy way to celebrate fall. They’re simple enough for beginners but still look polished and put together.
2. Cozy Plaid Pattern Nails
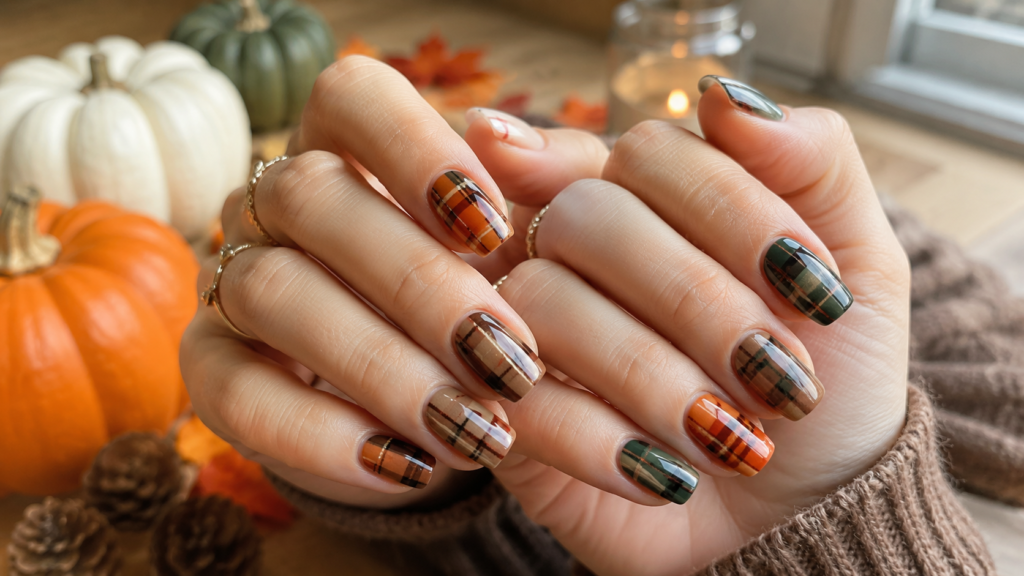
Plaid isn’t just for flannels anymore. This idea brings that cozy, cabin-in-the-woods feeling right to your fingertips.
Why You’ll Love This Idea
Plaid nails feel festive and detailed but are easier to create than they look. It’s a fun way to show off your fall style in a unique, eye-catching way.
Materials Needed
- Base color polish (cream or brown)
- Two accent colors (orange and dark green work well)
- Thin striping tape
- Detail brush
- Top coat
Step-by-Step Instructions
- Paint your nails with a cream or light brown base color.
- Let the base dry completely.
- Place thin strips of striping tape vertically across the nail.
- Paint over the tape with your first accent color, then remove the tape.
- Let it dry for a few minutes.
- Place tape horizontally and repeat with your second accent color.
- Once dry, use a detail brush to add thin crossing lines where the colors meet.
- Clean up any smudges around the nail edges.
- Seal everything with a top coat.
Beginner Tips
- Practice the tape technique on paper first.
- Use short pieces of tape for more control.
Common Mistakes to Avoid
- Removing tape too early or too late, which can smear lines.
- Using too many colors, which can make the pattern look messy.
Styling or Decorating Ideas
Try plaid on just one or two accent nails, with the rest in a solid cream color.
Best Colors and Materials
Cream, burnt orange, dark green, and brown make a classic plaid combination.
Estimated Cost
$10–$18
Estimated Time
45–60 minutes
Difficulty Level
Intermediate
Where It Looks Best
Perfect for holiday gatherings, fall photoshoots, and cozy weekend outings.
Pinterest-Worthy Tip
Pair plaid nails with a matching flannel or scarf for a coordinated fall photo.
Conclusion
Plaid nails are a creative twist on classic September nail ideas. They take a little more time but the payoff is a totally unique, Pinterest-worthy design.
3. Golden Leaf Accent Nails
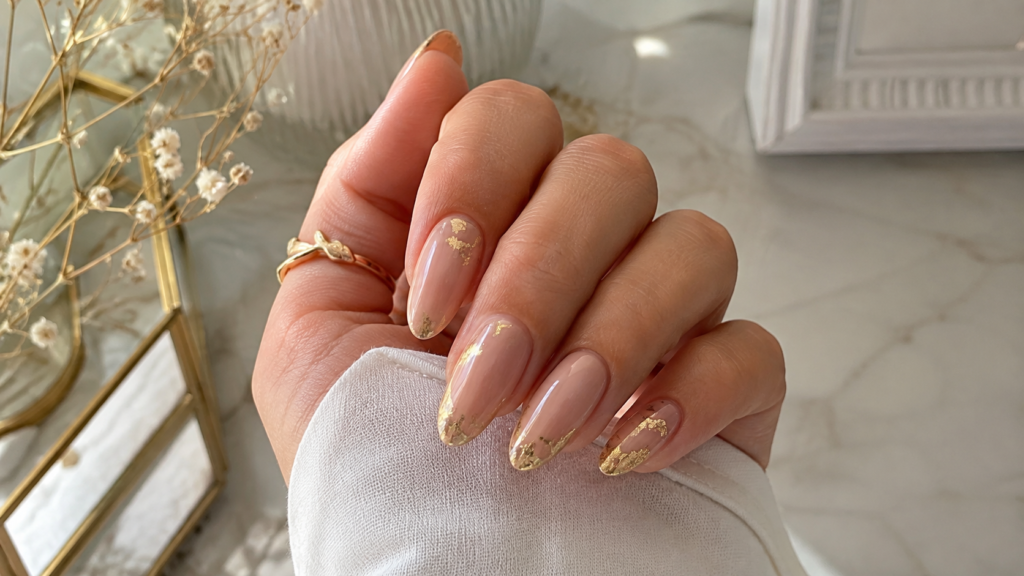
Nothing says fall like golden leaves drifting through the air. This design brings that magic to your nails.
Why You’ll Love This Idea
This design is elegant and glamorous while still feeling like nature. It’s perfect for anyone who wants a touch of sparkle without going overboard.
Materials Needed
- Nude or soft brown base polish
- Gold nail foil or gold polish
- Small detail brush
- Top coat
Step-by-Step Instructions
- Apply a nude or soft brown base color to all nails.
- Let it dry fully.
- Choose one or two nails to be your accent nails.
- Using a thin brush, paint a simple leaf outline in gold polish.
- Fill in the leaf shape lightly, leaving some texture.
- Add small vein lines inside the leaf using a thinner brush.
- Let the design dry for several minutes.
- Apply gold foil pieces near the leaf for extra shine, if desired.
- Seal with a glossy top coat.
Beginner Tips
- Practice drawing a leaf shape on paper before doing it on your nail.
- Keep the leaf design small and simple for a cleaner look.
Common Mistakes to Avoid
- Making the leaf too large for the nail.
- Adding too much foil, which can look cluttered.
Styling or Decorating Ideas
Combine with a matte top coat on the other nails for a nice contrast between shiny and soft finishes.
Best Colors and Materials
Nude, caramel, or soft brown base with gold or copper accents.
Estimated Cost
$12–$20
Estimated Time
40–50 minutes
Difficulty Level
Intermediate
Where It Looks Best
Great for weddings, fall parties, and date nights.
Pinterest-Worthy Tip
Take a close-up photo with real fall leaves in the background for a stunning nature-inspired pin.
Conclusion
Golden leaf nails are one of the most elegant September nail ideas on this list. They combine nature and glamour in one beautiful design.
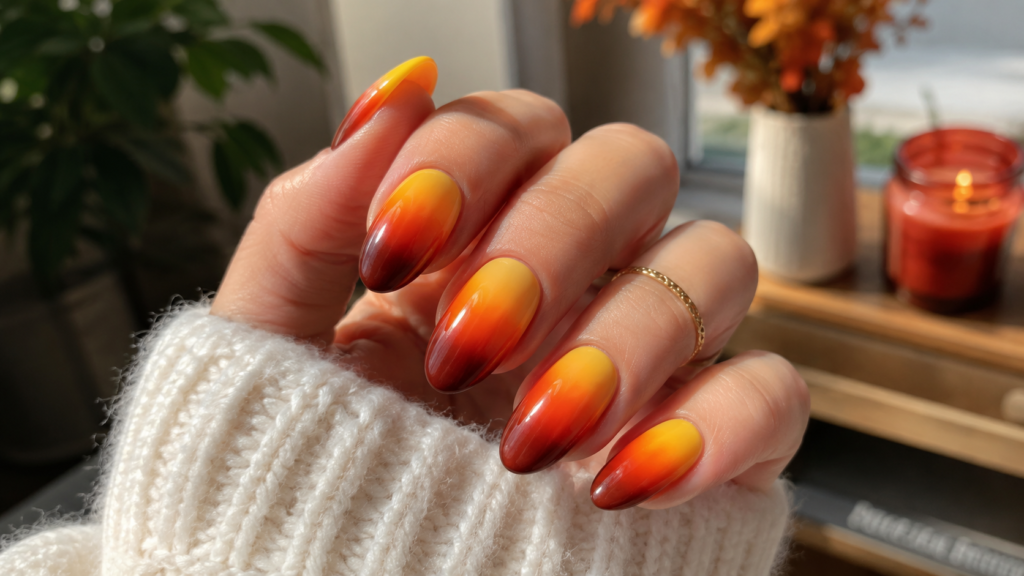
This design blends fall colors together like a beautiful sunset, making it one of the most eye-catching September nail ideas you can try.
Why You’ll Love This Idea
The blended colors create a soft, dreamy look that feels artistic and unique. It’s a great way to use multiple fall shades in one design.
Materials Needed
- Yellow, orange, and red-brown polish
- Makeup sponge
- Base coat
- Top coat
Step-by-Step Instructions
- Apply a base coat and let it dry.
- Paint a thin layer of yellow polish near the base of the nail.
- Paint orange polish in the middle section.
- Paint red-brown polish near the tip.
- While still slightly wet, dab a makeup sponge gently over the colors to blend them.
- Repeat dabbing until the colors flow smoothly into each other.
- Let the design dry completely.
- Clean up edges with a brush and remover.
- Apply a top coat for shine and protection.
Beginner Tips
- Work quickly so the polish doesn’t dry before blending.
- Use a new section of the sponge for each nail to avoid muddy colors.
Common Mistakes to Avoid
- Pressing the sponge too hard, which can remove polish instead of blending it.
- Using too many colors at once, which can look messy.
Styling or Decorating Ideas
Add a thin gold line at the base of the nail for a polished finish.
Best Colors and Materials
Yellow, orange, and deep red-brown blend best for a sunset look.
Estimated Cost
$10–$16
Estimated Time
45 minutes
Difficulty Level
Intermediate
Where It Looks Best
Perfect for outdoor fall events, hikes, and cozy coffee shop visits.
Pinterest-Worthy Tip
Photograph your nails outside during golden hour for natural lighting that matches the design.
Conclusion
Sunset ombre nails are a beautiful, artistic choice among September nail ideas. They look complicated but are actually simple once you get the blending technique down.
5. Chocolate Brown French Tips
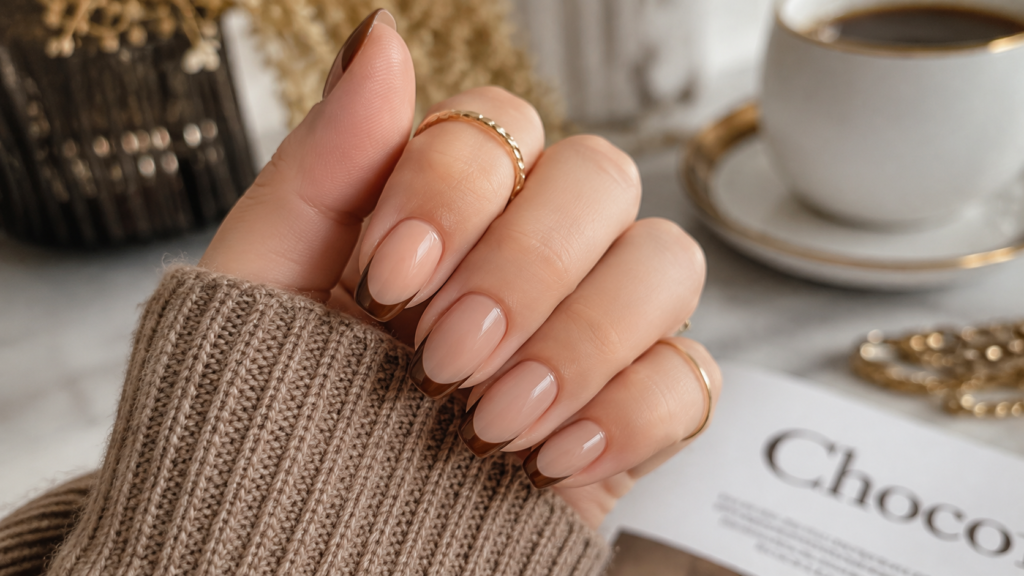
A twist on the classic French manicure, this design swaps white tips for rich chocolate brown.
Why You’ll Love This Idea
It’s elegant, modern, and works for both casual and formal settings. This design proves that French tips can be trendy all year long.
Materials Needed
- Sheer pink or nude polish
- Chocolate brown polish
- Thin brush or french tip guide stickers
- Top coat
Step-by-Step Instructions
- Apply a sheer pink or nude base color to all nails.
- Let it dry completely.
- Place french tip guide stickers just below the nail tip, if using.
- Paint the tip of the nail with chocolate brown polish.
- Use a thin brush to clean up the curve of the tip line.
- Remove the guide stickers carefully while polish is still slightly wet.
- Let the tips dry fully.
- Add a second coat to the tips for a bolder look, if desired.
- Seal the whole nail with a glossy top coat.
Beginner Tips
- Guide stickers make it much easier to get a clean, curved line.
- Practice the tip shape on one nail before doing all ten.
Common Mistakes to Avoid
- Making the tip line uneven between nails.
- Removing stickers too late, which can peel off wet polish.
Styling or Decorating Ideas
Add a tiny gold dot at the center of the tip line for extra detail.
Best Colors and Materials
Chocolate brown, espresso, or deep mocha tips over a sheer pink or nude base.
Estimated Cost
$10–$18
Estimated Time
35–45 minutes
Difficulty Level
Intermediate
Where It Looks Best
Great for work, dinners, and everyday elegance.
Pinterest-Worthy Tip
Show off the tips with hands wrapped around a warm mug for a cozy autumn photo.
Conclusion
Chocolate brown French tips are a chic and modern update to a classic style. They’re one of the most sophisticated September nail ideas on this list.
6. Matte Olive Green Nails
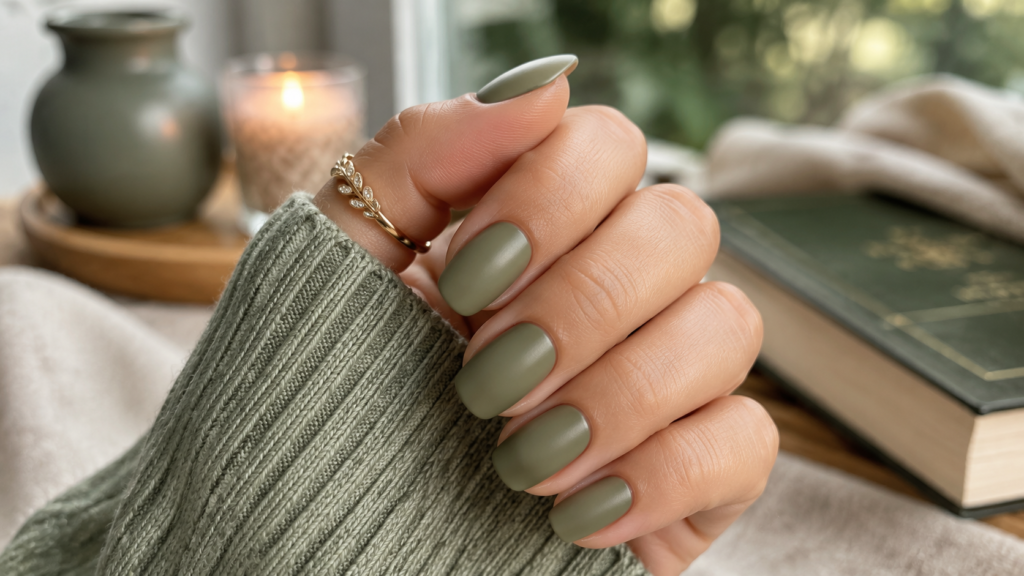
Olive green is a favorite fall color, and the matte finish makes it feel even more autumn-inspired.
Why You’ll Love This Idea
This look is trendy, calming, and slightly unexpected. It pairs beautifully with both neutral and bold fall outfits.
Materials Needed
- Olive green polish
- Matte top coat
- Base coat
- Nail file
Step-by-Step Instructions
- File and shape your nails.
- Apply a base coat and let it dry.
- Paint the first coat of olive green polish.
- Wait a few minutes for it to dry.
- Apply a second coat for full, even color.
- Let the polish dry completely.
- Clean up any edges with a small brush.
- Apply a matte top coat instead of a glossy one.
- Let the matte finish set for a few minutes before touching anything.
Beginner Tips
- Matte top coats dry differently than glossy ones, so avoid touching your nails too soon.
- Two thin coats of color look better than one thick coat.
Common Mistakes to Avoid
- Applying matte top coat before the color is fully dry, which can smudge the design.
- Using too much matte top coat, which can look streaky.
Styling or Decorating Ideas
Add one glossy accent nail for a nice contrast between matte and shiny finishes.
Best Colors and Materials
Olive green, moss green, or deep sage work beautifully with a matte finish.
Estimated Cost
$9–$15
Estimated Time
25–30 minutes
Difficulty Level
Beginner
Where It Looks Best
Perfect for everyday wear, work, and casual fall outfits.
Pinterest-Worthy Tip
Pair with a cream sweater for a soft, earthy color contrast in photos.
Conclusion
Matte olive nails are simple, stylish, and totally on-trend. They’re an easy way to bring modern fall vibes into your September nail ideas rotation.
7. Pumpkin Spice Swirl Nails
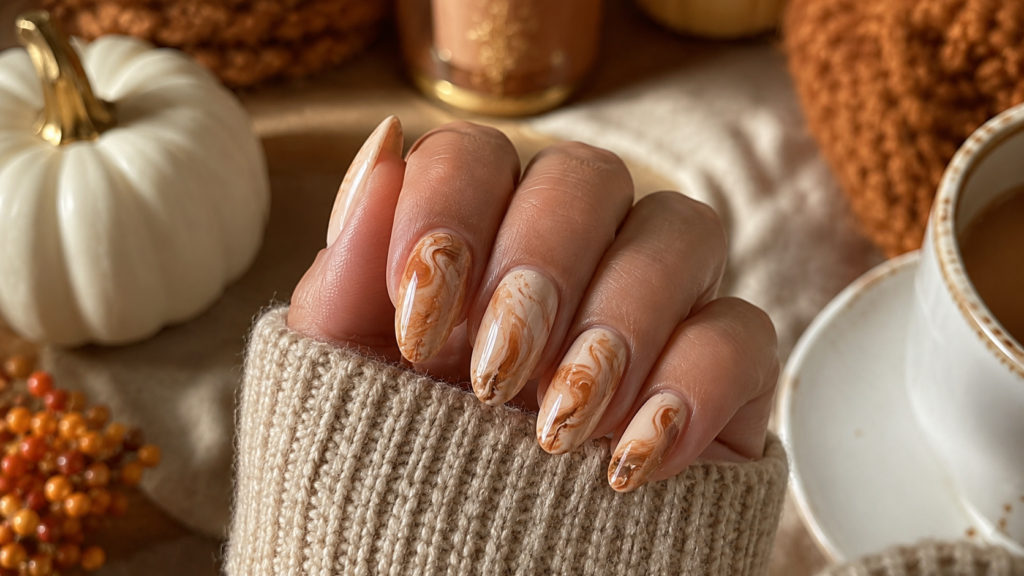
Inspired by everyone’s favorite fall drink, this design mixes creamy and spiced tones into a fun swirl pattern.
Why You’ll Love This Idea
It’s playful, festive, and instantly recognizable as a fall design. It’s a great choice if you want something fun and a little different.
Materials Needed
- Cream polish
- Cinnamon or orange-brown polish
- Toothpick or thin nail art tool
- Top coat
Step-by-Step Instructions
- Apply a cream base color and let it dry fully.
- Paint small dots of cinnamon-brown polish onto the nail while the base is dry.
- Use a toothpick to gently swirl the dots into a marbled pattern.
- Add a few more dots in different spots for variety.
- Swirl again lightly, being careful not to overmix.
- Let the design dry completely, ideally overnight or for a few hours.
- Clean up any smudges around the edges.
- Apply a glossy top coat once fully dry.
- Check for any air bubbles and smooth them out if needed.
Beginner Tips
- Work on one nail at a time so the polish doesn’t dry before you swirl it.
- Less is more. A few swirls look better than too many.
Common Mistakes to Avoid
- Swirling too much, which can turn the pattern into one solid color.
- Moving on to top coat before the design is fully dry.
Styling or Decorating Ideas
Add a tiny dot of gold glitter polish in the center of the swirl for a fun accent.
Best Colors and Materials
Cream, cinnamon brown, and soft orange work best for this swirl effect.
Estimated Cost
$10–$16
Estimated Time
50–60 minutes
Difficulty Level
Advanced
Where It Looks Best
Great for fall festivals, coffee dates, and cozy weekend hangouts.
Pinterest-Worthy Tip
Photograph your nails wrapped around a pumpkin spice latte cup for the ultimate fall aesthetic.
Conclusion
Pumpkin spice swirl nails are fun, festive, and full of personality. They take a bit more practice but are one of the most creative September nail ideas you can try.
8. Deep Maroon Velvet Nails
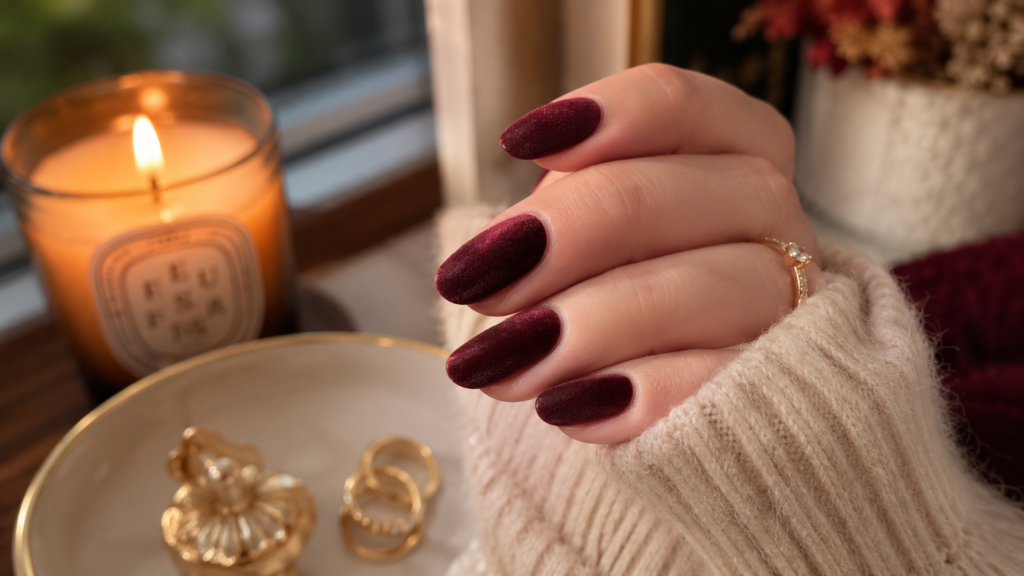
Rich, romantic, and a little dramatic, deep maroon nails bring elegant fall energy to any occasion.
Why You’ll Love This Idea
This color feels luxurious without much effort. It’s a bold statement that still feels classic and easy to wear.
Materials Needed
- Deep maroon or wine-colored polish
- Base coat
- Glossy top coat
- Nail file
Step-by-Step Instructions
- File and shape your nails evenly.
- Apply a clear base coat and let it dry.
- Paint the first coat of maroon polish carefully.
- Let it dry for a few minutes.
- Apply a second coat for a deep, rich color.
- Check for any streaks and fix them with a thin brush.
- Let the polish dry completely.
- Clean up the edges around your cuticles.
- Apply a glossy top coat for a shiny, velvet-like finish.
Beginner Tips
- Dark polish shows streaks easily, so use thin, even coats.
- Let each coat dry fully before adding the next one.
Common Mistakes to Avoid
- Applying too much polish at once, which causes clumping near the cuticle.
- Skipping the top coat, which can make the color look dull.
Styling or Decorating Ideas
Add tiny gold star studs near the base of one nail for a touch of sparkle.
Best Colors and Materials
Deep maroon, wine red, or oxblood polish with a high-gloss top coat.
Estimated Cost
$8–$14
Estimated Time
25–35 minutes
Difficulty Level
Beginner
Where It Looks Best
Perfect for evenings out, holiday parties, and cozy fall date nights.
Pinterest-Worthy Tip
Photograph your nails near candles or warm string lights for a moody, elegant fall vibe.
Conclusion
Deep maroon nails are a timeless, elegant addition to your list of September nail ideas. They’re simple to create but look incredibly luxurious.
Expert Decorating Tips
- Start with clean, dry nails. Any oil or lotion left on your nails can make polish peel faster.
- Always use a base coat. It protects your nails and helps color last longer.
- Apply thin coats. Thin layers dry faster and look smoother than thick ones.
- Practice new designs on paper first. This helps you get comfortable with the technique before trying it on your nails.
- Keep a small brush and remover nearby. It makes cleanup so much easier while you work.
- Let each layer dry fully. Patience is the secret to a smooth, professional-looking manicure.
- Match your design to the occasion. Simple colors work for every day, while detailed art is great for special events.
Budget-Saving Tips
- Buy multi-use tools. A dotting tool can double as a detail brush in a pinch.
- Choose polishes with good pigment. These need fewer coats, saving both time and product.
- Reuse old polish colors. Many fall shades you already own can work for these designs.
- DIY at home instead of visiting a salon. This can save a significant amount of money over time.
- Make your own striping tape alternative. Scotch tape can work in place of nail striping tape.
- Buy basic tools in sets. Nail art kits are often cheaper than buying each item separately.
Frequently Asked Questions
1. What are the best colors for September nail ideas? Warm tones like burnt orange, olive green, chocolate brown, and deep maroon are the most popular fall colors.
2. Do I need gel polish for these designs? No, regular polish works great for all of these ideas. Gel polish can make the design last longer, but it’s not required.
3. How long does fall nail polish usually last? Regular polish typically lasts 5–7 days, while gel polish can last 2–3 weeks with proper care.
4. Are these designs beginner-friendly? Yes, most of these ideas are simple, though a few like the pumpkin spice swirl and plaid pattern take extra practice.
5. What tools are essential for nail art beginners? A good base coat, top coat, thin detail brush, and a few fall-colored polishes are enough to start.
6. Can I do these designs on short nails? Absolutely. All eight ideas work well on both short and long nails.
7. How can I make my fall nails last longer? Always apply a base coat and top coat, avoid harsh chemicals, and wear gloves when cleaning.
8. What if I make a mistake while painting? Use a small brush dipped in nail polish remover to clean up mistakes without removing the whole design.
9. Is matte or glossy better for fall nails? Both look great. Matte finishes feel modern and cozy, while glossy finishes look classic and polished.
10. Where can I find more September nail ideas for inspiration? Pinterest is one of the best places to explore seasonal nail trends and save your favorite looks for later.
Final Thoughts
Fall is such a fun season to express yourself through nail art. These September nail ideas give you everything from simple, everyday colors to detailed, eye-catching designs. No matter your skill level, there’s an idea here that fits your style and your schedule.
The best part about fall nails is how much personality they add to your look. A warm color or a cozy pattern can instantly make you feel ready for pumpkin patches, sweater weather, and everything else this season brings.
Take your time trying out these designs, and don’t be afraid to mix and match colors or techniques to make them your own. Nail art is all about having fun and expressing your personal style.
Save This Pin!
Loved these September nail ideas? Don’t forget to save this pin so you can come back to it anytime you need fall nail inspiration. Share it with a friend who loves cozy autumn vibes too, and let’s make this the best nail season yet!