Introduction
Picture day mornings can feel a little crazy, right? You’re trying to find matching socks, pack lunches, and somehow still get out the door on time. The last thing you want is a hairstyle that takes an hour to finish. That’s exactly why cute picture day hairstyles for girls that are easy are such a lifesaver for busy parents everywhere.
The good news is that easy does not mean boring. In fact, some of the simplest hairstyles end up looking the most adorable in photos. A soft braid, a sparkly clip, or a half-up style can make your daughter’s smile shine even brighter in her school picture. These styles are quick to create, gentle on little heads, and still look polished enough for a special day.
This guide is packed with 8 detailed, step-by-step hairstyle ideas that any parent can try at home, even if you are not a hairstyling expert. Each idea includes the tools you need, simple instructions, styling tips, and even ideas for cute hair accessories. Whether your daughter has short hair, long hair, curly hair, or straight hair, you will find something here that works for her.
We will also cover why these hairstyles have become so popular on Pinterest, what tools and materials you need to have on hand, and some helpful safety tips for working with kids’ hair. By the end of this article, you will have a whole list of go-to picture day hairstyles ready for this year and many years to come.
So grab your hairbrush, a few clips, and let’s make picture day morning stress-free and full of adorable hair magic!
Why This Trend Is Popular
Picture day hairstyles have become one of the most searched and saved topics on Pinterest, and it’s easy to see why. Parents everywhere are looking for ways to make their kids look their best without spending hours in front of the mirror.
Here are a few reasons this trend keeps growing:
- Busy mornings need quick solutions. Most families do not have 45 minutes to spare before school.
- Kids want to feel confident. A cute hairstyle can boost a child’s confidence when the camera comes out.
- Photos last forever. Picture day photos get printed, framed, and shared for years, so parents want them to look special.
- Pinterest makes it visual. Parents love seeing real photo examples of styles before trying them at home.
- Easy styles reduce tears and tantrums. Simple hairstyles mean less pulling, less waiting, and a happier kid.
- They work for all hair types. Braids, half-up styles, and clips can be adjusted for straight, wavy, or curly hair.
This is why cute picture day hairstyles for girls that are easy continue to trend every single school year, especially in late summer and early fall when picture day season begins.
Materials and Tools Needed
Before you start any of the hairstyles below, it helps to have a small “hair kit” ready to go. Here is a simple table of the basic tools and materials most of these styles use.
| Tool or Material | Purpose |
|---|---|
| Wide-tooth comb | Detangles hair gently without pulling |
| Small hairbrush | Smooths hair before styling |
| Hair ties (clear or matching color) | Secures braids and ponytails |
| Bobby pins | Holds flyaways and small sections in place |
| Hair clips or bows | Adds a cute decorative touch |
| Water spray bottle | Softens hair and makes it easier to style |
| Leave-in conditioner or detangler spray | Reduces frizz and breakage |
| Small elastic bands (mini ponytail holders) | Great for braids and pigtails |
| Edge control gel or light hair gel | Smooths baby hairs and flyaways |
| Hair ribbon | Adds a soft, feminine touch to braids or ponytails |
You do not need every item on this list for every hairstyle. Most of these ideas only need 2 to 4 items, which makes them perfect for busy school mornings.
Safety Tips
Little heads are sensitive, so it’s important to keep hair styling gentle and comfortable. Here are some simple safety tips to follow:
- Always detangle first. Never brush a knot straight through; work from the ends up.
- Avoid pulling hair too tight. Tight hairstyles can cause headaches or hair breakage over time.
- Use kid-safe accessories. Avoid small parts that could be a choking hazard for younger children.
- Watch heat tools carefully. If using a curling wand or flat iron, always use a low heat setting and keep it away from little ears and skin.
- Take breaks if your child feels antsy. A wiggly child is more likely to get poked by a comb or clip.
- Check for allergies. Some hair gels or sprays may irritate sensitive scalps, so patch test if trying a new product.
Following these simple safety habits will make picture day hairstyling a positive experience for both you and your daughter.
8 Cute Picture Day Hairstyles for Girls That Are Easy
1. Classic Half-Up Ponytail with a Bow
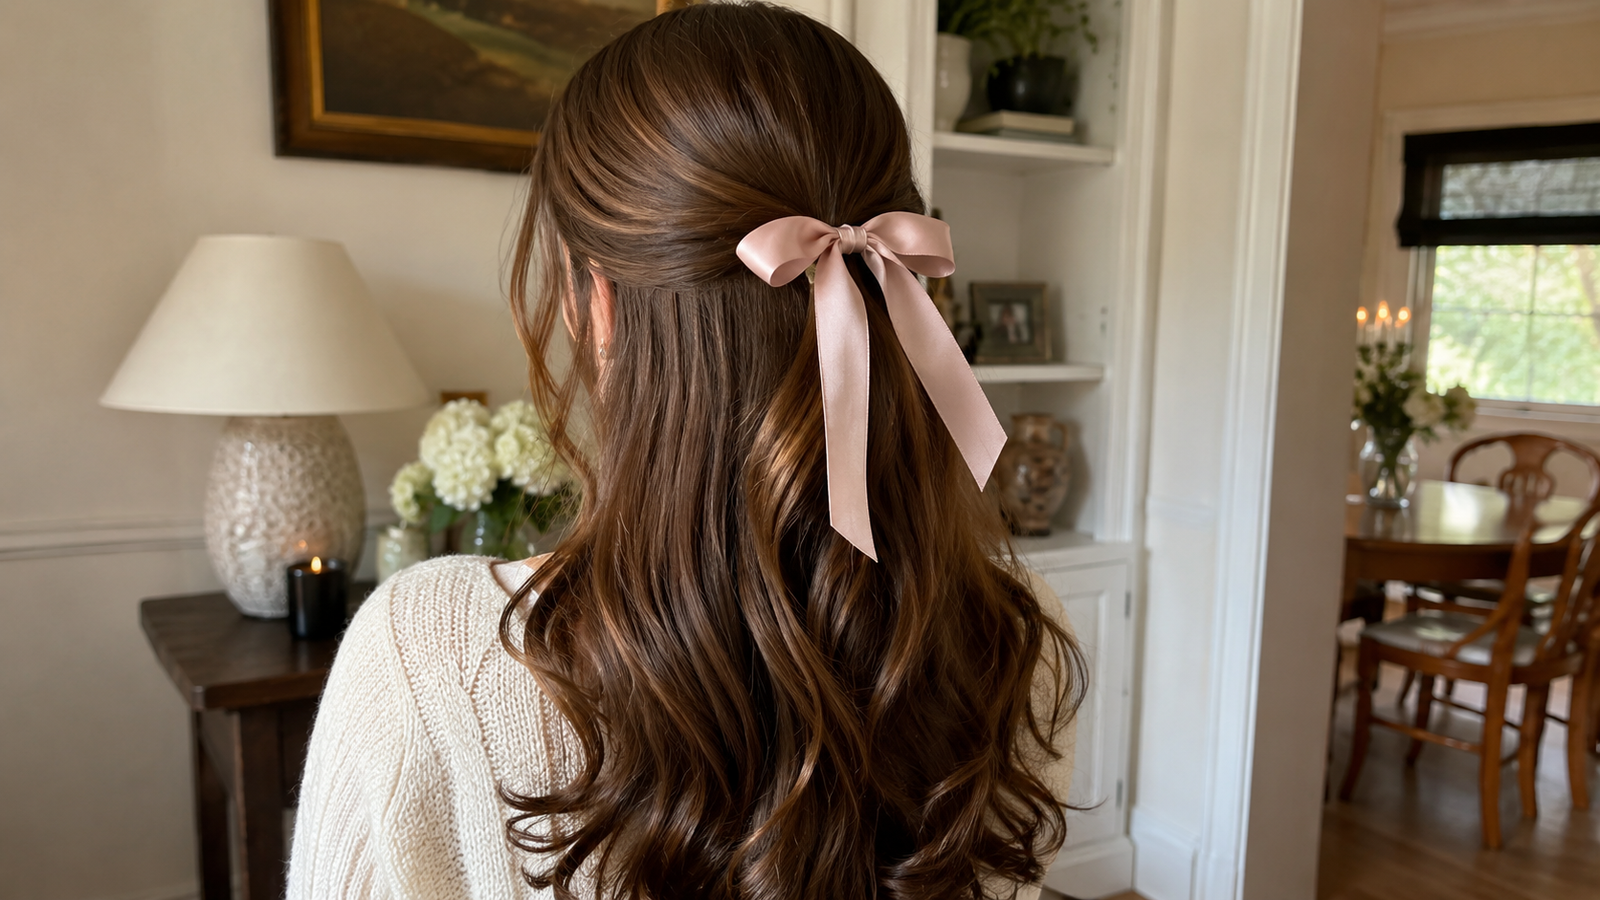
The half-up ponytail is one of the most timeless cute picture day hairstyles for girls that are easy, and it’s a favorite for a reason. It keeps hair out of the face while still showing off long or medium-length hair.
Why You’ll Love This Idea
This style takes less than five minutes and works on almost any hair type. It looks neat, sweet, and camera-ready without feeling overdone.
Materials Needed
- Small hairbrush
- One small hair tie
- A cute bow or clip
- Optional: light hairspray
Step-by-Step Instructions
- Brush the hair fully to remove tangles.
- Part a small section of hair from ear to ear at the top of the head.
- Gather that top section into your hand.
- Smooth it back gently with your fingers.
- Secure it with a small hair tie into a mini ponytail.
- Fluff the ponytail slightly for volume.
- Clip a bow or decorative pin over the hair tie.
- Lightly smooth any flyaways with your hands or a small brush.
Beginner Tips
- Use clear elastics if you don’t have a matching color.
- If hair is slippery, spray a little water first for grip.
Common Mistakes to Avoid
- Pulling the ponytail too tight, which can cause discomfort.
- Using a section that is too big, which can make the style look heavy.
Styling or Decorating Ideas
- Add a second small bow at the base for extra flair.
- Use a ribbon instead of a bow for a softer look.
Best Colors and Materials
Pastel bows, velvet ribbons, or classic white bows photograph beautifully and match most school outfits.
Estimated Cost
$3–$8 (mostly for the bow or clip)
Estimated Time
5 minutes
Difficulty Level
Beginner-friendly
Where It Looks Best
Perfect for school photos, family portraits, or everyday wear.
Pinterest-Worthy Tip
Choose a bow that matches the color of the school shirt for a coordinated, camera-ready look.
Conclusion
This half-up ponytail is proof that simple can still be stunning. It’s fast, gentle, and always photo-ready.
2. Simple Side Braid
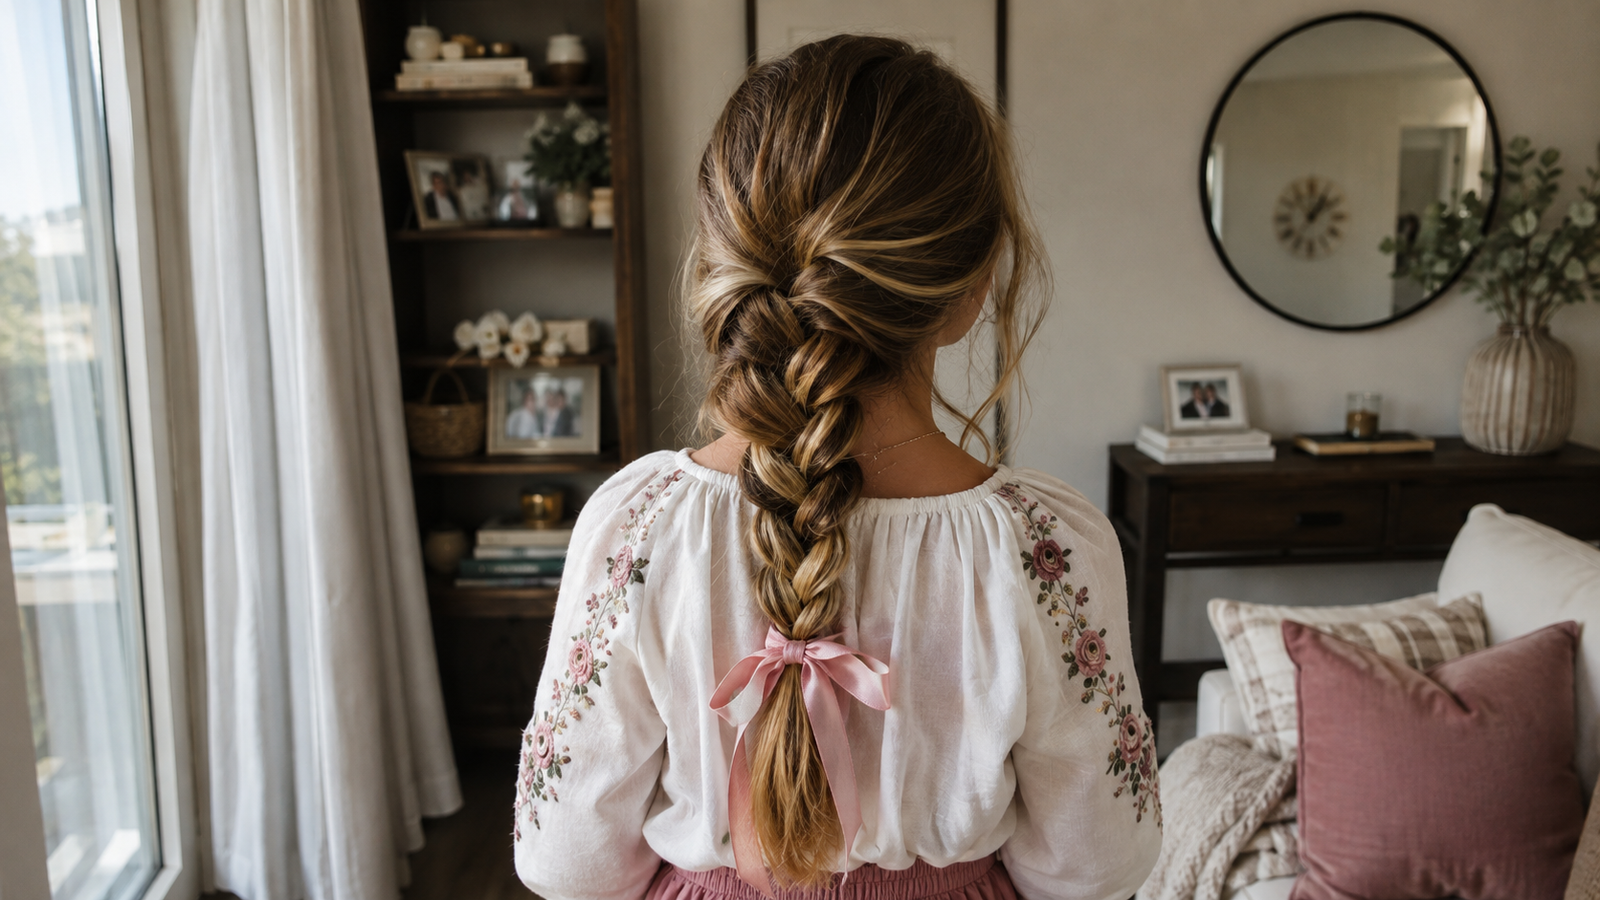
A side braid is another one of those cute picture day hairstyles for girls that are easy because it works no matter how much time you have. It gives a soft, romantic look that photographs beautifully from any angle.
Why You’ll Love This Idea
Side braids stay neat all day, keep hair away from the face, and give a slightly more grown-up, elegant touch to picture day.
Materials Needed
- Detangling brush
- Hair tie
- Small clip or bobby pins
- Optional: light hair gel
Step-by-Step Instructions
- Brush all hair to one side of the head.
- Divide the hair into three even sections.
- Cross the right section over the middle section.
- Cross the left section over the new middle section.
- Repeat this pattern, braiding down the side of the head.
- Keep the braid slightly loose for a soft look, or tight for neatness.
- Secure the end with a small hair tie.
- Gently pull the edges of the braid to add fullness (optional).
- Pin back any flyaways near the hairline with bobby pins.
Beginner Tips
- Practice on a doll or stuffed animal first if you’re new to braiding.
- Start with damp hair for easier control.
Common Mistakes to Avoid
- Braiding too loosely, which can cause it to fall apart quickly.
- Forgetting to secure flyaway pieces near the front.
Styling or Decorating Ideas
- Weave a thin ribbon into the braid for extra sparkle.
- Add a flower clip at the top of the braid.
Best Colors and Materials
Satin ribbons in gold, blush pink, or white add a soft, elegant touch.
Estimated Cost
$2–$6
Estimated Time
7–10 minutes
Difficulty Level
Beginner to Intermediate
Where It Looks Best
Great for both casual school days and dressier picture day outfits.
Pinterest-Worthy Tip
Loosen the braid slightly with your fingers after finishing for a soft, “boho” look that photographs beautifully.
Conclusion
The side braid is simple, sweet, and endlessly versatile — a true picture day classic.
3. Double Dutch Braids (Boxer Braids)
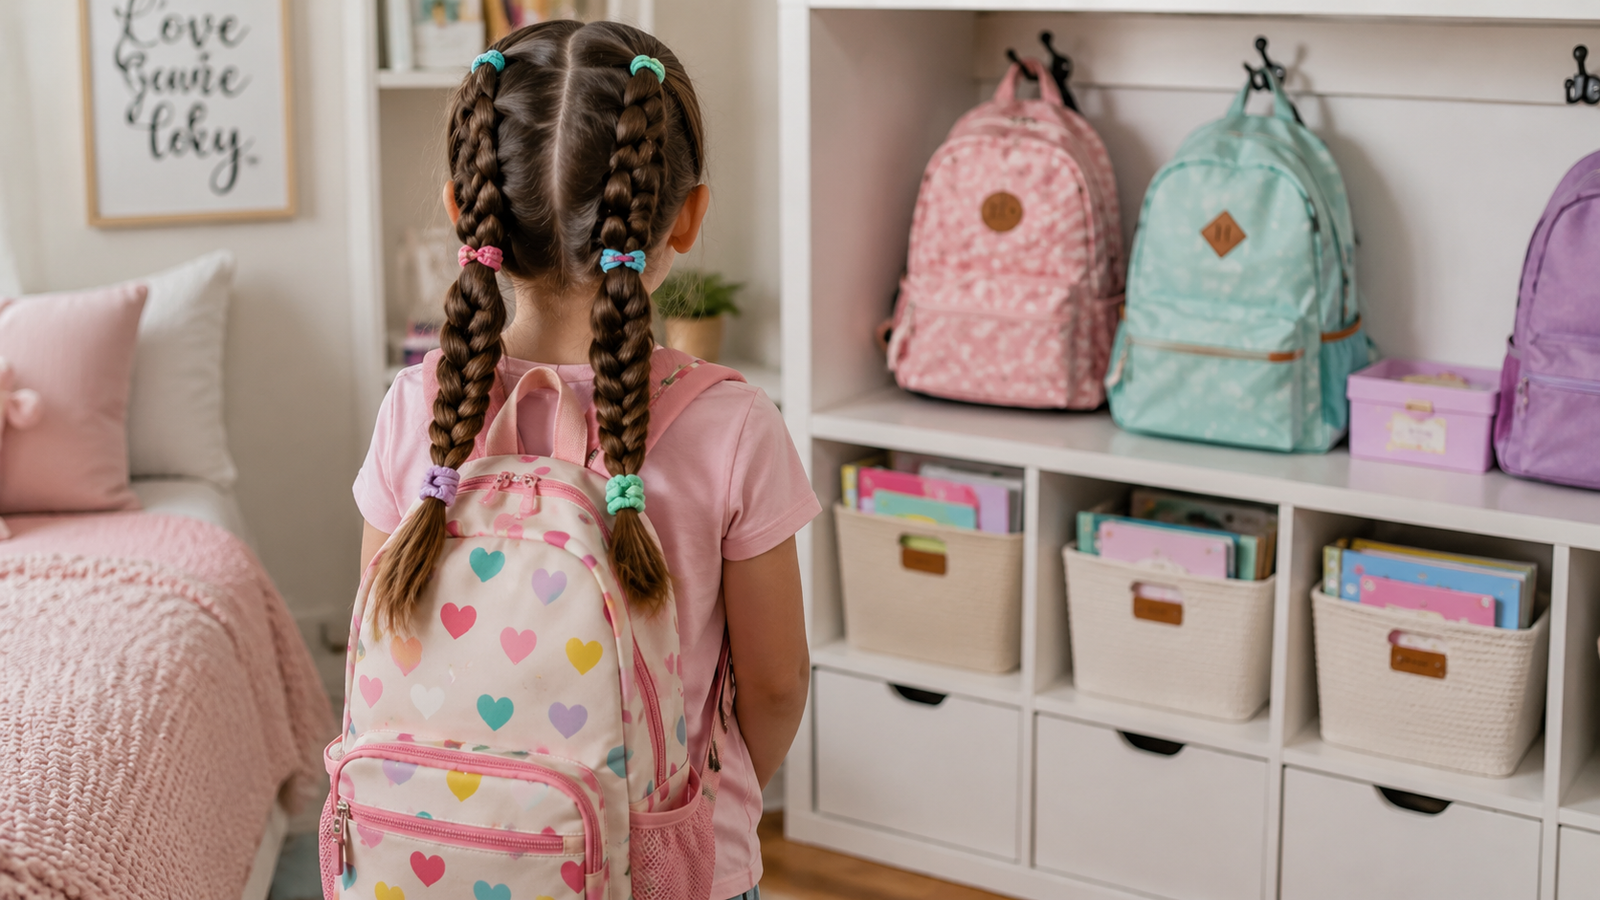
Double braids are one of the most popular cute picture day hairstyles for girls that are easy because they stay in place all day and look neat even after recess.
Why You’ll Love This Idea
This style is sturdy, sporty, and stylish all at once. It’s perfect for active kids who don’t want hair falling in their face.
Materials Needed
- Brush and comb
- Two small hair ties
- Detangler spray
Step-by-Step Instructions
- Part the hair down the middle into two equal sections.
- Starting at the top of one section, divide it into three small pieces.
- Begin a Dutch braid by crossing sections under instead of over.
- Add small pieces of hair into the braid as you go down.
- Continue until you reach the nape of the neck.
- Finish with a regular three-strand braid to the ends.
- Secure with a hair tie.
- Repeat the same steps on the other side.
- Gently tug the edges of both braids for a fuller look.
Beginner Tips
- If Dutch braiding feels tricky, a regular braid still looks adorable.
- Use hair clips to hold sections while you work.
Common Mistakes to Avoid
- Uneven parting, which makes the two braids look mismatched.
- Braiding too fast, which can lead to bumps or gaps.
Styling or Decorating Ideas
- Tie small bows at the base of each braid.
- Add tiny flower pins along the part line.
Best Colors and Materials
Bright-colored hair ties or bows make this style pop in photos.
Estimated Cost
$3–$7
Estimated Time
12–15 minutes
Difficulty Level
Intermediate
Where It Looks Best
Great for both indoor and outdoor picture day settings.
Pinterest-Worthy Tip
Use a rat-tail comb to create a super straight, clean middle part for a polished finish.
Conclusion
Double Dutch braids are strong, cute, and long-lasting — ideal for an active school day.
4. Sparkly Space Buns
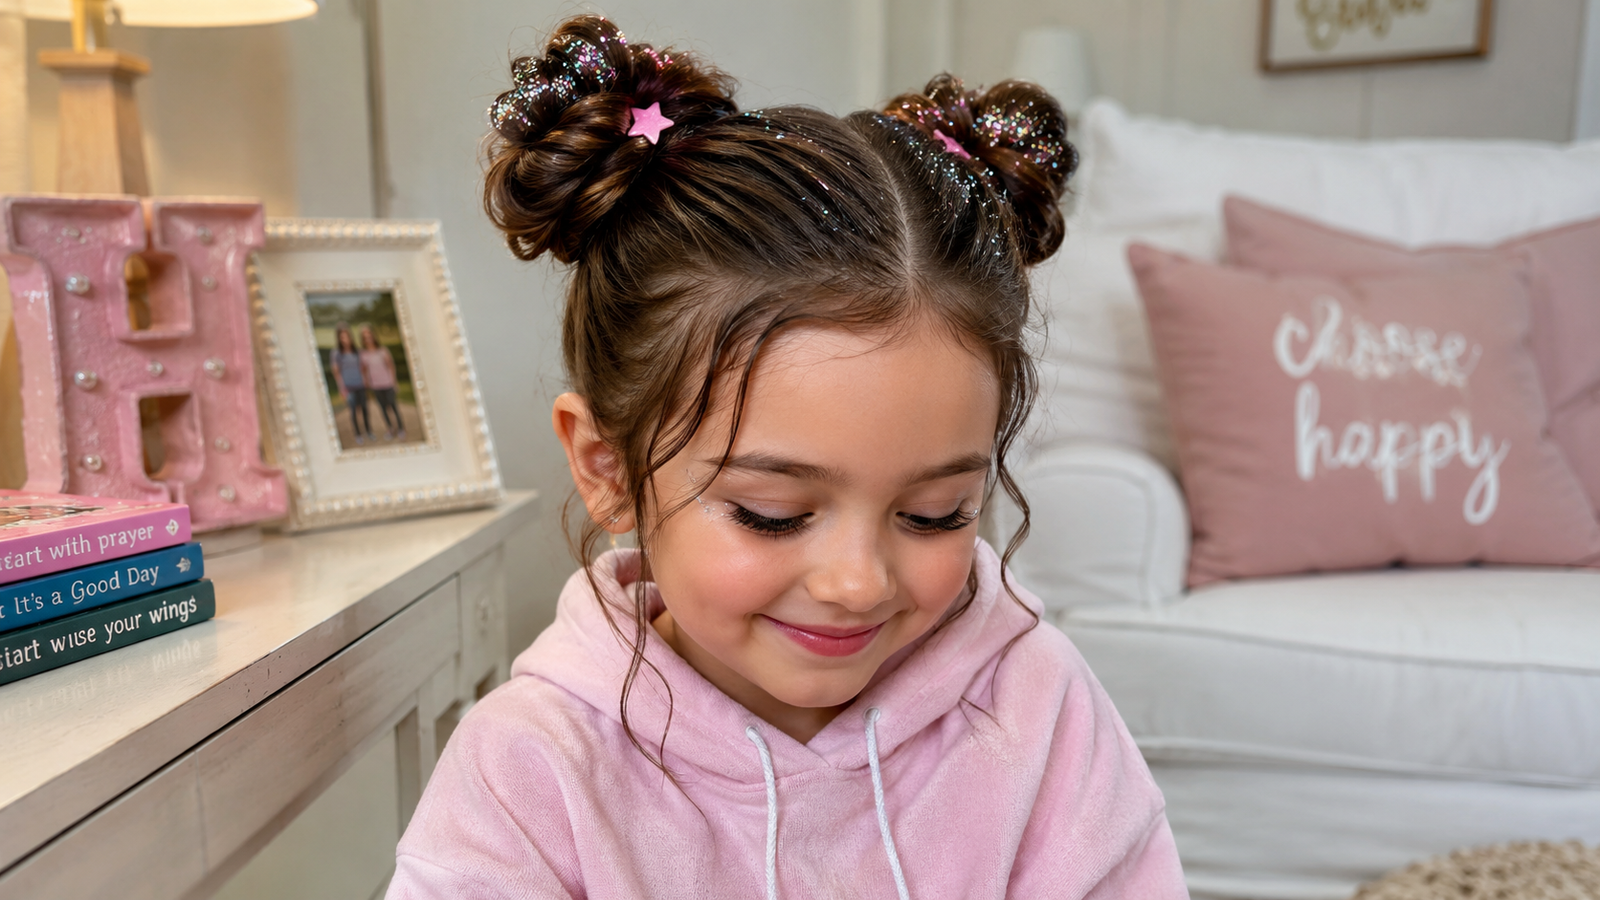
Space buns are a fun and trendy choice among cute picture day hairstyles for girls that are easy, especially for kids who love a playful, unique look.
Why You’ll Love This Idea
This style is quick, fun, and adds instant personality to any picture day outfit.
Materials Needed
- Two hair ties
- Two mini scrunchies or ties for the buns
- Sparkly clips (optional)
Step-by-Step Instructions
- Part the hair down the middle into two sections.
- Gather one section into a high ponytail on one side.
- Secure it tightly with a hair tie.
- Twist the ponytail around itself into a bun shape.
- Wrap a second hair tie around the twisted bun to secure it.
- Repeat the same steps on the other side.
- Adjust both buns so they are even in height and size.
- Add sparkly clips or small bows for extra shine.
Beginner Tips
- Use small elastics made for kids’ hair to avoid tangling.
- Practice with looser buns first if your child has sensitive skin.
Common Mistakes to Avoid
- Making buns too tight, which can cause discomfort.
- Uneven parting, which makes buns look mismatched.
Styling or Decorating Ideas
- Wrap a thin ribbon around each bun.
- Add glitter hairspray for a fun sparkle effect.
Best Colors and Materials
Metallic or glitter hair ties work beautifully for this playful style.
Estimated Cost
$4–$9
Estimated Time
8–10 minutes
Difficulty Level
Beginner
Where It Looks Best
Perfect for fun, colorful picture day themes or casual school photos.
Pinterest-Worthy Tip
Leave a few soft face-framing pieces loose for a whimsical, photo-friendly touch.
Conclusion
Space buns bring a playful charm that kids love and cameras capture beautifully.
5. Soft Curls with a Headband
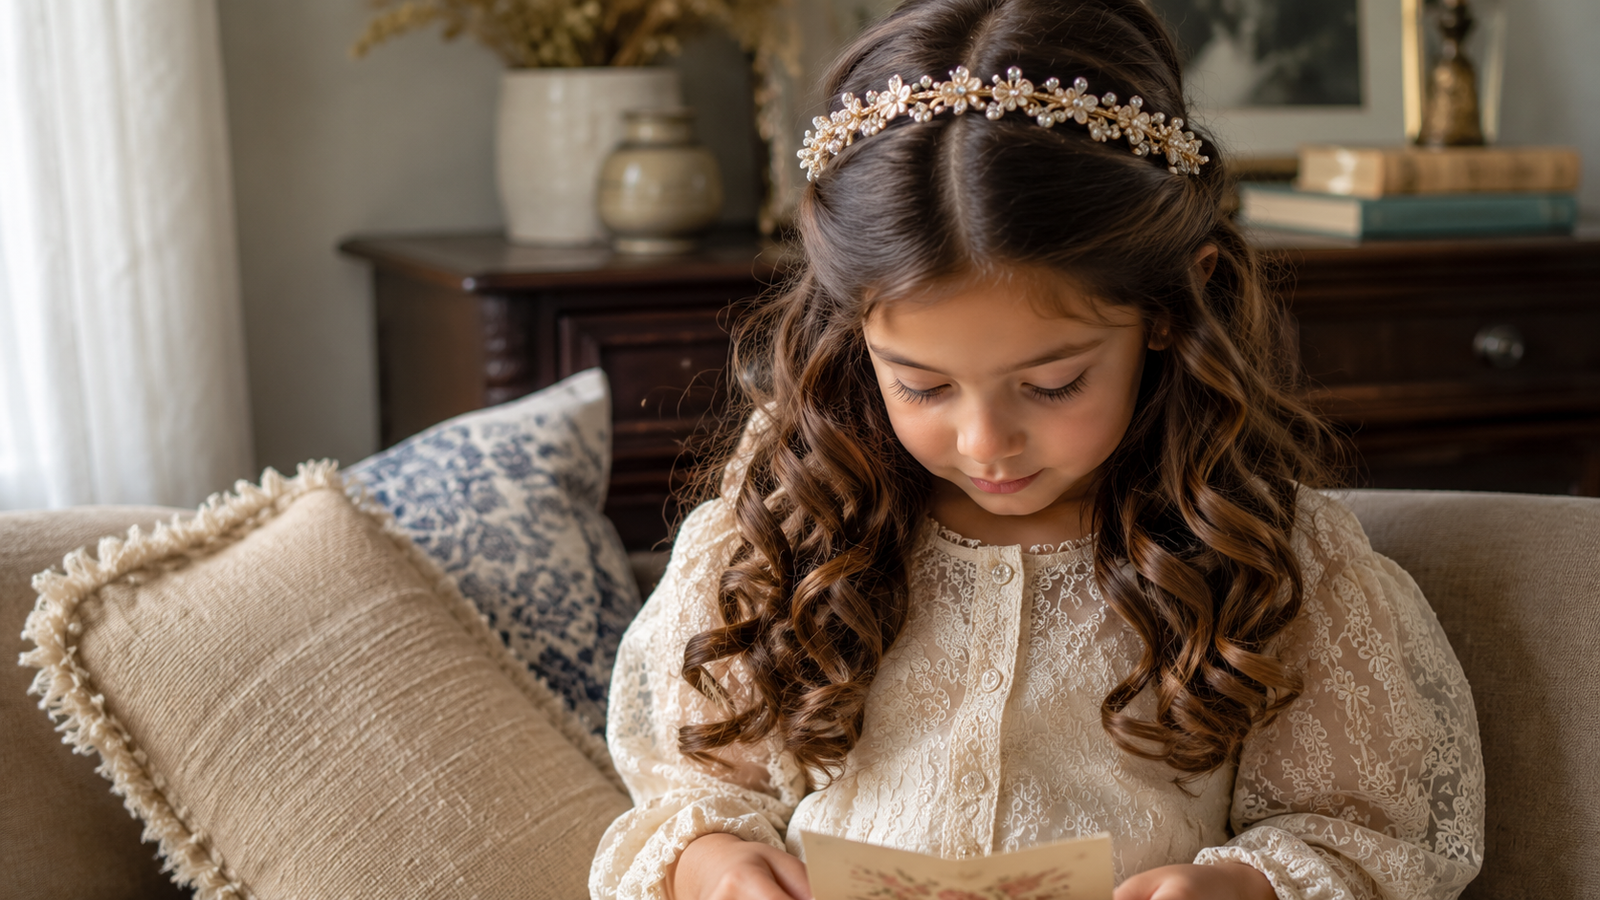
Soft curls paired with a headband make an elegant addition to the list of cute picture day hairstyles for girls that are easy, perfect for kids with straight or wavy hair who want extra volume.
Why You’ll Love This Idea
This style adds a soft, romantic touch without needing any braiding skills at all.
Materials Needed
- Curling wand (low heat) or foam rollers
- Heat protectant spray (if using heat)
- A cute headband
Step-by-Step Instructions
- Brush hair to remove any tangles.
- Apply heat protectant spray if using a curling wand.
- Section hair into small pieces for even curling.
- Curl each section gently, holding for just a few seconds.
- Let each curl cool before releasing it from the wand or roller.
- Repeat until all sections are curled.
- Gently shake out the curls with your fingers for a natural look.
- Place the headband over the head, pushing hair back slightly.
- Adjust curls around the headband for a full, soft finish.
Beginner Tips
- Foam rollers are a safer, no-heat option for younger kids.
- Curl hair the night before for longer-lasting results.
Common Mistakes to Avoid
- Using high heat, which can damage delicate hair.
- Brushing curls out completely, which can make them fall flat.
Styling or Decorating Ideas
- Choose a headband with bows, pearls, or floral details.
- Add a small clip near the ear for extra sparkle.
Best Colors and Materials
Velvet or fabric headbands in soft pastels photograph beautifully.
Estimated Cost
$6–$15
Estimated Time
15–20 minutes
Difficulty Level
Intermediate
Where It Looks Best
Perfect for formal picture day settings or special school events.
Pinterest-Worthy Tip
Curl away from the face for a soft, camera-friendly frame around the cheeks.
Conclusion
Soft curls with a headband create a dreamy, polished look that feels extra special for picture day.
6. Fishtail Braid Ponytail
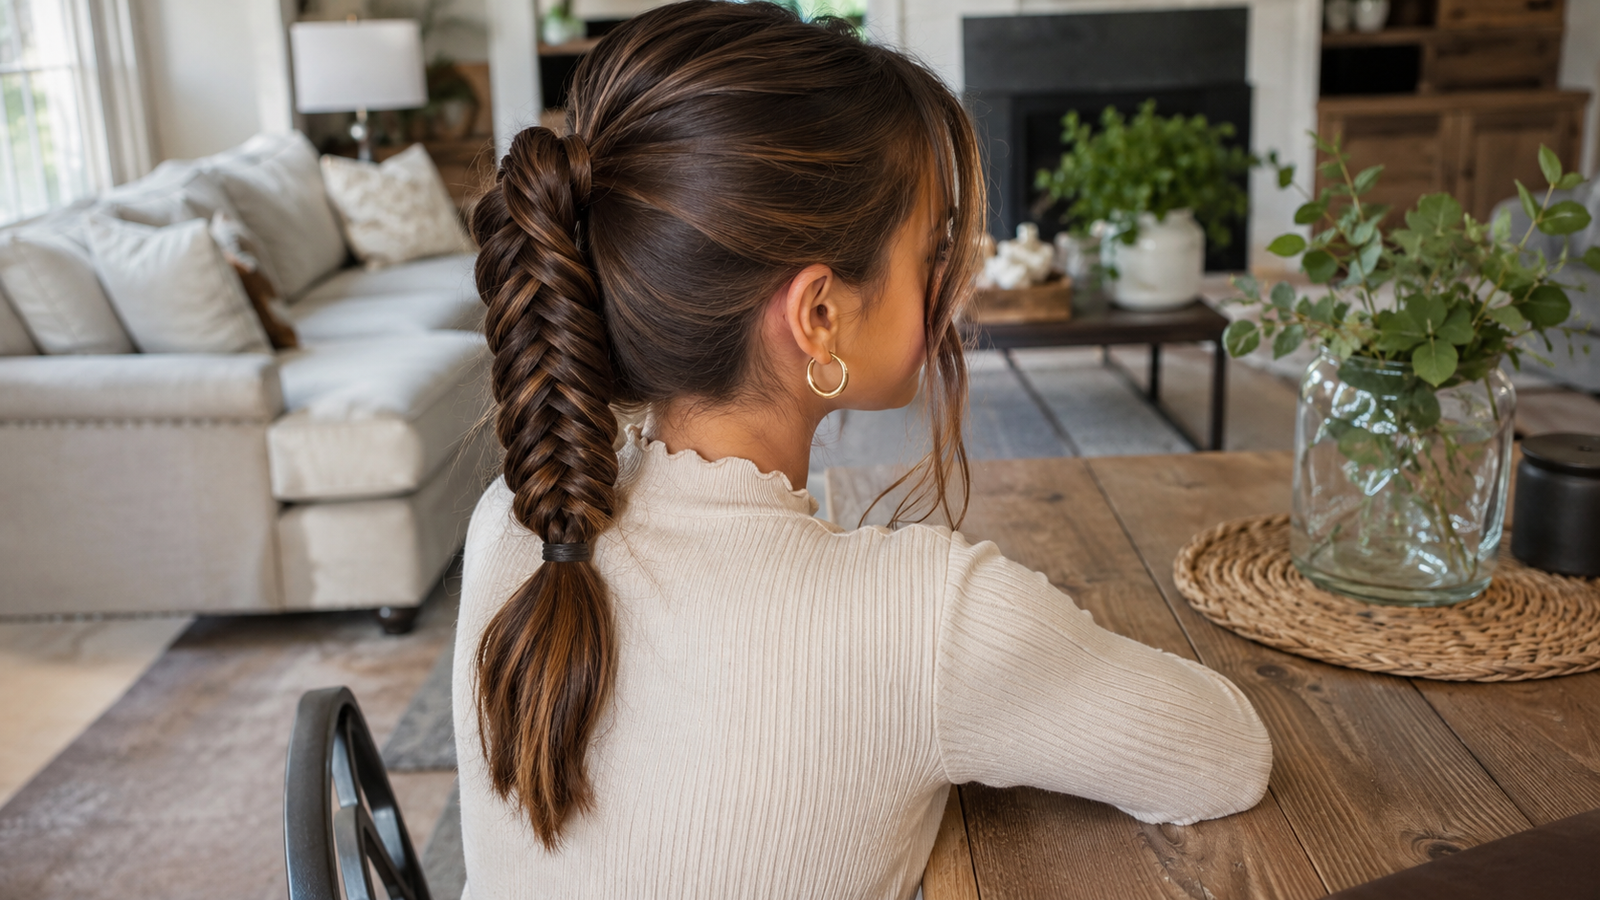
The fishtail braid ponytail is a slightly more advanced option among cute picture day hairstyles for girls that are easy, but it looks so impressive that it’s worth the extra few minutes.
Why You’ll Love This Idea
It gives a detailed, textured look that feels fancy but is still simple enough for beginners to learn.
Materials Needed
- Brush
- Hair tie
- Small clips (optional)
Step-by-Step Instructions
- Gather all hair into a smooth ponytail and secure it.
- Divide the ponytail into two equal sections.
- Take a small piece from the outside of the left section.
- Cross it over to join the right section.
- Take a small piece from the outside of the right section.
- Cross it over to join the left section.
- Continue alternating sides until you reach the ends.
- Secure the braid with a small hair tie.
- Gently pull the edges of the braid for a fuller, textured look.
Beginner Tips
- Keep sections small and even for the best fishtail pattern.
- Practice on a ponytail before trying it directly on the head.
Common Mistakes to Avoid
- Taking sections that are too large, which can hide the fishtail pattern.
- Braiding too tightly, which can make it hard to loosen later.
Styling or Decorating Ideas
- Tie a ribbon at the top of the ponytail before braiding.
- Add small pearl pins along the braid for extra elegance.
Best Colors and Materials
Soft ribbons in cream, gold, or blush tones complement this elegant style.
Estimated Cost
$3–$8
Estimated Time
15 minutes
Difficulty Level
Intermediate to Advanced
Where It Looks Best
Perfect for picture day, recitals, or special school events.
Pinterest-Worthy Tip
Gently loosen each section after braiding for that soft, “Pinterest-perfect” fishtail texture.
Conclusion
This fishtail braid ponytail feels fancy and unique, yet it’s still simple enough for a school morning.
7. Twisted Half-Up Style
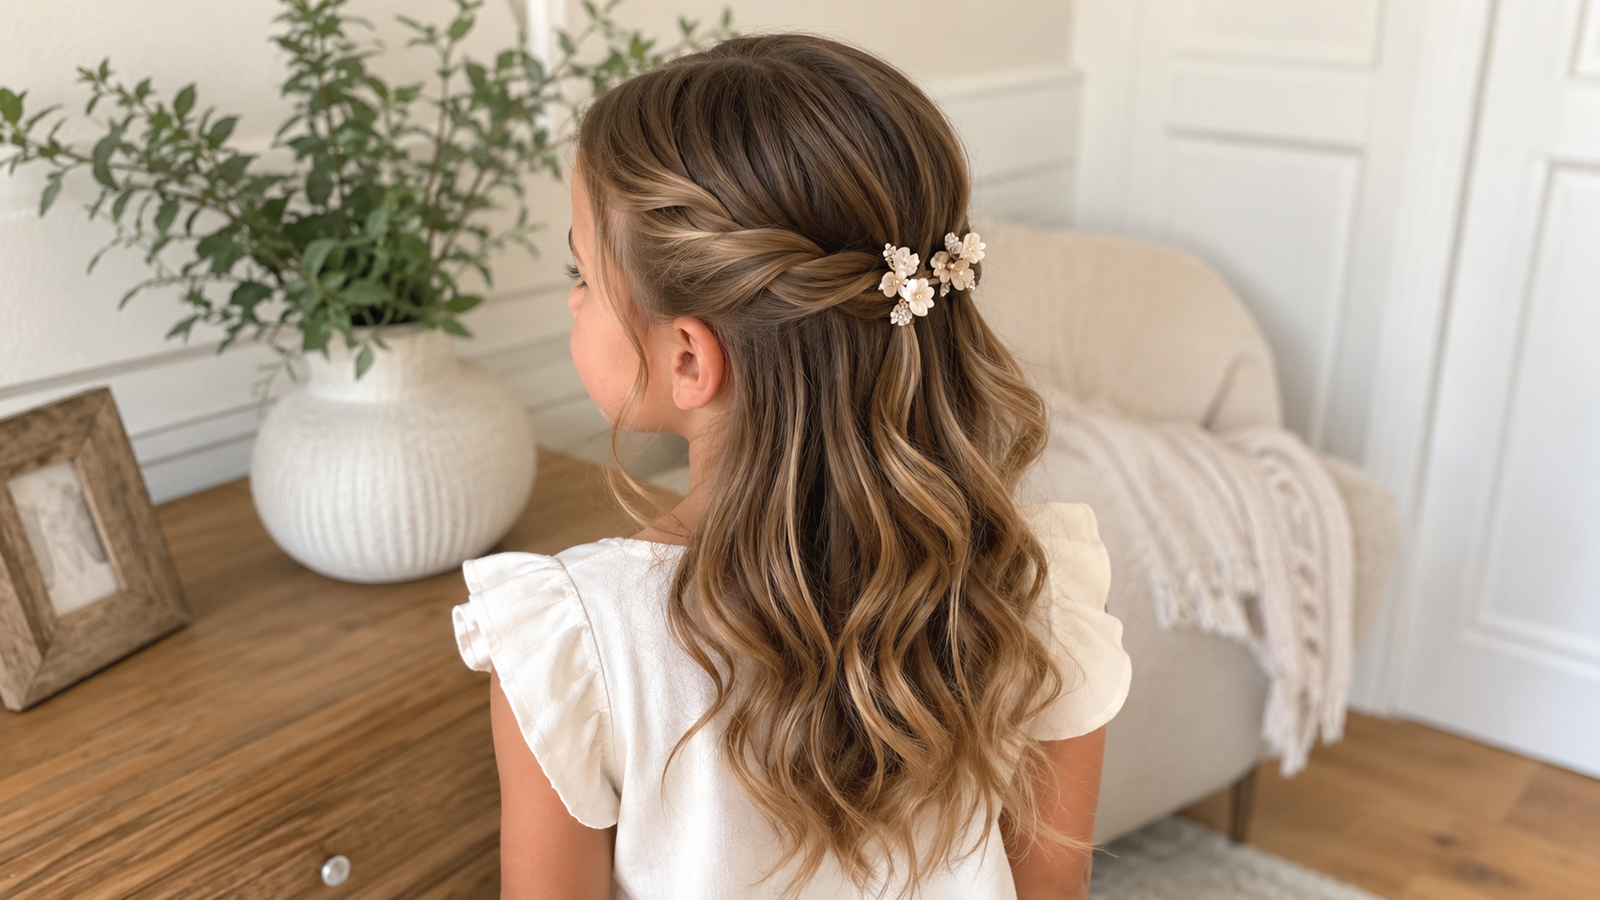
The twisted half-up style is a beautiful middle ground between simple and elegant, making it one of the most requested cute picture day hairstyles for girls that are easy on Pinterest.
Why You’ll Love This Idea
It looks intricate but is actually made with just two simple twists, perfect for parents short on time.
Materials Needed
- Brush
- Two small hair ties
- One larger hair tie or clip
Step-by-Step Instructions
- Brush hair smooth and part it down the middle.
- Take a small section from the front on one side.
- Twist the section back toward the back of the head.
- Secure the twist temporarily with a small clip.
- Repeat the same twist on the other side.
- Bring both twisted sections together at the back.
- Secure them together with a hair tie.
- Gently pull the twists to loosen and add volume.
- Add a bow or clip over the hair tie to finish the look.
Beginner Tips
- Twist toward the face for a fuller, more voluminous look.
- Use bobby pins to hold twists in place if they feel loose.
Common Mistakes to Avoid
- Twisting too tightly, which can cause the style to slip out.
- Uneven twists, which can make the style look lopsided.
Styling or Decorating Ideas
- Add small flower clips along each twist.
- Use a decorative hair tie instead of a plain one.
Best Colors and Materials
Floral clips and pastel hair ties add a soft, feminine touch.
Estimated Cost
$3–$7
Estimated Time
8–10 minutes
Difficulty Level
Beginner to Intermediate
Where It Looks Best
Works beautifully for both indoor and outdoor picture day photos.
Pinterest-Worthy Tip
Curl the ends of the hair slightly after securing the twist for extra softness in photos.
Conclusion
The twisted half-up style is elegant, quick, and always a Pinterest favorite for picture day.
8. Low Bubble Ponytail
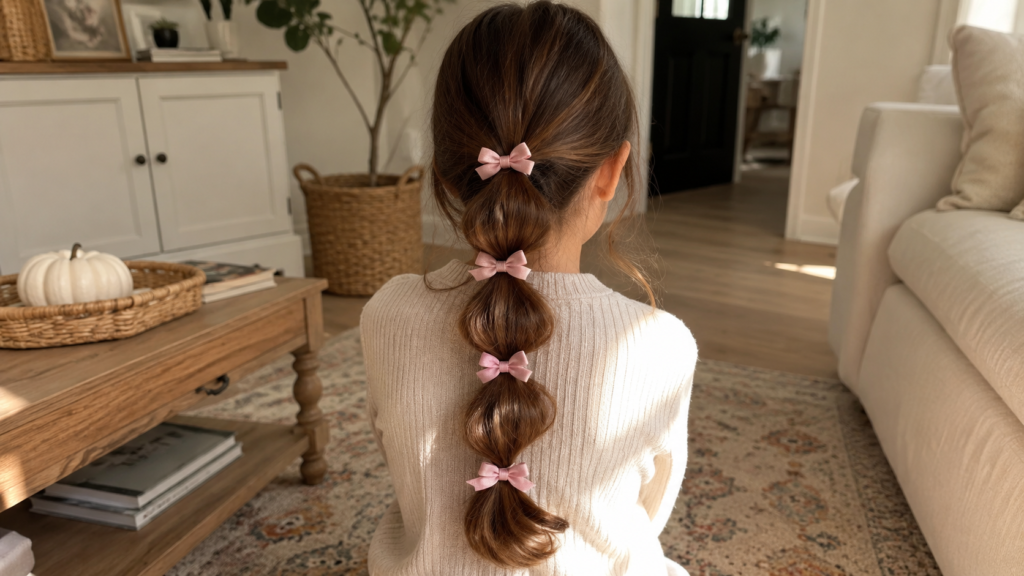
The low bubble ponytail rounds out our list of cute picture day hairstyles for girls that are easy, offering a fun, modern twist on the classic ponytail.
Why You’ll Love This Idea
This trendy style is simple to create but looks incredibly stylish and unique in photos.
Materials Needed
- Brush
- 4–5 small hair ties
- Optional: small bows
Step-by-Step Instructions
- Brush all hair back into a smooth, low ponytail.
- Secure the base with a hair tie.
- Add a second hair tie about two inches down the ponytail.
- Gently pull the hair between the two ties to create a “bubble” shape.
- Add a third hair tie a few inches further down.
- Repeat the pulling technique to create another bubble.
- Continue adding ties and bubbles down the length of the ponytail.
- Fluff each bubble section gently for a fuller look.
- Add small bows or clips at each hair tie for extra cuteness.
Beginner Tips
- Keep hair ties evenly spaced for a balanced look.
- Use clear elastics if you don’t want the ties to show.
Common Mistakes to Avoid
- Spacing the ties unevenly, which makes bubbles look uneven.
- Pulling too hard when creating bubbles, which can cause discomfort.
Styling or Decorating Ideas
- Add a bow at the very top of the ponytail.
- Use different colored ties for a fun, colorful effect.
Best Colors and Materials
Bright or pastel hair ties make each bubble section stand out beautifully.
Estimated Cost
$3–$8
Estimated Time
10–12 minutes
Difficulty Level
Beginner to Intermediate
Where It Looks Best
Great for both casual and dressy picture day looks.
Pinterest-Worthy Tip
Take the photo from the side to show off the fun bubble texture running down the ponytail.
Conclusion
The low bubble ponytail is a playful, eye-catching style that’s surprisingly easy to create at home.
Expert Decorating Tips
- Match accessories to the outfit, not just the hairstyle, for a coordinated photo look.
- Keep it simple — one or two accessories per style is usually enough.
- Use soft, pastel tones for a timeless photo that won’t look dated in a few years.
- Add texture with braids or twists instead of relying only on accessories.
- Practice the night before so picture day morning feels stress-free.
Budget-Saving Tips
- Buy multipacks of hair ties and clips instead of single items.
- Reuse ribbons and bows from gift wrapping for hair accessories.
- Choose no-heat styles like braids and buns to avoid buying styling tools.
- Shop for accessories at dollar stores or discount aisles.
- Make your own bows using ribbon and a hot glue gun for a fraction of store prices.
Frequently Asked Questions
1. What is the easiest hairstyle for picture day? A half-up ponytail with a bow is usually the fastest and easiest option, taking less than five minutes.
2. How can I keep my daughter’s hairstyle neat all day? Use a light hairspray or gel to smooth flyaways, and choose braided styles that hold up well through recess and play.
3. What if my daughter has short hair? Space buns, small twists, or clips near the front can still create a cute, styled look even with shorter hair.
4. Are heat tools safe for kids’ hair? Yes, if used carefully on a low heat setting with a heat protectant spray. No-heat options like foam rollers are also great alternatives.
5. How do I stop hair ties from slipping out of fine hair? Try using textured or silicone-grip hair ties, which hold better than smooth elastic bands.
6. What hairstyle works best for curly hair? Twisted half-up styles and space buns work beautifully with natural curls and require very little smoothing.
7. How early should I start practicing these hairstyles? Try practicing a few days before picture day so both you and your child feel comfortable with the style.
8. What colors of accessories photograph best? Soft pastels, white, and metallic tones tend to photograph the most timeless and elegant.
9. Can these hairstyles work for other special occasions? Yes! These styles are great for birthday parties, recitals, family photos, and holidays too.
10. What if my child doesn’t like anything touching their scalp? Try looser styles like a simple half-up ponytail or soft curls, which require less pulling and less time.
Final Thoughts
Picture day doesn’t have to be stressful. With these cute picture day hairstyles for girls that are easy, you can create a beautiful, camera-ready look in just a few minutes using simple tools you probably already have at home. From classic ponytails to playful space buns, there’s a style here for every hair type, every personality, and every busy morning.
The best part? These hairstyles aren’t just for picture day. They’re perfect for birthdays, family outings, holidays, or just adding a little extra sparkle to an ordinary day.
Pinterest Call-to-Action
💗 Loved these ideas? Save this pin now so you’ll have the perfect hairstyle ready for the next picture day, birthday party, or special event! Don’t forget to follow for more easy hairstyle inspiration. 💗