
Introduction
When the crisp breeze starts to replace the humid summer air, it is time to refresh your style. Transitioning your wardrobe from sundresses to cozy oversized sweaters is always fun, but nothing completes your seasonal vibe faster than a fresh set of nails. If you are searching for trendy early fall nails ideas you need to try today, you have arrived at the perfect spot. Early autumn is a special season for nail art. You do not have to jump straight into deep, dark Halloween shades like pitch black or dark blood red just yet. Instead, early fall lets you play with warm neutrals, rich pumpkin spices, soft muted greens, elegant tortoiseshell patterns, and subtle metallic touches.
As a dedicated lifestyle blogger, I know that your manicure is more than just polish—it is an essential extension of your overall aesthetic. Whether you love curling up with a warm chai latte, snapping photos of your cozy knitted sweater holding a coffee mug, or planning your seasonal home decor updates, your hands are always in the frame. Pinterest is currently overflowing with gorgeous transitional manicures, and sorting through endless boards can feel overwhelming. That is why I have created this ultimate guide to help you bring the best nail trends right into the comfort of your own home.
In this comprehensive blog post, we are going to explore eight detailed, Pinterest-worthy nail designs tailored specifically for the early autumn months. From minimalist chrome accents to rich sweater-texture art, each project includes complete step-by-step DIY instructions, material lists, beginner tips, cost breakdowns, and common mistakes to avoid. Even if you consider yourself a complete beginner at at-home manicures, these guides will help you achieve clean, salon-quality results without breaking the bank. Let us dive into these beautiful seasonal designs and give your fingertips the autumn makeover they deserve!
Why Early Fall Nail Trends Are So Popular
The transition from late summer to early fall creates a unique shift in beauty and fashion aesthetics. People naturally crave warmth, comfort, and cozy textures as the days grow shorter. Early fall nail trends captivate beauty enthusiasts on Pinterest and Instagram for several key reasons:
- Versatile Color Palettes: Early autumn bridges the gap between bright summer neons and heavy winter darks. It combines warm terracottas, sage greens, creamy oats, and soft amber tones that flatter every skin tone.
- Cozy Aesthetic Appeal: Seasonal nails pair effortlessly with cozy autumn wardrobe essentials like flannel shirts, cardigan sweaters, and leather boots.
- Cost-Effective Self-Care: Doing your own trend-forward nail art at home provides a relaxing self-care ritual while saving hundreds of dollars compared to frequent salon visits.
- High Visual Engagement: Nail art photo inspiration is among the most saved and pinned content on social media, making these designs timeless favorites for mood boards and aesthetic planning.
Essential Materials and Tools Needed
To achieve long-lasting, professional-looking nail art at home, having the right preparation tools and supplies makes all the difference. Here is a handy reference table of essential items to keep in your DIY manicure kit:
| Material / Tool | Primary Purpose | Why It Is Essential |
| Nail Prep Dehydrator & Primer | Cleanses natural nail plate | Removes natural oils to prevent polish chipping |
| Base Coat & Top Coat | Foundation and protection | Base coat prevents staining; top coat seals shine |
| Fine Detailer Nail Brushes | Precise line art & intricate shapes | Crucial for clean French tips and detailed line patterns |
| Dotting Tools | Creating dots and circular patterns | Essential for floral accents, animal prints, and polka dots |
| LED/UV Nail Lamp | Curing gel polishes quickly | Required if using gel polish for long-lasting wear |
| Cuticle Oil | Hydrating surrounding skin | Keeps manicures looking fresh and prevents hangnails |
Safety and Hygiene Tips for At-Home Manicures
Before starting any DIY nail transformation, keeping your natural nails healthy should always be your top priority. Follow these simple safety guidelines:
- Work in a Well-Ventilated Room: Nail polishes, acetones, and gel solvents emit fumes. Keep a window open or use a small desk fan to maintain clean airflow.
- Never Forcefully Peel Gel Polish: Scraping or peeling gel polish strips off natural layers of your nail bed. Always soak off gel using 100% pure acetone and cotton pads wrapped in foil.
- Sanitize Your Metal Tools: Wipe down nail clippers, cuticle pushers, and metal dotting tools with 70% isopropyl alcohol before and after every use to prevent bacterial infections.
- Avoid Cutting Live Cuticle Tissue: Gently push cuticles back using a wooden cuticle stick. Only nip clear dead skin or hangnails to avoid cut-induced infections.
8 Trendy Early Fall Nail Ideas You Need to Try
Idea 1: Warm Pumpkin Spice French Tips
Introduction
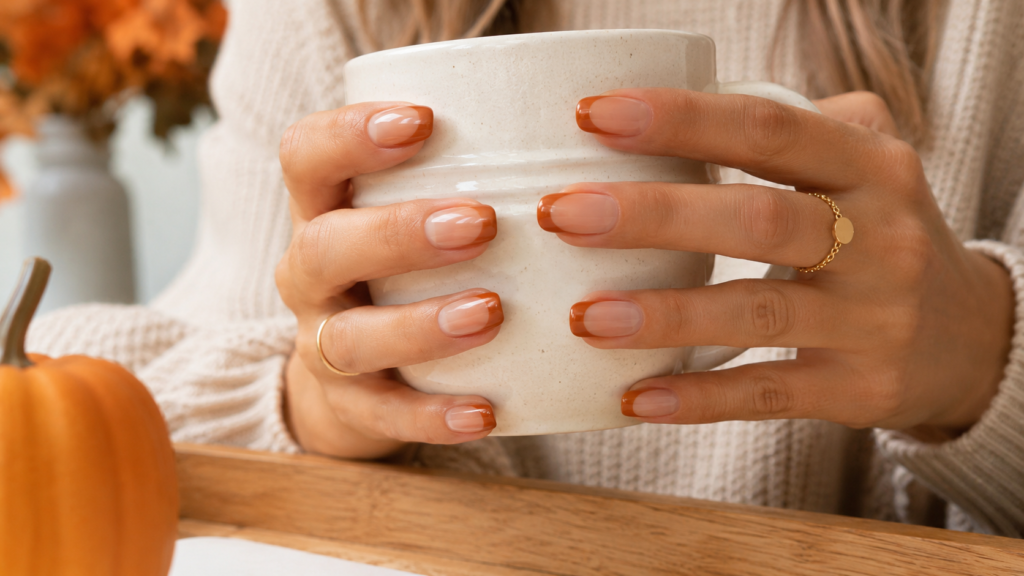
Give the classic white French tip a cozy seasonal twist by swapping basic white for rich, warm pumpkin spice orange. This design maintains a clean, sophisticated look while adding just the right touch of autumn warmth to your fingertips.
Why You’ll Love This Idea
It offers an effortless balance between professional elegance and seasonal fun. The warm terracotta hue flatters all skin tones and transitions seamlessly from office hours to weekend pumpkin patch outings.
Materials Needed
- Sheer nude or light pink base polish
- Warm pumpkin spice or burnt orange polish
- Curved French tip guide stickers or a thin detailer brush
- Glossy top coat
Step-by-Step Instructions
- Prep the Nails: File nails into a soft almond or square shape, push back cuticles, and wipe nails with rubbing alcohol.
- Apply Base Coat: Paint one thin coat of clear base coat and allow it to dry completely.
- Apply Nude Base: Apply two thin coats of sheer nude polish to create a clean, even background canvas.
- Position Tip Guides: Once dry, stick your French tip guides across the upper curve of each nail plate.
- Paint the Tips: Paint the exposed tip area with your warm pumpkin spice orange polish using light strokes.
- Remove Guides Promptly: Carefully peel off the guide stickers while the orange polish is still slightly damp to keep edges sharp.
- Clean Up Edges: Dip a small flat brush into acetone to clean up any slight smudges around your side walls.
- Seal with Top Coat: Apply a generous layer of high-shine top coat across the entire nail, capping the front free edge.
Beginner Tips
If you do not have French tip stickers, use a fine detailer brush and rest your hand flat on a table to stabilize your fingers while drawing the curved tip line.
Common Mistakes to Avoid
- Applying the orange polish too thick, which leads to bubbling and uneven drying.
- Waiting until the polish is 100% dry before removing tip guide tapes, which tears the crisp line.
Styling and Decorating Ideas
Pair this manicure with gold minimalist rings, cream-colored knit cardigans, and a structured leather shoulder bag for an elevated fall aesthetic.
Best Colors and Materials
- Colors: Warm terracotta, muted pumpkin orange, translucent beige nude.
- Finish: High gloss or semi-matte finish.
Quick Project Info
- Estimated Cost: $8 – $15
- Estimated Time: 35 minutes
- Difficulty Level: Beginner
- Where It Looks Best: Medium-length almond or oval-shaped nails.
- Pinterest-Worthy Tip: Take a close-up photo holding a warm ceramic coffee mug to highlight the rich warm tones against knit fabric textures.
Conclusion
Warm Pumpkin Spice French Tips provide a simple yet stunning way to celebrate early fall without committing to heavy nail art.
Idea 2: Glossy Tortoiseshell Accent Nails
Introduction
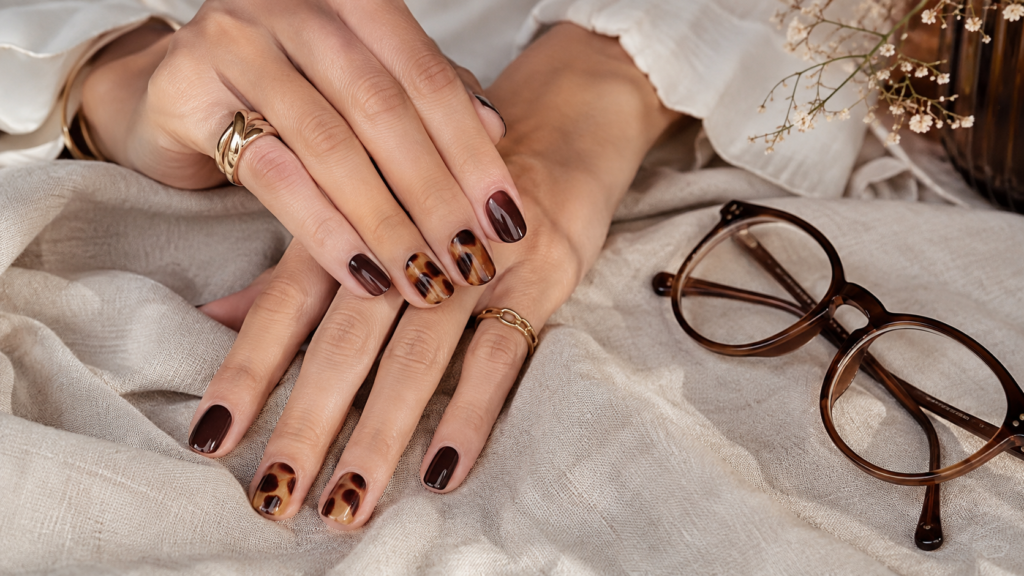
Tortoiseshell patterns scream luxury and vintage charm. Featuring translucent ambers, rich caramel browns, and deep chocolate spots, this accent nail design brings high-end runway sophistication directly to your hands.
Why You’ll Love This Idea
It looks incredibly complex and expensive, yet it uses a simple layering technique. Combining full tortoise accent nails with solid brown companion nails creates an eye-catching contrast.
Materials Needed
- Jelly amber or translucent yellow-brown polish
- Deep chocolate brown or black nail polish
- Clear blooming gel or regular clear top coat
- Fine dotting tool or fine detailer brush
Step-by-Step Instructions
- Prepare Base Canvas: Clean and shape your nails, then apply a clear base protective coat.
- Paint Base Shade: Apply one thin layer of translucent jelly amber polish on your selected accent nails.
- Apply Wet Clear Coat: Apply a thin layer of wet clear top coat or blooming gel without curing/drying it.
- Add Brown Spots: Dab small, irregular dots of deep chocolate brown polish into the wet clear coat using a dotting tool.
- Watch Color Bloom: Allow 10–15 seconds for the brown dots to spread naturally and blur at the edges.
- Cure or Dry: Lock in the blurred pattern under an LED lamp or allow it to dry completely.
- Add Second Layer: Apply another thin coat of translucent amber polish over the spots to add depth, then add a few smaller, darker black dabs inside the blurred spots.
- Seal and Shine: Apply a thick top coat to build a glossy, glass-like dimensional depth.
Beginner Tips
Do not worry about making dots perfect circles. Real tortoiseshell is organic and irregular, so uneven shapes look much more authentic!
Common Mistakes to Avoid
- Using fully opaque yellow polish instead of translucent jelly polish, which destroys the layered glass effect.
- Placing too many dark spots, which hides the beautiful amber background color.
Styling and Decorating Ideas
Looks breathtaking when styled alongside tortoiseshell sunglasses, dark brown suede jackets, and brass vintage jewelry.
Best Colors and Materials
- Colors: Amber jelly, mustard tint, espresso brown, soft black.
- Finish: Ultra-high gloss glass finish.
Quick Project Info
- Estimated Cost: $12 – $20
- Estimated Time: 45 minutes
- Difficulty Level: Intermediate
- Where It Looks Best: Coffin, square, or long almond nails.
- Pinterest-Worthy Tip: Pose your hands over a neutral linen napkin next to a pair of tortoiseshell eyeglasses for a vintage aesthetic frame.
Conclusion
Glossy Tortoiseshell Accent Nails add timeless luxury to your autumn beauty look with surprising ease.
Idea 3: Muted Sage Green and Gold Foil Accents
Introduction
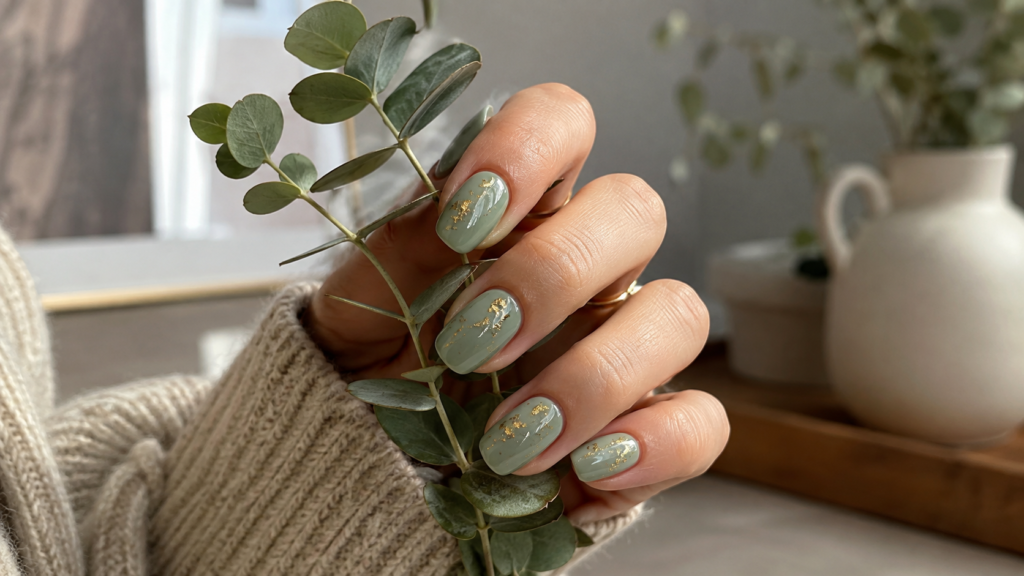
Sage green is the ultimate transitional color from late summer greenery into earthy autumn tones. Enhanced with delicate flecks of gold leaf foil, this design feels earthy, soothing, and effortlessly chic.
Why You’ll Love This Idea
Sage green acts as a stunning cool neutral that offers a subtle break from traditional warm orange hues while still feeling deeply rooted in autumn nature.
Materials Needed
- Muted sage green polish
- Creamy off-white polish
- Gold leaf foil flakes
- Pair of tweezers
- Matte or glossy top coat
Step-by-Step Instructions
- Nail Prep: Shape nails into a soft oval and apply your base coat foundation.
- Paint Base Colors: Paint most nails with two coats of muted sage green. Paint one accent nail per hand with creamy off-white polish.
- Tacky Layer Setup: Allow the accent nail polish to dry until it is slightly tacky to the touch.
- Gently Pick Foil: Pick up tiny pieces of gold leaf foil using delicate tweezers.
- Place Foil Fragments: Gently press the gold foil fragments onto the tacky surface of the accent nail in an irregular diagonal cluster.
- Smooth Down Foil: Tap the foil flat using the soft pad of a clean finger or a silicone tool.
- Clean Edges: Brush away any stray foil dust from your surrounding skin using a clean fan brush.
- Top Coat Protection: Seal with a thick layer of top coat to smooth out any foil texture and prevent peeling.
Beginner Tips
A tiny amount of gold leaf foil goes a long way. Less is more when creating an effortless, elegant organic layout.
Common Mistakes to Avoid
- Pressing foil onto fully wet polish, which causes the polish to smear and bunch up.
- Forgetting to seal the edges of the gold foil with top coat, causing pieces to snag on clothing.
Styling and Decorating Ideas
Complements olive green utility coats, cream turtleneck sweaters, and simple gold band rings.
Best Colors and Materials
- Colors: Soft sage green, eucalyptus tint, warm cream, metallic gold.
- Finish: Looks stunning in either matte or high gloss.
Quick Project Info
- Estimated Cost: $10 – $16
- Estimated Time: 30 minutes
- Difficulty Level: Beginner
- Where It Looks Best: Short to medium round or oval nails.
- Pinterest-Worthy Tip: Capture your nails holding a small dried eucalyptus branch against a neutral beige background.
Conclusion
Sage green combined with gold foil creates a serene, nature-inspired early fall manicure that feels fresh and artistic.
Idea 4: Matte Cozy Cable-Knit Texture Nails
Introduction
Bring the snug tactile comfort of your favorite knitted sweater right onto your fingernails! 3D cable-knit accent art paired with a smooth velvet-matte finish is a staple of fall nail inspiration.
Why You’ll Love This Idea
The raised 3D texture adds physical depth to your manicure that feels amazing and looks like it was done by an expert nail artist.
Materials Needed
- Creamy nude, blush, or greige gel polish
- Matching shade acrylic dipping powder or clear polymer powder
- Fine liner brush
- Matte gel top coat
- LED/UV lamp
Step-by-Step Instructions
- Prep and Base: Clean the nail plate and apply your gel base coat; cure under your LED lamp for 60 seconds.
- Apply Base Color: Apply two coats of your chosen creamy gel polish, curing each layer completely.
- Matte Seal: Apply a coat of matte gel top coat over the entire nail and cure.
- Draw Knit Pattern: Dip your fine detailer brush into the same gel color and draw vertical cable-knit patterns (braids and dots) down the center of the nail.
- Dust Powder: Before curing the wet gel lines, sprinkle clear acrylic powder generously over the wet pattern.
- Tap Away Excess: Gently tap your finger to let excess acrylic powder fall back into its container.
- Cure 3D Layer: Cure under the LED lamp for a full 90 seconds to solidify the textured knit pattern.
- Dust Clean: Use a soft dusting brush to clean away residual powder. Do not apply another top coat, as this keeps the 3D sweater texture raised and touchable!
Beginner Tips
Practice drawing simple “S” shapes and small dots connected by lines on a paper towel before painting directly onto your nails.
Common Mistakes to Avoid
- Curing the gel lines before sprinkling the acrylic powder, which ruins the velvety 3D sweater texture.
- Painting sweater lines too thick, which causes them to slump together into a blob before curing.
Styling and Decorating Ideas
Pairs perfectly with chunky cable-knit cardigans, fleece blankets, and hot cocoa mugs for cozy fall indoor photos.
Best Colors and Materials
- Colors: Creamy oat, dusty Rose, oatmeal beige, soft dove gray.
- Finish: Tactile 3D matte finish.
Quick Project Info
- Estimated Cost: $15 – $25
- Estimated Time: 50 minutes
- Difficulty Level: Advanced
- Where It Looks Best: Almond, coffin, or medium square nails.
- Pinterest-Worthy Tip: Frame your textured nails holding a plush knitted blanket edge with soft window lighting.
Conclusion
3D Cable-Knit Texture Nails deliver unbeatable autumn atmosphere, turning your fingertips into a cozy fashion statement.
Idea 5: Caramel Macchiato Mismatched Swirls
Introduction
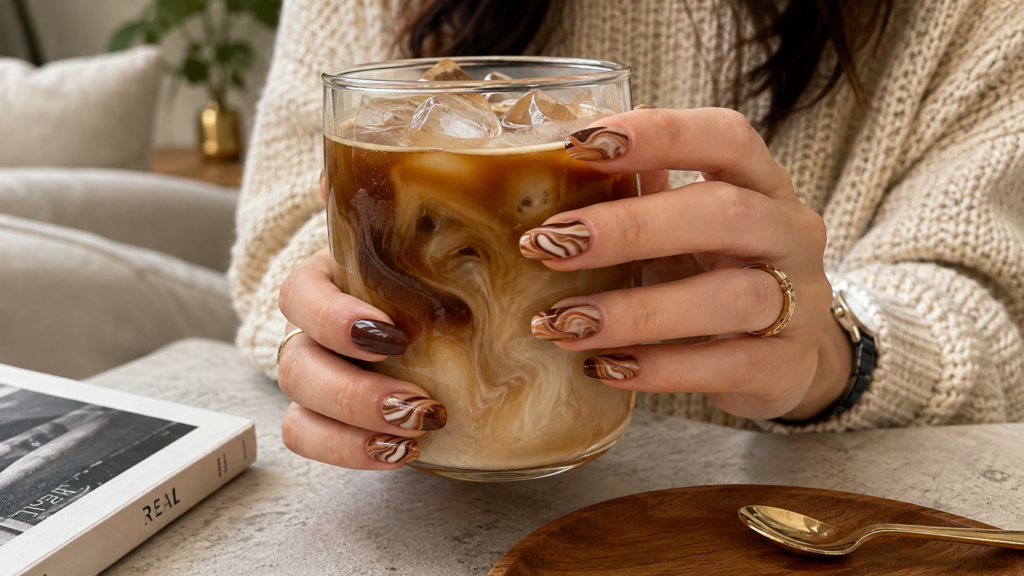
Inspired by your favorite warm coffee order, this trend uses abstract, flowing swirl lines in shades of caramel, espresso, cream, and soft vanilla across every nail.
Why You’ll Love This Idea
Mismatched swirl art is extremely forgiving because no two lines need to look identical. The fluid motion feels whimsical yet sophisticated.
Materials Needed
- Coffee palette polishes (Espresso brown, caramel, cream, soft tan)
- Sheer nude base coat
- Long fine liner brush (striping brush)
- Glossy top coat
Step-by-Step Instructions
- Clean Prep: File nails into shape and apply an oil-free base layer.
- Apply Translucent Canvas: Paint two thin coats of a sheer nude polish as your background base.
- First Swirl Line: Dip your long liner brush into caramel polish and paint a gentle, wavy diagonal line from base to tip.
- Second Contrast Line: Clean the brush, dip into espresso brown, and trace a curving line that hugs alongside the caramel swirl.
- Add Cream Accents: Add a third thin swirl line in creamy off-white to brighten up the overall design.
- Vary Each Finger: Repeat the swirl technique on all fingers, changing the line directions slightly on each nail for a mismatched effect.
- Clean Edges: Remove any polish smudges along skin borders using an acetone-dipped brush.
- Gloss Seal: Top off with a high-shine glossy top coat to blend the swirl layers visually into one smooth finish.
Beginner Tips
Use light pressure on the brush when starting the swirl, then press down slightly firmer to make the line widen organically in the middle.
Common Mistakes to Avoid
- Overcrowding the nail with too many swirl lines, which hides the clean background space.
- Using thick, gooey polishes that drag and create clumpy, uneven lines.
Styling and Decorating Ideas
Looks fantastic paired with beige trench coats, brown leather boots, and golden layered bracelets.
Best Colors and Materials
- Colors: Dark chocolate, warm caramel, coffee-with-milk brown, ivory cream.
- Finish: Ultra glossy.
Quick Project Info
- Estimated Cost: $10 – $18
- Estimated Time: 40 minutes
- Difficulty Level: Intermediate
- Where It Looks Best: Medium to long almond or oval nails.
- Pinterest-Worthy Tip: Hold an iced coffee cup with swirling milk layers to echo the nail artwork visually.
Conclusion
Caramel Macchiato Swirls bring energetic coffee-shop aesthetics right to your everyday fall wardrobe.
Idea 6: Celestial Metallic Bronze and Gold Constellations
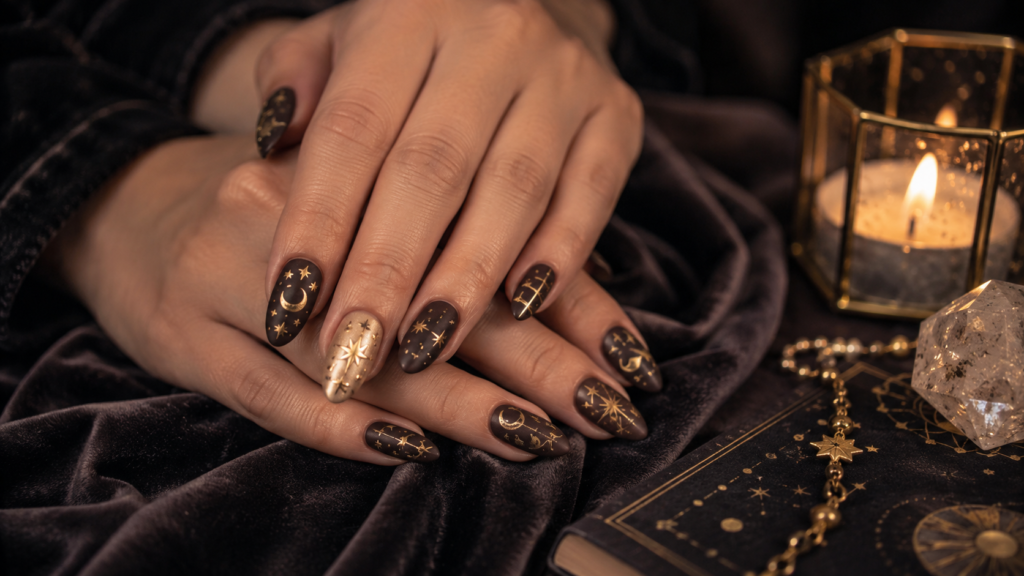
Introduction
As early fall night skies grow clearer and crispness fills the evening air, celestial moon and star motifs become wildly popular. Shiny bronze and gold constellations set against a sheer nude background feel dreamy and magical.
Why You’ll Love This Idea
It blends dainty, elegant jewel-like minimalism with a touch of mystical autumn charm without feeling like a bright Halloween costume design.
Materials Needed
- Milky nude or translucent blush polish
- Metallic gold and metallic bronze polish or gel
- Micro nail dotting tool
- Ultra-fine detailer brush
- Glossy top coat
Step-by-Step Instructions
- Prep Foundation: Prepare nail surfaces and coat with a smooth base polish layer.
- Apply Milky Base: Paint two coats of semi-translucent milky nude polish.
- Place Center Stars: Dip your fine detail brush in metallic gold and paint a tiny four-pointed star in the center of selected nails.
- Add Crescent Moon: On one accent nail per hand, paint a delicate crescent moon curve using bronze metallic polish.
- Dot Constellation Points: Use your micro dotting tool to add tiny constellation dots scattered lightly around the celestial symbols.
- Connect Fine Lines: Use your micro brush to draw wafer-thin connecting lines between dots for an authentic starry sky effect.
- Dry & Inspect: Let metallic elements set completely to preserve their crisp reflection.
- Protect with Top Coat: Seal with a clear top coat to keep metallic details from tarnishing or rubbing off.
Beginner Tips
You can substitute hand-drawn stars with high-quality nail decals or water-transfer stickers if drawing thin lines feels too intimidating!
Common Mistakes to Avoid
- Drawing stars and moons too large, which overpowers small or short nails.
- Smudging metallic paint by applying the top coat roughly; always glide top coat gently over art without pressing down hard.
Styling and Decorating Ideas
Complements dark velvet fabrics, celestial gold star jewelry, and evening cocktail attire.
Best Colors and Materials
- Colors: Metallic bronze, warm yellow gold, milky sheer beige.
- Finish: High shine with sparkling metallic reflections.
Quick Project Info
- Estimated Cost: $8 – $15
- Estimated Time: 35 minutes
- Difficulty Level: Intermediate
- Where It Looks Best: Short to medium round or almond nails.
- Pinterest-Worthy Tip: Set hands on dark navy or emerald green velvet fabric near flickering mood candles.
Conclusion
Celestial Bronze and Gold nails give your hands a delicate, enchanting glow for cozy autumn evenings.
Idea 7: Deep Plum and Pearl Minimalist Ombre
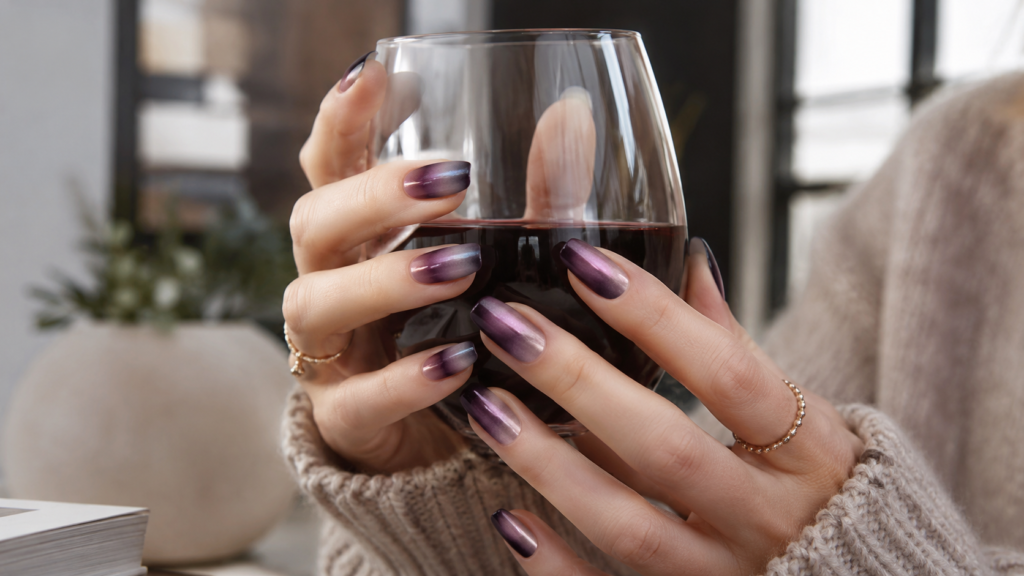
Introduction
If you adore rich berry shades, this design is your ultimate early autumn choice. Fading deep plum purple into a translucent base and topping it with soft iridescent pearl shimmer captures early fall twilight vibes.
Why You’ll Love This Idea
It introduces rich darker berries gently, keeping the overall manicure light near the cuticle so nail growth stays invisible for much longer.
Materials Needed
- Deep plum or dark blackberry polish
- Chrome/pearl shimmer powder or pearl top coat
- Makeup sponge wedge
- Latex barrier or liquid tape
- High-shine top coat
Step-by-Step Instructions
- Prep Nail Bed: Prep nails thoroughly and apply a clear protective base coat.
- Apply Skin Barrier: Paint liquid latex skin barrier around the surrounding finger skin for fast cleanup.
- Dab Color onto Sponge: Stripe deep plum polish onto the edge of a clean makeup sponge wedge.
- Sponge Ombre Effect: Gently dab the sponge onto the top half of your nail, building the deepest plum color at the tip while blending down lightly toward the center.
- Build Depth: Allow 1 minute to dry, then repeat a second sponging layer to intensify the tip color gradient.
- Peel Skin Barrier: Carefully peel away the liquid latex skin guard from your cuticle borders.
- Apply Pearl Shimmer: Dust an iridescent pearl chrome powder gently over the nail or apply a coat of pearl shimmer polish.
- Seal and Smooth: Apply a top coat to smooth out any sponge texture and lock in the pearl glow.
Beginner Tips
Slightly dampen your makeup sponge with water before applying polish so the sponge does not soak up all your nail polish!
Common Mistakes to Avoid
- Pressing the sponge down too hard, which creates unwanted air bubbles in the polish layer.
- Skipping skin protection, resulting in messy cleanup around delicate cuticles.
Styling and Decorating Ideas
Looks dramatic and stylish when worn with plum lipsticks, wool coats, and sterling silver or platinum jewelry.
Best Colors and Materials
- Colors: Deep plum, wine burgundy, sheer iridescent pearl.
- Finish: Shimmery pearl gloss.
Quick Project Info
- Estimated Cost: $10 – $18
- Estimated Time: 40 minutes
- Difficulty Level: Intermediate
- Where It Looks Best: Medium-length coffin, square, or almond nails.
- Pinterest-Worthy Tip: Take a photo holding a glass of dark red sparkling cider or wine in soft afternoon lighting.
Conclusion
Deep Plum Ombre with pearl luster blends moody autumn color with soft, graceful light reflection.
Idea 8: Burnt Terracotta and Minimalist Micro Hearts
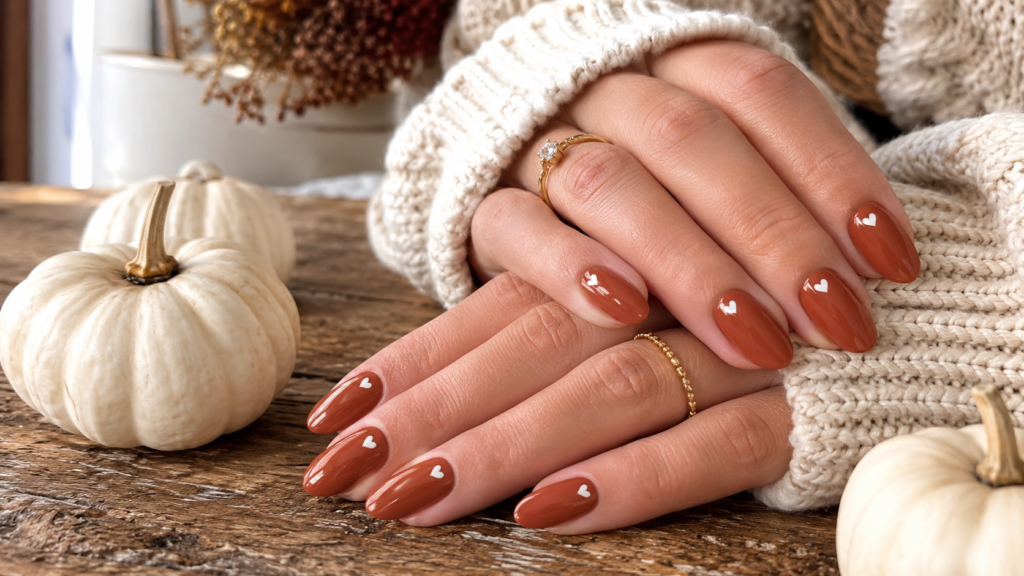
Introduction
A sweet, playful take on fall nail art! Combining a rich, earthy burnt terracotta base with tiny minimalist cream micro-hearts adds subtle warmth and charming personality to your seasonal look.
Why You’ll Love This Idea
It is incredibly subtle from a distance, but up close it reveals a delightful detail that never fails to spark compliments and smiles.
Materials Needed
- Burnt terracotta or rust-red polish
- Cream or off-white detail polish
- Fine dotting tool or toothpick
- Matte or glossy top coat
Step-by-Step Instructions
- Base Preparation: Prepare fingernails and apply your clear protective base coat.
- Paint Main Shade: Apply two smooth coats of rich burnt terracotta polish across all fingernails.
- Allow Full Drying: Let the terracotta color dry completely so background paint does not bleed.
- Make Heart Dots: Place two tiny dots of cream polish right next to each other using a toothpick or micro dotting tool.
- Drag Dot Tail: Quickly drag the bottom edges of the two dots down into a point using your detail brush to form a tiny micro heart.
- Scatter Design: Place 1–2 micro hearts per nail in asymmetrical positions (e.g., near the corner or base).
- Clean Borders: Wipe any accidental stray marks using a cotton swab moistened with acetone.
- Seal the Art: Seal the entire look with a glossy or velvety-matte top coat.
Beginner Tips
Using a toothpick makes drawing tiny micro hearts easier than using large professional brushes if your hands shake slightly.
Common Mistakes to Avoid
- Making hearts too large, which turns a dainty minimalist accent into a bulky block.
- Applying top coat too quickly, which drags the white heart paint across the terracotta background.
Styling and Decorating Ideas
Looks incredibly cute paired with oversized denim jackets, rustic brown boots, and cozy fall porch decor setups.
Best Colors and Materials
- Colors: Burnt rust, terracotta orange, warm cream, soft tan.
- Finish: Velvet matte or crystal gloss.
Quick Project Info
- Estimated Cost: $6 – $12
- Estimated Time: 25 minutes
- Difficulty Level: Beginner
- Where It Looks Best: Short, square, or active round natural nails.
- Pinterest-Worthy Tip: Photograph your manicured hands resting over a rustic wooden table surrounded by mini orange and white ornamental pumpkins.
Conclusion
Burnt Terracotta Micro Hearts bring cozy warmth and whimsical joy into your everyday fall routine.
Expert Decorating and Home Styling Tips
Your aesthetic does not have to end at your fingertips! When your nails look stunning, match your surrounding home environment to create picture-perfect moments for your social media or Pinterest boards:
- Incorporate Warm Textiles: Decorate your living spaces with chunky knit throw blankets, linen cushion covers, and suede pillows in terracotta and sage hues.
- Use Natural Elements: Set up fall flat-lay photo scenes featuring dried eucalyptus branches, pinecones, cinnamon sticks, and mini ornamental white pumpkins.
- Layer Atmospheric Lighting: Utilize warm 2700K ambient lamps, fairy lights, and beeswax pillar candles to create soft, cozy shadows for hands and lifestyle photography.
- Coordinate Ceramics: Serve warm drinks in handmade, textured ceramic mugs or neutral stoneware pottery that highlights warm nail tones in every shot.
Budget-Saving Tips for DIY Nail Artists
Keeping up with seasonal nail trends does not require spent fortunes at upscale nail salons. Follow these practical budget tips:
- Invest in a Reusable Tool Kit: Buy one comprehensive nail art toolkit containing dotting tools, liner brushes, and cuticle pushers online for under $15—it pays for itself instantly.
- Mix Custom Polishes: Create new custom seasonal shades by mixing leftover summer polishes on a plastic pallet (e.g., mix bright orange with a drop of chocolate brown to create custom terracotta!).
- Extend Manicure Longevity: Reapply a thin layer of top coat every 3 days to protect your artwork from chipping and double its wear time.
- Use Gel Polish Sets: Purchase curated multi-color fall gel kits during seasonal online sales instead of buying individual polish bottles.
Frequently Asked Questions (FAQs)
1. What are the most popular nail colors for early fall?
The most popular early fall nail colors include warm pumpkin spice, burnt terracotta, sage green, espresso brown, caramel nude, mustard gold, and deep plum.
2. How can I make my at-home manicure last longer?
Dehydrate your nail plates with alcohol before painting, apply thin layers, cap the front edge of your nails with top coat, and reapply top coat every 3 days.
3. Do I need gel polish to make these fall nail designs?
No! While gel polish lasts longer and cures instantly, every design listed in this guide can be created using regular air-dry nail polish with patience.
4. What is the best nail shape for fall 2026?
Medium almond and short square shapes are currently leading fall trends on Pinterest because they look natural, elongate fingers, and hold art beautifully.
5. How do I remove 3D gel nail art without damaging my natural nails?
Gently file down the raised top layer with a coarse hand file, soak cotton balls in pure acetone, place them on nails, wrap tightly with foil for 15 minutes, and gently push softened polish off.
6. What is the easiest nail design in this list for complete beginners?
The Warm Pumpkin Spice French Tips and Burnt Terracotta Micro Hearts are the easiest designs for beginners due to their simple steps and forgiving shapes.
7. Can I do tortoiseshell nails with regular nail polish?
Yes! Use a translucent jelly amber polish and quickly dab brown polish into a layer of wet clear top coat so the edges bleed naturally.
8. How do I keep my cuticles from looking dry in fall photo close-ups?
Apply high-quality cuticle oil containing jojoba or vitamin E oil daily, especially right before shooting photos or videos.
Final Thoughts
Transitioning your style into autumn is one of the most comforting beauty rituals of the year. Updating your nails with these warm, trendy early fall ideas lets you embrace cozy seasonal vibes wherever you go. Whether you choose elegant tortoiseshell accents, minimalist sage green with gold foil, or sweet terracotta hearts, doing your own nail art at home is a fun, creative, and rewarding experience. Try one of these designs this weekend, gather your favorite cozy props, and enjoy your fresh autumn look!
Love these early fall nail ideas? Pin this post to your favorite Pinterest Nail or Autumn Style Board to save these step-by-step tutorials for later!