Introduction
Homecoming is one of the most exciting nights of the school year. You have your dress picked out, your shoes are ready, and now it’s time to think about the last big piece of the puzzle: your hair. The right homecoming hairstyles can take your whole look from cute to absolutely unforgettable.
The best part? You don’t need to book an expensive salon appointment to get a gorgeous look. With a few tools, some patience, and this guide, you can create stunning hairstyles right in your own bedroom. Whether you love soft romantic curls, sleek and sophisticated updos, or fun braided styles, there is something here for every hair type and every dress style.
This guide is packed with 8 detailed homecoming hairstyle ideas, complete with step-by-step instructions, beginner tips, common mistakes to avoid, and styling inspiration. We will also cover the tools you need, safety tips for using hot styling tools, and answers to the most common questions about homecoming hair.
Pinterest is full of gorgeous hairstyle inspiration, and this article brings together the most popular, most saved, and most trendy looks for this season. From half-up curls to elegant low buns, these styles work whether you have short hair, long hair, thick hair, or fine hair.
So grab your hairbrush, your favorite hair accessories, and let’s get started. By the end of this article, you will have a full list of gorgeous homecoming hairstyles to choose from, along with everything you need to know to create them yourself at home. Save this pin now so you can come back to it while you plan your big night!
Why This Trend Is Popular
Homecoming hairstyles trend every single year on Pinterest, and there are some clear reasons why:
- DIY beauty is booming. More people want to learn how to style their own hair instead of paying for a salon visit.
- Social media inspiration. Pinterest and Instagram are full of gorgeous hair looks that make people want to try new styles.
- Personal expression. A hairstyle is a way to show off your personality, whether you love classic elegance or bold, trendy looks.
- Budget-friendly glam. Doing your own hair saves money that can be spent on your dress, shoes, or accessories.
- Confidence boost. A great hairstyle makes you feel ready to walk into the dance with confidence.
These homecoming hairstyles are also popular because they are versatile. They work with almost any dress neckline, from strapless to high-neck, and they can be dressed up or down depending on your personal style.
Materials and Tools Needed
Before you start, gather these basic tools. You probably already have most of them at home.
| Tool/Material | Purpose |
|---|---|
| Curling iron or wand | Creates curls and waves |
| Flat iron | Smooths hair or creates sleek looks |
| Hair dryer | Preps hair before styling |
| Teasing comb | Adds volume at the roots |
| Bobby pins | Secures braids, buns, and updos |
| Hair elastics | Ties ponytails and buns |
| Hairspray | Holds your style in place |
| Heat protectant spray | Protects hair from heat damage |
| Wide-tooth comb | Detangles hair gently |
| Hair ties (clear/thin) | Sectioning hair without leaving marks |
| Decorative hair accessories | Bows, clips, pins, or rhinestone pieces |
| Texturizing spray | Adds grip for braids and updos |
You do not need every single item on this list for every style. Each hairstyle idea below will tell you exactly what you need.
Safety Tips
Since many of these homecoming hairstyles use heat tools, safety is important.
- Always use a heat protectant spray before curling or straightening your hair.
- Never use a curling iron or flat iron on wet hair. This can damage your hair and is dangerous.
- Keep heat tools away from your face and ears while styling.
- Unplug your tools when you are finished to avoid accidents.
- Do a strand test if you are trying a new heat setting for the first time.
- Ask an adult or friend for help with the back sections of your hair, especially for updos.
- Set hot tools on a heat-safe mat, not directly on carpet or fabric.
- Give yourself plenty of time. Rushing while using hot tools can lead to burns or mistakes.
Now let’s get into the fun part: the hairstyles!
Idea 1: Classic Half-Up Half-Down with Curls
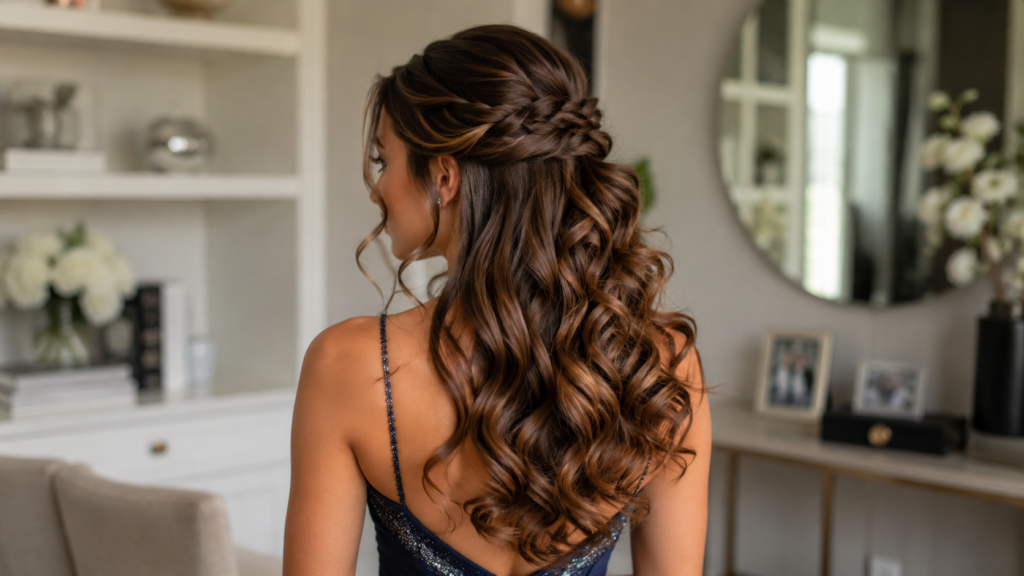
This is one of the most requested homecoming hairstyles every single year, and for good reason. It is romantic, flattering, and works with almost any dress style.
Why You’ll Love This Idea
This look gives you the best of both worlds. You get soft curls flowing down, but your face is still framed beautifully. It is a timeless style that never goes out of fashion.
Materials Needed
- Curling iron or wand
- Heat protectant spray
- Bobby pins
- Small clear hair elastic
- Hairspray
- Rat-tail comb
Step-by-Step Instructions
- Start with clean, dry hair. Apply heat protectant spray from mid-length to ends.
- Curl your hair in small sections using a curling wand, alternating the direction of each curl for a natural look.
- Let the curls cool completely before touching them.
- Once cool, gently brush through the curls with your fingers to loosen them into soft waves.
- Take a section of hair from each side of your head, near your temples.
- Pull both sections back and cross them over each other at the back of your head.
- Secure the crossed sections with bobby pins or a small elastic.
- Gently pull on the top of the pulled-back section to add volume.
- Add a few bobby pins underneath the pulled-back hair to hide them.
- Finish with a light mist of hairspray to hold everything in place.
Beginner Tips
- Curl away from your face for a softer, more flattering look.
- Let curls cool before brushing them out, or they will fall flat.
- Practice this style a few days before homecoming so you feel confident.
Common Mistakes to Avoid
- Brushing curls too soon, which can make them lose their shape.
- Pulling the half-up section too tight, which looks stiff instead of soft.
- Skipping heat protectant, which can damage your hair.
Styling Ideas
Add a decorative hairpin or small flowers where the two sections meet at the back. A thin ribbon woven through the pulled-back section also looks lovely.
Best Colors and Materials
This style works beautifully with rhinestone pins, pearl clips, or gold hairpins. These small details photograph well and add sparkle without being too much.
Estimated Cost
$10–$25 if you already own a curling iron (just accessories and hairspray).
Estimated Time
30–40 minutes
Difficulty Level
Beginner-friendly
Where It Looks Best
With V-neck, sweetheart, or off-the-shoulder dresses that show your neckline.
Pinterest-Worthy Tip
Take a photo from the side to show off both the curls and the pulled-back section. This angle is a Pinterest favorite for a reason!
Conclusion
The classic half-up half-down curled style is a safe, beautiful choice that flatters nearly everyone. It is easy enough for beginners but still looks polished and elegant for photos all night long.
Idea 2: Sleek High Ponytail with a Bow
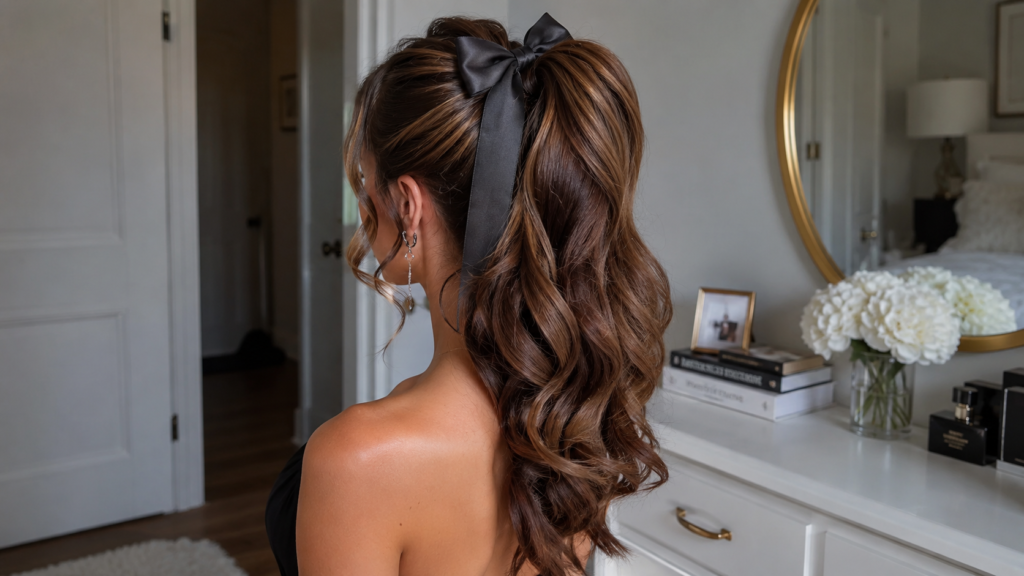
If you want a look that feels modern, chic, and a little edgy, the sleek high ponytail is a top choice among trendy homecoming hairstyles.
Why You’ll Love This Idea
This style is sharp, clean, and shows off your face and jewelry. It also works with almost any hair length and gives serious red-carpet vibes.
Materials Needed
- Flat iron
- Teasing comb
- Strong hold hair elastic
- Bobby pins
- Hairspray
- Decorative bow or ribbon
- Small section of hair or extra hair tie for wrapping
Step-by-Step Instructions
- Brush your hair thoroughly to remove all tangles.
- Use a flat iron to smooth out any frizz or bumps.
- Gather all your hair at the crown of your head, adjusting the height to your preference.
- Secure it tightly with a strong hold elastic.
- Smooth the front sections with a fine-tooth comb and a little hairspray for a sleek finish.
- Take a small piece of hair from the ponytail and wrap it around the base to hide the elastic.
- Pin the wrapped piece underneath with a bobby pin.
- Tie your decorative bow or ribbon around the base of the ponytail.
- Use hairspray on your palms and smooth down any flyaways along the hairline.
- Curl the ends of the ponytail lightly if you want extra movement.
Beginner Tips
- Use a comb dipped in a tiny bit of gel to tame flyaways along the hairline.
- Practice pulling your hair up evenly so the ponytail sits centered.
Common Mistakes to Avoid
- Placing the ponytail too low, which loses the sleek, elevated look.
- Not securing it tightly enough, causing it to droop during the night.
- Forgetting to check the back in a mirror before leaving.
Styling Ideas
A big satin bow is a huge Pinterest trend, but you can also use a rhinestone hair cuff or a simple velvet ribbon for a more subtle touch.
Best Colors and Materials
Match your bow or ribbon to your dress color for a coordinated look, or choose classic black, white, or gold for a timeless finish.
Estimated Cost
$5–$20 depending on your bow or accessory choice.
Estimated Time
20–30 minutes
Difficulty Level
Beginner to intermediate
Where It Looks Best
With high-neck, halter, or one-shoulder dresses that pair well with an open neckline.
Pinterest-Worthy Tip
Style your ponytail with a slight side part at the front for extra dimension in photos.
Conclusion
The sleek high ponytail with a bow is bold, modern, and perfect for anyone who wants their homecoming hairstyle to feel a little more fashion-forward.
Idea 3: Braided Crown (Halo Braid)
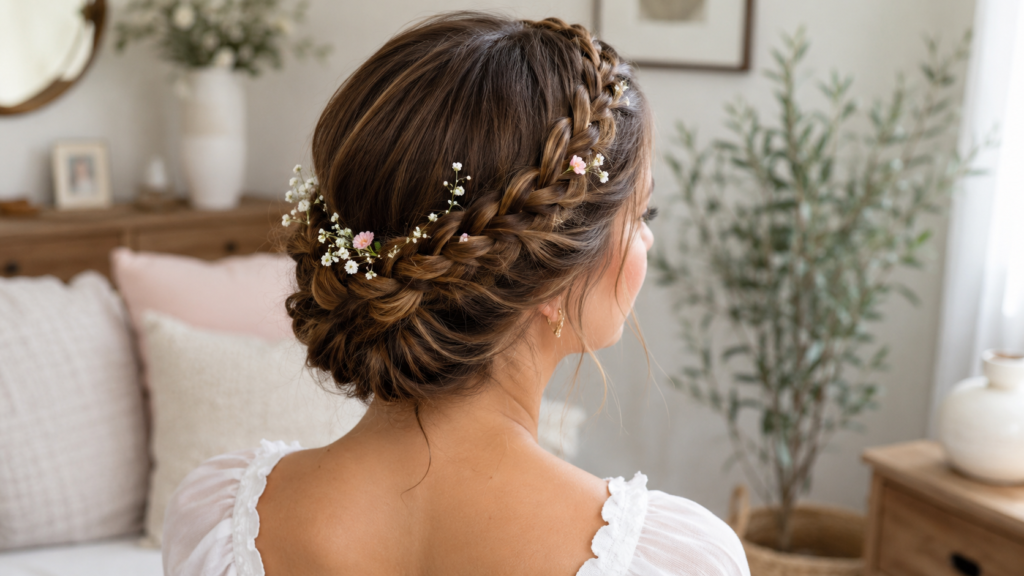
The braided crown, also called a halo braid, is a romantic and whimsical option among homecoming hairstyles that has been trending on Pinterest for years.
Why You’ll Love This Idea
This look feels like something out of a fairy tale. It keeps your hair off your face all night, which is perfect for dancing, and it looks stunning from every angle.
Materials Needed
- Wide-tooth comb
- Texturizing spray
- Bobby pins (lots!)
- Clear elastics
- Hairspray
Step-by-Step Instructions
- Spray texturizing spray through your hair to give it more grip for braiding.
- Part your hair down the middle or to the side, depending on your preference.
- Start a Dutch braid (or regular braid if you are a beginner) on one side, close to your hairline.
- Braid all the way around your head, following your hairline like a crown.
- Continue braiding until you reach the other side of your head.
- Secure the end of the braid with a small clear elastic.
- Repeat the same braid on the other side, starting where the first one ended.
- Wrap the second braid around to meet the first one, forming a full circle.
- Pin the ends of both braids underneath the crown so they are hidden.
- Gently pull on the edges of the braids to loosen them for a fuller, more romantic look.
Beginner Tips
- Practice basic braiding on a doll or a friend before trying it on yourself.
- Use a mirror on both sides so you can see what you are doing at the back of your head.
- If braiding is hard, ask a friend or family member to help.
Common Mistakes to Avoid
- Braiding too tightly, which can cause headaches by the end of the night.
- Not using enough bobby pins, which can cause the braid to loosen.
- Skipping the texturizing spray, which makes hair slippery and harder to braid.
Styling Ideas
Tuck small flowers or pearl pins into the braid for a garden-party feel. This is one of the most Pinterest-loved details for this hairstyle.
Best Colors and Materials
Pastel flowers, gold pins, or delicate pearl clips all look beautiful woven into the braid.
Estimated Cost
$5–$15 for accessories, since no heat tools are required.
Estimated Time
25–35 minutes
Difficulty Level
Intermediate
Where It Looks Best
With boho-style dresses, flowy fabrics, and off-the-shoulder necklines.
Pinterest-Worthy Tip
Photograph this style from above or behind to show off the full crown shape. This angle gets saved again and again on Pinterest.
Conclusion
The braided crown is perfect for anyone who wants a whimsical, romantic homecoming hairstyle that also happens to be very practical for a night full of dancing.
Idea 4: Voluminous Beach Waves
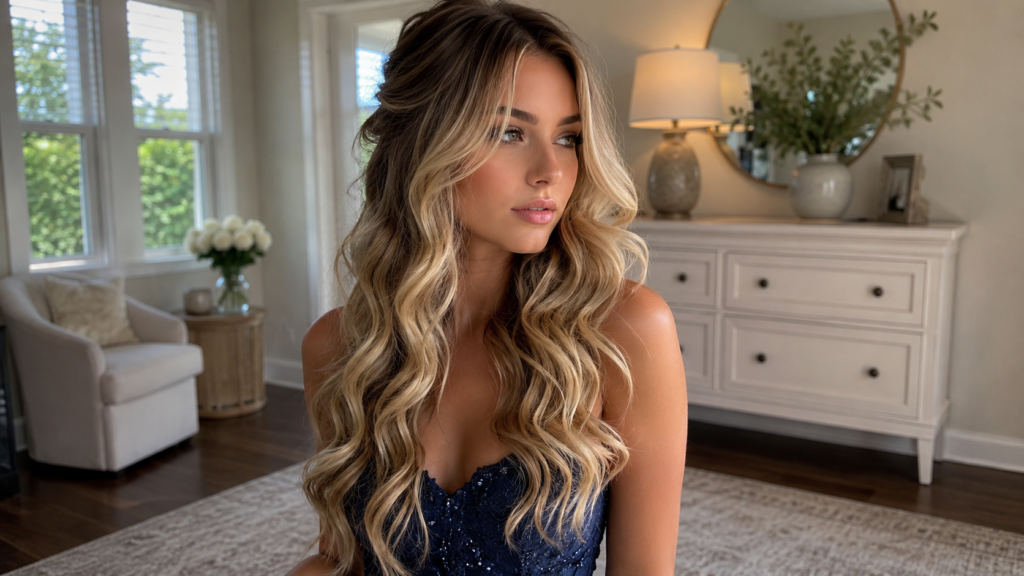
If you want your hair down but still styled, voluminous beach waves are one of the most popular homecoming hairstyles for a relaxed yet glamorous look.
Why You’ll Love This Idea
This style feels effortless but still looks intentional. It works for almost every hair length and gives you that “I woke up like this” glow, but way more polished.
Materials Needed
- Curling iron (1-inch or 1.25-inch barrel)
- Heat protectant spray
- Texturizing or sea salt spray
- Wide-tooth comb
- Hairspray
Step-by-Step Instructions
- Apply heat protectant spray to dry hair before you begin.
- Divide your hair into four sections: two on top, two on the bottom.
- Starting with the bottom sections, curl one-inch pieces of hair, alternating the direction each time.
- Move to the top sections and repeat the same curling pattern.
- Let all the curls cool completely before touching them.
- Once cool, run your fingers through the curls to break them apart gently.
- Flip your head upside down and shake your roots to add volume.
- Spray texturizing spray through the mid-lengths and ends for extra texture.
- Use a wide-tooth comb to lightly brush through for a softer wave pattern.
- Finish with a flexible-hold hairspray so the waves keep their movement.
Beginner Tips
- Curl hair in small sections for the most natural-looking wave pattern.
- Alternate the curl direction to avoid a “ringlet” look.
- Do not brush waves out completely, just use your fingers.
Common Mistakes to Avoid
- Curling every section in the same direction, which looks unnatural.
- Using too much product, which can weigh the waves down.
- Brushing waves with a regular brush, which removes the texture.
Styling Ideas
Add a delicate headband or a single hair clip on one side for a subtle, elegant touch that doesn’t take away from the wave texture.
Best Colors and Materials
Gold or silver hair clips add a small sparkle without competing with the natural wave pattern.
Estimated Cost
$5–$15 for spray products, assuming you own a curling iron.
Estimated Time
30–45 minutes
Difficulty Level
Beginner to intermediate
Where It Looks Best
With flowy, romantic dresses, especially in soft colors like blush, lavender, or sage green.
Pinterest-Worthy Tip
Style this look near a window with natural light for photos. The texture of beach waves photographs beautifully in soft, natural lighting.
Conclusion
Voluminous beach waves give you a relaxed, romantic homecoming hairstyle that still feels special and photo-ready. It’s a great choice if you want your hair down but full of movement.
Idea 5: Elegant Low Bun with Face-Framing Pieces
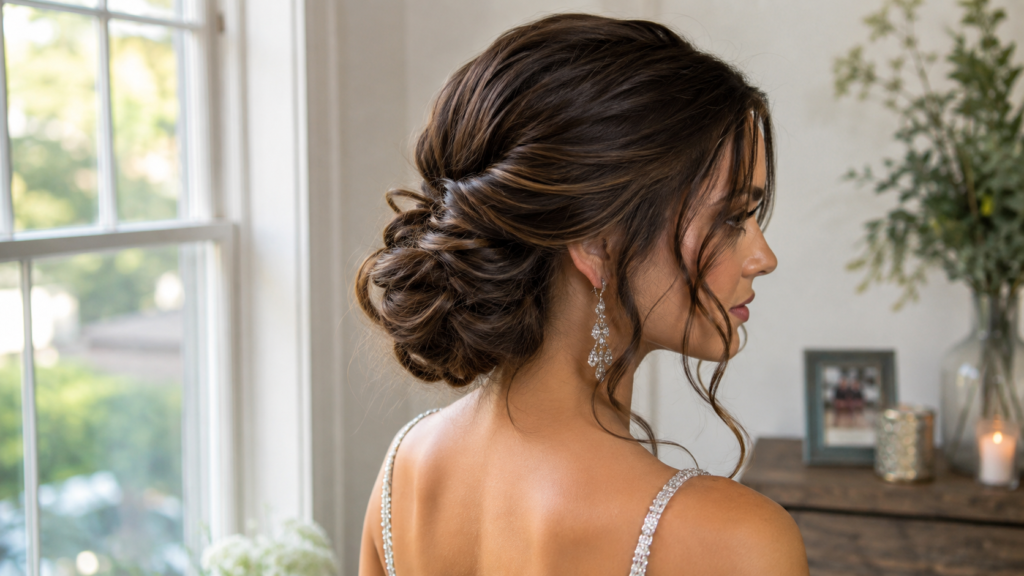
The low bun is a classic, sophisticated choice among homecoming hairstyles that works beautifully for formal dances.
Why You’ll Love This Idea
This style is elegant, timeless, and stays put all night long, even through hours of dancing. It also draws attention to your neckline and earrings.
Materials Needed
- Flat iron (optional, for face-framing pieces)
- Teasing comb
- Bobby pins
- Hair donut or sock bun tool (optional)
- Strong hold elastic
- Hairspray
Step-by-Step Instructions
- Brush your hair back into a low ponytail at the nape of your neck.
- Secure the ponytail with a strong hold elastic.
- If using a hair donut, thread your ponytail through it and spread your hair evenly around it.
- Tuck the ends of your hair under and around the donut, pinning as you go.
- If not using a donut, twist your ponytail into a tight coil and wrap it around the base, pinning as you go.
- Continue pinning until the bun feels secure and no loose ends are showing.
- Pull out two small pieces of hair near your temples to frame your face.
- Lightly curl these face-framing pieces with a flat iron or curling wand.
- Smooth the top of your head with a comb and a touch of hairspray for a polished finish.
- Set the entire style with a strong hold hairspray.
Beginner Tips
- A hair donut makes this style much easier for beginners.
- Tease your ponytail slightly before wrapping it for a fuller bun.
- Use small, criss-crossed bobby pins for the most secure hold.
Common Mistakes to Avoid
- Making the bun too tight, which can look severe instead of soft.
- Forgetting to pin the underside of the bun, leading to loose ends.
- Skipping face-framing pieces, which can make the style look too plain.
Styling Ideas
A jeweled hairpin or small comb tucked into the side of the bun adds elegance without overpowering the simple shape.
Best Colors and Materials
Silver or crystal hairpins pair beautifully with almost any dress color and catch the light in photos.
Estimated Cost
$8–$20 for pins, elastic, and a hair donut if needed.
Estimated Time
20–30 minutes
Difficulty Level
Intermediate
Where It Looks Best
With backless dresses, high necklines, or dresses with statement necklaces or earrings.
Pinterest-Worthy Tip
Take a back-view photo to show off the bun shape along with your dress details, especially if your dress has a low back.
Conclusion
The elegant low bun is a timeless, formal choice among homecoming hairstyles. It keeps hair secure all night and gives off major sophistication, especially paired with sparkly accessories.
Idea 6: Space Buns with Braided Accents
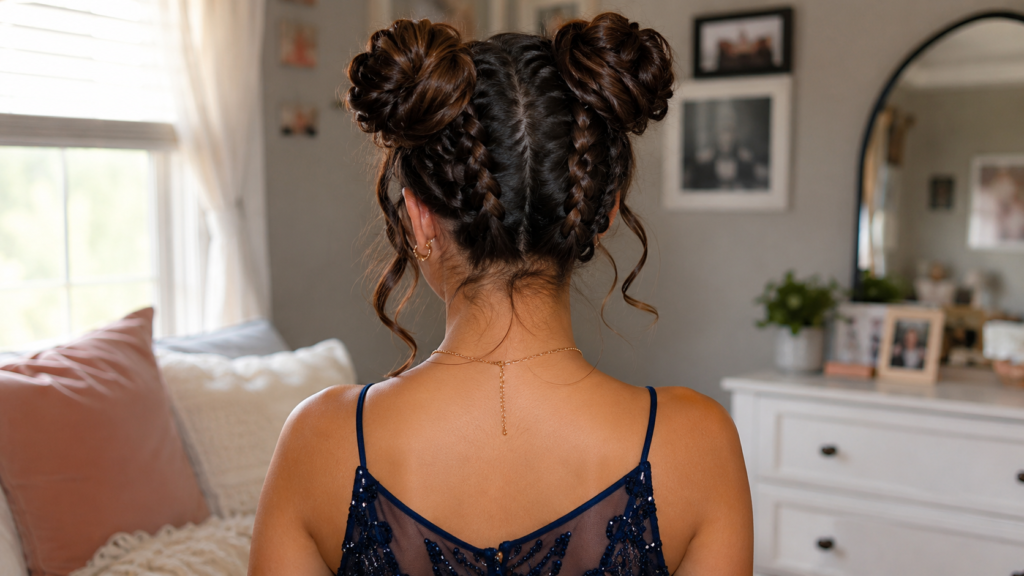
For a fun, trendy, and slightly bold look, space buns with braided accents are quickly becoming favorites among modern homecoming hairstyles.
Why You’ll Love This Idea
This style feels playful and unique while still looking put together. It stands out on the dance floor and photographs beautifully from every angle.
Materials Needed
- Rat-tail comb
- Two strong hold elastics
- Bobby pins
- Texturizing spray
- Hairspray
Step-by-Step Instructions
- Part your hair evenly down the middle from your forehead to the nape of your neck.
- Gather one side into a high ponytail and secure it with an elastic.
- Repeat on the other side so you have two even ponytails.
- Braid a small section of hair from the front of one ponytail before twisting the rest into a bun.
- Wrap the twisted section around the base of the ponytail to form a bun, pinning as you go.
- Wrap the braided piece around the bun as an accent, and pin it in place.
- Repeat the same process on the other side.
- Adjust both buns so they are even in size and height.
- Gently pull a few pieces loose around the buns for a softer, undone look.
- Finish with hairspray to hold the style in place all night.
Beginner Tips
- Use a comb to create a perfectly straight middle part for symmetry.
- Keep both ponytails at the same height for a balanced look.
- Practice this style before homecoming since it involves a few steps.
Common Mistakes to Avoid
- Making the part uneven, which throws off the whole look.
- Pulling hair too tight, which can be uncomfortable for a full night.
- Making the buns too small, which can look sparse in photos.
Styling Ideas
Add small rhinestone pins around the braided accents for extra sparkle, or tie thin ribbons around the base of each bun.
Best Colors and Materials
Colorful ribbons that match your dress or metallic pins add a fun, personalized touch.
Estimated Cost
$5–$15 for accessories.
Estimated Time
25–35 minutes
Difficulty Level
Intermediate
Where It Looks Best
With fun, modern dress styles, bold colors, or dresses with unique necklines.
Pinterest-Worthy Tip
Take photos from the front and back since both buns look adorable from every angle, especially with the braided details.
Conclusion
Space buns with braided accents are a fresh, fun twist on classic homecoming hairstyles. They are perfect for anyone who wants to stand out with a playful, trendy look.
Idea 7: Fishtail Braid Updo
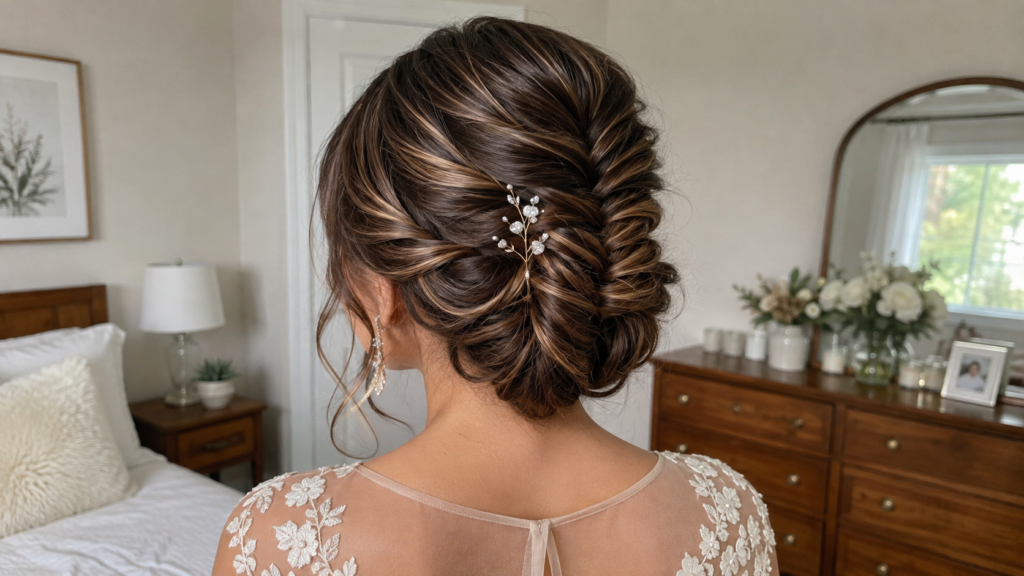
The fishtail braid updo combines the elegance of an updo with the detailed texture of a fishtail braid, making it one of the most eye-catching homecoming hairstyles on this list.
Why You’ll Love This Idea
This look is intricate and beautiful, but once you learn the technique, it comes together faster than you might think. It also holds up incredibly well through hours of dancing.
Materials Needed
- Rat-tail comb
- Texturizing spray
- Bobby pins
- Small elastic
- Hairspray
Step-by-Step Instructions
- Spray texturizing spray through dry hair for extra grip.
- Gather all your hair into a low ponytail and secure with an elastic.
- Divide the ponytail into two even sections.
- Take a small piece from the outside of the right section and cross it over to the left section.
- Take a small piece from the outside of the left section and cross it over to the right section.
- Continue this pattern, alternating sides, until you reach the ends of your hair.
- Secure the end of the braid with a small clear elastic.
- Gently pull on the edges of the braid to loosen it and make it look fuller.
- Coil the braid upward into a loose bun shape at the base of your neck.
- Pin the coiled braid in place and set with hairspray.
Beginner Tips
- Practice the fishtail braid technique on loose hair a few times before trying the updo version.
- Keep your sections even in size for a neat, consistent pattern.
- Loosen the braid gently for a softer, more romantic finish.
Common Mistakes to Avoid
- Making the braid too tight, which looks stiff instead of elegant.
- Uneven sections, which create a messy pattern.
- Rushing through the coiling step, which can make the bun look lopsided.
Styling Ideas
Weave a thin ribbon through the braid before coiling it, or add small pearl pins along the braid for extra shine.
Best Colors and Materials
Pearl and gold accessories pair beautifully with the detailed texture of a fishtail braid.
Estimated Cost
$5–$15 for accessories.
Estimated Time
30–40 minutes
Difficulty Level
Advanced
Where It Looks Best
With elegant, structured gowns and dresses with a fitted bodice.
Pinterest-Worthy Tip
Get a close-up shot of the braid texture. This detail shot is exactly the kind of image that gets saved and repinned often.
Conclusion
The fishtail braid updo is for anyone who wants a truly show-stopping homecoming hairstyle. It takes a little more practice, but the stunning texture and elegant shape make it well worth the effort.
Idea 8: Glamorous Finger Waves (Vintage Hollywood)
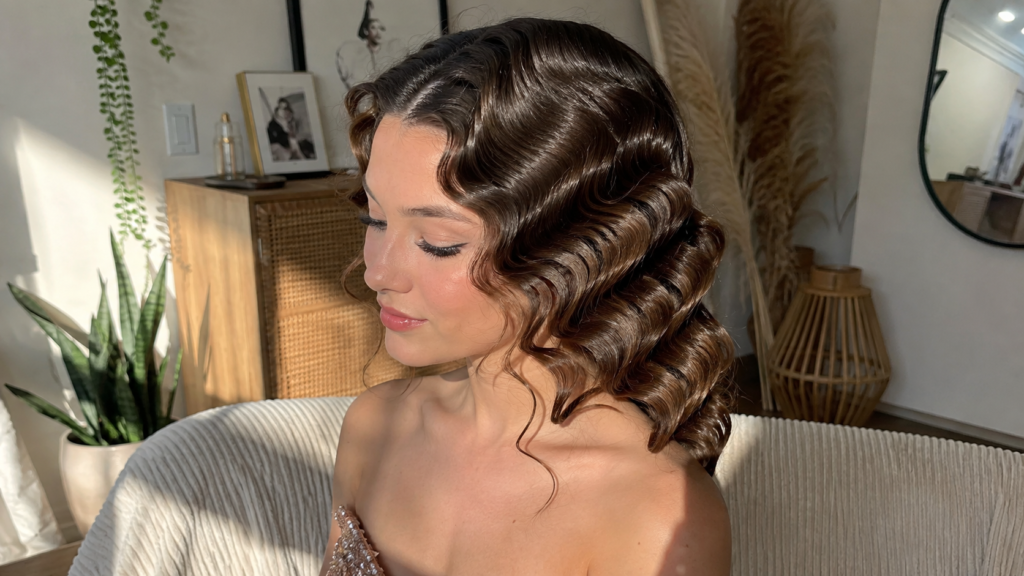
For a bold, vintage-inspired look, finger waves bring old Hollywood glamour to modern homecoming hairstyles.
Why You’ll Love This Idea
This style is dramatic and unforgettable. It stands out in the best way and pairs perfectly with a glam makeup look and a statement dress.
Materials Needed
- Flat iron
- Fine-tooth comb
- Wave clips or duckbill clips
- Strong hold gel
- Hairspray
Step-by-Step Instructions
- Apply a small amount of strong hold gel to damp or dry hair.
- Use a flat iron to smooth your hair completely, removing all frizz.
- Starting near your temple, use a comb to create an S-shape wave pattern.
- Push the top of the “S” forward with your fingers to define the wave.
- Clip the wave in place with a wave clip while it sets.
- Continue creating S-shaped waves down the section of hair, clipping each one.
- Repeat the pattern on the rest of your head, keeping the waves consistent in size.
- Let the gel dry completely before removing the clips. A blow dryer on low heat can speed this up.
- Once dry, carefully remove the clips one at a time.
- Set the finished waves with a light mist of hairspray.
Beginner Tips
- Use plenty of gel to help the waves hold their shape.
- Keep your wave pattern consistent by measuring roughly two to three finger-widths per wave.
- Practice on a small section first to get comfortable with the technique.
Common Mistakes to Avoid
- Removing clips before the gel is fully dry, which causes waves to fall.
- Using too little gel, resulting in a wave pattern that does not hold.
- Making waves too large, which can look messy instead of defined.
Styling Ideas
Add a vintage-style hairpin or a small feather clip for extra old-Hollywood glamour.
Best Colors and Materials
Deep red, black, or gold accessories complement this dramatic, vintage-inspired style beautifully.
Estimated Cost
$10–$20 for gel and clips.
Estimated Time
40–50 minutes
Difficulty Level
Advanced
Where It Looks Best
With fitted, glamorous gowns, especially in jewel tones or metallics.
Pinterest-Worthy Tip
Photograph this style in profile to highlight the clean wave pattern along the side of your head.
Conclusion
Glamorous finger waves are perfect for anyone who wants their homecoming hairstyle to feel like a true statement. It takes practice, but the dramatic, vintage result is absolutely worth it.
Expert Decorating Tips
Take your homecoming hairstyle to the next level with these finishing touches:
- Match metals, not just colors. If your jewelry is gold, choose gold hairpins instead of silver.
- Less is more. Choose one or two accessories instead of piling on many small pieces.
- Consider your dress neckline. Updos highlight necklaces, while down styles pair well with statement earrings.
- Practice your final look a few days early, including how it holds up over several hours.
- Take a “test photo” under bright light before homecoming night so you know exactly how it will look in pictures.
Budget-Saving Tips
You do not need to spend a lot of money to get a gorgeous homecoming hairstyle. Try these budget-friendly ideas:
- Borrow tools from a friend or family member instead of buying new ones.
- Use accessories you already own, like clips or ribbons from home.
- Practice ahead of time so you don’t waste product on redos.
- Choose no-heat styles, like braids, to skip the cost and damage of heat tools.
- Watch free tutorials online instead of paying for a styling class.
- Buy multi-use products, like a texturizing spray that also adds hold.
Frequently Asked Questions
1. How far in advance should I practice my homecoming hairstyle? Try practicing your chosen style at least one to two weeks before homecoming so you feel confident and know how long it takes.
2. What if I have short hair? Can I still do these styles? Yes! Many of these styles, like the braided crown, half-up curls, and finger waves, can be adjusted for shorter hair with a few small changes.
3. How do I make my hairstyle last all night? Use a strong hold hairspray, secure your style with enough bobby pins, and avoid touching your hair too much throughout the night.
4. Should I wash my hair the day of homecoming? It is usually easier to style hair that is one day old, since freshly washed hair can be too slippery for braids and updos.
5. What is the easiest homecoming hairstyle for beginners? The classic half-up half-down curled style and voluminous beach waves are two of the easiest options for beginners.
6. How do I choose the best hairstyle for my dress? Updos work well with high necklines and statement jewelry, while down styles pair beautifully with off-the-shoulder or sweetheart necklines.
7. Can I do these hairstyles by myself, or do I need help? Most of these styles can be done alone with practice, but styles like the fishtail braid updo or space buns are easier with a friend’s help for the back sections.
8. What hair accessories are trending for homecoming this year? Pearl pins, rhinestone clips, satin bows, and delicate gold hairpins are all trending choices this season.
9. How do I protect my hair from heat damage? Always use a heat protectant spray before curling or straightening, and avoid using the highest heat setting unless necessary.
10. What should I do if my hairstyle starts to fall during the dance? Carry a small emergency kit with bobby pins and travel-size hairspray so you can do quick touch-ups throughout the night.
Final Thoughts
Homecoming only comes around once a year, and your hairstyle is a big part of making the night feel special. Whether you choose soft romantic curls, a sleek modern ponytail, or a dramatic vintage look, the most important thing is choosing a style that makes you feel confident and beautiful.
Take your time practicing before the big day, gather the right tools, and don’t be afraid to add your own personal touch with accessories. These homecoming hairstyles are designed to be achievable at home, so you can save money while still looking absolutely stunning.
Pinterest Call-to-Action
Loved these homecoming hairstyle ideas? Save this pin now so you can come back to it while you plan your perfect look! Don’t forget to share it with your friends who are also getting ready for homecoming season. Happy styling!