Introduction
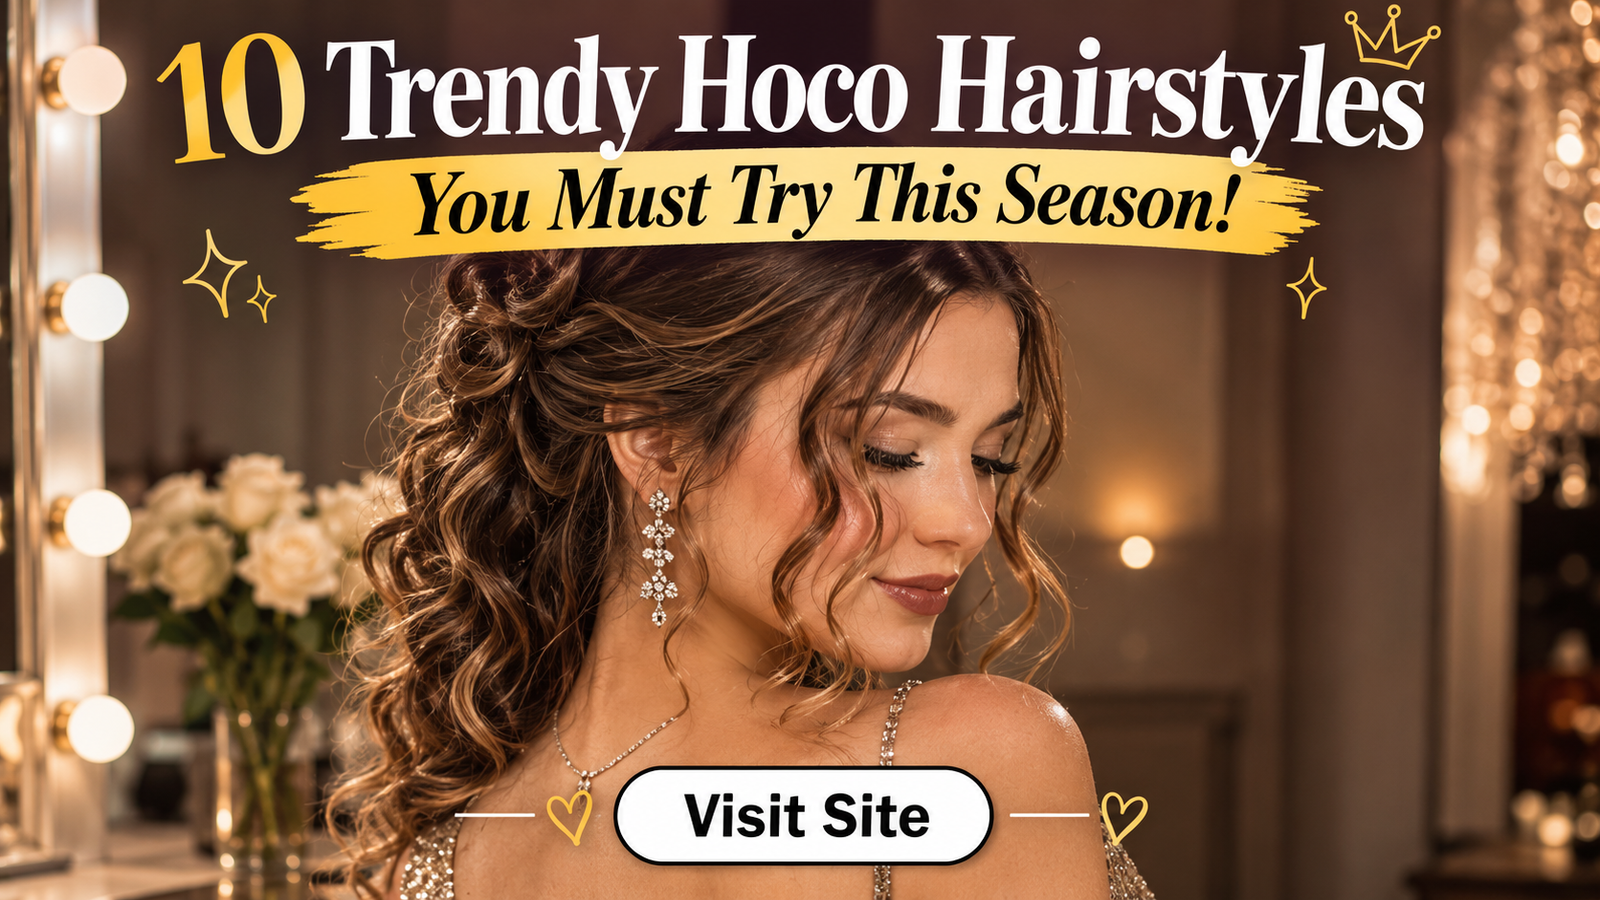
Homecoming night is one of the most exciting events of the school year. It marks the start of fall, fun school spirit, and dancing the night away with your best friends. Choosing your outfit is a big deal, but finding the perfect hairstyle ties your whole look together. Whether you are wearing a classic satin dress, a sparkly sequin dress, or a trendy floral outfit, your hair needs to match your style while keeping you comfortable all night long.
When planning your look, you want a hairstyle that looks high-end without needing a expensive trip to the salon. The great news is that you can recreate the hottest homecoming trends right at home! With a few basic tools, a little patience, and clear step-by-step guidance, you can style your hair like a professional stylist.
In this guide, we are diving deep into the absolute best trendy Hoco hairstyles for this season. From romantic bohemian braids and sleek high ponytails to classic textured updos and glam beach waves, there is a look here for every hair length, texture, and personal aesthetic. We will break down each hairstyle with exact tools, easy-to-follow steps, insider tips, and even budget estimates so you feel confident and picture-perfect on dance night!
Why This Trend Is Popular
Homecoming hair trends have evolved rapidly over the past few seasons. The heavy, formal updos of the past have been replaced by effortless, textured, and photo-ready styles. Here is why these trends are taking over Pinterest feeds and social media everywhere:
- Effortless Elegance: Modern teens prefer hair that looks natural and moves freely on the dance floor rather than stiff, heavily hairsprayed styles.
- DIY-Friendly: Today’s top trends rely on smart techniques—like using claw clips, bubble elastics, or curling wands—making them easy to do at home with friends.
- Versatility for All Hair Types: Whether your hair is short, medium, long, curly, or fine, there is a trendy Hoco hairstyle designed to accentuate your natural beauty.
- Photo & Video Ready: Soft framing pieces, pearl pins, and shiny finishes ensure your hair looks camera-ready under flash photography and video lighting.
Materials and Tools Needed
To get salon-worthy results at home, set up your styling station with these essential items:
| Tool / Product | Purpose & Benefit |
| 1-Inch Curling Wand | Creates long-lasting curls, waves, and textured volume. |
| Volumizing Texturizing Spray | Adds grip, hold, and instant lift to fine or slippery hair. |
| Clear Elastic Bands | Holds braids and half-up styles discreetly. |
| Bobby Pins & Hair Grips | Secures updos and hides loose ends in place. |
| Heat Protectant Spray | Prevents heat damage from wands and flat irons. |
| Rat-Tail Comb | Ensures crisp parts and clean hair sectioning. |
| Lightweight Shine Spray | Adds a glowing finish for photos without flattening volume. |
Safety Tips
Before you start styling, keep these simple safety guidelines in mind:
- Always Use Heat Protectant: Hot tools can reach temperatures above 350°F (175°C). Spritz a heat guard evenly through damp or dry hair before styling.
- Avoid Touching Hot Barrels: Keep curling barrels away from your ears, forehead, and neck to prevent accidental burns.
- Don’t Over-Tighten Elastics: Pulling hair too tightly can cause headaches or tension breakage along your hairline.
- Work in Well-Ventilated Areas: Spray aerosol hairsprays and texturizers in open rooms so you do not inhale fumes.
8 Trendy Hoco Hairstyles to Try This Season
1. Boho Bubble Braid Half-Up Style
Introduction
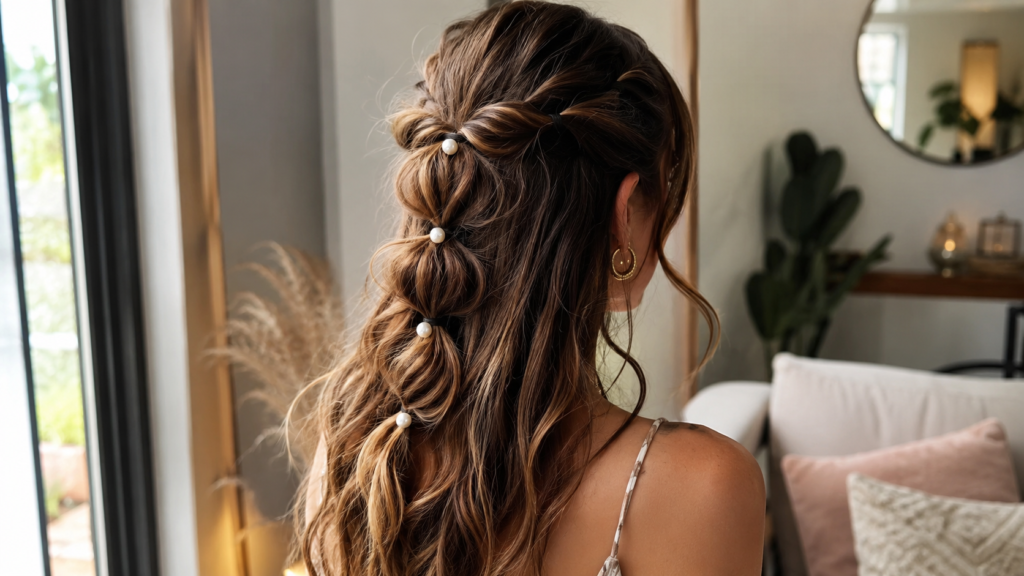
The Boho Bubble Braid Half-Up style is the ultimate blend of casual romance and modern festival glam. It combines the soft framing of loose curls with the playful texture of pulled-apart “bubbles.” This style keeps hair out of your face while showcasing your hair length, making it ideal for dancing.
Why You’ll Love This Idea
It looks insanely intricate, yet it is much easier to pull off than a traditional French or Dutch braid. It also stays secure all night long!
Materials Needed
- Heat protectant
- 1-inch curling iron
- Small clear elastic bands
- Texturizing powder or spray
- Decorative pearl hair pins
Step-by-Step Instructions
- Prep Hair: Apply heat protectant spray thoroughly across dry hair.
- Add Waves: Curl 1-inch sections of hair away from your face using a curling iron.
- Section top: Gather the top crown section of your hair from temple to temple.
- Secure Ponytail: Tie this top section with a clear elastic band at the back of your head.
- Add Elastic: Place a second clear elastic band about two inches down the ponytail.
- Create the First Bubble: Hold the second elastic and gently pinch and pull small sections of hair outwards between the two elastics to form a rounded “bubble.”
- Repeat Down the Length: Place another elastic two inches below and pancake the hair outward again to create a second bubble.
- Add Side Accents: Take a small piece of hair near your ear, twist it back, and loop it into the base of the top elastic.
- Frame Face: Pull out two thin tendrils around your cheeks to frame your face softly.
- Lock in Hold: Spray with medium-hold hairspray and insert pearl pins into the center of each bubble.
Beginner Tips
- Use texturizing powder on the ponytail before pulling the bubbles apart. This gives the hair “grip” so the bubbles hold their shape.
Common Mistakes to Avoid
- Pulling the bubbles too hard can cause the elastic to slip down or break. Use a light hand when tugging!
Styling & Decorating Ideas
- Pair this style with small dried flowers or delicate pearl clips inserted down the braid line for an ethereal fairytale look.
Best Colors & Materials
- Looks stunning on balayage or highlighted hair, as the multi-toned colors accentuate the depth of each bubble.
Detailed Details Table
| Feature | Details |
| Estimated Cost | $10 – $15 (DIY supplies) |
| Estimated Time | 20 – 30 Minutes |
| Difficulty Level | Beginner to Intermediate |
| Where it Looks Best | Open-back dresses, high necklines, boho dresses |
Pinterest-Worthy Tip
- Shoot your photos in golden-hour sunlight so the light shines through the texture of the bubbles and curls.
Conclusion
This romantic bubble braid gives you maximum viral-style points with minimal stress on dance night!
2. Sleek High Ponytail with Flippy Ends
Introduction
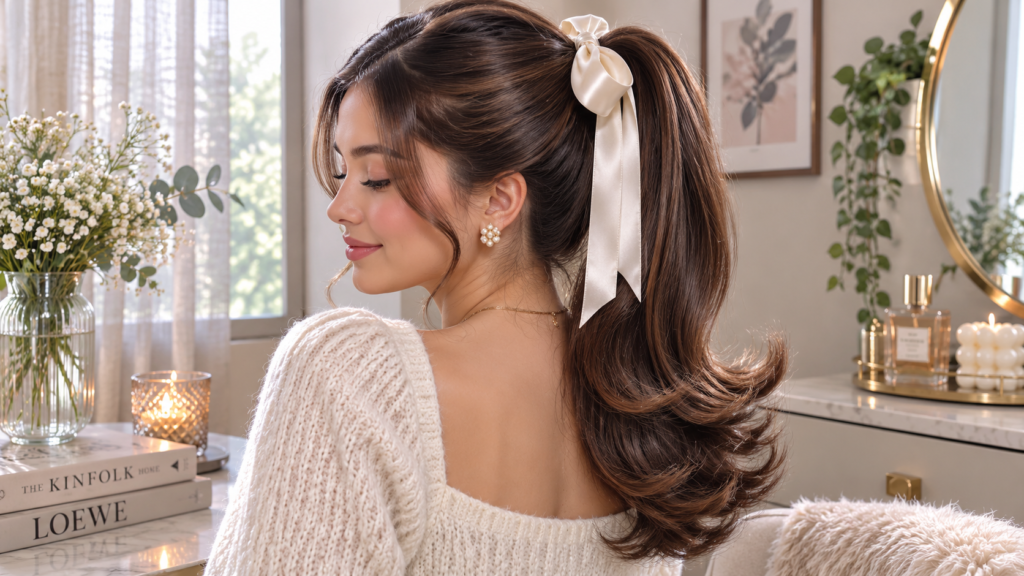
Channel retro Y2K elegance with a super smooth, high-fashion ponytail that features cute, bouncy flippy ends. This sharp look brings high energy and accentuates your cheekbones, making it a favorite for modern homecoming queens.
Why You’ll Love This Idea
It is completely windproof, sweatproof, and dance-floor proof! It also keeps your neck cool while showing off statement earrings.
Materials Needed
- Boar bristle smoothing brush
- Strong-hold hair gel or edge control
- Heavy-duty elastic band
- Flat iron
- Hair wrap elastic or bobby pins
Step-by-Step Instructions
- Blow Dry Straight: Blow dry your hair smooth using a paddle brush.
- Apply Sleek Gel: Work a small amount of smoothing gel along your roots and crown.
- Brush Upward: Use a boar bristle brush to sweep hair up toward the crown of your head.
- Tie Securely: Fasten the ponytail tightly with a heavy-duty elastic band.
- Conceal Elastic: Take a half-inch strip of hair from the bottom of the ponytail, wrap it around the elastic band, and secure it underneath with a bobby pin.
- Flat Iron Ponytail: Iron the length of the ponytail until completely smooth.
- Flip the Ends: As you reach the last two inches of the hair with the flat iron, curve your wrist upward to create a clean, 90-degree outward flip.
- Set the Curve: Hold the flipped end in your hand for three seconds while it cools to lock in the shape.
- Tame Flyaways: Use a clean toothbrush with a spritz of hairspray to smooth down baby hairs around the hairline.
- Final Shine: Finish with a light misting of high-shine aerosol spray.
Beginner Tips
- Tilt your head back slightly while securing your ponytail. This prevents loose bagging at the nape of your neck when you stand upright.
Common Mistakes to Avoid
- Using a weak hair tie. High ponytails are heavy and require strong support so they do not sag halfway through the night.
Styling & Decorating Ideas
- Wrap a velvet ribbon around the base of the ponytail for a chic aesthetic touch.
Best Colors & Materials
- Works amazingly well on dark brown, jet black, or platinum blonde hair where sleek shine really stands out.
Detailed Details Table
| Feature | Details |
| Estimated Cost | $8 – $12 |
| Estimated Time | 15 – 25 Minutes |
| Difficulty Level | Easy |
| Where it Looks Best | Strapless dresses, suit sets, glittery sequin outfits |
Pinterest-Worthy Tip
- Pose from a side angle to highlight the high lift of the pony and the sharp flip at the end.
Conclusion
Bold, sleek, and fierce, this high ponytail keeps you looking like a runway model all night.
3. Glam Hollywood Waves with Sparkly Side Clips
Introduction
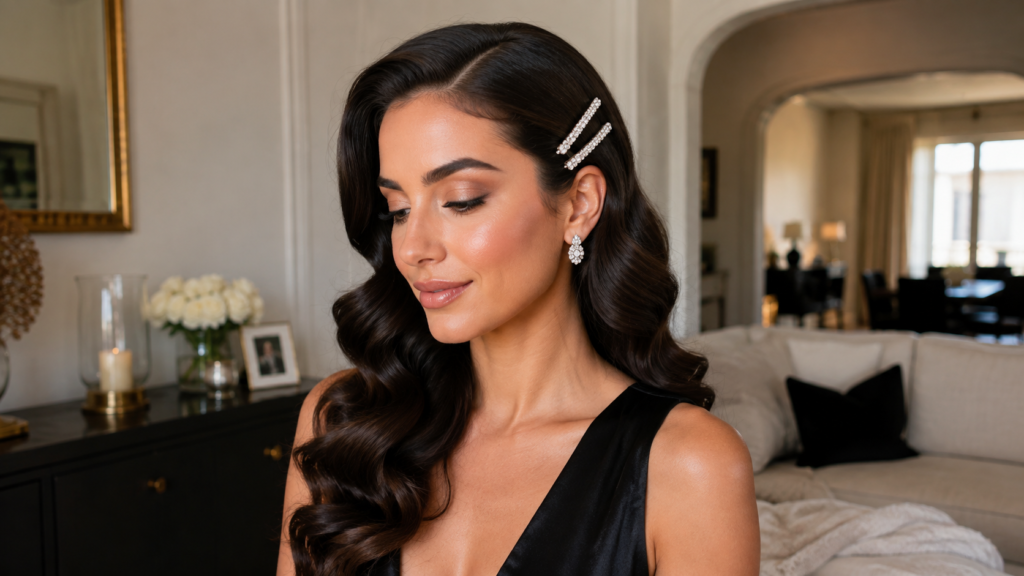
If you want timeless red-carpet glamour, Hollywood waves are the answer. This style features sleek, uniform S-waves that cascade over one shoulder, held in place by eye-catching vintage hair clips.
Why You’ll Love This Idea
It gives off high-end glam vibes that look incredible in formal portraits and group photos.
Materials Needed
- 1.25-inch curling iron
- Duckbill setting clips
- Fine-tooth comb
- Flexible hold hairspray
- Rhinestone side comb or oversized sparkle pins
Step-by-Step Instructions
- Deep Side Part: Create a deep side part aligned with the arch of your eyebrow using a comb.
- Heat Protect: Apply heat protectant spray throughout all strands.
- Curl in One Direction: Curl 1-inch sections of hair, making sure EVERY curl is wrapped in the exact same direction (toward your face).
- Pin to Cool: Pin each curl to your head using a duckbill clip while it cools down.
- Remove Clips: Once the hair is fully cool, carefully unpin all sections.
- Gently Brush Out: Brush through all curls using a paddle brush. Watch them lock together into uniform S-waves!
- Secure Sleek Side: On the side with less hair, brush hair tightly behind your ear toward the nape of your neck.
- Add Statement Clips: Slide two or three sparkling rhinestone clips vertically above your ear to lock that side down.
- Shape Front Wave: Use your fingers to mold the front wave around your forehead line.
- Set with Hairspray: Coat with a medium-hold hairspray to prevent frizz.
Beginner Tips
- Letting curls cool completely in duckbill clips is the secret to long-lasting waves! Do not skip this step.
Common Mistakes to Avoid
- Curling sections in different directions. Hollywood waves require every section to be curled the same way to form connected waves.
Styling & Decorating Ideas
- Match your rhinestone hair clips to the jewelry or dress embellishments you plan to wear.
Best Colors & Materials
- Incredible on monochromatic hair colors like rich espresso, golden blonde, or vivid red.
Detailed Details Table
| Feature | Details |
| Estimated Cost | $15 – $25 |
| Estimated Time | 35 – 45 Minutes |
| Difficulty Level | Intermediate |
| Where it Looks Best | Satin gowns, off-the-shoulder dresses, classic sweetheart necklines |
Pinterest-Worthy Tip
- Capture a close-up photo focusing on the reflection of light off the rhinestone clips and glossy waves.
Conclusion
Hollywood waves deliver pure elegance that will make your homecoming pictures look timeless for years to come.
4. Messy Low Textured Chignon Bun
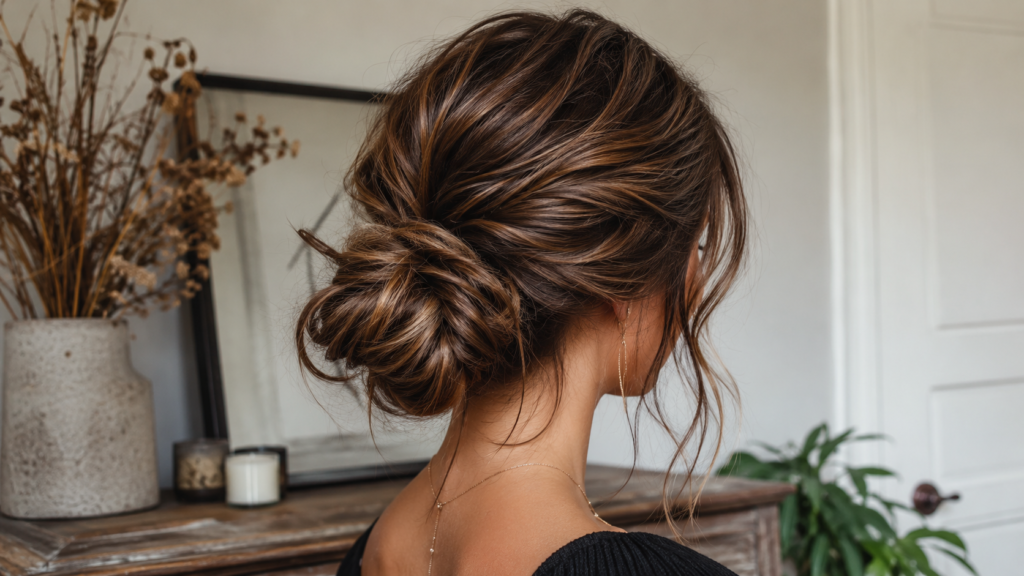
Introduction
The messy low chignon is the effortless queen of updos. It combines soft loops, delicate wisps, and touchable volume into a low bun resting comfortably near the nape of the neck.
Why You’ll Love This Idea
It works on second-day hair, takes less than 20 minutes, and stays put even during energetic dancing.
Materials Needed
- Texture powder or dry shampoo
- Hair elastics
- Open bobby pins (U-pins)
- Finishing hairspray
Step-by-Step Instructions
- Prep Texturize: Spray dry shampoo or texturizing spray into roots for instant volume.
- Leave Framing Pieces: Pull out soft tendrils around ears and forehead.
- Create Low Pony: Gather remaining hair into a low ponytail near the base of your neck.
- Loop Hair: On the final pull through the elastic, leave hair in a half-loop.
- Twist & Wrap: Take the loose tail of hair and wrap it loosely around the base loop.
- Secure with U-Pins: Tuck open U-pins into the bun to secure without flattening the texture.
- Pancake the Bun: Gently tug edges of the bun to make it fuller and messier.
- Gently Tease Crown: Lightly pull up small sections at the crown for a lifted silhouette.
- Softly Curl Face Frame: Use a wand to add a light bend to your face-framing tendrils.
- Set: Spritz lightly with flexible-hold spray.
Beginner Tips
- Use U-shaped bobby pins instead of tight flat bobby pins. They hold bun loops in place while keeping that fluffy, relaxed texture.
Common Mistakes to Avoid
- Making it too tight! The beauty of a chignon lies in its soft, relaxed shape.
Styling & Decorating Ideas
- Tuck a small botanical hair piece or pearl spray right above the bun loop.
Best Colors & Materials
- Perfect for fine hair, textured hair, and dimensional highlights.
Detailed Details Table
| Feature | Details |
| Estimated Cost | $5 – $10 |
| Estimated Time | 15 – 20 Minutes |
| Difficulty Level | Beginner |
| Where it Looks Best | High necklines, halter neck dresses, lace outfits |
Pinterest-Worthy Tip
- Take a photo from behind slightly angled over your shoulder to showcase the detail of the low bun and back design of your dress.
Conclusion
Soft, cozy, and effortlessly chic, this messy low chignon is a hassle-free go-to for homecoming night.
5. Half-Up Claw Clip Twist with Soft Curls
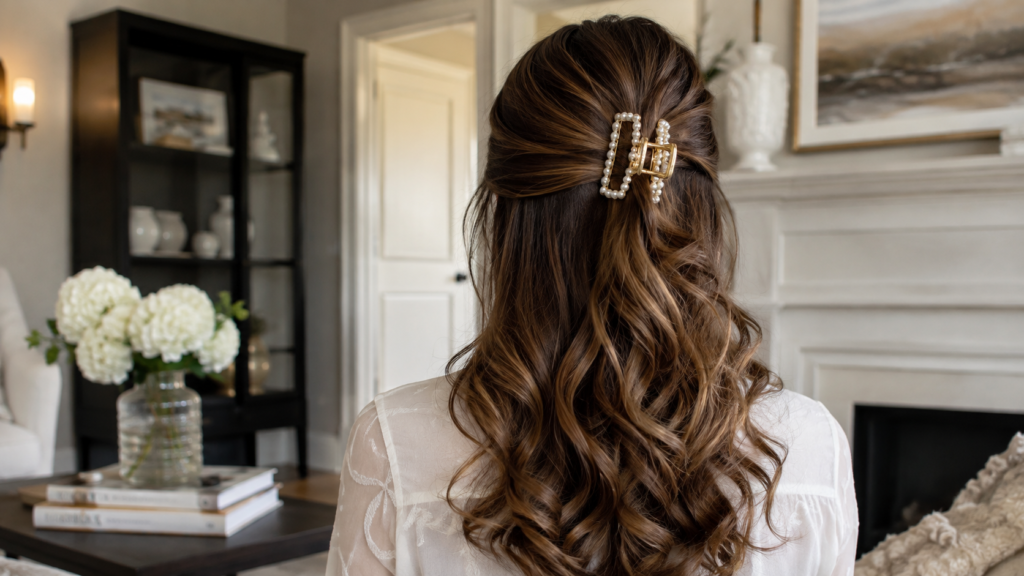
Introduction
Claw clips have taken over street style, and now they are making a huge wave in formal hair fashion! A decorated claw clip twist elevates loose curls into an effortless half-up masterpiece.
Why You’ll Love This Idea
It takes under 15 minutes and lets you change your look mid-dance if you want to let your hair completely down later!
Materials Needed
- 1-inch curling wand
- Metal or pearl claw clip
- Teasing comb
- Light hairspray
Step-by-Step Instructions
- Curl Hair: Wand-curl medium sections of hair, switching directions for a natural look.
- Tease Crown: Lightly tease the crown area for subtle height.
- Gather Half-Up: Gather upper hair from ears up into a half-ponytail shape using your hands.
- Twist Hair: Twist the gathered hair upward twice against your head.
- Clip in Place: Clamp your decorative claw clip over the twisted section, securing it against your scalp.
- Cascade Ends: Allow the curled ends of the twist to spill gently over the top of the claw clip.
- Adjust Front Volume: Gently lift front roots to ensure the top looks soft and airy.
- Frame Face: Pull down two soft pieces of hair around your face.
- Add Shine: Spray with lightweight shine mist.
- Touch Up Curls: Re-curl any ends that lost shape during twisting.
Beginner Tips
- Opt for a metal or embellished clip rather than basic matte plastic to instantly elevate the formal vibe.
Common Mistakes to Avoid
- Using a clip that is too small for your hair density. Ensure the claw teeth fully grip your hair against your scalp.
Styling & Decorating Ideas
- Pair with simple gold or silver hoop earrings to complement the claw clip hardware.
Best Colors & Materials
- Ideal for shoulder-length to long hair of all hair colors.
Detailed Details Table
| Feature | Details |
| Estimated Cost | $5 – $12 |
| Estimated Time | 10 – 15 Minutes |
| Difficulty Level | Easy |
| Where it Looks Best | Casual-chic dresses, floral homecoming dresses, A-line skirts |
Pinterest-Worthy Tip
- Shoot from a 45-degree back angle so both the decorative clip and front framing curls are visible.
Conclusion
It is quick, trendy, and stylish—proof that low-effort styles can deliver high impact.
6. Dutch Braid Crown Halo
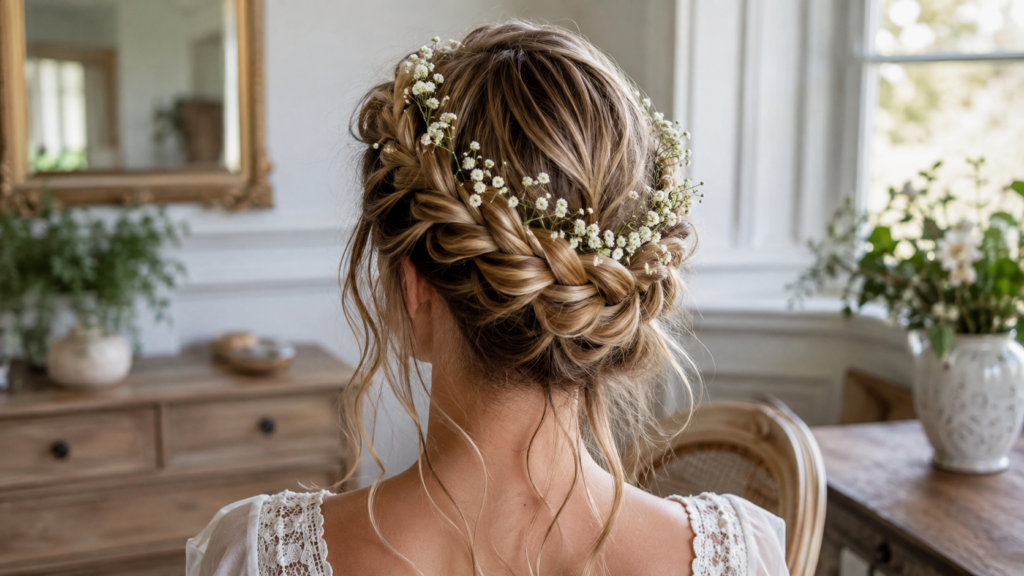
Introduction
The Dutch Braid Crown (or Halo Braid) wraps stunning braided texture around your head like a queen’s tiara. It keeps hair completely secure and elevated.
Why You’ll Love This Idea
It is completely hands-free once done! No worrying about wind, humidity, or dance floor sweat ruining your hair.
Materials Needed
- Rat-tail comb
- Clear elastics
- Bobby pins
- Strong-hold hairspray
Step-by-Step Instructions
- Center Part: Part hair down the center into two equal sections.
- Begin Left Braid: Start a Dutch braid (crossing strands under instead of over) at the nape of the neck on the left side, braiding along the hairline toward your forehead.
- Continue Braid: Continue braiding across the top of your forehead, adding hair as you go.
- Braid Right Side: Repeat on the right side, working along the edge toward the crown.
- Cross Braid Ends: Wrap the ends of both braids around to meet each other, forming a complete circle.
- Pin Hidden Ends: Tuck the tail ends underneath the opposite braid and secure with bobby pins.
- Pancake Braids: Carefully tug outward on braid stitches to double their size and thickness.
- Secure Gaps: Add extra bobby pins anywhere the braid feels loose against your head.
- Pull Tendrils: Loosen two tiny wisps near the ears for a soft finish.
- Spray to Lock: Mist thoroughly with strong-hold hairspray.
Beginner Tips
- Practice Dutch braiding on a friend or watching a mirror video a few days before the dance to get your finger rhythm down.
Common Mistakes to Avoid
- Crossing strands over instead of under. Over-braids create a French braid that lies flat; under-braids create the raised 3D Dutch look!
Styling & Decorating Ideas
- Weave tiny baby’s breath flowers or crystal pins into the braid stitches.
Best Colors & Materials
- Outstanding on highlighted or multi-tonal hair where braid weaves pop visually.
Detailed Details Table
| Feature | Details |
| Estimated Cost | $5 – $8 |
| Estimated Time | 25 – 35 Minutes |
| Difficulty Level | Advanced |
| Where it Looks Best | Fairytale gowns, tulle skirts, corset-top dresses |
Pinterest-Worthy Tip
- Take an overhead shot or direct profile photo to showcase the full halo braid circle.
Conclusion
Feel like royalty all night long with a braided halo that stays perfect from grand entry to late-night snacks.
7. Space Buns with Glitter Root Accent
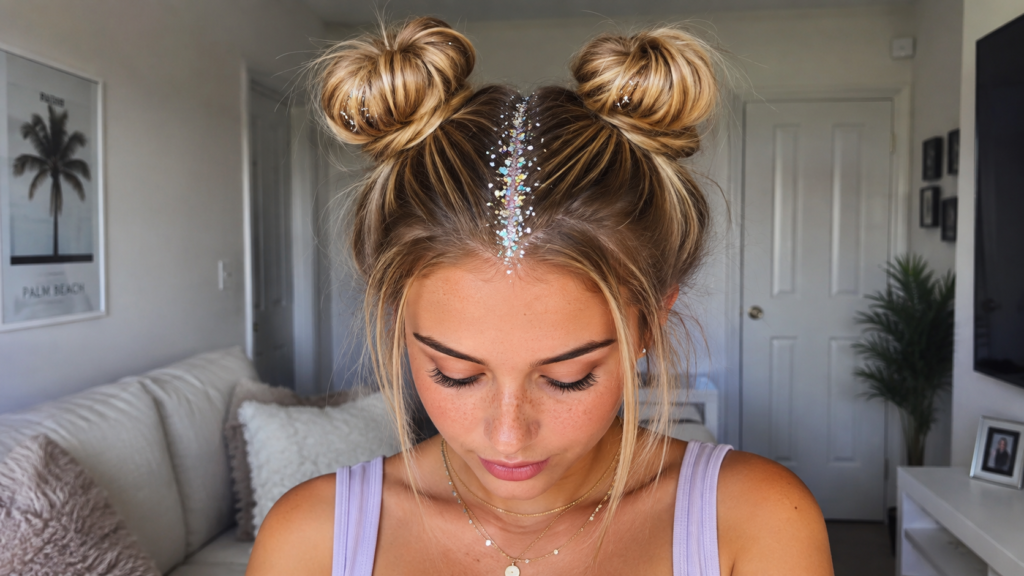
Introduction
Fun, playful, and packed with personality! Space buns bring a bold festival energy to homecoming, especially when paired with sparkly glitter roots.
Why You’ll Love This Idea
If your aesthetic is quirky, fun, and modern, space buns let you express yourself while keeping your hair totally dance-proof.
Materials Needed
- Hair elastics
- Hair gel
- Fine body glitter
- Small paint brush
- Bobby pins
Step-by-Step Instructions
- Clean Center Part: Use a rat-tail comb to make a sharp center part from forehead to neck.
- High Pigtails: Tie hair into two symmetrical high pigtails on top of your head.
- Tease Pigtails: Lightly tease each pigtail for bun volume.
- Twist into Buns: Twist one pigtail into a spiral bun and wrap around the base.
- Secure Bun: Pin tightly with bobby pins.
- Repeat Opposite Side: Create the matching bun on the other side.
- Mix Hair Glitter: Mix clear hair gel with cosmetic glitter in a small cup.
- Paint Parting Line: Paint the glitter gel mixture along your center parting line with a brush.
- Smooth Edges: Smooth down baby hairs along your hairline with gel.
- Set Style: Hairspray the buns for maximum hold.
Beginner Tips
- Use cosmetic-grade glitter only! Avoid craft glitter, which can have sharp edges that irritate your scalp.
Common Mistakes to Avoid
- Uneven bun placement. Stand directly in front of a mirror to verify both pigtail bases are at equal height before wrapping your buns.
Styling & Decorating Ideas
- Pair with metallic liquid eyeliner and star face gems to complete a cosmic glam look.
Best Colors & Materials
- Works amazingly well on pastel-dyed hair, dark hair with bright glitter contrast, or short-to-medium lengths.
Detailed Details Table
| Feature | Details |
| Estimated Cost | $8 – $15 |
| Estimated Time | 20 – 25 Minutes |
| Difficulty Level | Easy |
| Where it Looks Best | Two-piece sets, mini dresses, edgy velvet outfits |
Pinterest-Worthy Tip
- Shoot under bright natural light or ring lights so the glitter roots shimmer in high contrast.
Conclusion
Express your fun side with this unforgettable, sparkle-filled homecoming style.
16:9 Image Prompt
Ultra-realistic Pinterest-quality photography of high twin space buns with a sparkling cosmetic glitter center part, elegant styling, natural daylight, modern home decor, highly detailed textures, premium craftsmanship, cozy atmosphere, soft shadows, magazine-quality interior photography, realistic colors, ultra HD, DSLR, 16:9 aspect ratio.
8. Soft Mermaid Beach Waves with Micro-Braids
Introduction
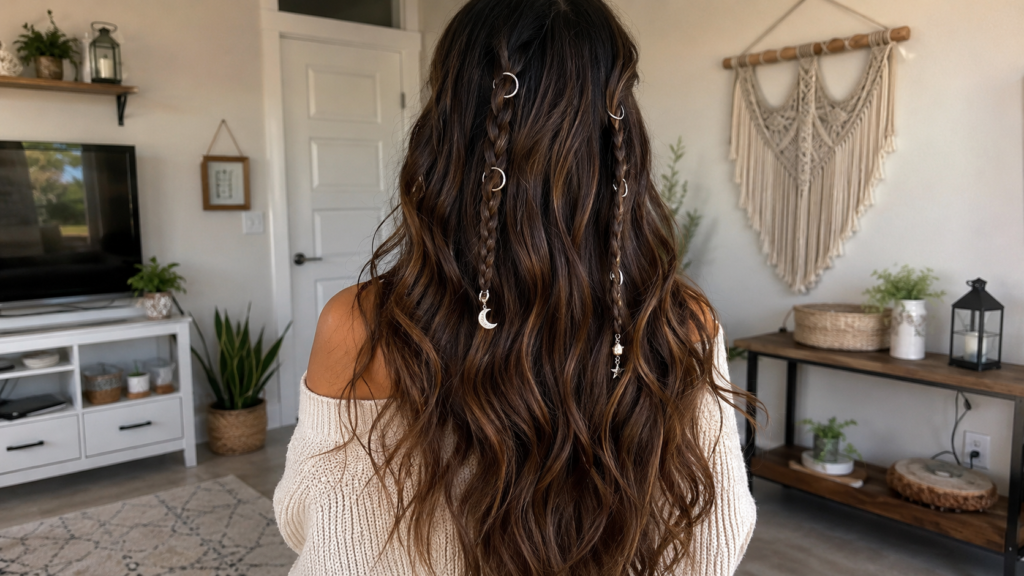
Soft mermaid waves paired with hidden micro-braids offer a relaxed boho chic look. It lets your hair flow long while adding subtle texture and braid detail throughout.
Why You’ll Love This Idea
It gives you maximum length and movement with a trendy boho twist that feels comfortable all night.
Materials Needed
- 3-barrel waver or crimping wand
- Mini micro elastics
- Sea salt spray
- Flexible hairspray
Step-by-Step Instructions
- Apply Heat Guard: Spray heat protection evenly over dry hair.
- Section Hair: Divide hair into three horizontal tiers.
- Wafe Hair: Press a 3-barrel waver down 2-inch sections from roots to ends for continuous mermaid ripples.
- Wafe All Tiers: Repeat throughout all layers of hair.
- Create Front Micro-Braid: Pick up a tiny half-inch piece near your front hairline and braid it tightly to the end.
- Secure Braid: Tie with a tiny clear micro-elastic.
- Add Random Micro-Braids: Create 3 or 4 additional thin braids randomly around the mid-layers of your hair.
- Mist Salt Spray: Spritz light sea salt spray to enhance beachy texture.
- Tousle Waves: Run fingers through waves to break up uniform patterns.
- Lock in Hold: Set with flexible-hold hairspray.
Beginner Tips
- Hold the 3-barrel waver on each section for just 4-5 seconds to keep waves soft rather than stiff crimps.
Common Mistakes to Avoid
- Making micro-braids too thick! They should be tiny subtle accents that blend smoothly into the waves.
Styling & Decorating Ideas
- Slide tiny silver hair rings onto your micro-braids for an edgy boho feel.
Best Colors & Materials
- Stunning on balayage, ombre, and long hair extensions.
Detailed Details Table
| Feature | Details |
| Estimated Cost | $10 – $20 |
| Estimated Time | 25 – 35 Minutes |
| Difficulty Level | Easy to Intermediate |
| Where it Looks Best | Flowy chiffon dresses, floral prints, slip dresses |
Pinterest-Worthy Tip
- Capture candid shots in motion—like walking or spinning—so the waves and micro-braids catch air and movement.
Conclusion
Beachy, beautiful, and full of texture, this mermaid style guarantees effortless beauty all evening long.
Expert Decorating & Styling Tips for Homecoming Hair
To make sure your hair stays dance-proof and camera-ready, follow these professional stylist tips:
- Wash Hair the Day Before: Freshly washed hair is often too slippery to hold pins, braids, or curls. Wash your hair 24 hours prior so natural oils give it grip.
- Prep with Texture: Always apply texturizing spray or dry shampoo to your roots before styling. This provides immediate volume that does not collapse under heavy dancing.
- Match Hair Accessories to Jewelry: If you are wearing silver jewelry, opt for silver clips or pearl accessories. If your outfit features warm gold accents, choose gold pins or clips to maintain a cohesive look.
- Carry a Mini Emergency Touch-Up Kit: Pack a small pouch in your purse with extra bobby pins, clear elastics, travel-sized hairspray, and a small comb for quick bathroom touch-ups.
Budget-Saving Tips for Homecoming Hairstyles
You do not need to spend $100+ at a salon to look incredible for homecoming. Try these smart budget hacks:
- Host a Pre-Hoco Hair Party: Get together with two or three friends before the dance. You can braid each other’s hair, share curling irons, and save money together!
- Shop Accessories at Craft Stores: Pearl pins, velvet ribbons, and floral clips are often 70% cheaper at craft stores compared to beauty boutiques.
- Use Multi-Purpose Products: Invest in a good heat protectant that also offers medium hold and shine so you buy fewer individual products.
- Rent or Borrow Hot Tools: If you do not own a 3-barrel waver or high-end curling wand, ask a friend or family member if you can borrow theirs for the weekend.
Frequently Asked Questions (FAQs)
1. How can I make my homecoming curls last all night?
To make curls last, apply a hold mousse to damp hair before blow drying, use heat protectant, and pin each curl up with a clip until it cools completely. Finish with a strong-hold aerosol hairspray.
2. What is the best hairstyle for short hair for homecoming?
A half-up claw clip twist, soft mermaid waves, or a side-pinned glam style with pearl clips look amazing on pixie cuts, bobs, and shoulder-length hair.
3. Should I wash my hair on the morning of homecoming?
It is usually best to wash your hair the night before. Second-day hair holds styles, braids, and updos much better than silky, freshly washed hair.
4. How do I match my hairstyle to my dress neckline?
- High/Halter Necklines: Look best with updos like a high pony or low chignon to show off the dress details.
- Strapless/Sweetheart Necklines: Look gorgeous with down styles like Hollywood waves or half-up styles.
5. Can I achieve these styles without expensive hot tools?
Yes! You can create heatless waves by sleeping in satin braid rods or rope twists overnight, then adding accessories in the morning.
6. How do I keep flyaways smooth without making my hair look greasy?
Spritz a clean toothbrush or spoolie brush with light hairspray and gently brush baby hairs into place along your hairline.
7. How long before the dance should I start doing my hair?
Give yourself at least 1.5 to 2 hours for hair and makeup. Starting early eliminates stress if you need to adjust a braid or re-curl a strand.
8. What hair accessories are trending for homecoming this season?
Pearl decorative bobby pins, metallic claw clips, silk ribbons, and subtle rhinestone side combs are dominating Pinterest boards this year.
Final Thoughts
Homecoming is your time to shine, celebrate with friends, and make lasting memories. Whether you choose a dramatic sleek high ponytail, a dreamy boho bubble braid, or classic glam Hollywood waves, the key is choosing a style that makes you feel confident and comfortable.
By following these simple step-by-step guides, prepping your hair properly, and using the right tools, you can create a salon-quality look right in your own bedroom on a budget.
📌 Save This to Pinterest!
Loved these trendy Hoco hairstyles? Don’t lose these ideas! Click the Pin button below to save this guide directly to your Homecoming Inspiration, DIY Hairstyles, or Fall Fashion board on Pinterest so you can reference it when getting ready on dance night!