Introduction
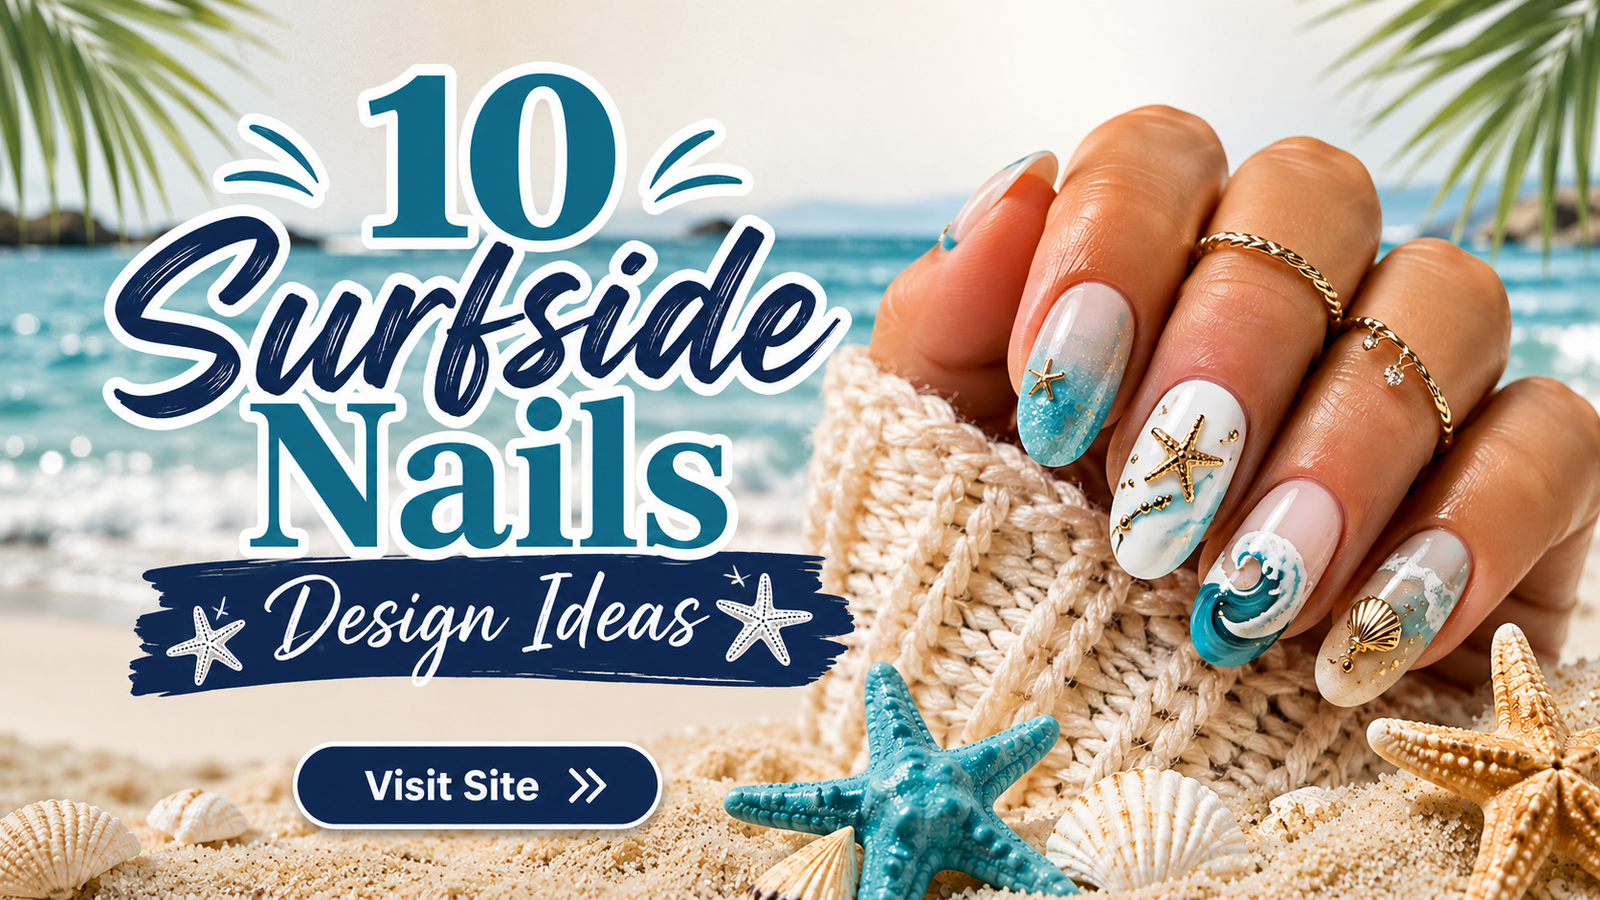
Nothing captures the effortless beauty of summer quite like ocean waves, sun-soaked beaches, and cool coastal breezes. If you want to bring those relaxing beach vacation vibes right to your fingertips, you are going to fall in love with surfside nails design ideas.
Surfside nails are all about capturing the fluid motion of sea foam, the warm glisten of golden sand, and the crisp blues of rolling ocean tides. Whether you are heading off on a tropical getaway, lounging poolside, or simply dreaming of sandy shores from your desk, sea-inspired manicure designs are the ultimate way to refresh your style.
In recent seasons, beach nail art has evolved beyond basic solid turquoise polishes or simple palm tree decals. Today’s surfside manicures blend modern techniques like 3D gel water droplets, shimmering chrome powder, elegant negative space, and soft gradient ombré to create wearable works of art. The best part? You do not need to be a professional nail technician or spend a fortune at a luxury nail salon to recreate these breathtaking looks. With a few basic tools, a steady hand, and a splash of creativity, you can achieve salon-quality beach nails right in the comfort of your own home!
In this ultimate guide, we will explore 8 detailed, Pinterest-worthy surfside nail art ideas. Each tutorial comes complete with a full list of materials, easy-to-follow step-by-step instructions, beginner tips, common mistakes to avoid, and styling suggestions. Get ready to ride the beauty wave and discover your next favorite manicure!
Why This Trend Is Popular
Beach-inspired nail art continues to dominate Pinterest feeds and Instagram reels every single year. But why has the surfside nail trend captured the hearts of beauty enthusiasts worldwide?
- Instant Mood Booster: Coastal colors like ocean blue, seafoam green, and sandy beige evoke feelings of warmth, calm, and relaxation. Looking down at your hands provides a mini mental escape to the seaside.
- Incredible Versatility: Surfside nails suit every nail shape and length! From short natural square nails to long almond acrylics, sea-themed designs scale beautifully.
- Creative Freedom: You can go as subtle or as bold as you like. Choose a minimal wave accent nail for office-friendly elegance, or go all-out with 3D shell textures and pearl accents for festival season.
- Highly Photogenic: Beach manicures are tailor-made for social media! Whether you are holding a cold coconut drink or snapping a photo against sea foam, these nails look stunning in photos.
Materials and Tools Needed
To create a professional surfside manicure at home, having the right supplies on hand makes all the difference. Here is a master list of essential tools you will want in your nail art kit:
| Category | Essential Items |
| Prep & Care | Cuticle pusher, nail file (180/240 grit), buffer block, isopropyl alcohol or nail dehydrator |
| Base & Top Coats | Base coat, no-wipe glossy top coat, matte top coat, clear 3D builder gel |
| Nail Polishes | Sky blue, navy blue, crisp white, pastel turquoise, nude/sandy beige, gold shimmer |
| Art Tools | Fine detail liner brushes, dotting tools, cosmetic makeup sponge (for ombré) |
| Accents & Powders | White sea foam blooming gel, pearl chrome powder, tiny gold starfish studs, flatback pearls |
| Equipment | UV/LED nail lamp (for gel polish users), lint-free wipes |
Safety Tips for DIY Nail Art
Before diving into the creative tutorials, keep these safety practices in mind for healthy, strong natural nails:
- Work in a Well-Ventilated Area: Ensure proper airflow when using nail polish, acetone, or UV gels to avoid inhaling fumes.
- Avoid Skin Contact with Uncured Gel: When working with gel products, clean off any gel touching your cuticles before curing under the UV/LED light to prevent skin irritation or allergies.
- Never Peel Off Gel Polish: Always remove gel polish correctly using acetone wraps. Peeling off polish strips away layers of your natural nail plate.
- Protect Your Cuticles: Apply a nourishing cuticle oil daily after finishing your nail art to keep your skin hydrated and free from hanging skin.
Idea 1: Foamy Ocean Wave Accent Nails
Overview
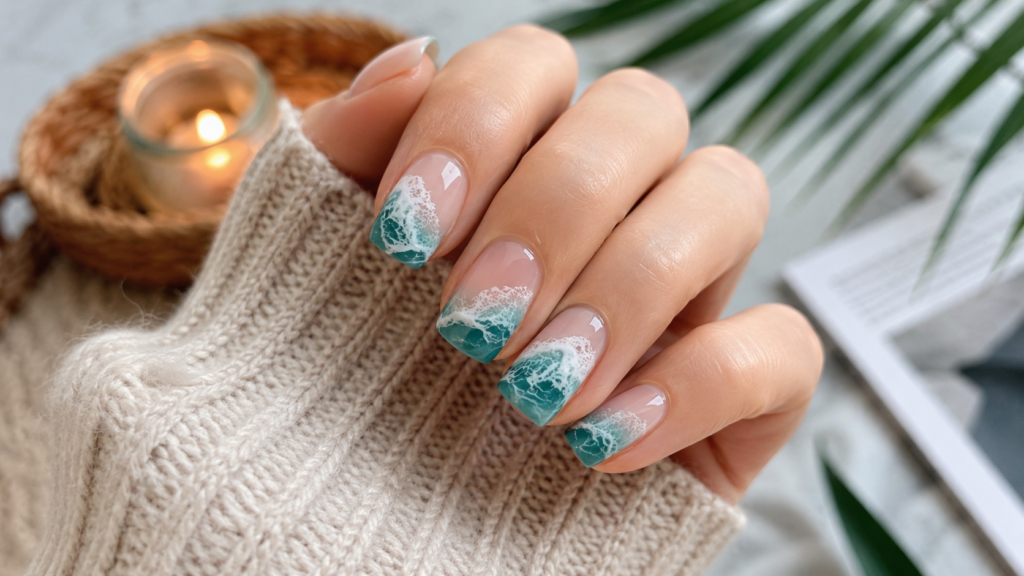
Bring the gentle swell of ocean waves to your fingertips with this classic foamy water design. By layering shades of deep ocean blue with sheer white foam effects, this look gives the realistic appearance of water breaking on the shore.
       _____
      /     \    <-- Sheer Sky Blue Base
     |  ~~   |   <-- Deep Ocean Blue Swirls
     | ~~~~  |   <-- White Foamy Splatters (Blooming Gel Effect)
     \_____/
Why You’ll Love This Idea
It strikes the perfect balance between artistic sophistication and effortless beach vibes. The movement of the waves means imperfection actually makes it look more natural!
Materials Needed
- Nude or sheer pink base polish
- Ocean blue gel polish
- Crisp white gel polish
- Blooming gel (or isopropyl alcohol spray technique)
- Fine detail liner brush
- UV/LED lamp and glossy top coat
Step-by-Step Instructions
- Prep the Nail: Clean, file, and buff your nails into an almond shape. Apply a thin layer of base coat and cure for 60 seconds.
- Apply Base Shade: Paint two thin coats of sheer nude polish as your neutral background. Cure each coat.
- Draw the Sea Base: Paint a diagonal curved band of ocean blue polish across the top half of your accent nail. Do not cure yet.
- Blend for Depth: Soften the edge of the blue polish using a dry brush to create a smooth gradient toward the base of the nail. Cure for 30 seconds.
- Apply Blooming Gel: Spread a thin layer of clear blooming gel over the blue section (do not cure).
- Add Foam Lines: Dip a fine liner brush into white polish and draw thin wavy lines across the wet blooming gel. Watch as the white polish spreads to mimic sea foam.
- Detail the Crest: Add tiny white dots along the wave edges using a dotting tool for extra dimension.
- Cure and Seal: Cure under the LED light for 60 seconds. Seal the entire design with a high-shine top coat and cure again.
Beginner Tips
- If you do not have blooming gel, mix a drop of white polish with a drop of clear top coat on a palette to create a sheer, flowy texture.
Common Mistakes to Avoid
- Overloading the brush: Too much white polish will bleed together and lose the delicate wave structure.
Styling & Decorating Ideas
- Pair this wave accent nail with solid pastel turquoise on your other fingers for a balanced look.
Best Colors & Materials
- Deep sapphire, clear blooming gel, seafoam green, and bright white.
Project Details
- Estimated Cost: $12 – $18 (DIY kit supplies)
- Estimated Time: 35 minutes
- Difficulty Level: Intermediate
- Where It Looks Best: Medium to long almond or coffin nails.
Pinterest-Worthy Tip: Take a close-up photo holding a shell against natural sunlight to highlight the glossy water depth!
Conclusion
This foamy wave design delivers authentic coastal magic without requiring professional painting skills. It is an instant head-turner that feels fresh all summer long.
Idea 2: Shimmering Golden Sand & Sea Gradient
Overview
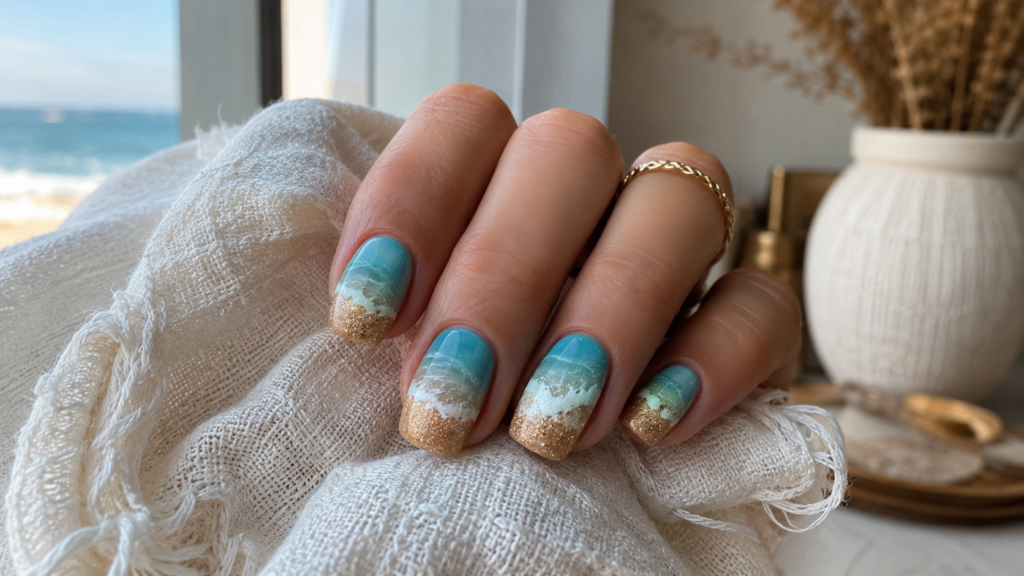
This design captures the exact moment where soft golden sand meets the turquoise tide. Using a simple makeup sponge gradient, you can transition smoothly from shimmering nude sand to sparkling tropical blue water.
Why You’ll Love This Idea
Gradient ombré nails are super flattering because they visually elongate your fingers while giving you a sun-drenched beach look.
Materials Needed
- Fine gold shimmer or glitter polish
- Sandy nude cream polish
- Bright turquoise blue polish
- Latex tape or barrier cream
- Triangular wedge makeup sponge
- Glossy top coat
Step-by-Step Instructions
- Prep & Protect: Prep your nails and apply skin barrier tape around your cuticles to make cleanup easy.
- Apply Base Color: Paint all nails with one to two coats of sandy nude polish as your base foundation. Allow to dry thoroughly.
- Load the Sponge: Stripe sandy nude polish, golden shimmer polish, and turquoise blue polish side-by-side onto a latex makeup sponge.
- Dab the Ombré: Gently dab the sponge onto your nail in a soft tapping motion. Repeat 2–3 times for full color intensity.
- Add Golden Sparkle: While the gradient is still tacky, lightly dust extra fine gold glitter at the base of the nail to represent sunlit sand.
- Clean Up Edges: Peel away the latex tape and clean up any excess polish along the cuticles using a brush dipped in acetone.
- Seal with Top Coat: Apply a generous layer of plump top coat to smooth out the sponge texture and create a glass-like finish.
Beginner Tips
- Dampen your makeup sponge slightly with water before applying polish so the sponge does not absorb all your polish.
Common Mistakes to Avoid
- Pressing too hard: Pressing the sponge down aggressively can create harsh lines instead of a seamless gradient.
Styling & Decorating Ideas
- Wear this look with delicate gold stackable rings and casual linen beachwear.
Best Colors & Materials
- Beach nude, warm metallic gold, bright turquoise, and clear top coat.
Project Details
- Estimated Cost: $8 – $15
- Estimated Time: 25 minutes
- Difficulty Level: Beginner
- Where It Looks Best: Short to medium oval or square nails.
Pinterest-Worthy Tip: Tilt your hand under direct sunlight so the gold shimmer catches the rays on camera!
Conclusion
The golden sand gradient is an effortless, beachy style that beginners can master on their very first try.
Idea 3: 3D Textured Seashell Empress Nails
Overview
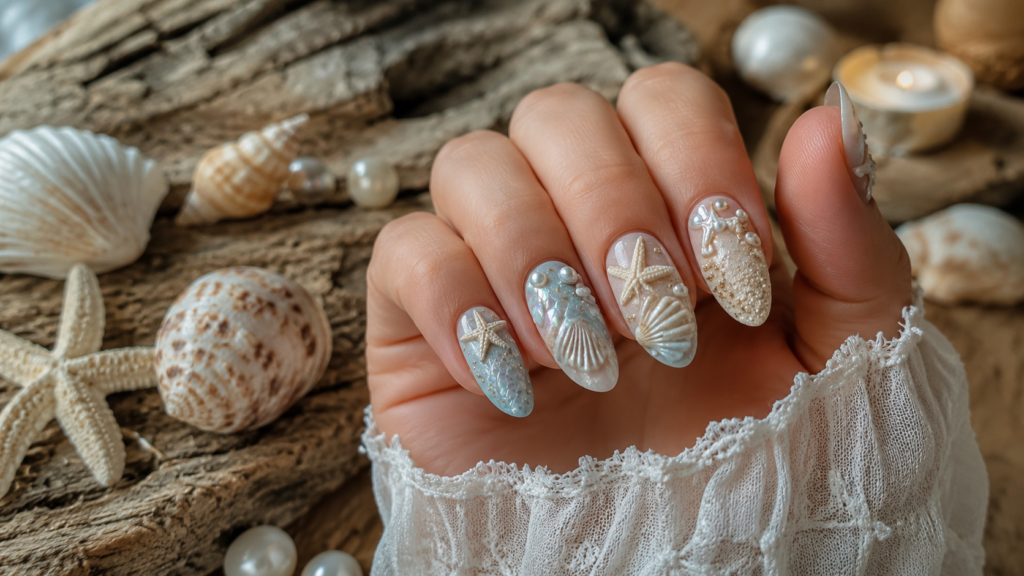
Step up your nail game with tactile 3D seashell ridges! Using clear builder gel over a pearlescent background, you can sculpt realistic shell grooves that feel amazing to touch.
       .---.
      /  || \    <-- Sculpted 3D Gel Ridges
     |   ||  |   <-- Pearlescent Chrome Finish
     |  /||\ |   <-- Tiny Pearl at Base
      '-----'
Why You’ll Love This Idea
3D shell nails look like they were crafted by a high-end luxury salon artist, yet the sculpting technique is remarkably simple to learn.
Materials Needed
- Iridescent white polish or white chrome powder
- Hard clear 3D builder gel or gel art resin
- Fine liner brush
- Tiny flatback pearl embellishments
- UV/LED lamp
Step-by-Step Instructions
- Apply Pearl Base: Apply two coats of sheer white polish, dust with white pearl chrome powder, and cure.
- Mark the Origin: Place a tiny dot of clear gel near the base center of your nail—this is where your shell ridges will branch out.
- Sculpt First Ridge: Dip a fine liner brush into thick builder gel. Draw a raised line from the base dot up to the top tip of the nail.
- Flash Cure: Cure under your LED lamp for 10 seconds to freeze the gel shape in place.
- Draw Additional Ridges: Draw 3 to 4 more curved gel lines fanning outward like a natural scallop shell.
- Final Cure: Cure the completed 3D shell lines for a full 60 seconds.
- Attach Pearl Accent: Place a tiny drop of rhinestone glue at the bottom center of the shell and set a miniature pearl into it.
- Top Coat Protection: Carefully coat the ridges with top coat using a thin detail brush so you don’t fill in the grooves.
Beginner Tips
- Use a high-viscosity (thick) builder gel so the 3D ridges do not flatten out before you cure them.
Common Mistakes to Avoid
- Filling in the gaps: Applying top coat too thickly will flood the valleys between ridges, erasing the 3D effect.
Styling & Decorating Ideas
- Keep this as a single focal feature nail on your ring finger with sheer pearl polish on the surrounding nails.
Best Colors & Materials
- Mother-of-pearl chrome, clear builder gel, miniature white pearls.
Project Details
- Estimated Cost: $15 – $25
- Estimated Time: 45 minutes
- Difficulty Level: Advanced
- Where It Looks Best: Medium-length almond or coffin shapes.
Pinterest-Worthy Tip: Capture a macro video showing your fingers tracing the raised shell ridges to drive massive engagement!
Conclusion
3D seashell nails are the crown jewel of coastal nail art, turning your hands into a stunning sea-inspired showpiece.
Idea 4: Matte Sea Glass Coastal Minimalist
Overview
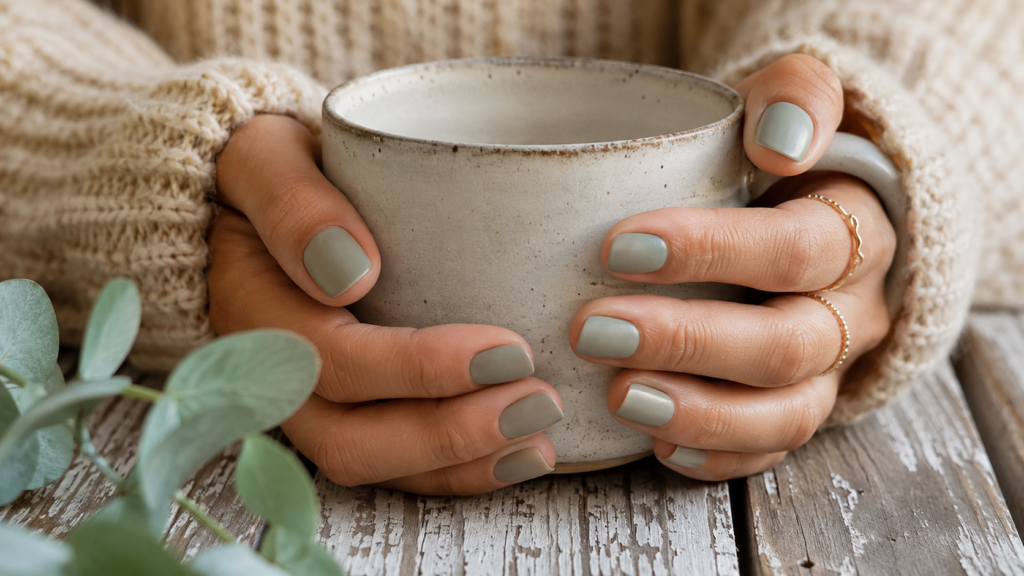
Inspired by smooth, frosted sea glass tumbled by the ocean waves, this design features muted shades of sage, soft teal, and frosted blue topped with an ultra-velvety matte finish.
Why You’ll Love This Idea
If you prefer clean, understated, and modern aesthetics over glitter and shine, matte sea glass nails offer an ultra-sophisticated look.
Materials Needed
- Pastel mint green polish
- Muted dusty sea blue polish
- Frosted white or pale teal polish
- Premium velvet matte top coat
- Dehydrator/Prep kit
Step-by-Step Instructions
- Nail Preparation: Ensure your nail surface is thoroughly buffed and clean; matte top coats highlight any surface bumps.
- Apply Base Coat: Coat nails with a protective base layer and cure.
- Paint Muted Tones: Paint each nail in alternating muted sea glass colors—mint, pale seafoam, dusty blue, and soft aqua.
- Apply Second Layer: Apply a second thin coat of each color for complete opacity.
- Optional Wave Outline: Using a sheer white polish, draw a subtle geometric wave line across one nail for a minimal touch.
- Apply Matte Top Coat: Paint every nail with a velvety matte top coat.
- Cure Fully: Cure under your LED lamp for 60 to 90 seconds to unleash the soft-touch frosted effect.
Beginner Tips
- Wipe away the inhibition layer with isopropyl alcohol after curing to reveal the true velvety finish.
Common Mistakes to Avoid
- Skipping buffing: Matte finish highlights ridges, so spend extra time buffing your natural nails smooth first.
Styling & Decorating Ideas
- Complements minimalist silver jewelry, matte white ceramic mugs, and cozy oversized knits.
Best Colors & Materials
- Sage green, seafoam, dusty sky blue, frosted mint, matte top coat.
Project Details
- Estimated Cost: $10 – $15
- Estimated Time: 20 minutes
- Difficulty Level: Beginner
- Where It Looks Best: Short natural square or squoval nails.
Pinterest-Worthy Tip: Flat-lay your nails next to authentic pieces of frosted sea glass on a distressed wooden table!
Conclusion
Matte sea glass nails are soft, modern, and delightfully low-maintenance while exuding high-end aesthetic appeal.
Idea 5: Tropical Turquoise Marble & Gold Leaf
Overview
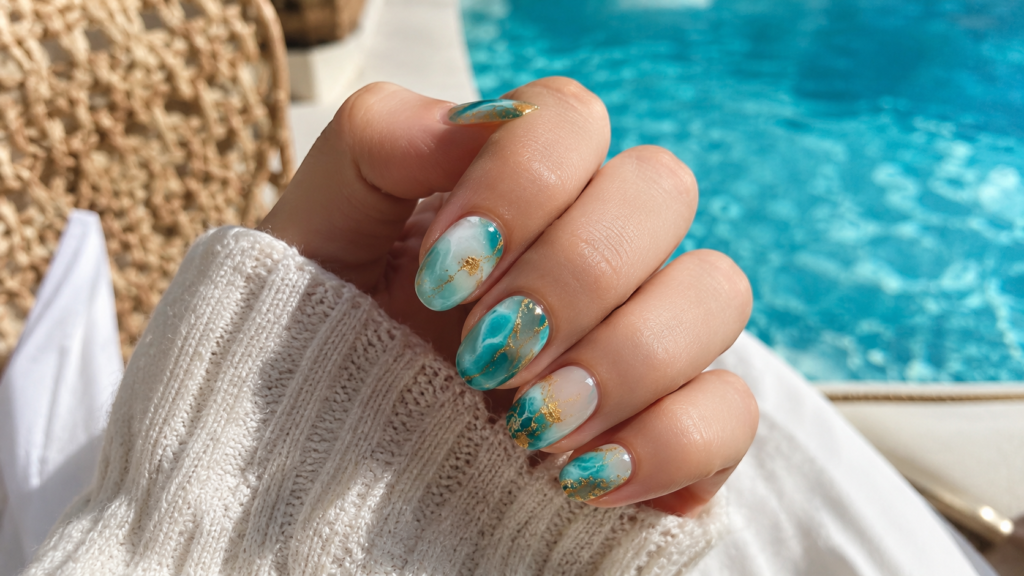
Recreate the mesmerizing swirling patterns of natural turquoise gemstones infused with shimmering veins of raw gold leaf.
Why You’ll Love This Idea
Marble designs look complex and luxurious, but using the plastic wrap or fluid drop technique makes it surprisingly easy to master at home.
Materials Needed
- Bright turquoise polish
- Dark teal polish
- White polish
- Flaky gold leaf foil
- Plastic cling wrap
- Fine detail brush
Step-by-Step Instructions
- Foundation: Paint nails with two coats of vibrant turquoise polish and let dry/cure.
- Prepare Paint Palette: Place random dots of dark teal, bright white, and turquoise polish onto a piece of foil.
- Crumple Plastic Wrap: Ball up a small piece of plastic cling wrap.
- Dab and Marble: Dab the crumpled wrap into the mixed polishes, then gently stamp it onto your nail plate to transfer the vein patterns.
- Refine Veins: Use a fine liner brush dipped in thin white polish to draw delicate fluid cracks across the marble.
- Apply Gold Leaf: Dab tiny flakes of gold leaf foil onto the wet marble veins using tweezers or a silicone tool.
- Seal with Polish: Seal the textured foil and marble design with two generous coats of glossy top coat.
Beginner Tips
- Less is more with gold foil! Small accents create an elegant look without overpowering the marble.
Common Mistakes to Avoid
- Over-smudging: Stamping the plastic wrap too many times will mix colors into a muddy brown shade.
Styling & Decorating Ideas
- Pair with boho gold rings, turquoise stone cuffs, and summer resort dresses.
Best Colors & Materials
- Rich turquoise, white cream, dark teal, genuine gold leaf foil.
Project Details
- Estimated Cost: $12 – $20
- Estimated Time: 30 minutes
- Difficulty Level: Intermediate
- Where It Looks Best: Medium-length almond or oval shapes.
Pinterest-Worthy Tip: Photograph your hand outdoors against a clear swimming pool background for incredible color pop!
Conclusion
Turquoise marble nails offer a rich gemstone finish that brings instant elegance and beachy sophistication to your hands.
Idea 6: Pearlescent Ocean Mermaid Chrome
Overview
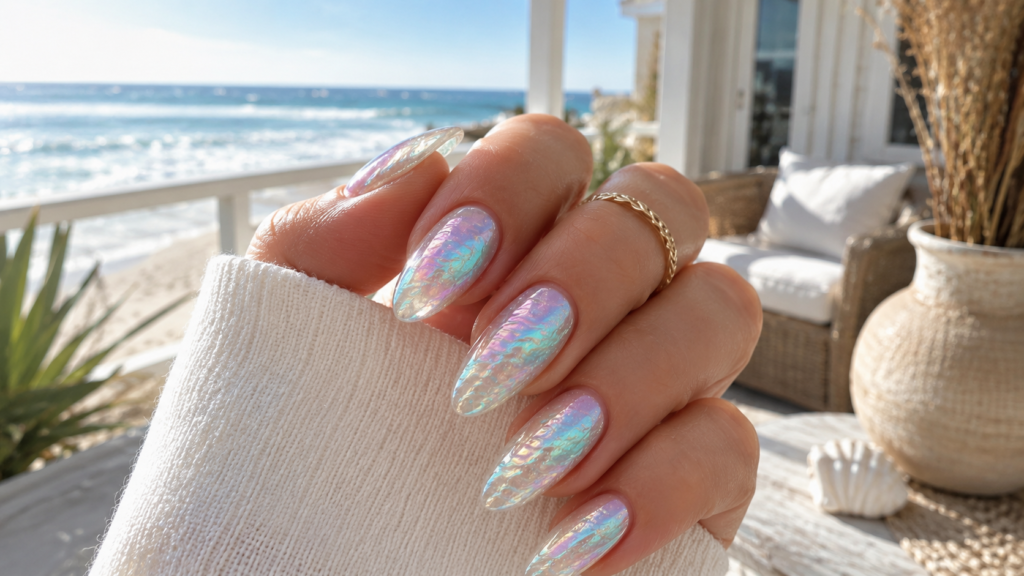
Capture the mystical gleam of mermaid scales with iridescent pearl chrome powder rubbed over soft aquatic blue hues.
      .------.
     /  /  \  \   <-- Pearlescent Chrome Reflection
    |  |  |  |  |  <-- Aquatic Aqua/Lavender Base
     \  \  /  /   <-- High-Shine Glazed Finish
      '------'
Why You’ll Love This Idea
Chrome nails reflect sunlight in breathtaking rainbow shifts, creating a trendy “glazed donut” look with a cool ocean spin.
Materials Needed
- Pale lavender or seafoam blue gel polish
- No-wipe chrome top coat
- Pearl white or mermaid aurora chrome powder
- Eyeshadow applicator sponge
- Soft dust brush
Step-by-Step Instructions
- Apply Aquatic Base: Paint your nails with a light lavender-blue shade and cure.
- Apply Special Top Coat: Coat with a specialized no-wipe top coat and cure under LED for exactly 30 seconds (it must remain slightly warm).
- Buff Chrome Powder: Dip an eyeshadow sponge into aurora chrome powder and firmly rub it onto the nail until a mirror finish appears.
- Dust Excess: Use a fluffy soft brush to gently sweep away unattached chrome dust around the cuticles.
- Cap the Free Edge: Apply top coat over the entire nail, paying special attention to seal the front edge to prevent chipping.
- Final Cure: Cure for a full 60 seconds under your LED lamp.
Beginner Tips
- Pay attention to cure time! If your top coat cures too long, the chrome powder will not stick properly.
Common Mistakes to Avoid
- Touching with bare fingers: Natural skin oils will smudge the unsealed chrome mirror shine.
Styling & Decorating Ideas
- Looks incredible with pearl hair slides, silk blouses, and delicate silver jewelry.
Best Colors & Materials
- Light pastel blue, aurora chrome powder, no-wipe gel top coat.
Project Details
- Estimated Cost: $15 – $22
- Estimated Time: 20 minutes
- Difficulty Level: Beginner to Intermediate
- Where It Looks Best: Almond, coffin, or long oval nails.
Pinterest-Worthy Tip: Shoot a short video clipping through soft sunlight to demonstrate the iridescent color shift!
Conclusion
Mermaid chrome nails deliver maximum visual drama with minimal effort, making them a must-try for modern trendsetters.
Idea 7: Realistic 3D Water Droplet Nails
Overview
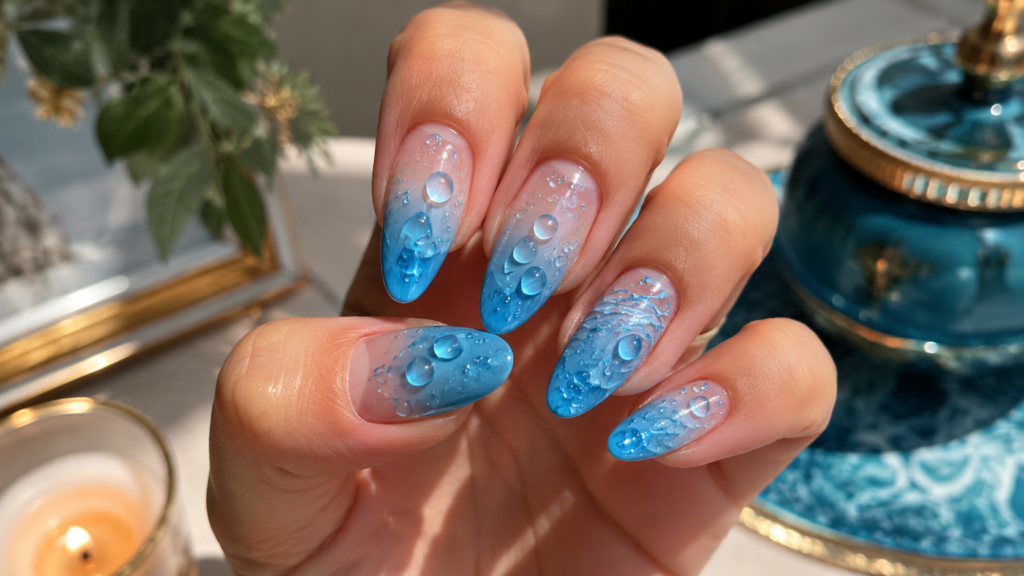
Imagine stepping out of the ocean with fresh dew-like water drops glistening on your nails. This artistic design uses clear gel drops over a glossy ocean wave gradient.
Why You’ll Love This Idea
It is a fun optical illusion! The 3D water drops look completely wet and liquid even after they are fully dried and cured under the light.
Materials Needed
- Ocean gradient gel base (Blue & Turquoise)
- Thick non-wipe builder gel or top coat
- Medium dotting tool
- UV/LED lamp
Step-by-Step Instructions
- Create Base Gradient: Apply a ocean blue gradient base on your nails, seal with a top coat, and cure completely.
- Load Dotting Tool: Dip the ball tip of a dotting tool into thick non-wipe builder gel.
- Deposit Water Drops: Touch the tool onto the nail surface to deposit round, raised droplets of clear gel.
- Vary Drop Sizes: Create a realistic look by placing a mix of tiny dots and larger droplets across the nail.
- Freeze the Gel: Immediately flash cure under a mini LED torch for 5 seconds so the droplets keep their rounded shape.
- Full Cure: Place your entire hand in the UV/LED lamp for 60 seconds to lock in the 3D drops.
Beginner Tips
- Work on one or two fingers at a time so the raised builder gel droplets do not level out before curing.
Common Mistakes to Avoid
- Using thin top coat: Thin top coats will flatten out and lose their round droplet shape before you can cure them.
Styling & Decorating Ideas
- Pair with casual beachwear, denim shorts, and bright summer swimwear.
Best Colors & Materials
- Deep ocean blue, clear thick builder gel, dotting tools.
Project Details
- Estimated Cost: $10 – $18
- Estimated Time: 25 minutes
- Difficulty Level: Intermediate
- Where It Looks Best: Any length; works fantastically on short natural nails!
Pinterest-Worthy Tip: Take macro photos using a smartphone macro lens attachment to highlight the realistic light refraction inside each drop!
Conclusion
3D water droplet nails are refreshingly unique, interactive, and guaranteed to spark conversations wherever you go.
Idea 8: Coastal Chic Shell Charm French Tips
Overview
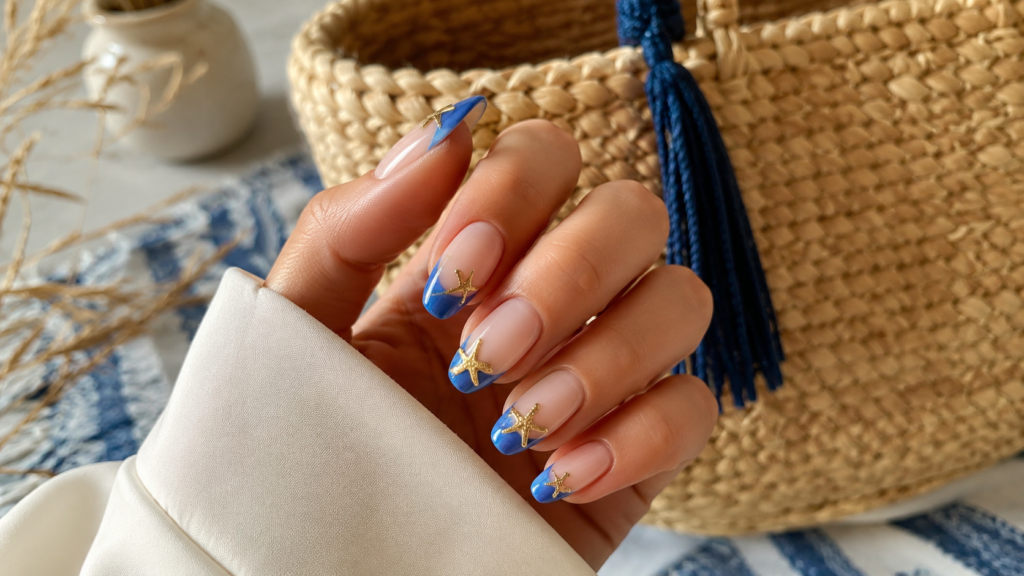
A fresh, summer twist on the classic French manicure! Swap traditional white tips for crisp ocean blue arches adorned with tiny gold starfish and sea turtle charms.
Why You’ll Love This Idea
It offers the timeless elegance of a traditional French tip while incorporating cute beach elements that feel fun and seasonal.
Materials Needed
- Sheer nude/pink base polish
- Navy or royal blue polish
- French tip guide stickers or striping tape
- Miniature gold metal sea charms (starfish, shell, turtle)
- Nail rhinestone glue
Step-by-Step Instructions
- Base Coat Prep: Paint all nails with two coats of sheer nude polish to create a clean, classic base.
- Apply French Guides: Place smile-line guide stickers near the free edges of your nails.
- Paint Blue Tips: Paint the exposed tips with vivid ocean blue polish. Peel stickers off while polish is still wet.
- Prep Charm Placement: Dab a dot of strong nail glue near the smile line on your chosen accent nail.
- Set the Charm: Pick up a miniature gold starfish charm with tweezers and press it firmly into the glue.
- Seal Edges: Use a fine liner brush to run clear gel around the edges of the charm to prevent it from snagging on hair or clothes.
- Top Coat Seal: Apply glossy top coat over all nails and cure.
Beginner Tips
- Bend metal charms gently over a pencil prior to application so they match the natural curve of your nail bed.
Common Mistakes to Avoid
- Using weak glue: Regular top coat will not hold metal charms long; always use dedicated rhinestone glue or gem gel.
Styling & Decorating Ideas
- Pair with classic nautical navy-and-white striped tops, crisp white linen pants, and woven straw bags.
Best Colors & Materials
- Sheer pink, deep navy blue, gold metal starfish charms.
Project Details
- Estimated Cost: $12 – $20
- Estimated Time: 35 minutes
- Difficulty Level: Intermediate
- Where It Looks Best: Medium square or coffin nails.
Pinterest-Worthy Tip: Frame your nails against a rattan beach tote bag for that high-end Pinterest summer vibe!
Conclusion
Coastal French tips deliver refined, sophisticated elegance that bridges everyday wear with beach holiday style.
Comparison of All 8 Surfside Ideas
To help you decide which look to try first, here is a quick side-by-side comparison matrix:
| Design Idea | Skill Level | Est. Time | Key Feature | Best Nail Shape |
| 1. Foamy Ocean Wave | Intermediate | 35 mins | Blooming gel water foam | Almond / Coffin |
| 2. Golden Sand Gradient | Beginner | 25 mins | Soft sponge ombré | Short Square / Oval |
| 3. 3D Seashell Empress | Advanced | 45 mins | Sculpted builder gel ridges | Almond / Stiletto |
| 4. Matte Sea Glass | Beginner | 20 mins | Soft-touch frosted finish | Short Natural |
| 5. Turquoise Marble | Intermediate | 30 mins | Real gold leaf veining | Medium Almond |
| 6. Mermaid Chrome | Beginner-Int | 20 mins | Iridescent rainbow shift | Long Coffin |
| 7. 3D Water Droplets | Intermediate | 25 mins | Dewy raised gel dots | All Shapes |
| 8. Coastal French Tips | Intermediate | 35 mins | Navy tips & starfish charms | Square / Squoval |
Expert Decorating & Nail Care Tips
To keep your coastal manicure looking fresh, shiny, and chip-free for up to three weeks, follow these professional insider tips:
- Dehydrate Before Painting: Wipe your bare nails with 70% isopropyl alcohol or acetone to remove all natural oils before applying your base coat.
- Cap Your Edges: Always run your polish brush along the front edge (free edge) of your nail. This seals the polish layer and prevents lifting when typing or washing dishes.
- Reapply Top Coat Every 4 Days: Extend the life of your nail art by painting a fresh layer of quick-dry top coat every few days to protect against dulling and scratches.
- Nourish Cuticles Daily: Massage cuticle oil into your skin twice a day. Hydrated cuticle beds prevent hangnails and promote faster, healthier nail growth.
Budget-Saving Tips for Home Nail Artists
You do not need to spend hundreds of dollars at a salon to enjoy luxury surfside nails. Here is how to keep your nail art hobby affordable:
- Repurpose Household Items: Use a crumpled piece of plastic kitchen wrap for marble designs, or an old makeup sponge for perfect gradient ombré!
- Build a Versatile Color Palette: Invest in five core shades—white, nude, ocean blue, turquoise, and gold. You can mix these shades together on a palette to create dozens of custom hues.
- Buy Charm Sets in Bulk: Purchase multipacks of sea charms and chrome powders online rather than individual pots; bulk sets cost up to 70% less per unit.
- Use DIY Dotting Tools: No dotting tools? No problem! The flat end of a bobby pin or a toothpick works as a substitute for making water drops and polka dots.
Frequently Asked Questions (FAQs)
Q1: How long do DIY surfside gel nails usually last?
When properly prepped with dehydrator and sealed along the edges, a DIY gel manicure will typically last between 14 to 21 days without chipping or peeling.
Q2: Can I create these designs using regular nail polish?
Yes! Most designs (like the sand gradient, matte sea glass, and coastal tips) work great with regular air-dry polish. However, 3D textured designs like water droplets and seashell ridges require UV/LED builder gel to build volume.
Q3: What is blooming gel, and is it necessary for wave designs?
Blooming gel is a clear wet gel coat that causes any color painted over it to spread out automatically. While helpful for creating foamy ocean effects, you can achieve a similar look by spraying alcohol onto wet white polish or mixing polish with top coat.
Q4: Will chrome powder stick to regular nail polish?
Chrome powder sticks best to cured no-wipe gel top coat. If using regular polish, wait until the top coat is nearly dry (tacky to touch), rub the chrome powder on gently, and seal immediately with a water-based top coat.
Q5: How do I remove 3D builder gel without damaging my nails?
Gently file down the top 3D ridges with a nail file to reduce thickness. Then wrap cotton soaked in 100% pure acetone over the nail with aluminum foil for 15 minutes before gently sliding off the softened gel with a wooden cuticle stick.
Q6: What nail shape looks best with ocean-themed art?
Almond and coffin nail shapes work beautifully for long flowing designs like waves and chrome, while short squoval shapes look amazing with matte sea glass and subtle gradients.
Q7: How do I stop gold metal charms from catching on my clothes?
After glueing your charm down, use a fine liner brush dipped in clear builder gel or top coat to trace around the edges of the charm, filling in any gaps between the charm and your nail.
Q8: What can I use instead of gold leaf foil?
You can substitute gold leaf foil with a fine gold glitter polish applied lightly using a fan brush or a small piece of a sea sponge.
Final Thoughts
Surfside nail designs offer a delightful, creative outlet to celebrate summer vibes, ocean beauty, and coastal style right at home. From soft frosted matte finishes to dramatic 3D sea shell ridges, there is a sea-inspired manicure to match every style, skill level, and occasion.
Remember, nail art is an art form—imperfections in your waves and water drops only add to the natural, organic beauty of the ocean theme! Grab your favorite shades of blue and gold, gather your tools, and enjoy bringing these beachy ideas to life.
Pin This Idea!
Love these surfside nail ideas?
Don’t forget to save this article to your favorite Beach Style or DIY Nail Art board on Pinterest so you have fresh inspiration ready for your next manicure day! 📌