
Introduction
Heading back to school means fresh notebooks, new outfits, and of course, a fresh set of gorgeous nails! Whether you are heading back to high school hallways or walking across a college campus, having clean, cute, and stylish nails is one of the easiest ways to boost your confidence. You do not need to spend hundreds of dollars at a luxury nail salon to achieve that flawless aesthetic. With simple DIY tools and a little bit of practice, you can create salon-quality designs right at your study desk.
The term basic back to school nails does not mean boring. In fact, “basic” in modern nail trends stands for clean, effortless, minimalist, and timeless designs that complement every outfit in your wardrobe. From classic pastel French tips to minimal micro-hearts and trendy butter yellow accents, low-maintenance manicures are taking over Pinterest boards this academic year. School dress codes, busy class schedules, and budget limits call for manicures that are quick to paint, easy to maintain, and resistant to chipping.
In this ultimate guide, we will break down the most viral back-to-school nail trends, essential tools every nail DIYer needs, expert safety tips, and eight ultra-detailed step-by-step manicures you can easily recreate at home. Grab your favorite polish, set up a comfortable workstation, and let us get your nails school-ready!
Why This Trend Is Popular
Minimalist and cute basic nails are exploding on social media platforms like Pinterest and TikTok for several practical and aesthetic reasons:
- Versatility: Minimalist designs like nude bases, simple dots, or thin line art match every school outfit, from cozy hoodies to styled varsity jackets.
- Dress Code Friendly: Many high schools and dress codes have strict rules regarding length or flashy accessories. Basic short-to-medium nails keep you stylish without breaking school guidelines.
- Durability: Short, natural, and neatly painted nails are far less likely to break during physical education class, typing on laptop keyboards, or digging through heavy backpacks.
- Time-Saving: Busy students do not have hours to spend in a salon chair every two weeks. These simple DIY designs take under thirty minutes to complete.
- Cost-Effective: Doing your own nails at home costs a fraction of salon prices, allowing you to save your money for school supplies and fall wardrobe pieces.
Materials and Tools Needed
To achieve a professional, long-lasting manicure at home, having the right setup makes all the difference. Here is your essential nail prep and design kit:
| Tool / Material | Purpose |
| Nail Clipper & Glass File | Shapes nails precisely without causing split edges |
| Cuticle Pusher & Oil | Preps the nail bed and nourishes surrounding skin |
| Rubbing Alcohol / Dehydrator | Cleans off natural oils for maximum polish adhesion |
| Base Coat & Top Coat | Protects natural nails and seals art with high shine |
| Pastel & Neutral Polishes | Provides clean background colors (nudes, pinks, soft yellows) |
| Dotting Tool & Fine Liner Brush | Creates precise dots, line art, French tips, and hearts |
| Nail Art Tape / Guides | Helps beginners achieve crisp, clean geometric lines |
Safety Tips for DIY Nail Art
Before diving into your manicure, keep these key safety and hygiene tips in mind:
- Work in a Well-Ventilated Area: Always paint your nails in a room with good airflow or open window to avoid inhaling polish fumes.
- Never Cut Cuticles Aggressively: Gently push cuticles back with a wooden stick or rubber pusher. Cutting cuticles can introduce bacterial infections.
- Avoid Contact with Skin: When using gel polishes or UV lights, keep uncured gel off your skin to prevent allergic reactions.
- Sanitize Your Tools: Clean nail clippers, files, and dotting tools with isopropyl alcohol before and after each use.
8 Detailed DIY Back To School Nail Ideas
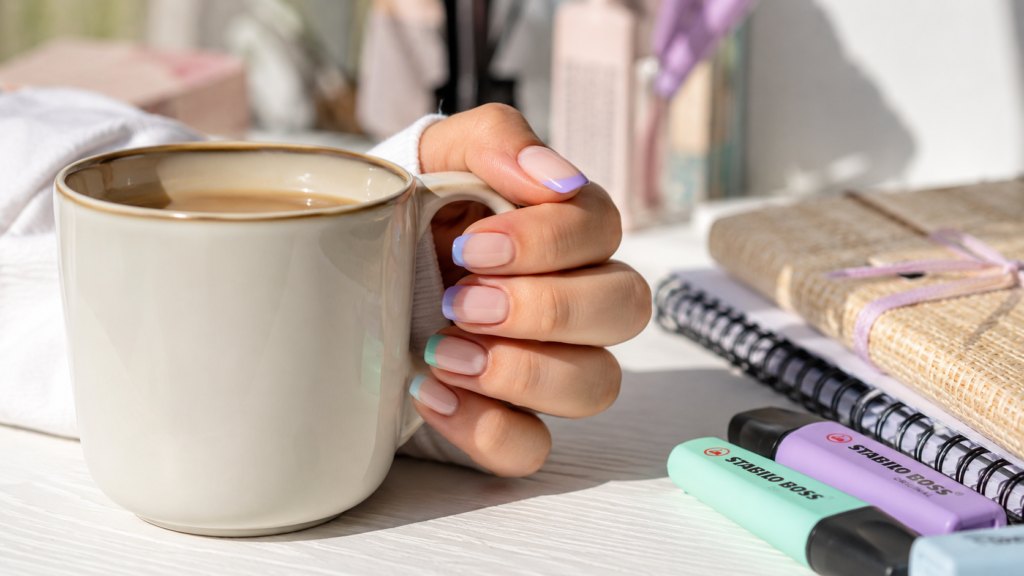
Idea 1: Classic Pastel French Tips
Short Introduction
Upgrade the classic white French manicure with soft, dreamy pastel shades. This look adds a playful twist while remaining clean and classic enough for everyday class attendance.
Why You’ll Love This Idea
Pastel tips give you a pop of playful color without feeling overwhelming. They grow out seamlessly, meaning your nails will still look fresh even after two weeks of classes.
Materials Needed
- Sheer pink or nude base polish
- Pastel nail polishes (lavender, soft blue, mint, peach, butter yellow)
- Fine detail nail brush or silicone stamper
- High-gloss top coat
Step-by-Step Instructions
- Shape nails into a tidy squoval or oval shape using a fine-grit glass file.
- Push cuticles back gently and wipe each nail with rubbing alcohol to remove natural oils.
- Apply one thin layer of base coat and let it dry completely for 2 minutes.
- Apply two thin coats of sheer nude or soft pink base polish, drying between coats.
- Dip your fine detail brush into your chosen pastel polish shade.
- Carefully sweep a thin curve across the free edge of your nail, following your natural smile line.
- Repeat the pastel tip for all five fingers, using a different pastel shade for each finger if desired.
- Let the tips dry for 3 to 5 minutes.
- Seal the entire nail with a generous layer of quick-dry shiny top coat.
- Finish by applying hydrating cuticle oil around the base of your nails.
Beginner Tips
If hand-drawing tips feels scary, roll a blob of polish onto a silicone nail stamper and gently press the tip of your finger into it at a 45-degree angle.
Common Mistakes to Avoid
- Making the French tip line too thick, which can visually shorten your nails.
- Skipping the edge capping step with your top coat, leading to premature tip wear.
Styling Ideas
Pair these cute pastel tips with cozy oversized cardigans, denim jackets, and aesthetic canvas tote bags.
Best Colors and Materials
- Colors: Creamy lavender, baby blue, matcha green, pastel peach.
- Finish: Glossy cream polish.
Estimated Cost
$5 – $10 (using polishes you likely already own).
Estimated Time
20–25 minutes.
Difficulty Level
Easy / Beginner-friendly.
Where It Looks Best
Short to medium oval or almond-shaped natural nails.
Pinterest-Worthy Tip
Photograph your hands holding an iced coffee cup or pastel highlighter set under bright, natural daylight.
Conclusion
Pastel French tips are an effortless entry into back-to-school beauty. They are classic, subtle, and guarantee complement compliments during study sessions!
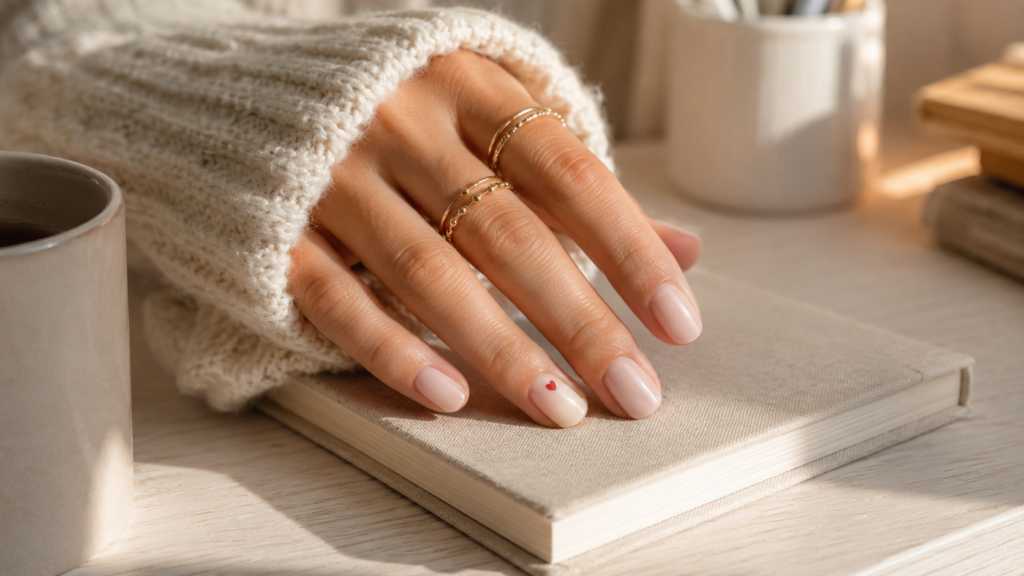
Idea 2: Minimalist Micro Accent Hearts
Short Introduction
Micro nail art is having a huge moment! Adding tiny, delicate hearts near the cuticle line creates an ultra-sweet, clean aesthetic that takes less than fifteen minutes.
Why You’ll Love This Idea
It is subtle, sweet, and incredibly easy to achieve even if you claim to have shaky hands.
Materials Needed
- Milky white or translucent nude polish
- Cherry red or chocolate brown polish for the micro-hearts
- Small dotting tool or toothpick
- Protective shiny top coat
Step-by-Step Instructions
- File nails clean and round, then push back cuticles.
- Clean nail surfaces with rubbing alcohol.
- Apply one protective coat of base polish.
- Paint two coats of milky white or neutral nude polish as your clean canvas.
- Place a tiny droplet of red or brown polish on a clean piece of foil or paper.
- Dip the tip of a small dotting tool (or toothpick) into the colored polish.
- Place two tiny dots side by side near the base of one accent nail.
- Drag the bottom of the two dots down together in a V-shape to create a tiny heart.
- Repeat on one or two accent nails per hand.
- Allow the hearts to dry fully for 3 minutes.
- Apply top coat smoothly over the entire nail without pressing too hard.
Beginner Tips
Practice making two or three micro hearts on a piece of paper towel before touching your actual nail to gauge the right pressure.
Common Mistakes to Avoid
- Using too much polish on the dotting tool, which creates a messy blob instead of a tiny heart.
- Dragging the top coat aggressively, which causes the red polish to smudge across your nude base.
Styling Ideas
Looks gorgeous when paired with minimal gold ring stacks and cozy knit sweaters.
Best Colors and Materials
- Colors: Sheer beige base with dark cherry red, forest green, or black accent hearts.
Estimated Cost
$3 – $7.
Estimated Time
15 minutes.
Difficulty Level
Very Easy.
Where It Looks Best
Short, natural square or round nails.
Pinterest-Worthy Tip
Pose your hand resting flat on top of a leather-bound journal showing off your minimal gold jewelry.
Conclusion
Micro heart manicures prove that less is truly more. It adds just enough personality to your hands while staying completely minimalist.
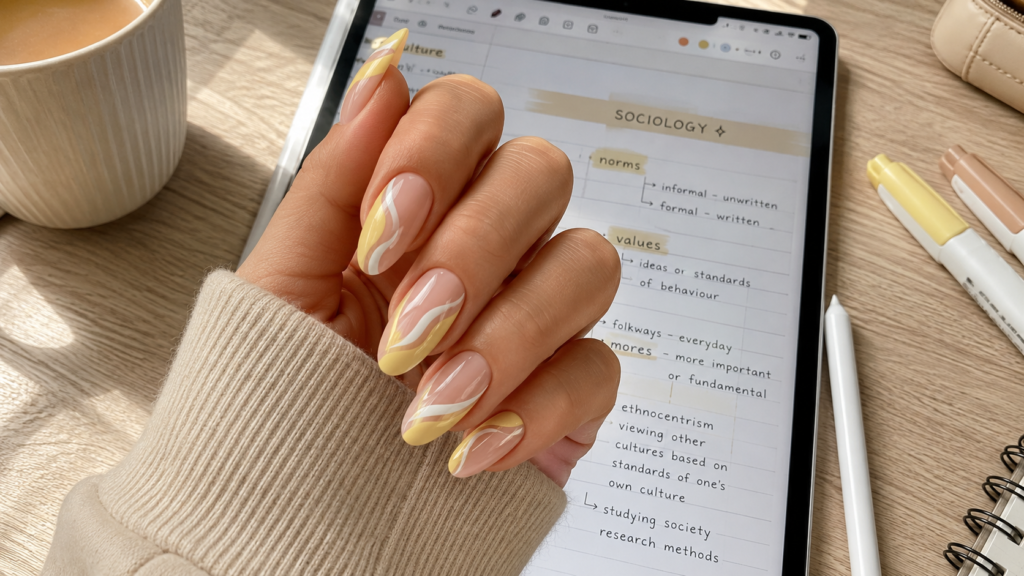
Idea 3: Trendy Butter Yellow Swirls
Short Introduction
Butter yellow is officially the soft neutral color of the season. Swirling this creamy pastel tone across a bare nail base creates a trendy modern aesthetic.
Why You’ll Love This Idea
Abstract swirls do not require precision or symmetry. Every single nail turns out unique, removing the stress of painting perfect lines!
Materials Needed
- Clear or sheer beige base coat
- Butter yellow pastel polish
- Crisp white polish
- Long fine liner nail brush
Step-by-Step Instructions
- Shape nails into a smooth oval or almond shape.
- Apply base coat and follow with one coat of sheer beige polish.
- Dip your fine liner brush into the butter yellow polish.
- Paint an organic, curvy, wavy line diagonally across your nail from top right to bottom left.
- Fill in one side of the wave or add a secondary thin line running parallel to it.
- Clean your liner brush and dip it into crisp white polish.
- Accent the butter yellow swirl with a thin white line hugging its edge.
- Allow the art to set for 4 minutes.
- Seal with a high-shine quick-dry top coat.
- Hydrate with cuticle oil.
Beginner Tips
Keep your arm resting firmly on a table while painting swirls to keep your hand steady and relaxed.
Common Mistakes to Avoid
- Overthinking the wave pattern; organic curves look best when painted in single fluid strokes.
Styling Ideas
Complements warm autumn outfits, cream totes, and casual denim jeans effortlessly.
Best Colors and Materials
- Colors: Butter yellow, soft cream white, nude base.
Estimated Cost
$5 – $10.
Estimated Time
20 minutes.
Difficulty Level
Easy.
Where It Looks Best
Medium length almond or squoval nails.
Pinterest-Worthy Tip
Capture your nails holding an aesthetic yellow highlighter or matching lemon-infused water bottle on a clean white desk.
Conclusion
Butter yellow swirls bring a cheerful, trendy vibe to your back-to-school wardrobe while remaining effortlessly modern.
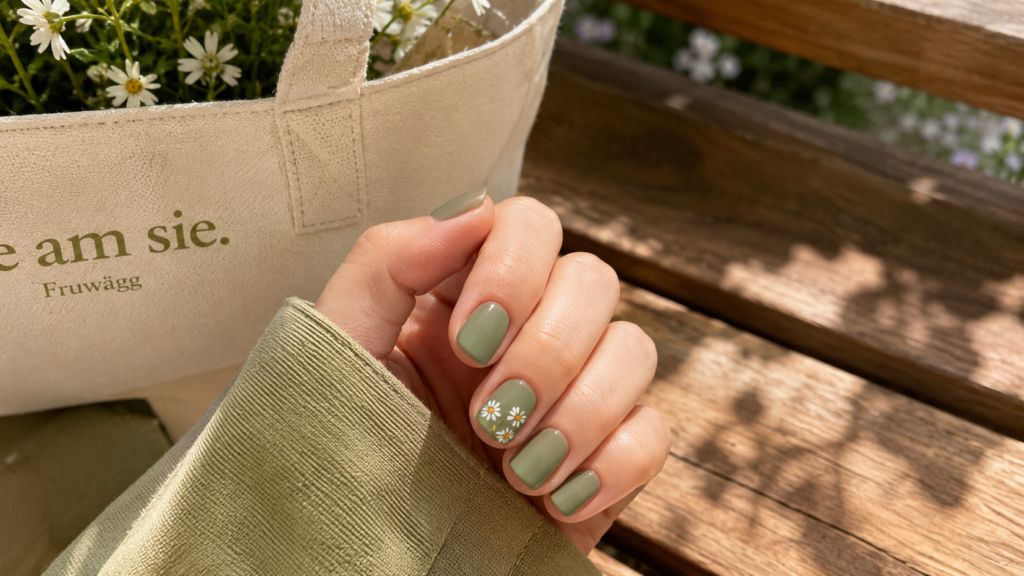
Idea 4: Cute Matte Daisy Accent Nails
Short Introduction
Bring cheerful floral energy into the classroom with simple dot-flower daisies on a matte pastel background.
Why You’ll Love This Idea
Daisies are the easiest flowers to paint using just a dotting tool, and the velvety matte finish makes them look like high-end salon art.
Materials Needed
- Soft pastel green or lavender polish
- Bright yellow polish
- Crisp white polish
- Dotting tool
- Matte top coat
Step-by-Step Instructions
- File and prepare nail beds with an alcohol wipe.
- Apply a protective base coat.
- Paint two coats of your favorite soft pastel green or lavender polish on all nails.
- Let dry completely for 3 minutes.
- Dip the larger end of your dotting tool into yellow polish and place a small center dot on your accent nail.
- Clean the tool, dip the smaller end into white polish, and place 5 tiny dots surrounding the yellow center dot to form flower petals.
- Paint 2 to 3 daisies per accent nail.
- Let the flower art dry for 4 minutes.
- Apply a velvet matte top coat over all nails.
- Allow the matte finish to air dry completely to see the velvety transformation.
Beginner Tips
Space your petal dots slightly apart initially; as the polish levels out, they will connect into realistic petal shapes.
Common Mistakes to Avoid
- Applying matte top coat before the flower dots are completely dry, which causes smearing.
Styling Ideas
Looks adorable with embroidered tote bags, floral canvas sneakers, and cozy thrifted sweaters.
Best Colors and Materials
- Colors: Sage green, butter yellow, optic white, matte finish.
Estimated Cost
$6 – $12.
Estimated Time
25 minutes.
Difficulty Level
Easy to Intermediate.
Where It Looks Best
Short or medium rounded natural nails.
Pinterest-Worthy Tip
Take a top-down photo holding a fresh flower or resting your hand on a floral pattern textbook.
Conclusion
Matte daisy nails offer a charming, youthful aesthetic that feels like a warm spring day even during early morning study sessions.
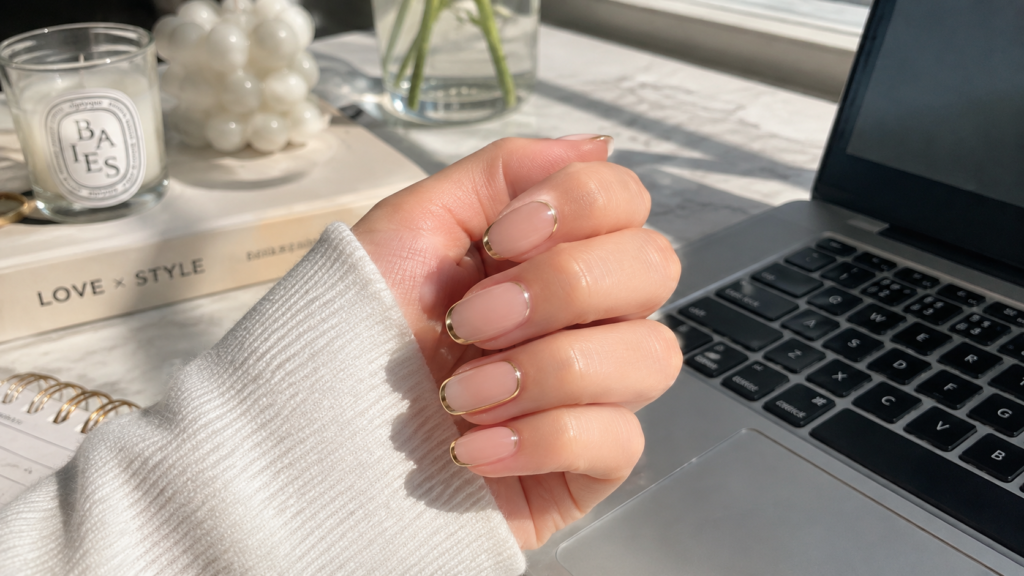
Idea 5: Elegant Nude & Gold Chrome Lines
Short Introduction
If you prefer a sophisticated, grown-up look for high school seniors or college students, subtle metallic gold lines on a clean nude base are perfection.
Why You’ll Love This Idea
This manicure looks remarkably expensive, takes very little time, and elevates every single outfit instantly.
Materials Needed
- Milky nude or beige polish
- Metallic gold liner polish (or gold chrome powder with gel topcoat)
- Thin striping brush
- Glossy gel-look top coat
Step-by-Step Instructions
- Shape nails into sleek squoval shapes.
- Apply base coat followed by two coats of classic nude polish.
- Dip your thin striping brush into metallic gold polish.
- Draw a clean, minimal straight or diagonal line across the upper third of each nail.
- Add a secondary parallel micro line if desired for extra elegance.
- Let the gold polish dry thoroughly for 3 minutes.
- Seal with a ultra-glossy top coat to give the gold a liquid-metal appearance.
- Apply cuticle oil to add a healthy glow.
Beginner Tips
Use flexible striping tape as a mask guide if drawing straight freehand lines feels challenging.
Common Mistakes to Avoid
- Using thick metallic polish; thin layers create crisp, shiny lines without bulk.
Styling Ideas
Complements gold wristwatches, delicate bracelets, and structured blazer jackets.
Best Colors and Materials
- Colors: Deep nude, warm beige, champagne metallic gold.
Estimated Cost
$5 – $10.
Estimated Time
15–20 minutes.
Difficulty Level
Easy.
Where It Looks Best
Medium squoval or coffin-shaped nails.
Pinterest-Worthy Tip
Photograph your hand typing on a silver laptop keyboard with gold rings catching natural sunlight.
Conclusion
Gold line accents bring timeless chic style to back-to-school beauty, keeping you polished for class presentations and casual weekends alike.
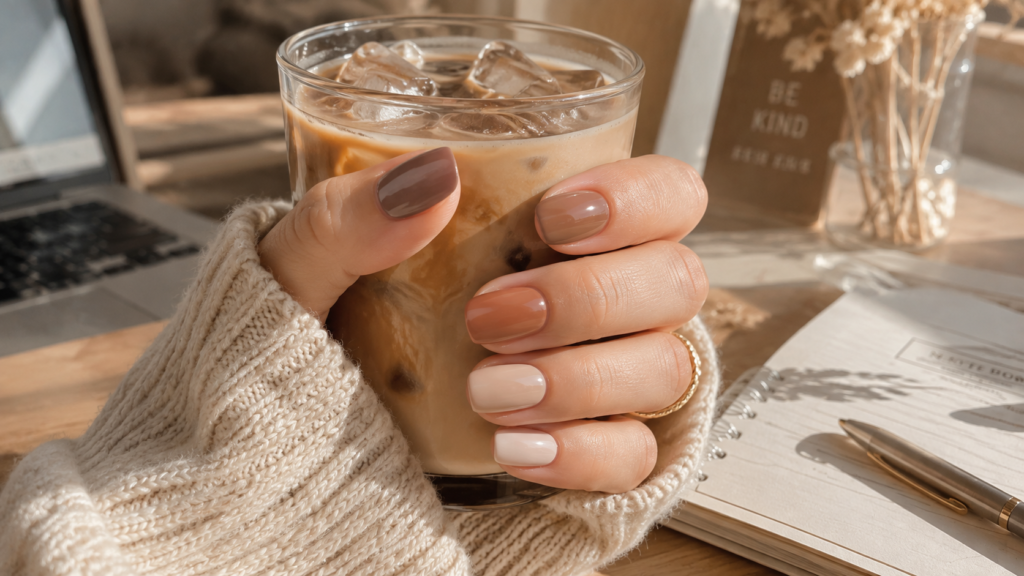
Idea 6: Aesthetic Mismatched Neutral Tones
Short Introduction
Can’t decide on just one nude shade? Paint each finger a different gradient shade of chocolate brown, tan, nude, and cream for a cozy autumn trend.
Why You’ll Love This Idea
No art brush skills needed! The style relies purely on choosing complementary bottle colors for an effortless chic look.
Materials Needed
- 5 polish bottles in gradient brown/nude tones (Dark Mocha, Caramel, Warm Nude, Soft Beige, Cream White)
- Base coat and top coat
Step-by-Step Instructions
- Prep and file nails uniform in shape.
- Apply base coat across all nails.
- Paint Thumb: Dark Mocha brown (2 coats).
- Paint Index Finger: Soft caramel tan (2 coats).
- Paint Middle Finger: Warm nude (2 coats).
- Paint Ring Finger: Soft beige (2 coats).
- Paint Pinky: Off-white cream (2 coats).
- Allow all fingers to dry for 3 minutes.
- Top with a high-shine or velvety matte top coat based on personal preference.
Beginner Tips
Test your five color bottles side-by-side on paper beforehand to ensure the gradient transition flows smoothly from dark to light.
Common Mistakes to Avoid
- Mixing cool-toned nudes with warm-toned browns; keep all five polishes within the same warm or cool undertone family.
Styling Ideas
Pairs seamlessly with knit sweaters, leather accessories, and warm autumn plaid scarves.
Best Colors and Materials
- Colors: Espresso, beige, taupe, cream, mocha.
Estimated Cost
$10 – $15 (or use polish sets).
Estimated Time
15 minutes.
Difficulty Level
Very Easy (Super beginner friendly!).
Where It Looks Best
All nail lengths and shapes.
Pinterest-Worthy Tip
Hold a cozy iced chai latte cup with a woven sleeve to highlight the chocolate and coffee tones.
Conclusion
Mismatched neutral tones are low-stress, foolproof, and scream cozy back-to-school aesthetic!
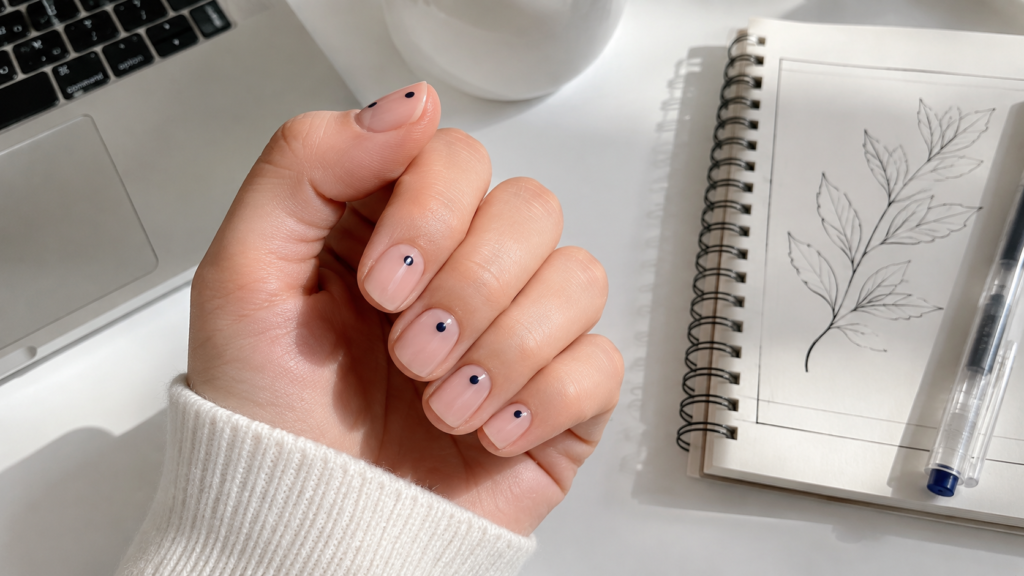
Idea 7: Playful Dotty Minimalist Nails
Short Introduction
Dot art is playful, eye-catching, and virtually impossible to mess up! A single contrasting dot on a bare or nude nail creates a graphic look.
Why You’ll Love This Idea
It takes less than ten minutes to do both hands, making it the ultimate quick manicure night solution before school mornings.
Materials Needed
- Clean nude polish
- Contrast polishes (navy blue, red, or black)
- Medium dotting tool
Step-by-Step Instructions
- Clean nail beds and apply base coat.
- Paint two coats of sheer nude polish on all nails.
- Dip your dotting tool into the dark contrast polish.
- Place one bold dot centered right above the cuticle moon on each nail.
- Alternatively, alternate placing dots at the tip on one finger and base on the next.
- Let dots dry completely for 3 minutes.
- Seal with a layer of clear top coat.
Beginner Tips
Keep dot sizes uniform by re-dipping your dotting tool in fresh polish before painting each finger.
Common Mistakes to Avoid
- Pressing the dotting tool too hard into the nail, which squishes polish into uneven rings.
Styling Ideas
Looks fantastic with clean streetwear, white sneakers, and graphic school hoodies.
Best Colors and Materials
- Colors: Translucent pink base with navy, cobalt blue, or black dots.
Estimated Cost
$3 – $5.
Estimated Time
10 minutes.
Difficulty Level
Super Easy.
Where It Looks Best
Short, neatly trimmed natural square nails.
Pinterest-Worthy Tip
Pose holding modern minimalist stationery or a sleek black pen against a bright white background.
Conclusion
Minimalist dot nails give off artist-chic vibes while taking zero professional effort to execute.
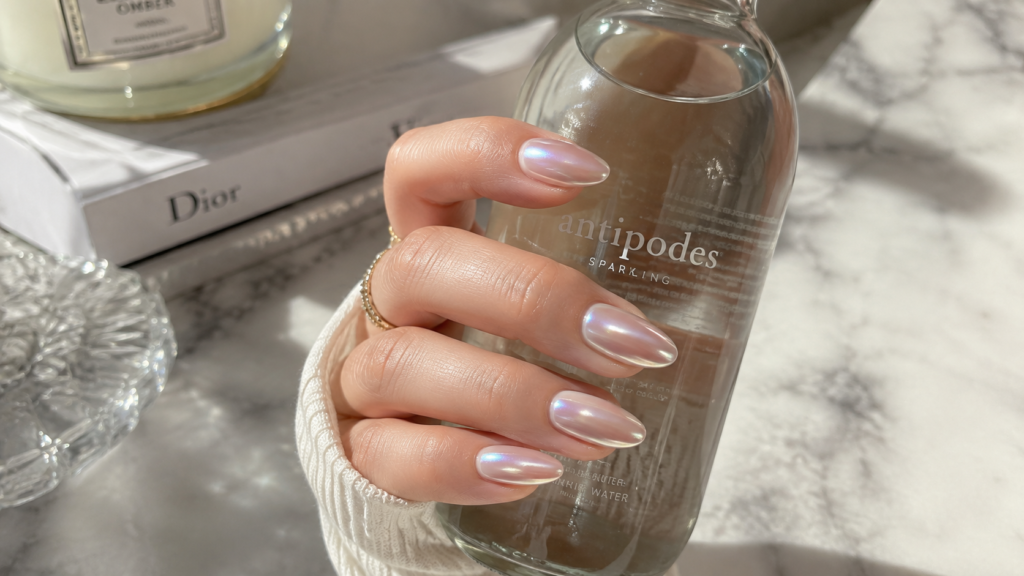
Idea 8: Soft Glazed Donut Chrome Nails
Short Introduction
Inspired by viral celebrity trends, glazed donut nails feature a pearlescent shimmer over a translucent nude base that shines gorgeously under fluorescent classroom lighting.
Why You’ll Love This Idea
It makes natural nails look extraordinarily healthy, clean, and radiant without needing complex nail art designs.
Materials Needed
- Sheer milky white polish
- Chrome nail powder (iridescent white) or iridescent top coat
- Sponge applicator
- No-wipe top coat
Step-by-Step Instructions
- Shape and prep natural nails thoroughly.
- Apply base coat and dry.
- Paint one coat of sheer milky white polish.
- Apply a no-wipe top coat and let dry (or cure if using gel).
- Gently rub pearl chrome powder over the entire nail using an eyeshadow sponge applicator until glossy and metallic.
- Dust off excess powder with a fluffy brush.
- Seal with a final glossy top coat to lock in the pearlescent glaze.
Beginner Tips
If you do not have chrome powder, achieve a similar effect by using a pearlescent, iridescent shimmer top coat polish directly over milky white polish!
Common Mistakes to Avoid
- Forgetting to dust off extra chrome powder, which can make the top coat look grainy instead of glassy.
Styling Ideas
Matches literally everything from athletic wear to dressy homecoming outfits.
Best Colors and Materials
- Colors: Pearlescent white, iridescent shimmer, sheer nude.
Estimated Cost
$8 – $14.
Estimated Time
20 minutes.
Difficulty Level
Easy.
Where It Looks Best
Medium oval or almond nails.
Pinterest-Worthy Tip
Capture a video clip or photo under direct sun to catch the rainbow pearlescent sheen.
Conclusion
Glazed donut nails offer the ultimate sleek, clean aesthetic that stays stylish all semester long.
Expert Decorating and Styling Tips for DIY Nails
To keep your manicures looking like they cost $80 at a high-end salon, incorporate these pro nail artist habits into your weekly routine:
+-----------------------------------------------------------------------+
|                       PRO NAIL CARE CHECKLIST                         |
+-----------------------------------------------------------------------+
| [ ] Clean oil off nails with rubbing alcohol BEFORE applying polish.  |
| [ ] Always seal the edge (free tip) of nails with polish and topcoat. |
| [ ] Apply thin coats rather than one thick layer to avoid bubbles.    |
| [ ] Apply fresh top coat every 3 days to double manicure lifespan.    |
| [ ] Apply cuticle oil every night before going to sleep.             |
+-----------------------------------------------------------------------+
- Invest in Glass Files: Glass files seal the keratin layers of your natural nails instead of tearing them like rough emery boards do, preventing peeling and chipping.
- Master the Capping Technique: Always run your polish brush along the top edge of your nail tip. This seals the polish edge and prevents lifting during typing.
- Keep Clean-Up Brushes Nearby: Dip an old angled eyeliner brush into pure acetone to instantly erase stray polish on your cuticles before it dries.
Budget-Saving Tips for Students
Nail art does not have to eat into your snack or school supply budget! Here is how to keep your hands looking stunning on a student budget:
- Use Household Household Tools for Art: You do not need professional dotting tools. Bobby pins, toothpicks, and pencil tips make perfect dots and hearts!
- Buy Multi-Packs of Polishes: Purchase pastel or neutral mini-polish sets online, which cost significantly less than buying full-sized individual bottles.
- Extend Polish Life with Alcohol Prep: Cleaning your nails thoroughly with rubbing alcohol before painting removes natural oils, doubling the life of inexpensive polishes.
- Swap Press-Ons for Quick Sets: High-quality press-on nails cost around $5–$10 and can be reused multiple times with gentle adhesive tabs.
Frequently Asked Questions (FAQs)
Q1: How long should my basic back-to-school manicure last?
Answer: A well-prepped natural manicure with standard polish usually lasts 5 to 7 days without chipping. Gel polish manicures can last up to 2 to 3 weeks.
Q2: How can I prevent my nail polish from chipping when typing on keyboards?
Answer: Keep natural nails trimmed to short or medium lengths and always cap the free tip edge of your nail with both color polish and top coat.
Q3: What is the best nail shape for busy students?
Answer: Squoval (square with rounded edges) or short round shapes are the most durable because they do not have sharp corners that catch or snap under pressure.
Q4: Are these nail designs safe for school dress codes?
Answer: Yes! All eight designs listed feature subtle nude bases, pastels, or minimalist accents that easily satisfy strict school dress codes.
Q5: How do I dry my nails faster before school?
Answer: Use a quick-dry top coat or dip your painted nails into a bowl of ice cold water for 2 minutes after waiting 60 seconds post-application.
Q6: Can I do these designs on natural short nails?
Answer: Absolutely! Minimalist designs like micro-hearts, French tips, single dots, and mismatched neutral tones look exceptional on short natural nails.
Q7: What is the difference between nail dehydrator and rubbing alcohol?
Answer: Both remove surface oils from your nail plate. 70% or 91% isopropyl rubbing alcohol works as an affordable substitute for commercial nail dehydrators.
Q8: How can I grow stronger natural nails for school?
Answer: Apply cuticle oil daily, wear protective gloves when doing dishes or cleaning, and avoid using your nails as tools to open cans or boxes.
Final Thoughts
Back-to-school season is your opportunity to reset, express your personal style, and feel confident every day in class. You do not need expensive salon visits to maintain pretty, professional, and aesthetic hands. With basic nude polishes, pastel accents, and everyday household tools, you can easily create simple, cute nail art that fits your schedule and budget.
Experiment with different trends, find what suits your personality, and enjoy taking a relaxing 20-minute DIY beauty break amid your busy school prep!
Save This Pin!
Love these back-to-school nail ideas? 📌
Don’t lose this guide! Hover over any image and click the red “Save” button to pin this article directly to your Pinterest Beauty, Nail Inspo, or Back to School Boards. Share this with your best friends so you can host a fun DIY nail night before the first day of class!