Introduction
Rich chocolate brown hair with dimension is one of the most timeless, luxurious, and versatile hair trends in the world of beauty. Whether you want a warm, golden-toned brunette or a deep, cool espresso tone, adding dimensional highlights, lowlights, and glosses transforms flat color into a radiant masterpiece.
Dimensional hair color creates depth, movement, and visual thickness. Instead of a single flat shade, multi-tonal brown hair reflects light naturally, making your locks appear healthier, fuller, and effortlessly glossy. It works beautifully across all skin tones, hair lengths, and textures, which is why it continues to dominate Pinterest boards and salon request lists worldwide.
In this ultimate guide, we will walk you through everything you need to know about achieving, styling, and maintaining rich chocolate brown hair with dimension. From salon-inspired balayage techniques to at-home gloss treatments and styling ideas, you’ll find comprehensive inspiration, step-by-step guides, budget breakdowns, and expert secrets to keep your brunette hair looking salon-fresh every single day.
Why This Trend Is Popular
Chocolate brown hair with dimension has taken the beauty world by storm for several reasons:
- Universal Flattery: Warm and cool undertones can be customized to complement every skin tone perfectly.
- Low Maintenance: Unlike high-lift platinum blonds, dimensional brunette shades grow out gracefully with subtle root shadow blending.
- Healthier Appearance: Deep brown bases enriched with dimensional gloss reflect high shine, giving the optical illusion of thicker, healthier hair.
- Photogenic Quality: Multi-tonal shades catch natural light beautifully, making them ideal for Pinterest photos, social media, and everyday elegance.
Materials and Tools Needed
To create, maintain, or style rich chocolate brown hair with dimension at home, gather these key items:
- Sulfate-Free Color-Safe Shampoo & Conditioner: Keeps rich tones vibrant without stripping moisture.
- Brunette Color-Depositing Conditioner / Gloss: Refreshes chocolate and caramel tones between salon visits.
- Balayage Board & Application Brushes: Needed for precise, hand-painted dimensional highlights.
- Sectioning Clips & Foils: Keeps hair organized during multi-tonal color application.
- Heat Protectant Spray: Essential before using thermal styling tools to prevent color fading.
- Nourishing Hair Oil or Argan Serum: Enhances shine and smooths split ends for a seamless blend.
Safety Tips for Hair Coloring
Before applying any hair dye, gloss, or bleach:
- Perform a Patch Test: Apply a small amount of dye behind your ear 48 hours prior to check for allergic reactions.
- Perform a Strand Test: Test your color blend on a small hidden strand of hair to preview timing and final color output.
- Protect Your Skin: Apply petroleum jelly along your hairline, ears, and neck to prevent color staining.
- Wear Gloves & Work in Ventilation: Protect hands from chemical dye and ensure adequate airflow while working.
1. Honey Caramel Chocolate Balayage
Short Introduction
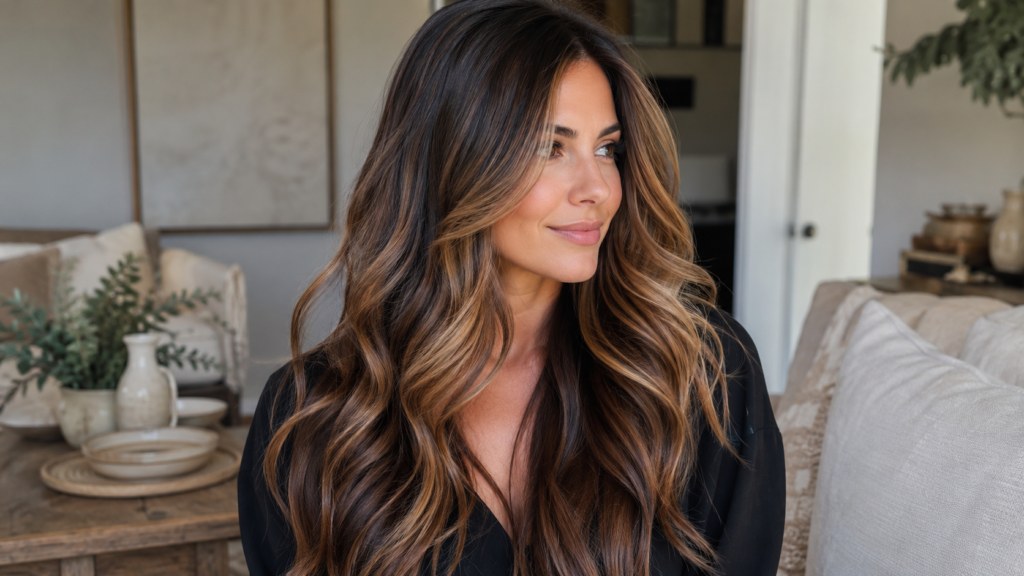
Honey caramel chocolate balayage seamlessly blends deep cocoa roots with warm, golden-caramel ribbon highlights. This dimensional combination creates softness around the face while preserving deep, rich brown contrast throughout the underneath layers.
Why You’ll Love This Idea
It offers the perfect middle ground between rich dark brown and luminous warm blonde. The soft gradient ensures a seamless grow-out process, making it exceptionally low-maintenance.
Materials Needed
- Dark chocolate base color (Level 4 or 5)
- Warm caramel toner / lightener
- Balayage clay lightener & 20-volume developer
- Tint brush, board, and sectioning clips
- Color-safe bonding treatment
Step-by-Step Instructions
- Prep the Hair: Clarify hair 24 hours prior; do not wash immediately before coloring to retain natural scalp oils.
- Sectioning: Divide hair into four quadrant sections (two front, two back) using non-metallic sectioning clips.
- Mix Lightener: Mix clay lightener with 20-volume developer to a thick, non-drip consistency.
- Paint Face-Framing Ribbons: Select thin diagonal strands around the hairline and hand-paint lightener from mid-lengths to ends.
- V-Paint Mid-Lengths: Take V-shaped sub-sections through the mid-layers, painting higher on the outer edges and lower in the center.
- Process & Monitor: Allow lightener to process for 25–35 minutes until a soft warm caramel level is reached.
- Rinse & Tone: Rinse thoroughly with lukewarm water and apply a warm honey-caramel toner for 10–15 minutes.
- Bonding Mask: Apply a restorative deep conditioning bonding mask to seal the cuticle and add luminous shine.
Beginner Tips
- Keep hand-painted strokes light near the roots and saturate heavily toward the ends.
- Feather the lightener upward using a vertical brush angle to avoid harsh harsh lines.
Common Mistakes to Avoid
- Over-bleaching the hair into an ashy blonde tone, which destroys the warm chocolate harmony.
- Applying lightener too close to the roots without blending.
Styling Ideas
- Style with loose 1.25-inch curling wand waves to highlight the dimensional ribbons of caramel.
Best Colors and Materials
- Deep cocoa brown roots paired with warm honey and soft gold accents.
Estimated Cost
- At-Home DIY: $35 – $55
- Professional Salon: $180 – $300
Estimated Time
- 2.5 to 3.5 hours
Difficulty Level
- Intermediate
Where It Looks Best
- Medium to long layered haircuts; warm and neutral skin undertones.
Pinterest-Worthy Tip
Shoot your photos in late afternoon “golden hour” daylight to capture the rich warm dimension reflection.
Conclusion
Honey caramel chocolate balayage provides a bright, sun-kissed lift to deep brown hair without sacrificing rich chocolate depth.
2. Espresso and Dark Chocolate Lowlight Dimension
Short Introduction
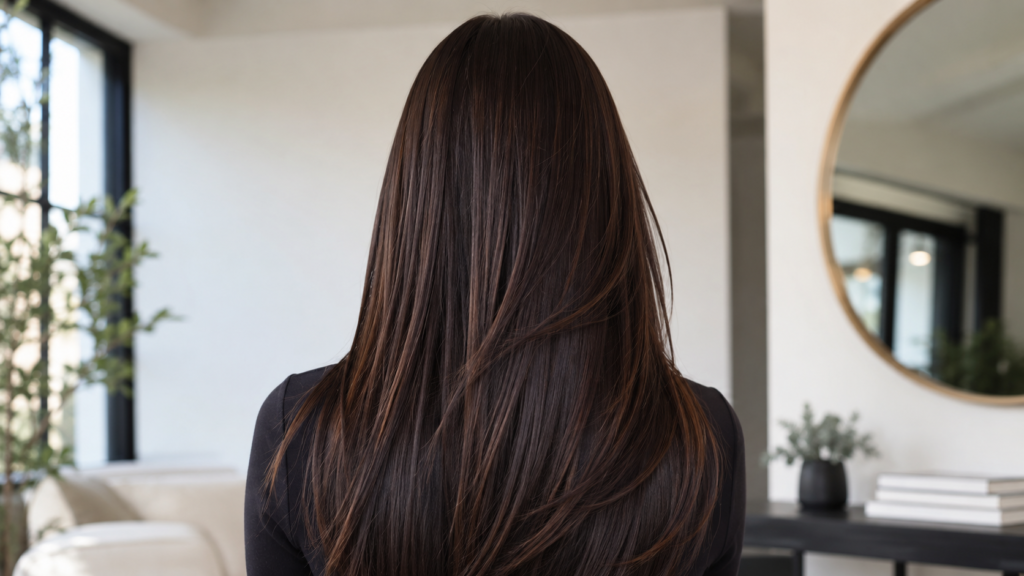
For those with natural medium brown or faded color, adding deep espresso lowlights creates dramatic contrast and structural dimension without needing bleach or lightener.
Why You’ll Love This Idea
It deepens lightened hair, adds incredible depth, and utilizes non-damaging deposit-only color.
Materials Needed
- Semi-permanent dark espresso hair color (Level 3)
- 10-volume developer or processing lotion
- Foil strips and tint brush
- Tail comb for precise weaving
Step-by-Step Instructions
- Analyze Hair Base: Ensure your starting shade is a Level 5 or 6 medium brown.
- Section Hair: Create neat 1-inch horizontal rows starting from the nape of the neck up.
- Weave Sub-Sections: Use a tail comb to weave out small alternating strands.
- Apply Dark Tint: Saturate the woven strands with dark espresso color from root to end.
- Enclose in Foils: Fold foil neatly over the dark strands to isolate them from remaining hair.
- Repeat Upward: Continue weaving and foiling through the crown and side panels.
- Process: Allow deposit-only color to develop for 25 minutes.
- Rinse & Condition: Rinse with cool water to lock in deep pigments and seal hair cuticles.
Beginner Tips
- Place lowlights underneath top layers to create hidden depth that shows when moving or tying hair up.
Common Mistakes to Avoid
- Using permanent black hair dye instead of soft espresso brown, which can look harsh and unnatural.
Styling Ideas
- Ultra-sleek straight blowouts emphasize the sharp, rich contrast between medium and espresso tones.
Best Colors and Materials
- Dark mahogany espresso combined with milk chocolate bases.
Estimated Cost
- At-Home DIY: $20 – $35
- Professional Salon: $120 – $220
Estimated Time
- 1.5 to 2 hours
Difficulty Level
- Easy to Intermediate
Where It Looks Best
- Fine to medium textured hair needing visual volume and depth; cool and olive skin tones.
Pinterest-Worthy Tip
Focus light directly onto straight styled hair to show off ribbon-like contrast lines.
Conclusion
Espresso lowlights are the ultimate damage-free trick to restore richness and body to plain brown locks.
3. Mocha Cinnamon Ribbon Highlights
Short Introduction
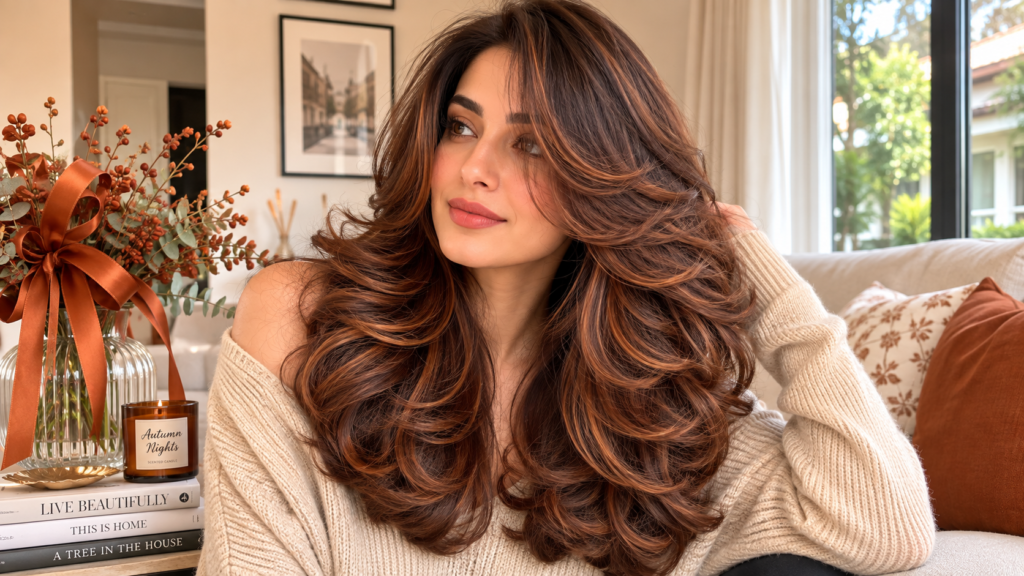
Mocha cinnamon ribbons blend rich, cool chocolate bases with spicy reddish-cinnamon accent highlights. This creates a multi-dimensional warmth that glows vibrantly under natural sunlight.
Why You’ll Love This Idea
Cinnamon notes bring immediate warmth, energy, and warmth to dark brown hair while keeping the overall palette within the brunette family.
Materials Needed
- Level 4 Mocha brown base shade
- Warm copper-cinnamon glaze or toner
- Foliage wraps and bleach lightener
- Color-locking shine serum
Step-by-Step Instructions
- Section the Crown: Isolate the top horseshoe section of the head for precise ribbon placement.
- Weave Medium Ribbons: Take medium-sized weave strands along the crown and sides.
- Apply Lightener: Paint lightener lightly on the mid-lengths and heavier towards the ends.
- Process Lightener: Lift hair to a warm orange-gold stage (Level 7).
- Rinse Lightener: Wash out bleach completely without conditioning.
- Apply Cinnamon Toner: Apply a rich cinnamon-copper glaze evenly over the lightened ribbons.
- Process Tone: Allow glaze to set for 20 minutes to absorb deep warm pigments.
- Final Wash & Seal: Rinse with cold water, apply a color-seal glaze, and blow dry.
Beginner Tips
- Keep cinnamon ribbons focused away from root lines for low-maintenance grow-out.
Common Mistakes to Avoid
- Over-toning with ash shades, which neutralizes the gorgeous cinnamon warm contrast.
Styling Ideas
- Bouncy blowout with large barrel curls to mix red-cinnamon ribbons into deep mocha layers.
Best Colors and Materials
- Deep mocha brown base mixed with warm cinnamon and bronze accents.
Estimated Cost
- At-Home DIY: $30 – $50
- Professional Salon: $160 – $280
Estimated Time
- 2 to 3 hours
Difficulty Level
- Intermediate
Where It Looks Best
- Warm, peach, or hazel-eyed complexions; medium to thick hair density.
Pinterest-Worthy Tip
Capture photos against neutral cream or beige outfit backgrounds to make cinnamon tones pop.
Conclusion
Mocha cinnamon ribbon highlights offer a vibrant, spicy variation on classic chocolate brown hair.
4. Chocolate Ash Brown Cool-Toned Dimension
Short Introduction
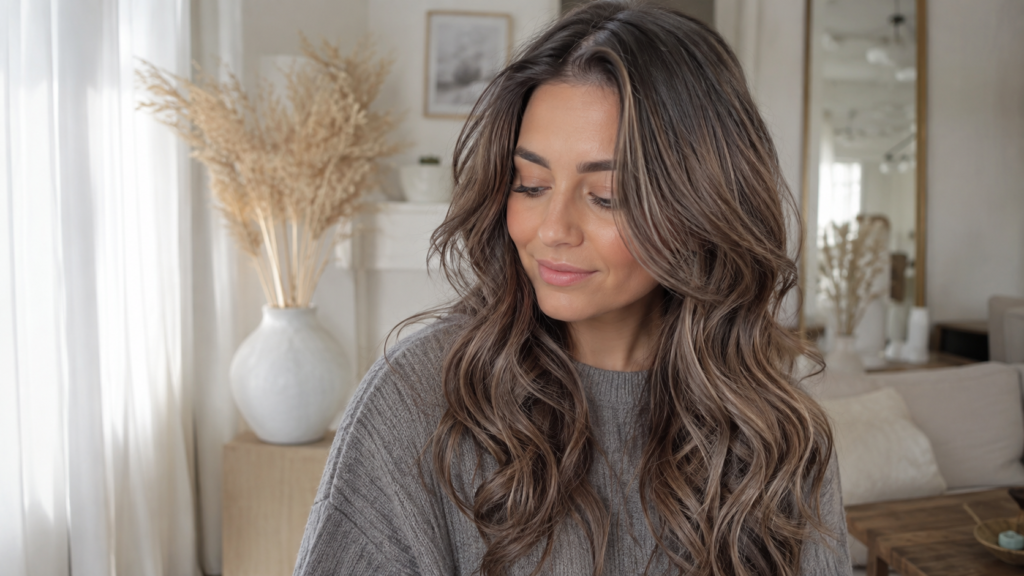
Chocolate ash brown combines deep chocolate undertones with smokey, cool-ash dimensional ribbons. It neutralizes brassiness while delivering a modern, high-fashion matte finish.
Why You’ll Love This Idea
If you prefer cool tones over golden or red hues, this sophisticated color palette keeps brunette hair looking ultra-chic, clean, and cool.
Materials Needed
- Cool dark brown base dye (Level 4 Ash)
- Violet-ash toner/gloss
- Blue/purple toning shampoo
- Fine-weaving tail comb and foils
Step-by-Step Instructions
- Prep Base: Apply cool dark brown root color if touching up dark regrowth.
- Fine Babylight Weaves: Weave micro-thin strands along the top layers to avoid thick chunky highlights.
- Lighten Hair: Apply lightener to babylights until lifting to a pale yellow stage.
- Rinse & Towel Dry: Wash bleach out thoroughly; towel dry hair to 80% dryness.
- Apply Cool Ash Toner: Apply a intense violet-ash brown toner across all highlighted areas.
- Process Tone: Process for full 20 minutes to eliminate all underlying warm undertones.
- Shampoo with Blue Soap: Wash with a blue-pigmented depositing shampoo to lock in cool ash.
- Condition & Style: Finish with a deep hydrating cool-tone mask and smooth blow dry.
Beginner Tips
- Always use blue-pigmented shampoos weekly to keep unwanted orange brassiness away.
Common Mistakes to Avoid
- Skipping toner, which leaves underlying warm raw bleach tones visible.
Styling Ideas
- Pair with textured beach waves or a chic textured bob to accentuate smokey dimension.
Best Colors and Materials
- Cool mushroom brown, smoky quartz, and dark espresso ash.
Estimated Cost
- At-Home DIY: $35 – $60
- Professional Salon: $200 – $350
Estimated Time
- 3 to 4 hours
Difficulty Level
- Intermediate to Advanced
Where It Looks Best
- Cool undertones, pink/rose skin, and light blue or dark brown eyes.
Pinterest-Worthy Tip
Style in crisp indoor daylight with minimalist cool grey or white backgrounds.
Conclusion
Chocolate ash brown dimension gives classic brunette hair a trendy, cool-toned luxury upgrade.
5. Golden Cocoa Face-Framing “Money Piece”
Short Introduction
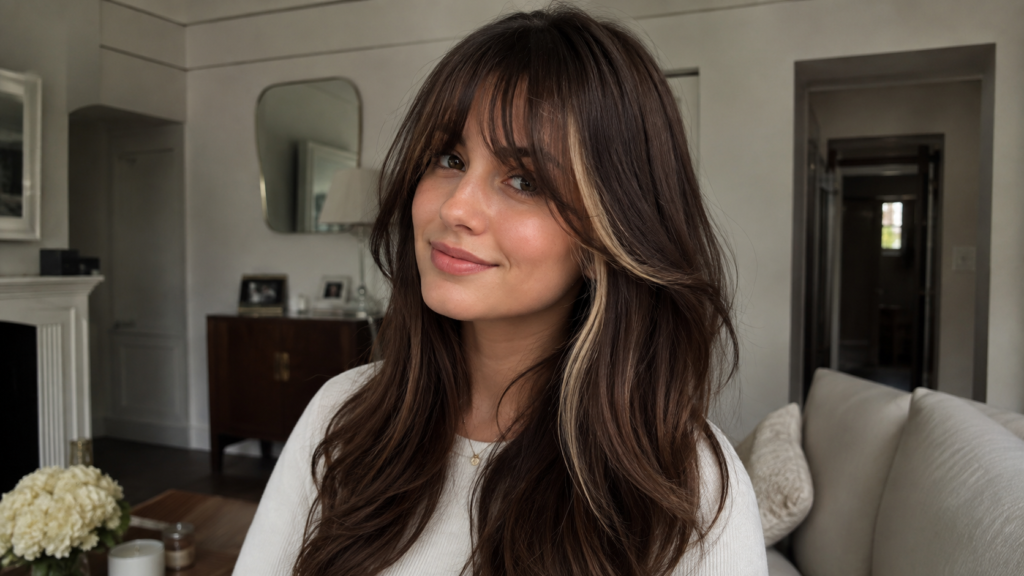
Add instant brightness around your face with a golden cocoa face-framing “money piece” integrated into a deep rich chocolate brown foundation.
Why You’ll Love This Idea
It instantly illuminates your complexion, accents facial features, and adds a pop of modern style without requiring full-head bleaching.
Materials Needed
- Rich dark chocolate base tint
- Gentle cream bleach lightener
- Golden-bronze toner
- Foil wrap clips and tint brush
Step-by-Step Instructions
- Isolate Front Sections: Draw a triangular section at the front hairline extending 1 inch back.
- Section Sides: Clip back all remaining hair securely to keep base color separate.
- Apply Lightener to Front: Paint lightener thinly near hairline roots and thicker down to the tips.
- Wrap in Foil: Seal the front money piece in foil to process efficiently.
- Apply Base Color: Dye remaining hair in deep cocoa brown to maximize contrast.
- Process Together: Allow both sections to process for 30 minutes.
- Rinse & Tone Front: Rinse front piece and apply warm golden-bronze glaze for 10 minutes.
- Final Wash: Wash entire head with color-safe shampoo and apply gloss treatment.
Beginner Tips
- Keep the money piece soft and blended near the hairline root rather than starting with a stark solid line.
Common Mistakes to Avoid
- Making the front section too thick, which can overpower the chocolate brown base color.
Styling Ideas
- Soft curtain bangs swept outward, framing cheeks and drawing focus to face-framing brightness.
Best Colors and Materials
- Deep milk chocolate paired with bright golden amber or cocoa bronze.
Estimated Cost
- At-Home DIY: $25 – $40
- Professional Salon: $140 – $220
Estimated Time
- 1.5 to 2.5 hours
Difficulty Level
- Easy
Where It Looks Best
- All face shapes; especially flattering on curtain bang cuts and long layers.
Pinterest-Worthy Tip
Take front-facing portraits in soft indirect light to highlight glowing face-framing ribbons.
Conclusion
A golden cocoa money piece adds playful brightness and modern elegance to rich brown hair in under two hours.
6. Chestnut Brown & Mahogany Dimension
Short Introduction
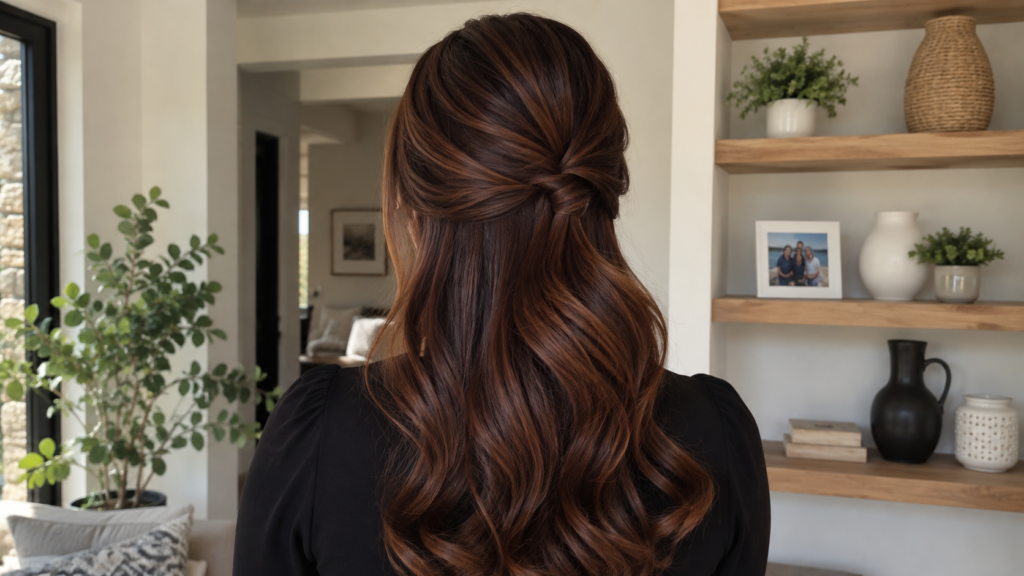
Blending chestnut brown with subtle mahogany undertones offers a multi-dimensional finish that glistens with reddish-plum warmth under light while looking rich and brown in shadow.
Why You’ll Love This Idea
It offers double tonal character—deep chocolate in ambient light, with hidden red-mahogany depth that flashes when moving.
Materials Needed
- Chestnut brown base color (Level 5)
- Mahogany-red gloss glaze
- Application brush, bowl, and sectioning pins
- Deep color-lock conditioner
Step-by-Step Instructions
- Dampen Clean Hair: Towel dry clean hair to 70% dampness for even gloss absorption.
- Mix Mahogany Base: Prepare deposit-only chestnut and mahogany gloss glaze.
- Sectioning: Divide hair into 4 manageable quadrant sections.
- Apply Color Alternatingly: Paint chestnut base on roots and alternating mid-length strands with mahogany gloss.
- Massage Roots to Ends: Gently massage strands to blend colors seamlessly along mid-lengths.
- Process Glaze: Allow glossy deposit tint to sit for 25–30 minutes without heat.
- Rinse Cool: Wash out with lukewarm to cool water until run clear.
- Condition & Dry: Apply deep shine conditioner, rinse, and blow-dry straight to inspect depth.
Beginner Tips
- Deposit-only glosses are non-damaging and perfect for testing mahogany shades risk-free.
Common Mistakes to Avoid
- Using bright red dyes instead of deep mahogany browns, resulting in brassy tones rather than rich dark brown depth.
Styling Ideas
- Deep side-part half-updo that displays shifting reddish-chestnut tones as hair cascades down.
Best Colors and Materials
- Deep chestnut, black cherry chocolate, and warm mahogany tones.
Estimated Cost
- At-Home DIY: $20 – $35
- Professional Salon: $110 – $180
Estimated Time
- 1 to 1.5 hours
Difficulty Level
- Easy
Where It Looks Best
- Green, brown, or hazel eyes; neutral and warm skin undertones.
Pinterest-Worthy Tip
Capture movement videos or live photos showing hair shifting under sunlight.
Conclusion
Chestnut mahogany dimension provides mesmerizing depth and rich warmth without needing heavy bleach treatments.
7. Melted Chocolate Butterscotch Sombre
Short Introduction
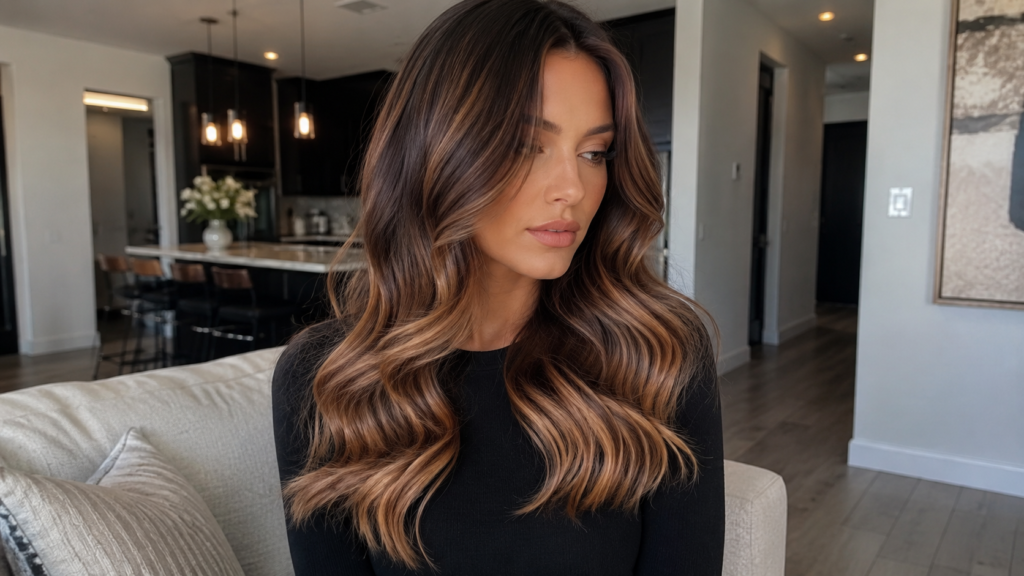
A sombre (soft ombre) transitions smoothly from a dark espresso root melt into a delicious, dimensional butterscotch chocolate on the ends.
Why You’ll Love This Idea
Because the transition is gradual and seamless, you get the dramatic lightness at the ends without harsh lines or frequent root touch-ups.
Materials Needed
- Espresso dark root color (Level 3 or 4)
- Butterscotch golden toner (Level 7)
- Balayage blender brush & foil backings
- Hydrating hair mask
Step-by-Step Instructions
- Apply Root Melt: Paint dark espresso color onto roots, extending down 3 to 4 inches.
- Comb Root Downward: Use a wide-tooth comb to feather root color downwards unevenly.
- Mid-length Lightening: Apply soft lightener from mid-lengths down to ends.
- Blend Transition Zone: Use fingers to smudge the boundary line between dark root and lightened ends.
- Process Lightener: Lift ends until achieving a soft golden butterscotch raw shade.
- Rinse Entire Head: Wash out color thoroughly with sulfate-free shampoo.
- Apply Butterscotch Gloss: Glaze mid-lengths and ends with butterscotch toner for 15 minutes.
- Deep Conditioning: Finish with an intensive moisturizing treatment to seal ends.
Beginner Tips
- Smudging the blend line with your gloved fingers is the secret to a seamless sombre transition.
Common Mistakes to Avoid
- Creating a sharp horizontal line between dark roots and butterscotch ends.
Styling Ideas
- Glamorous Hollywood waves created with a 1.5-inch curling iron bring out seamless color gradient flow.
Best Colors and Materials
- Dark cocoa root melted into warm butterscotch and golden brown tips.
Estimated Cost
- At-Home DIY: $40 – $65
- Professional Salon: $220 – $380
Estimated Time
- 3 to 4 hours
Difficulty Level
- Advanced
Where It Looks Best
- Long hair cuts; medium to tan skin complexions.
Pinterest-Worthy Tip
Fan out hair over shoulders in photos to showcase the complete gradient color progression.
Conclusion
Melted butterscotch sombre provides rich root depth combined with bright, sun-baked ends for ultimate dimensional glamour.
8. High-Shine Espresso Glass Chocolate Hair
Short Introduction
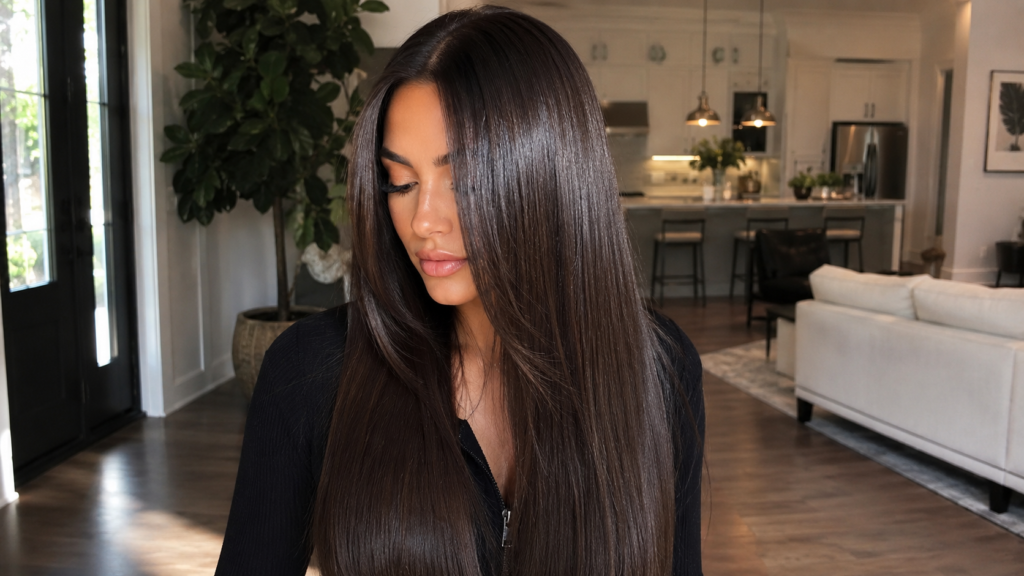
Focused entirely on sleek reflection and subtle undertone depth, high-shine glass chocolate hair combines deep espresso base tones with clear dimensional glossing treatments.
Why You’ll Love This Idea
It requires zero bleach or lightening, maximizes hair health, and delivers mirror-like shine that makes dark brown hair look ultra-expensive.
Materials Needed
- Deep espresso brown hair dye (Level 3)
- Clear acidic gloss treatment
- Flat iron with tourmaline plates
- High-shine finishing oil serum
Step-by-Step Instructions
- Base Application: Apply deep rich espresso brown dye evenly from roots to ends.
- Process Base Color: Let base shade set for full recommended duration (30 minutes).
- Rinse Fully: Wash out base dye with lukewarm water until water runs completely clear.
- Apply Clear Gloss: Saturate damp hair with acidic clear glass gloss treatment from root to tip.
- Process Gloss: Allow clear shine gloss to work for 20 minutes to smooth cuticle surfaces.
- Blow Dry Straight: Blow dry hair using a round boar-bristle brush focused downwards.
- Flat Iron Precision: Straighten small 1-inch sections at moderate heat (350°F / 175°C) using heat protectant.
- Serum Finish: Smooth two drops of weightless shine oil across surface layers.
Beginner Tips
- Always blow dry with nozzle pointing down the hair shaft to seal hair cuticles flat for maximum glass shine.
Common Mistakes to Avoid
- Using excessive heavy oils that weigh hair down instead of light gloss treatments that reflect light cleanly.
Styling Ideas
- Pin-straight center-parted glass hair finish resting sleekly over shoulders.
Best Colors and Materials
- Deep dark chocolate, espresso, obsidian brown, and clear glass glazes.
Estimated Cost
- At-Home DIY: $25 – $45
- Professional Salon: $100 – $180
Estimated Time
- 1.5 to 2 hours
Difficulty Level
- Easy
Where It Looks Best
- All hair lengths, especially sleek bobs and waist-length straight cuts; all skin tones.
Pinterest-Worthy Tip
Position a soft light source directly behind or above you to capture dramatic glass-like reflections.
Conclusion
High-shine espresso glass hair proves you don’t need bright highlights to achieve head-turning chocolate dimension and richness.
Quick Comparison Table
| Idea | Dimension Type | Maintenance Level | Best For | Estimated Salon Cost |
| Honey Caramel Balayage | Warm Hand-painted | Low | Layered Cuts & Warm Tones | $180 – $300 |
| Espresso Lowlights | Cool Deep Foils | Low to Medium | Fine Hair needing Depth | $120 – $220 |
| Mocha Cinnamon Ribbons | Spicy Warm Ribbons | Medium | Thick Hair & Warm Skin | $160 – $280 |
| Chocolate Ash Brown | Cool Smokey Babylights | High (Toning needed) | Cool/Pink Undertones | $200 – $350 |
| Golden Cocoa Money Piece | Face-Framing Brightness | Low | Curtain Bangs & Layered Cuts | $140 – $220 |
| Chestnut Mahogany | Shifting Red-Brown | Low | Damage-free Glossing | $110 – $180 |
| Butterscotch Sombre | Smooth Gradient Melt | Very Low | Long Hair | $220 – $380 |
| Espresso Glass Hair | High-Shine Mirror Finish | Low | Straight Bobs & Long Hair | $100 – $180 |
Expert Decorating & Maintenance Tips for Brunette Hair
Maintaining rich chocolate brown hair with dimension requires intentional hair care routines to prevent brassiness, fading, and dullness:
1. Wash with Cool Water
Hot water expands the hair cuticle, causing dye molecules to wash out quickly. Always rinse your hair with cool or lukewarm water to seal cuticles and retain rich brown tones.
2. Use Toning Shampoos Strategically
- Blue Shampoo: Neutralizes unwanted orange and brassy copper tones in dark brown hair.
- Purple Shampoo: Ideal if your highlights are lighter caramel or golden blonde shades.
- Use toning shampoos once every 2–3 washes rather than daily to prevent drying out your strands.
3. Apply Weekly Hair Masks
Dimensional coloring (especially balayage or foil techniques) can leave ends dry. Weekly deep conditioning masks enriched with argan oil, keratin, or shea butter keep dimensional ribbons silky and frizz-free.
4. Protect Against Thermal Damage
Heat styling tools quickly break down artificial color pigments. Always apply a generous layer of heat protectant spray prior to blow-drying, curling, or straightening. Keep heat tools under 375°F (190°C).
Budget-Saving Tips for Salon-Quality Brunette Hair
You don’t need to break the bank to enjoy stunning dimensional chocolate brown hair:
- Opt for Balayage or Live-In Color: Hand-painted balayage grows out seamlessly without harsh root lines, allowing you to extend salon visits to every 4–6 months instead of every 6 weeks.
- Use In-Shower Color Glosses: Refresh your rich chocolate and caramel tones at home between salon visits using $15–$25 color-depositing gloss treatments.
- Focus Lightener Face-Framing Only: Ask your stylist for a “mini balayage” or face-framing money piece instead of a full head of foils. This cuts costs by up to 50% while providing maximum visible impact.
- Maintain Healthy Ends: Regular trims at home or budget salons prevent split ends from traveling up, preserving your color investment longer.
Frequently Asked Questions (FAQs)
Q1: What is rich chocolate brown hair with dimension?
A: Rich chocolate brown hair with dimension combines a deep chocolate base shade with lighter highlights, dark lowlights, or gloss glazes. This multi-tonal technique creates visual depth, movement, and shine instead of a single flat color.
Q2: Will dimensional chocolate brown hair suit my skin tone?
A: Yes! Chocolate brown hair is incredibly versatile. Warm undertones pair wonderfully with honey, caramel, and butterscotch ribbons, while cool undertones look stunning with ash brown, espresso, and mushroom highlights.
Q3: How often do I need to touch up dimensional chocolate hair?
A: Low-maintenance styles like balayage or sombre only need touch-ups every 12–16 weeks. If you have gray coverage at the roots or all-over highlights, touch-ups every 6–8 weeks are recommended.
Q4: Can I achieve dimensional chocolate brown hair at home?
A: Yes. Simple techniques like applying a deposit-only espresso lowlight, face-framing money piece, or gloss glaze are easy to do at home. For complex multi-tonal balayage, professional salon application is recommended.
Q5: How do I stop my chocolate brown hair from turning orange?
A: Dark hair naturally lifts with warm orange undertones. Incorporating a blue-pigmented sulfate-free shampoo into your weekly routine will neutralize brassy orange tones and maintain rich cocoa clarity.
Q6: Does adding dimension damage dark hair?
A: Adding dimension using lowlights or glosses involves zero damage since they deposit color without bleach. Highlights or balayage require lightener, but gentle low-volume developers keep hair healthy.
Q7: What is the difference between highlights and balayage?
A: Foiled highlights apply color systematically from root to end for structured contrast. Balayage is a freehand painting technique that creates a soft, natural gradient lighter toward the ends.
Q8: What hair length works best for rich chocolate dimension?
A: Dimensional chocolate brown hair flatters every hair length, from chic pixie cuts and bobs to waist-length waves. Layers help emphasize multi-tonal ribbon contrast.
Final Thoughts
Rich chocolate brown hair with dimension remains the gold standard for effortless, radiant, and luxurious hair color. Whether you choose warm honey caramel balayage, cool ash ribbons, or high-shine espresso glass finish, adding depth and multi-tonal reflection elevates classic brunette locks into a stunning style statement.
By picking the right tonal blend for your complexion and keeping strands hydrated with color-safe care and weekly glosses, your hair will radiate salon-fresh brilliance every single day.
Save This Pin!
Loved these dimensional chocolate brown hair ideas? Pin this article to your favorite Pinterest Hair Inspiration Board so you have these exact color ideas, maintenance guides, and step-by-step styling tips ready for your next hair appointment or DIY touch-up!