Introduction
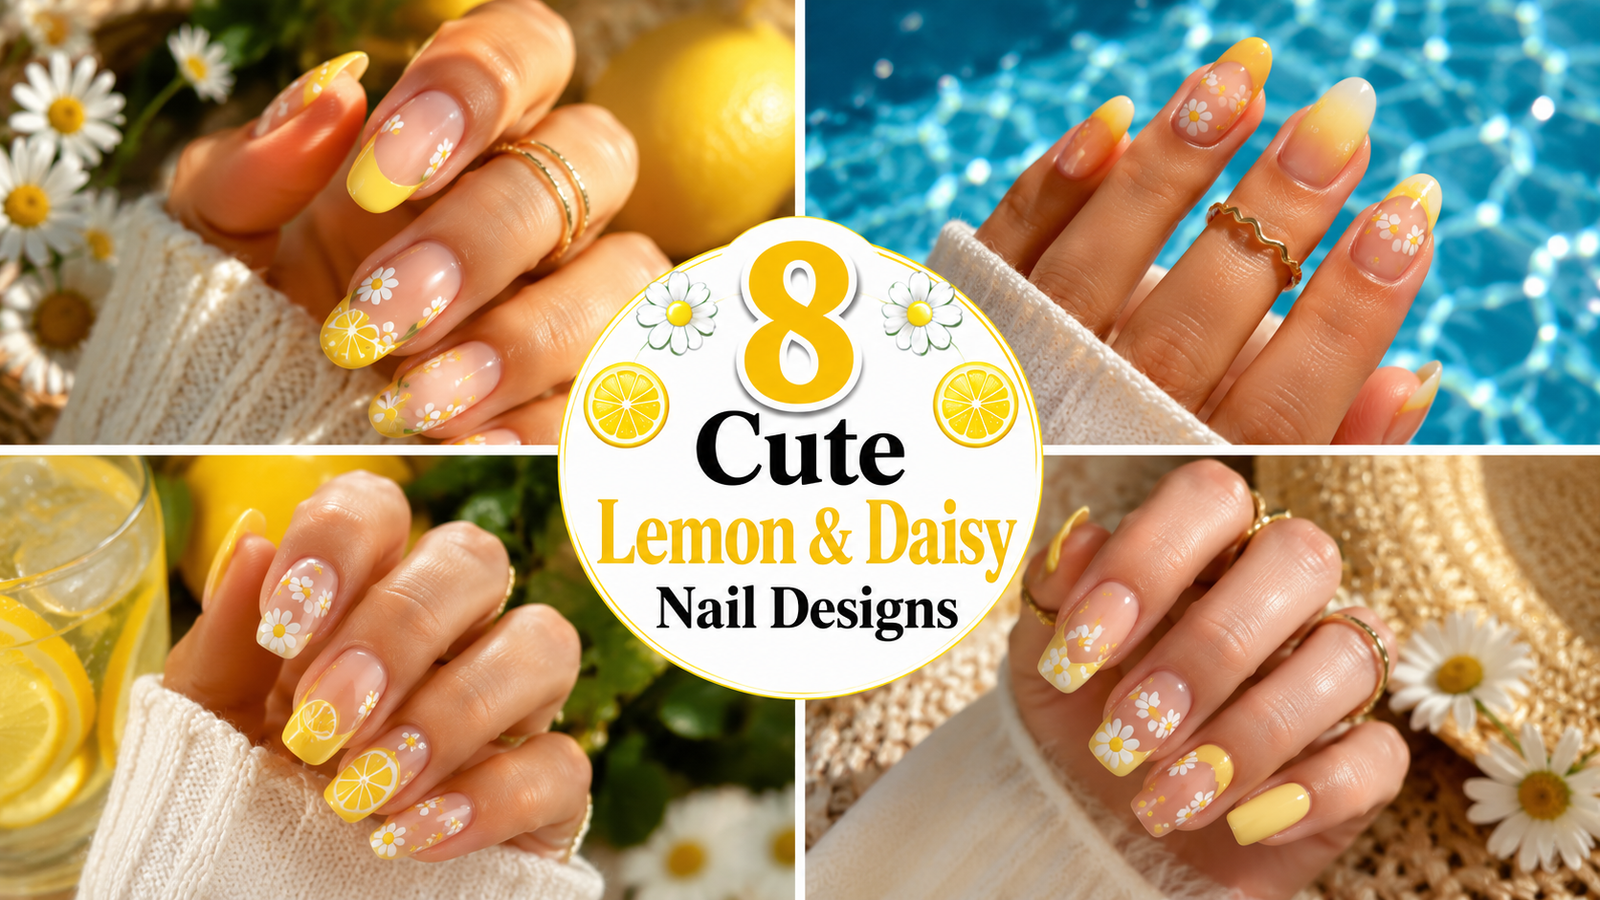
Bright yellow lemons, delicate white daisy petals, and fresh green accents—there is nothing quite as cheerful as a vibrant set of summer nails! If you are searching for a fun, playful, and charming way to upgrade your manicure this season, cute lemon & daisy nail designs are the ultimate trend to try. Combining the zesty energy of citrus fruit with the timeless elegance of floral nail art, this look brings instant sunshine right to your fingertips.
Whether you are heading out on a tropical vacation, hosting a sunny backyard garden party, or simply looking to brighten up your everyday outfit, citrus and floral manicures offer a delightful pop of color. The beauty of this trend lies in its endless versatility. You can go full maximalist with bright yellow accent nails, glossy textured lemon slices, and hand-painted blossoms, or keep it subtle and elegant with minimalist French tips decorated with dainty micro-daisies and subtle pastel lemons.
In this ultimate guide, we are sharing 8 comprehensive, step-by-step DIY nail art tutorials that you can recreate at home or show to your favorite nail technician. From micro-flower accents to vintage watercolor finishes, each design comes complete with material lists, detailed instructions, color suggestions, and Pinterest-worthy styling advice. Grab your favorite polishes, dotting tools, and fine detail brushes, and let’s dive into these sun-drenched nail art ideas!
Why This Trend Is Popular
The sudden rise of citrus-and-floral manicures on social media platforms like Pinterest and Instagram is no coincidence. Here is why everyone is falling in love with this sun-kissed look:
- Vibrant Mood Booster: Bright yellow and crisp white colors naturally evoke feelings of happiness, sunshine, and warmth. Wearing lemon and floral art acts as a daily mood lift!
- Ultimate Summer Aesthetic: Lemons and daisies naturally scream warm weather, outdoor picnics, farmer’s market runs, and poolside relaxing.
- Incredible Versatility: The combination works on every nail shape and length—from short natural almond shapes to long square gel extensions.
- Accessible for DIY Beginners: Basic daisies require nothing more than a simple dotting tool, while lemons rely on clean, simple geometric arcs and shading.
Materials and Tools Needed
To recreate these stunning nail art looks at home, set up a comfortable nail workstation equipped with these essential items:
| Tool / Material | Purpose & Description |
| Base Coat & Top Coat | Protective base coat to prevent staining and high-shine or matte top coat to lock in art. |
| Dotting Tools | Dual-ended metal dotting tools (various sizes) for creating perfect daisy petals and centers. |
| Fine Detail Brushes | Ultra-thin nail art brushes (5mm to 9mm) for painting lemon outlines, leaves, and stems. |
| Nail Polish Colors | Bright lemon yellow, soft pastel yellow, pure white, leaf green, mint green, and nude/sheer pink base colors. |
| Nail Art Sponge | Makeup wedge or ombre sponge for smooth gradient backgrounds. |
| Clean-Up Brush & Acetone | Flat angled brush dipped in pure acetone for tidying up edges and sidewalls. |
| UV/LED Lamp | Required if you are using gel polish for fast curing and smudge-proof longevity. |
Safety Tips for At-Home DIY Nail Art
Before starting your manicure session, keep these essential safety and prep tips in mind:
- Work in a Well-Ventilated Area: Ensure your room has good airflow to avoid inhaling chemical fumes from polish and pure acetone.
- Protect Your Cuticles: Avoid applying gel polish directly onto the skin or cuticles to prevent skin irritation or potential allergies. Clean away wet gel before curing.
- Avoid Excessive Buffing: Lightly buff the surface of your natural nail only enough to remove shine; over-buffing thins and weakens the nail plate.
- Nourish After Curing: Once your top coat is fully cured or dried, always rehydrate your cuticles and skin with a nourishing cuticle oil.
8 Detailed Lemon & Daisy Nail Designs
1. Minimalist Lemon & Daisy French Tips
Introduction
Give the timeless French manicure a cheeky, sun-soaked upgrade! This design combines crisp nude base tones with classic white French tips, elevated by delicate micro-lemons and tiny daisies placed along the smile line.
Why You’ll Love This Idea
It offers the polished, classic feel of a standard French tip while subtly adding a playful touch of color and summer charm. It is perfect for both corporate environments and casual weekend getaways.
Materials Needed
- Sheer nude base polish
- Opaque white polish
- Bright lemon yellow polish
- Leaf green detail polish
- Dotting tool & fine liner brush
- Glossy top coat
Step-by-Step Instructions
- Prep the Nails: File nails into a soft oval or almond shape, gently push cuticles back, and apply a clear base coat.
- Apply Nude Base: Paint two thin coats of sheer nude polish on all nails and allow to dry completely.
- Paint French Smile Lines: Using opaque white polish, paint smooth French tips on the free edge of each nail.
- Dot Daisy Centers: Place a tiny dot of bright yellow polish near the edge of the French tip on your accent nails using a small dotting tool.
- Add Daisy Petals: Dip the dotting tool in white polish and place 5 tiny dots surrounding the yellow center to form a delicate flower.
- Form Tiny Lemons: On adjacent nails, paint a tiny yellow oval with slight pointed tips at both ends to create a micro-lemon.
- Add Green Leaves: Using a 5mm fine detail brush, paint two tiny green leaf specks branching off each micro-lemon.
- Seal and Protect: Allow the artwork to settle for two minutes, then apply a thick layer of glossy top coat.
Beginner Tips
Use nail striping tape or French manicure guides if you struggle to paint clean, symmetrical smile lines by hand.
Common Mistakes to Avoid
Avoid making the lemons too large; keeping the elements micro-sized preserves the sleek, minimalist aesthetic.
Styling Ideas
Pair this design with classic white linen button-down shirts, gold layered rings, and straw tote bags.
Best Colors & Materials
- Base: Sheer pink-nude
- Accents: Canary yellow, crisp white, forest green
Project Details
- Estimated Cost: $10 – $15
- Estimated Time: 45 minutes
- Difficulty Level: Easy
- Where It Looks Best: Medium-length almond or oval nails
Pinterest-Worthy Tip
Photograph your hands holding a glass of ice-cold lemonade in natural morning sunlight to highlight the soft nude tones and vibrant micro-details.
Conclusion
Minimalist Lemon & Daisy French Tips bring sophistication and summer fun together in one effortless, low-maintenance manicure.
2. Pastel Sunshine Accent Nails
Introduction
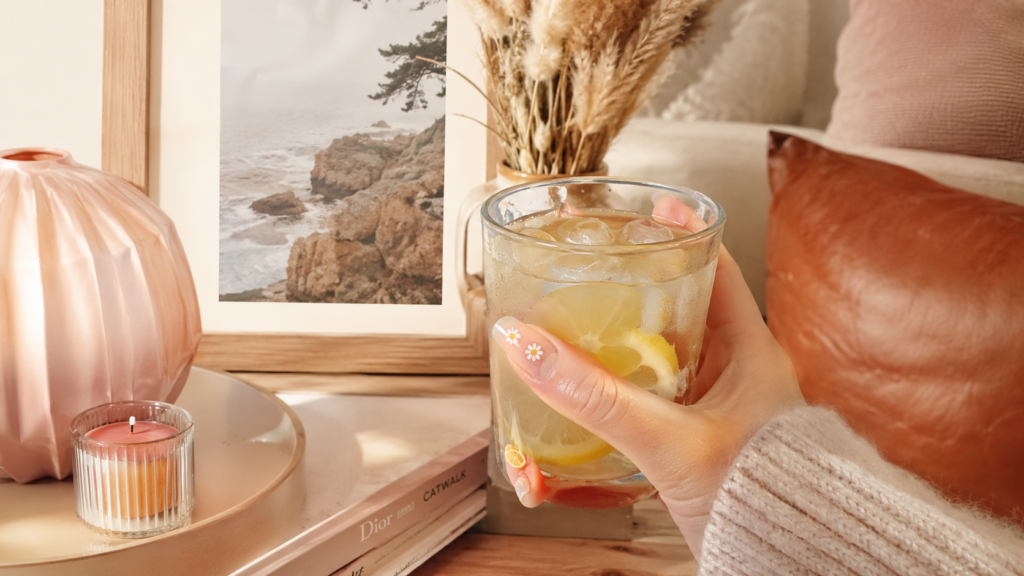
Soft, creamy pastels meet bright botanical artwork in this whimsical design. Featuring pastel yellow full-coverage accent nails alongside delicate hand-painted daisy fields and lemon slices, this design is pure happiness.
Why You’ll Love This Idea
If bold neons feel a bit overwhelming, this soft pastel palette provides a gentle, aesthetic aesthetic while still capturing the full charm of summer citrus.
Materials Needed
- Pastel butter-yellow polish
- Milk-white background polish
- Bright yellow detail polish
- Mint green polish for leaves
- Medium dotting tool
- Matte top coat
Step-by-Step Instructions
- Base Layer: Apply base coat. Paint index and pinky nails with pastel butter-yellow polish.
- Milky Accent Base: Paint thumb, middle, and ring nails with two coats of sheer milky-white polish.
- Create Daisy Clusters: On the middle nail, use a medium dotting tool to create clusters of white dots with yellow centers across the nail surface.
- Outline Lemon Slices: On the ring nail, use a detail brush and bright yellow polish to draw half-circle lemon slices along the side edge.
- Add Citrus Segments: Fill in the lemon rind and paint tiny white radial lines inside the yellow shape to represent juicy pulp segments.
- Add Soft Foliage: Paint delicate mint green leaves tucking into the spaces between flowers and lemon slices.
- Refine Outlines: Use a clean detail brush to sharpen lines if any polish bleeds into adjacent areas.
- Apply Matte Top Coat: Finish with a velvety matte top coat to give the soft pastel colors a smooth, modern ceramic finish.
Beginner Tips
Work with thin layers of pastel polish to avoid streakiness, allowing each coat to dry completely before applying the next.
Common Mistakes to Avoid
Don’t rush the drying time between the base color and detail work, as wet pastel polish can drag and smudge.
Styling Ideas
Complements soft knit cardigans, pastel floral sundresses, and silver jewelry seamlessly.
Best Colors & Materials
- Base: Butter yellow, milky white
- Accents: Soft mint, bright lemon yellow
Project Details
- Estimated Cost: $12 – $18
- Estimated Time: 50 minutes
- Difficulty Level: Intermediate
- Where It Looks Best: Short to medium square or squoval nails
Pinterest-Worthy Tip
Style your nails against a backdrop of fresh daisies and raw wooden tabletop surfaces for a cozy, rustic aesthetic.
Conclusion
Pastel Sunshine Accent Nails offer a dreamy, soothing take on the classic lemon and floral trend that looks effortlessly chic.
3. Vibrant Citrus & Daisy Collage Art
Introduction
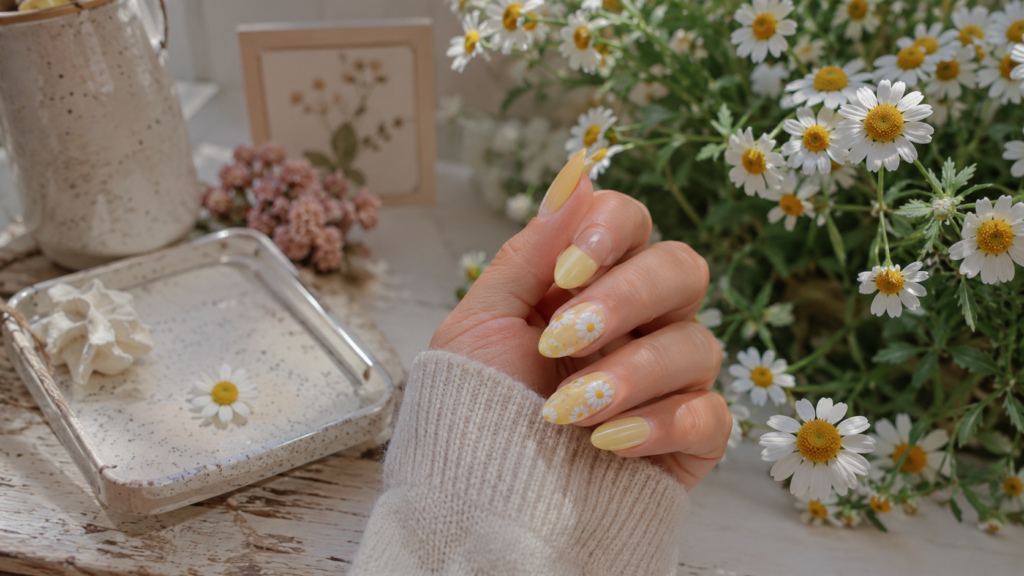
Unleash your inner artist with a full-coverage collage design! This eye-catching manicure features every nail filled with dynamic combinations of whole lemons, sliced citrus halves, blooming daisies, and lush green leaves.
Why You’ll Love This Idea
It is bold, expressive, and full of energy. Perfect for nail lovers who want a statement manicure that grabs attention and sparks conversation wherever they go.
Materials Needed
- Opaque cream base polish
- Bright yellow and golden-yellow polishes
- Pure white polish
- Deep forest green polish
- Fine liner brush (7mm)
- High-shine gel top coat
Step-by-Step Instructions
- Prepare Base: Prep nails and apply two smooth coats of opaque cream polish as a neutral canvas.
- Position Main Lemons: Paint full yellow oval shapes on opposite corners of each nail to establish the main focal points.
- Add Lemon Cuts: On central areas, paint small yellow circles. Fill the center with white and add tiny yellow triangular segments inside to depict cut lemons.
- Paint Overlapping Daisies: Paint classic 5-petal white daisies overlapping the edges of the whole lemons for depth.
- Fill Gaps with Foliage: Paint small forest green leaves and vine tendrils in all remaining empty spaces.
- Add Yellow Centers: Drop small dots of bright yellow or gold polish into the center of each daisy blossom.
- Add Highlights: Add a tiny swoosh of white polish on the edge of each whole lemon to create a 3D light reflection effect.
- Seal with High-Shine: Apply a generous layer of high-shine top coat, ensuring complete coverage over all detailed artwork.
Beginner Tips
Plan your collage composition on a piece of paper or practice nail tip before painting directly on your natural nails.
Common Mistakes to Avoid
Avoid cluttering the design too much without leaving tiny slivers of the neutral cream background exposed for contrast.
Styling Ideas
Match with vibrant summer attire, tropical print swimwear, and colorful resin jewelry.
Best Colors & Materials
- Base: Creamy off-white
- Accents: Sunny yellow, dark green, stark white
Project Details
- Estimated Cost: $15 – $22
- Estimated Time: 65 minutes
- Difficulty Level: Advanced
- Where It Looks Best: Long almond or coffin nails
Pinterest-Worthy Tip
Rest your hand on top of a basket of fresh organic lemons for a striking, magazine-worthy color coordination photo.
Conclusion
Vibrant Citrus & Daisy Collage Art transforms your nails into small botanical canvases that celebrate summer abundance.
4. Vintage Botanical Lemon Grove
Introduction
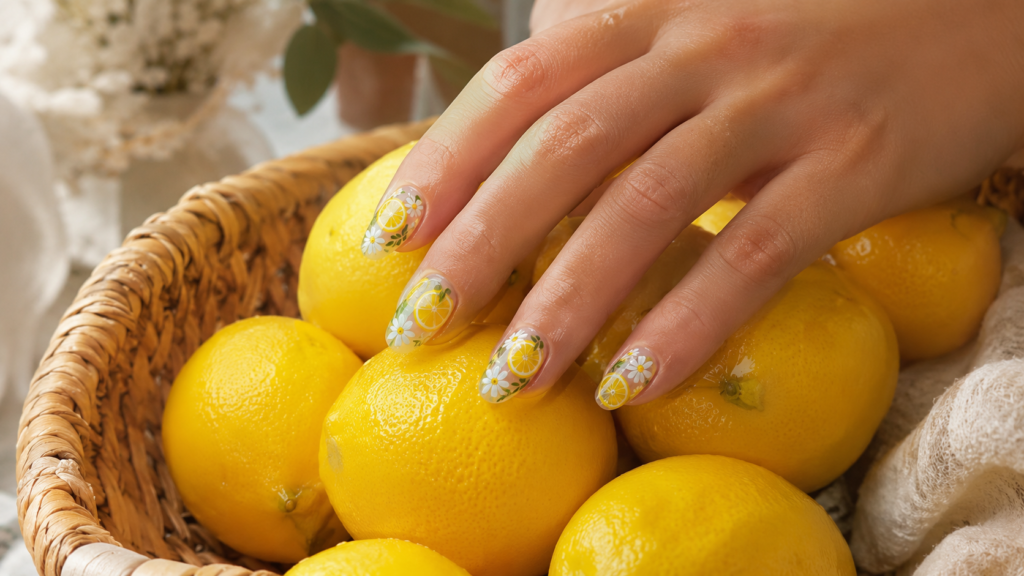
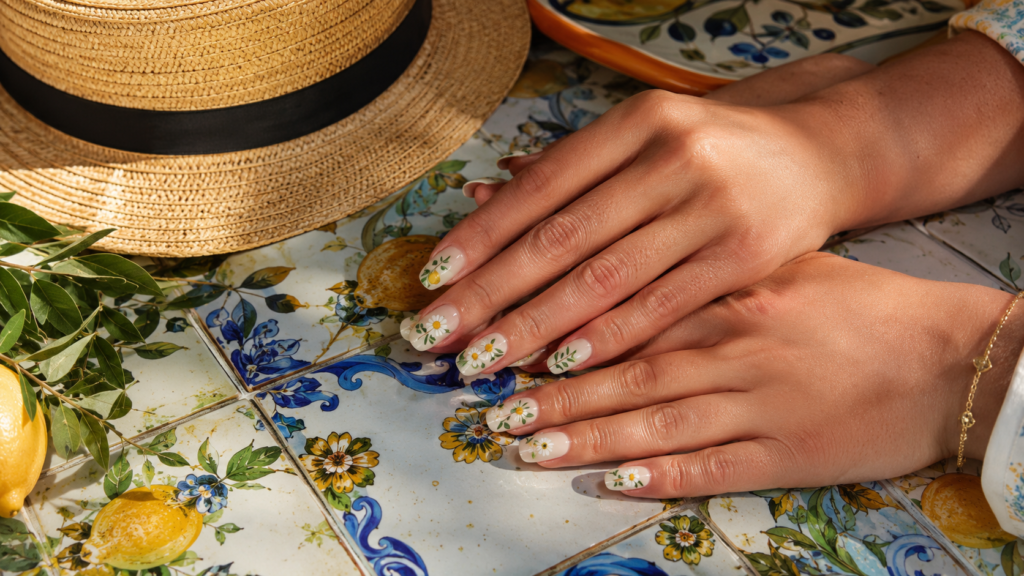
Inspired by vintage Mediterranean ceramic tiles and classic botanical illustrations, this design blends muted earthy olive greens, warm mustard lemons, and rustic white daisies over a soft porcelain base.
Why You’ll Love This Idea
It brings an artistic, Mediterranean elegance to your nails. If you love antique aesthetics, cottagecore vibes, and European travel inspiration, this look is tailor-made for you.
Materials Needed
- Porcelain white or pale taupe polish
- Mustard/warm yellow detail polish
- Olive green detail polish
- Soft white polish
- Ultra-thin 5mm detail brush
- Matte or satin finish top coat
Step-by-Step Instructions
- Apply Base Tone: Apply two coats of porcelain white or pale taupe polish to create an antique canvas.
- Sketch Lemon Outlines: Using mustard yellow polish and a detail brush, paint asymmetrical, realistic lemon shapes with delicate stem tips.
- Paint Olive Leaves: Draw slender olive-style leaves curving gracefully around the lemons using deep olive green polish.
- Paint Rustic Flowers: Paint small 4- or 5-petal white daisies with tiny mustard centers interspersed along the leafy branches.
- Add Stem Connections: Connect leaves and lemons using ultra-thin olive green lines to resemble a growing garden vine.
- Add Texture Details: Place microscopic olive green or brown stippling dots near the base of lemons to mimic realistic fruit peel texture.
- Clean Lines: Touch up background edges with a fine brush dipped in acetone to ensure razor-sharp botanical outlines.
- Finish with Matte Top Coat: Apply a satin or matte top coat to mimic the classic texture of vintage ceramic tile.
Beginner Tips
Keep your brush strokes feather-light and don’t worry about perfect symmetry—organic variations add authentic vintage character.
Common Mistakes to Avoid
Using overly bright or fluorescent yellow shades will disrupt the antique, warm tone of this specific design.
Styling Ideas
Looks gorgeous paired with linen dresses, vintage gold jewelry, woven straw hats, and leather sandals.
Best Colors & Materials
- Base: Soft porcelain white
- Accents: Warm mustard yellow, muted olive green
Project Details
- Estimated Cost: $14 – $20
- Estimated Time: 60 minutes
- Difficulty Level: Intermediate to Advanced
- Where It Looks Best: Medium-length oval or squoval nails
Pinterest-Worthy Tip
Shoot your manicure against an Italian ceramic tile plate or vintage linen tablecloth for maximum European travel aesthetic.
Conclusion
The Vintage Botanical Lemon Grove design offers a timeless, sophisticated aesthetic that feels like a piece of art from a sun-drenched Italian coast.
5. Subtle Sheer Nude with Micro Daisy & Lemon Borders
Introduction
For lovers of clean girl aesthetics and low-key elegance, this design features an ultra-sheer glass nude base with tiny micro-daisies and mini lemon slices lining only the cuticles and side borders.
Why You’ll Love This Idea
It is incredibly low-maintenance as it grows out seamlessly. It gives your hands a fresh, groomed appearance while providing a subtle kiss of sunshine when viewed close up.
Materials Needed
- Sheer translucent pink or glass nude polish
- Bright yellow polish
- Opaque white polish
- Micro dotting tool (0.5mm tip)
- Glossy gel top coat
Step-by-Step Instructions
- Prep Cuticles: Perform careful cuticle work and shape nails neatly into short, rounded edges.
- Apply Translucent Sheer: Apply two thin coats of translucent glass-nude polish for a naturally glowing nail bed.
- Dot Border Micro-Lemons: Using a micro dotting tool, place tiny yellow oval specks strictly along the lower cuticle curve of two accent nails.
- Add Micro-Daisies: Place tiny white dots around small yellow centers in the remaining space along the side wall borders.
- Connect with Delicate Dots: Add microscopic white or yellow filler dots between art elements to create a seamless border frame.
- Leave Nail Center Bare: Keep the center and tip of the nail plate entirely clean and negative-space sheer.
- Clean Edges: Use a fine clean-up brush to ensure no artwork touches the skin cuticle wall.
- Seal and Cure: Apply a thin, crystal-clear top coat to lock down the micro details with high gloss.
Beginner Tips
A micro dotting tool or the sharp tip of a wooden toothpick is essential for maintaining the ultra-small scale of this art.
Common Mistakes to Avoid
Placing artwork in the center of the nail ruins the delicate “framing” effect of this negative-space design.
Styling Ideas
Complements minimalist wardrobe essentials, dainty everyday silver/gold rings, and clean monochromatic neutral outfits.
Best Colors & Materials
- Base: Translucent glass pink/nude
- Accents: Bright lemon yellow, pure white
Project Details
- Estimated Cost: $8 – $12
- Estimated Time: 35 minutes
- Difficulty Level: Easy
- Where It Looks Best: Short natural round or squoval nails
Pinterest-Worthy Tip
Capture close-up macro photos holding a cup of herbal iced tea, allowing natural window light to bounce off the glossy nude surface.
Conclusion
Subtle Sheer Nude with Micro Borders delivers a fresh, clean-girl take on citrus nail art that feels effortless and refined.

6. Ombre Sunshine Gradient & Floral Accent
Introduction
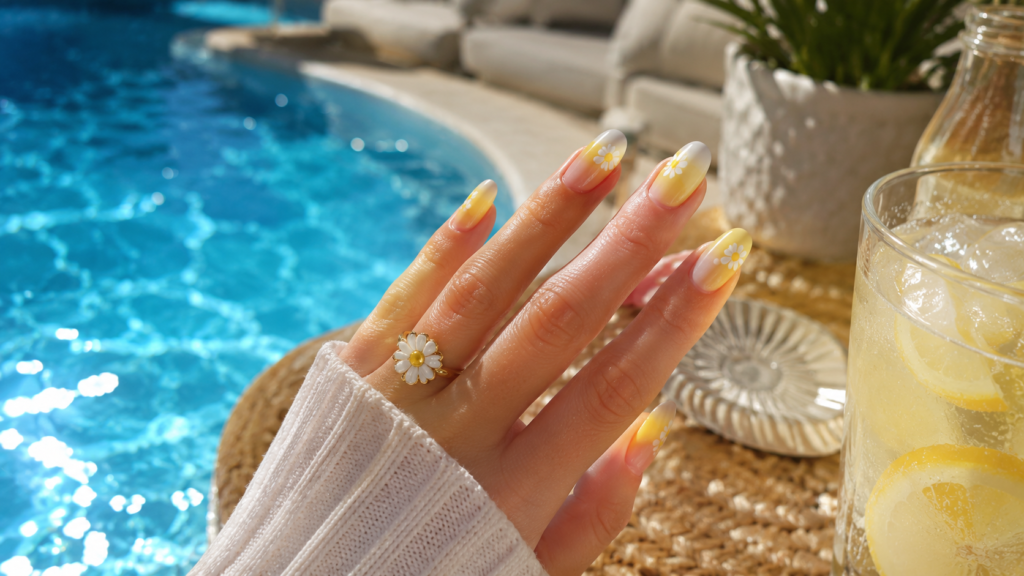
Combining a trendy vertical ombre gradient with bold 3D floral accents, this manicure smoothly transitions from soft cream to bright lemon yellow, topped off with crisp white daisy art on central nails.
Why You’ll Love This Idea
Gradient nails add instant visual interest and depth. The seamless color blend creates an illusion of longer nail beds while radiating vibrant summer energy.
Materials Needed
- Milky white base polish
- Vibrant lemon yellow polish
- Nail art wedge sponge
- Liquid latex or barrier cream
- White detail polish
- Plumping gel top coat
Step-by-Step Instructions
- Apply Base Canvas: Paint all nails with one thin layer of milky white polish to enhance gradient vibrancy.
- Protect Cuticles: Apply liquid latex around nail skin boundaries to make clean-up fast and easy.
- Prep Ombre Sponge: Stripe white polish and lemon yellow polish side-by-side onto a latex nail sponge.
- Dab Gradient onto Nails: Gently dab the sponge onto nails repeatedly until a smooth, blended yellow-to-white gradient forms.
- Peel Latex Barrier: Peel off the latex barrier skin protector and wipe any excess polish off with acetone.
- Add Daisy Overlay: On your middle and ring nails, paint large, bold white daisies with bright yellow centers directly over the gradient.
- Add Subtle Lemon Accents: Paint tiny yellow lemons tucked behind the outer daisy petals for an added layer of detail.
- Apply Plumping Top Coat: Finish with a generous layer of plumping gel top coat to smooth out sponge textures.
Beginner Tips
Dab the sponge gently and allow each gradient layer to dry briefly before dabbing again to build intensity without lifting polish.
Common Mistakes to Avoid
Using a dry or rough household sponge can leave unsightly air bubbles; always use dense cosmetics sponges.
Styling Ideas
Looks incredible with bright summer dresses, pool swimwear, neon beach towels, and colorful sunglasses.
Best Colors & Materials
- Base: Milky white, bright lemon yellow
- Accents: Stark white, sunshine yellow
Project Details
- Estimated Cost: $12 – $16
- Estimated Time: 50 minutes
- Difficulty Level: Intermediate
- Where It Looks Best: Medium to long coffin or square nails
Pinterest-Worthy Tip
Take photos outdoors near colorful summer flowers or against a bright pool-water backdrop to make the gradient pop visually.
Conclusion
The Ombre Sunshine Gradient brings a dynamic, modern glow to classic daisy art, making it an absolute head-turner.
7. Matte Pastel & Glossy Citrus Dual Finish
Introduction
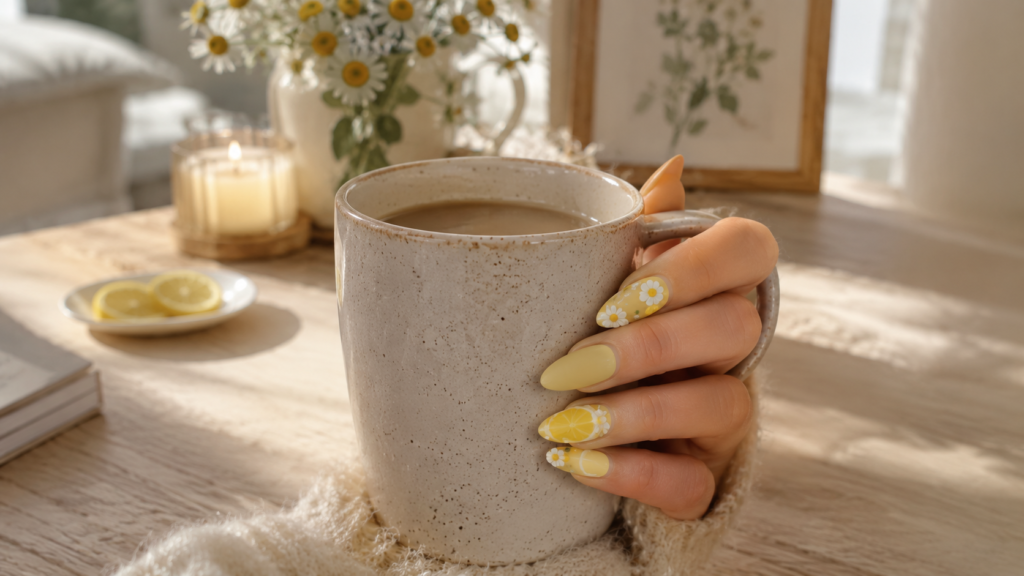
Play with contrasting textures! This sophisticated design features a velvety matte pastel yellow base on four nails, paired with a single glossy accent nail showcasing shiny, textured 3D lemon drops and crisp daisies.
Why You’ll Love This Idea
Texture contrasts are extremely fashionable on Pinterest. The juxtaposition between velvety matte backgrounds and ultra-shiny 3D citrus accents gives your manicure a high-end salon finish.
Materials Needed
- Pastel yellow polish
- Clear building gel or thick top coat
- White detail polish
- Matte top coat
- High-shine top coat
- Detail liner brush
Step-by-Step Instructions
- Paint Base Colors: Paint all nails except the ring finger with soft pastel yellow. Paint the ring finger with crisp white.
- Apply Matte Coat: Apply a velvety matte top coat over all yellow nails and let cure/dry completely.
- Paint Daisies on Accent: On the white accent nail, paint several full white daisies with pastel yellow centers.
- Paint Lemon Slice: Draw a central sliced lemon half on the accent nail using vibrant yellow detail polish.
- Seal Accent Finger: Coat the accent finger with a high-shine glossy top coat.
- Create 3D Dew Drops: Dip a detail brush into thick clear builder gel and place raised droplets on the lemon slice to represent realistic juice drops.
- Cure 3D Gel: Immediately cure under a UV/LED lamp to lock the raised 3D liquid droplets into place.
- Final Check: Ensure matte nails remain completely shine-free and 3D glossy accents stand out sharply.
Beginner Tips
If you don’t have builder gel, you can layer multiple thick drops of regular clear top coat, letting each drop dry between applications.
Common Mistakes to Avoid
Accidentally touching the matte nails with glossy top coat will ruin the matte finish—work with a steady hand!
Styling Ideas
Pairs brilliantly with cozy knitted summer tops, matte leather handbags, and minimalist gold watches.
Best Colors & Materials
- Base: Pastel soft yellow, bright white
- Finishes: Velvety matte finish and 3D glossy builder gel
Project Details
- Estimated Cost: $15 – $25
- Estimated Time: 55 minutes
- Difficulty Level: Intermediate to Advanced
- Where It Looks Best: Medium square or coffin nails
Pinterest-Worthy Tip
Photograph your hands holding a matte ceramic coffee mug so the contrast between matte polish and 3D glossy drops captures the light beautifully.
Conclusion
The Matte Pastel & Glossy Citrus design offers an artistic tactile experience that looks like it came straight off a runway.
8. Gingham & Lemon Picnic Chic
Introduction
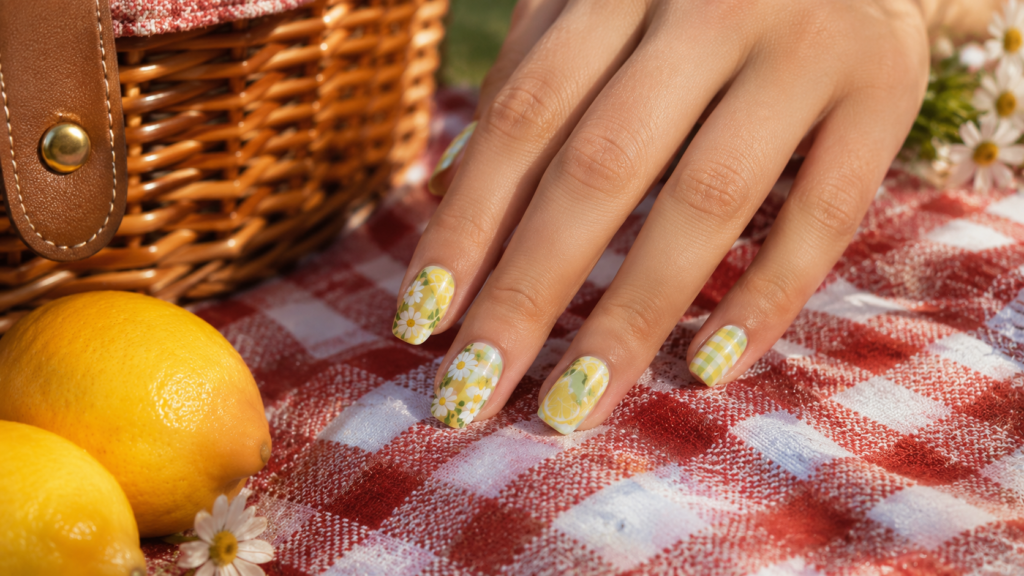
Nothing says summer picnic quite like classic gingham pattern! This design pairs hand-painted yellow or mint green gingham check patterns with sweet lemon halves and daisy clusters.
Why You’ll Love This Idea
It combines two of the most popular aesthetic Pinterest trends—cottagecore gingham and citrus florals—into one hopelessly adorable, head-turning set.
Materials Needed
- White base polish
- Sheer pastel yellow or mint green polish
- Opaque bright yellow polish
- Fine striping brush (9mm)
- Dotting tool
- Glossy top coat
Step-by-Step Instructions
- Apply Canvas: Paint all nails with two smooth coats of opaque white polish.
- Paint Gingham Lines: On index and pinky fingers, draw horizontal and vertical sheer pastel lines using a striping brush to form a plaid grid.
- Darken Grid Intersections: Paint slightly darker squares at line intersections to create an authentic gingham weave effect.
- Paint Lemons on Accents: On middle and ring fingers, paint full yellow lemons with tiny green leaves.
- Add Daisy Overlays: Scatter tiny white daisies across both the gingham nails and the lemon accent nails.
- Fill Flower Centers: Add tiny bright yellow centers to all daisies using a micro dotting tool.
- Clean Lines: Use an angled clean-up brush to keep line edges sharp and precise.
- Seal the Design: Apply a smooth, thick glossy top coat over all nails to fuse the grid pattern and artwork seamlessly.
Beginner Tips
Use a long striping brush rather than a short detail brush to draw smooth, straight lines across the nail plate in one steady stroke.
Common Mistakes to Avoid
Making gingham grid lines too thick can overpower the nail; keep grid lines light, sheer, and evenly spaced.
Styling Ideas
Complements gingham picnic dresses, denim jackets, wicker picnic baskets, and canvas sneakers.
Best Colors & Materials
- Base: Crisp white
- Accents: Soft mint or pastel yellow gingham grid, vibrant lemon accents
Project Details
- Estimated Cost: $12 – $18
- Estimated Time: 60 minutes
- Difficulty Level: Intermediate
- Where It Looks Best: Short to medium squoval or almond nails
Pinterest-Worthy Tip
Pose your manicure resting on a real checkered picnic blanket next to fresh lemons and field daisies outdoors.
Conclusion
Gingham & Lemon Picnic Chic delivers peak summer nostalgia, bringing playful cottagecore charm right to your hands.
Expert Styling & Application Tips
To ensure your cute lemon and daisy nail designs look like they were done by a high-end professional nail artist, follow these expert insider guidelines:
+-------------------------------------------------------------------+
|                   EXPERT NAIL ART SUCCESS STEPS                   |
+-------------------------------------------------------------------+
| 1. Flash Cure Art   -> Cure detail work for 10s to stop bleeding  |
| 2. Layering Depth   -> Place daisies over lemons for 3D realism   |
| 3. Seal Sidewalls   -> Cap free edges to prevent tip chipping     |
| 4. Cuticle Hydrate  -> Apply oil daily to keep skin looking fresh |
+-------------------------------------------------------------------+
- Master the Layering Technique: Paint your background elements (leaves and whole fruit) first, let them set, and then paint daisies over the top. Layering creates realistic depth and dimension.
- Flash Cure Gel Art: If working with gel polish, flash cure each completed flower or lemon for 10–15 seconds under your LED lamp before moving to the next nail. This prevents detailed polish lines from running or losing shape.
- Cap the Free Edge: Always swipe your top coat horizontally along the very front edge of your nail. Sealing the edge prevents water from lifting the polish and extends wear time by up to a week.
- Daily Cuticle Care: Gorgeous nail art looks best surrounded by healthy skin. Apply cuticle oil every night before bed to keep your skin hydrated and photo-ready.
Budget-Saving Tips for DIY Nail Art
You don’t need to spend $80+ at a luxury salon to enjoy sun-kissed citrus manicures. Here is how to create stunning looks on a budget:
- DIY Dotting Tools: Don’t have professional dotting tools? Use household items like bobby pins, the end of a sewing pin inserted into a pencil eraser, or a wooden toothpick tip.
- Repurpose Makeup Sponges: Basic wedge sponges from discount stores work just as effectively for nail gradients as expensive professional nail art sponges.
- Invest in Primary Colors: You don’t need every shade of yellow. Buy one bright yellow and one pure white polish; mix them on a foil palette to create customized pastel yellow shades.
- Use Nail Stickers or Decals: If hand-painting fine details feels too difficult, purchase affordable lemon and daisy nail decals online and seal them with a high-quality gel top coat for a salon finish at a fraction of the cost.
Frequently Asked Questions (FAQs)
1. How long do DIY gel lemon and daisy nails usually last?
When properly prepped (dehydrated, buffed, and sealed with quality base and top coats), a DIY gel manicure will last between 2 to 3 weeks without chipping. Regular nail polish typically lasts 5 to 7 days.
2. Can I create lemon and daisy nail art on short natural nails?
Absolutely! Micro designs—such as tiny single daisies and mini lemon accents—look exceptionally charming and neat on short natural round or square nails.
3. What is the easiest tool to draw daisy petals with?
A double-ended metal dotting tool is the easiest method. Simply dip the ball tip into white polish and press gently onto the nail. Five simple dots surrounding a yellow center instantly form a perfect flower!
4. How do I stop yellow nail polish from looking streaky?
Yellow pigment can naturally be thin. Apply two to three very thin coats rather than one thick coat, allowing each layer to dry fully before applying the next. Using an opaque white base coat also helps yellow pop without streaks.
5. Can I use regular nail polish for detail art instead of gel?
Yes, you can! Just ensure each detail layer is completely dry before applying top coat to avoid dragging or smudging your hand-painted lines.
6. What top coat finish looks best with citrus nail art?
Both high-shine glossy and velvety matte top coats look gorgeous! High-shine top coats make citrus colors look juicy and fresh, while matte top coats offer a chic, modern ceramic feel.
7. How can I make my hand-painted lemons look more realistic?
Add a subtle curved white stroke on one side for a light reflection highlight, and add tiny microscopic dots on the skin of the lemon using a slightly darker yellow or olive polish to mimic fruit peel texture.
8. What nail shapes complement lemon and daisy nail designs best?
Almond and oval shapes provide a lovely graceful canvas for botanical art, while short squoval and square shapes look crisp and modern with minimalist micro-patterns.
9. How do I remove 3D gel droplets or thick art without damaging my natural nails?
Lightly file down the top glossy layer and 3D gel bumps with a nail file to break the seal, then soak nails in pure acetone using cotton balls and foil wraps for 10–15 minutes until polish slides off gently.
Final Thoughts
Cute lemon and daisy nail designs are the ultimate way to embrace bright, cheerful summer vibes. Whether you prefer minimalist French tips with dainty micro-blooms, cozy cottagecore gingham patterns, or striking 3D textured citrus accents, this trend offers endless creative possibilities for every style preference and skill level.
With just a few basic tools like dotting tools, fine brushes, and vibrant polishes, you can transform your fingertips into sun-drenched floral canvases right from the comfort of your home. Pick your favorite design from this list, gather your materials, and bring a splash of sunshine to your next DIY manicure session!
Pin This for Later!
Love these nail art ideas? Don’t lose track of your favorite summer manicure inspiration! Click the Save button below or pin any image in this article directly to your Summer Nails, DIY Nail Art, or Aesthetic Beauty boards on Pinterest so you are ready for your next salon visit or DIY nail day!
Such a good information in this website very good information